Instruction Manual
Page 6
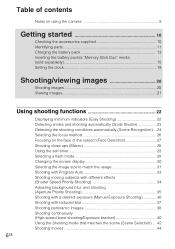
Table of contents Notes on using the camera 8 Getting started 10 Checking the accessories supplied 10 Identifying parts 11 Charging the battery pack 13 Inserting the battery pack/a "Memory Stick Duo" media (sold ...
Table of contents Notes on using the camera 8 Getting started 10 Checking the accessories supplied 10 Identifying parts 11 Charging the battery pack 13 Inserting the battery pack/a "Memory Stick Duo" media (sold ...
Instruction Manual
Page 7
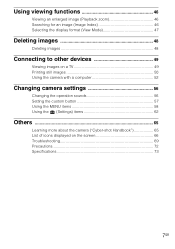
... on a TV 49 Printing still images 50 Using the camera with a computer 52 Changing camera settings 56 Changing the operation sounds 56 Setting the custom button 57 Using the MENU items 58 Using the (Settings) items 62 Others 65 Learning more about the camera ("Cyber-shot Handbook 65 List of icons displayed on the screen...
... on a TV 49 Printing still images 50 Using the camera with a computer 52 Changing camera settings 56 Changing the operation sounds 56 Setting the custom button 57 Using the MENU items 58 Using the (Settings) items 62 Others 65 Learning more about the camera ("Cyber-shot Handbook 65 List of icons displayed on the screen...
Instruction Manual
Page 8
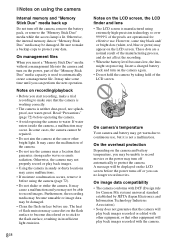
... pixels are a normal result of the camera. • Do not use . Notes on the camera again. • Do not hold the camera by JEITA (Japan Electronics and Information Technology Industries Association). • Sony does not guarantee that the camera will play back images recorded with other... equipment, or that generates strong radio waves or emits radiation. Insert a charged battery pack and turn on the camera and battery temperature, you may appear...
... pixels are a normal result of the camera. • Do not use . Notes on the camera again. • Do not hold the camera by JEITA (Japan Electronics and Information Technology Industries Association). • Sony does not guarantee that the camera will play back images recorded with other... equipment, or that generates strong radio waves or emits radiation. Insert a charged battery pack and turn on the camera and battery temperature, you may appear...
Instruction Manual
Page 9
... on the media. Unauthorized recording of such materials may be saved or recorded. No compensation for damaged content or recording failure Sony cannot compensate for a long time, fragmentation of data occurs on devices that do not support MPEG-4 AVC/H.264. Therefore, movies recorded ...the provisions of the copyright laws. In such a case, save your images on copyright Television programs, films, videotapes, and other devices This camera utilizes MPEG-4 AVC/H.264 Main Profile to record movies. Images cannot be copyrighted. Warning on some type of external media first, and then perform...
... on the media. Unauthorized recording of such materials may be saved or recorded. No compensation for damaged content or recording failure Sony cannot compensate for a long time, fragmentation of data occurs on devices that do not support MPEG-4 AVC/H.264. Therefore, movies recorded ...the provisions of the copyright laws. In such a case, save your images on copyright Television programs, films, videotapes, and other devices This camera utilizes MPEG-4 AVC/H.264 Main Profile to record movies. Images cannot be copyrighted. Warning on some type of external media first, and then perform...
Instruction Manual
Page 10
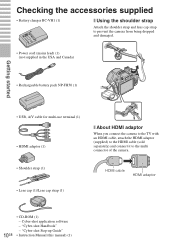
...accessories supplied • Battery charger BC-VH1 (1) x Using the shoulder strap Attach the shoulder strap and lens cap strap to prevent the camera from being dropped and damaged. • Power cord (mains lead) (1) (not supplied in the USA and Canada) • Rechargeable battery...supplied) to the HDMI cable (sold separately) and connect it to the multi connector of the camera. • Shoulder strap (1) • Lens cap (1)/Lens cap strap (1) HDMI cable HDMI adaptor 10GB • CD-ROM (1) - "Cyber-shot Handbook" - "Cyber-shot Step-up Guide" • Instruction Manual (this manual...
...accessories supplied • Battery charger BC-VH1 (1) x Using the shoulder strap Attach the shoulder strap and lens cap strap to prevent the camera from being dropped and damaged. • Power cord (mains lead) (1) (not supplied in the USA and Canada) • Rechargeable battery...supplied) to the HDMI cable (sold separately) and connect it to the multi connector of the camera. • Shoulder strap (1) • Lens cap (1)/Lens cap strap (1) HDMI cable HDMI adaptor 10GB • CD-ROM (1) - "Cyber-shot Handbook" - "Cyber-shot Step-up Guide" • Instruction Manual (this manual...
Instruction Manual
Page 11
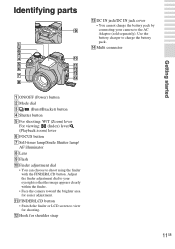
...button • Switch the finder or LCD screen to the AC Adaptor (sold separately). Adjust the finder adjustment dial to your camera to view for shoulder strap 11GB Use the battery charger to shoot using the finder with the FINDER/LCD button. Identifying parts M... jack cover • You cannot charge the battery pack by connecting your eyesight so that the image appears clearly within the finder. • Face the camera toward the brighter area for easier adjustment. N Multi connector Getting started A ON/OFF (Power) button B Mode dial C / (Burst/Bracket) button D Shutter ...
...button • Switch the finder or LCD screen to the AC Adaptor (sold separately). Adjust the finder adjustment dial to your camera to view for shoulder strap 11GB Use the battery charger to shoot using the finder with the FINDER/LCD button. Identifying parts M... jack cover • You cannot charge the battery pack by connecting your eyesight so that the image appears clearly within the finder. • Face the camera toward the brighter area for easier adjustment. N Multi connector Getting started A ON/OFF (Power) button B Mode dial C / (Burst/Bracket) button D Shutter ...
Instruction Manual
Page 12
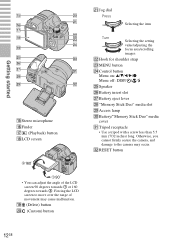
.../"Memory Stick Duo" media cover ea Tripod receptacle • Use a tripod with a screw less than 5.5 mm (7/32 inches) long. Otherwise, you cannot firmly secure the camera, and damage to move over the range of the LCD screen 90 degrees towards 1 or 160 degrees towards 2. Forcing the LCD screen to the...
.../"Memory Stick Duo" media cover ea Tripod receptacle • Use a tripod with a screw less than 5.5 mm (7/32 inches) long. Otherwise, you cannot firmly secure the camera, and damage to move over the range of the LCD screen 90 degrees towards 1 or 160 degrees towards 2. Forcing the LCD screen to the...
Instruction Manual
Page 14
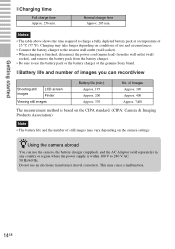
... (77 °F). Do not use the battery pack or the battery charger of the genuine Sony brand. Normal charge time Approx. 205 min. Charging may take longer depending on the CIPA standard. (CIPA: Camera & Imaging Products Association) Note • The battery life and the number of use and circumstances... Notes • The table above shows the time required to charge a fully depleted battery pack at a temperature of images you can use the camera, the battery charger (supplied), and the AC Adaptor (sold separately) in any country or region where the power supply is finished, disconnect the...
... (77 °F). Do not use the battery pack or the battery charger of the genuine Sony brand. Normal charge time Approx. 205 min. Charging may take longer depending on the CIPA standard. (CIPA: Camera & Imaging Products Association) Note • The battery life and the number of use and circumstances... Notes • The table above shows the time required to charge a fully depleted battery pack at a temperature of images you can use the camera, the battery charger (supplied), and the AC Adaptor (sold separately) in any country or region where the power supply is finished, disconnect the...
Instruction Manual
Page 16
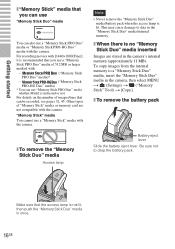
... not to data in once. 16GB PRO Duo" media)* ("Memory Stick - ("Memory Stick PRO-HG Duo" media) * You can use a "Memory Stick" media with the camera. For details on the number of images/time that the access lamp is no "Memory Stick Duo" media inserted Images are not compatible with the... camera. This may cause damage to drop the battery pack. Make sure that can also use a "Memory Stick PRO Duo" media or "Memory Stick PRO-HG ...
... not to data in once. 16GB PRO Duo" media)* ("Memory Stick - ("Memory Stick PRO-HG Duo" media) * You can use a "Memory Stick" media with the camera. For details on the number of images/time that the access lamp is no "Memory Stick Duo" media inserted Images are not compatible with the... camera. This may cause damage to drop the battery pack. Make sure that can also use a "Memory Stick PRO Duo" media or "Memory Stick PRO-HG ...
Instruction Manual
Page 17
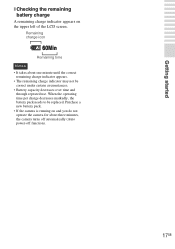
...and through repeated use. Getting started x Checking the remaining battery charge A remaining charge indicator appears on and you do not operate the camera for about one minute until the correct remaining charge indicator appears. • The remaining charge indicator may not be replaced. Purchase a ...new battery pack. • If the camera is running on the upper left of the LCD screen. Remaining charge icon Remaining time Notes • It takes about three minutes, the camera turns off automatically (Auto power-off function). 17GB
...and through repeated use. Getting started x Checking the remaining battery charge A remaining charge indicator appears on and you do not operate the camera for about one minute until the correct remaining charge indicator appears. • The remaining charge indicator may not be replaced. Purchase a ...new battery pack. • If the camera is running on the upper left of the LCD screen. Remaining charge icon Remaining time Notes • It takes about three minutes, the camera turns off automatically (Auto power-off function). 17GB
Instruction Manual
Page 18
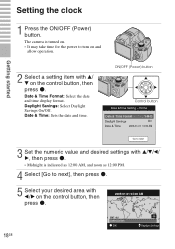
The camera is indicated as 12:00 AM, and noon as 12:00 PM. 4 Select [Go to turn on and allow operation. 2 Select a setting item with b/B on ...
The camera is indicated as 12:00 AM, and noon as 12:00 PM. 4 Select [Go to turn on and allow operation. 2 Select a setting item with b/B on ...
Instruction Manual
Page 19
Note • The camera does not have a feature for superimposing dates on images. x Setting the date and time again Press the MENU button, then select (Settings) t (Clock Settings) (page 64). 19GB Getting started 6 Select [OK], then press z. By using "PMB" in the CD-ROM (supplied), you can print or save images with the date.
Note • The camera does not have a feature for superimposing dates on images. x Setting the date and time again Press the MENU button, then select (Settings) t (Clock Settings) (page 64). 19GB Getting started 6 Select [OK], then press z. By using "PMB" in the CD-ROM (supplied), you can print or save images with the date.
Instruction Manual
Page 20
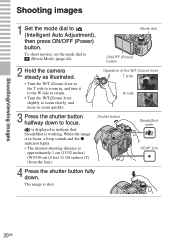
.... Shooting/viewing images Shooting/viewing images Shooting images 1 Set the mode dial to (Movie Mode) (page 44). Mode dial ON/OFF (Power) button 2 Hold the camera steady as illustrated. • Turn the W/T (Zoom) lever to the T side to zoom in focus, a beep sounds and the z indicator lights. • The shortest shooting...
.... Shooting/viewing images Shooting/viewing images Shooting images 1 Set the mode dial to (Movie Mode) (page 44). Mode dial ON/OFF (Power) button 2 Hold the camera steady as illustrated. • Turn the W/T (Zoom) lever to the T side to zoom in focus, a beep sounds and the z indicator lights. • The shortest shooting...
Instruction Manual
Page 21
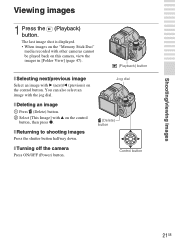
The last image shot is displayed. • When images on the "Memory Stick Duo" media recorded with other cameras cannot be played back on this camera, view the images in [Folder View] (page 47). (Playback) button x Selecting next/previous image Select an image with the jog ...(Delete) button Control button 21GB You can also select an image with B (next)/b (previous) on the control button, then press z. x Turning off the camera Press ON/OFF (Power) button. x Returning to shooting images Press the shutter button halfway down. x Deleting an image 1 Press (Delete) button. 2 Select...
The last image shot is displayed. • When images on the "Memory Stick Duo" media recorded with other cameras cannot be played back on this camera, view the images in [Folder View] (page 47). (Playback) button x Selecting next/previous image Select an image with the jog ...(Delete) button Control button 21GB You can also select an image with B (next)/b (previous) on the control button, then press z. x Turning off the camera Press ON/OFF (Power) button. x Returning to shooting images Press the shutter button halfway down. x Deleting an image 1 Press (Delete) button. 2 Select...
Instruction Manual
Page 23
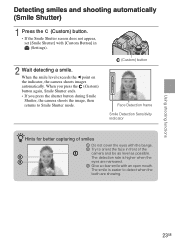
...screen does not appear, set [Smile Shutter] with [Custom Button] in front of the camera and be as level as possible. When the smile level exceeds the b point on the indicator, the camera shoots images automatically. The smile is higher when the eyes are showing. When you press... the (Custom) button again, Smile Shutter ends. • If you press the shutter button during Smile Shutter, the camera shoots the image, then returns to Smile Shutter mode. (Custom) button Face Detection frame Smile Detection Sensitivity indicator zHints for better capturing of smiles...
...screen does not appear, set [Smile Shutter] with [Custom Button] in front of the camera and be as level as possible. When the smile level exceeds the b point on the indicator, the camera shoots images automatically. The smile is higher when the eyes are showing. When you press... the (Custom) button again, Smile Shutter ends. • If you press the shutter button during Smile Shutter, the camera shoots the image, then returns to Smile Shutter mode. (Custom) button Face Detection frame Smile Detection Sensitivity indicator zHints for better capturing of smiles...
Instruction Manual
Page 24
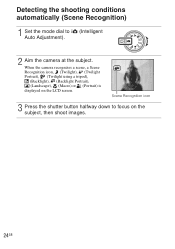
Scene Recognition icon 3 Press the shutter button halfway down to (Intelligent Auto Adjustment). 2 Aim the camera at the subject. Detecting the shooting conditions automatically (Scene Recognition) 1 Set the mode dial to focus on the LCD screen. When the camera recognizes a scene, a Scene Recognition icon, (Twilight), (Twilight Portrait), (Twilight using a tripod), (Backlight), (Backlight Portrait), (Landscape), (Macro) or (Portrait) is displayed on the subject, then shoot images. 24GB
Scene Recognition icon 3 Press the shutter button halfway down to (Intelligent Auto Adjustment). 2 Aim the camera at the subject. Detecting the shooting conditions automatically (Scene Recognition) 1 Set the mode dial to focus on the LCD screen. When the camera recognizes a scene, a Scene Recognition icon, (Twilight), (Twilight Portrait), (Twilight using a tripod), (Backlight), (Backlight Portrait), (Landscape), (Macro) or (Portrait) is displayed on the subject, then shoot images. 24GB
Instruction Manual
Page 25
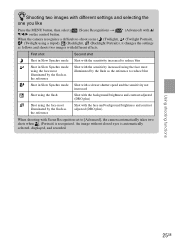
...scene ( (Twilight), (Twilight Portrait), (Twilight using a tripod), (Backlight), (Backlight Portrait)), it changes the settings as the reference Shot with the face and background brightness and contrast adjusted (DRO plus) When shooting with different effects. An image without closed eyes is ...MENU button, then select V/b/B on the control button. (Scene Recognition) t (Advanced) with v/ When the camera recognizes a difficult-to [Advanced], the camera automatically takes two shots when (Portrait) is automatically selected, displayed, and recorded. Using shooting functions 25GB
...scene ( (Twilight), (Twilight Portrait), (Twilight using a tripod), (Backlight), (Backlight Portrait)), it changes the settings as the reference Shot with the face and background brightness and contrast adjusted (DRO plus) When shooting with different effects. An image without closed eyes is ...MENU button, then select V/b/B on the control button. (Scene Recognition) t (Advanced) with v/ When the camera recognizes a difficult-to [Advanced], the camera automatically takes two shots when (Portrait) is automatically selected, displayed, and recorded. Using shooting functions 25GB
Instruction Manual
Page 27
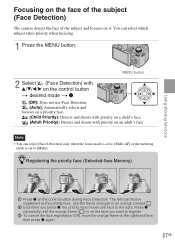
...), move the orange frame to the rightmost face, then press z again. 27GB Using shooting functions Focusing on the face of the subject (Face Detection) The camera detects the face of the subject and focuses on the control button during Face Detection.
...), move the orange frame to the rightmost face, then press z again. 27GB Using shooting functions Focusing on the face of the subject (Face Detection) The camera detects the face of the subject and focuses on the control button during Face Detection.
Instruction Manual
Page 28
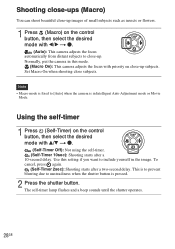
... Intelligent Auto Adjustment mode or Movie Mode. This is to prevent blurring due to [Auto] when the camera is pressed. 2 Press the shutter button. Using the self-timer 1 Press (Self-Timer) on the control button, then select the desired mode with v/V t z. (Self-...close-up images of small subjects such as insects or flowers. 1 Press (Macro) on the control button, then select the desired mode with b/B t z. (Auto): This camera adjusts the focus automatically from distant subjects to include yourself in the image. The self-timer lamp flashes and a beep sounds until the shutter operates...
... Intelligent Auto Adjustment mode or Movie Mode. This is to prevent blurring due to [Auto] when the camera is pressed. 2 Press the shutter button. Using the self-timer 1 Press (Self-Timer) on the control button, then select the desired mode with v/V t z. (Self-...close-up images of small subjects such as insects or flowers. 1 Press (Macro) on the control button, then select the desired mode with b/B t z. (Auto): This camera adjusts the focus automatically from distant subjects to include yourself in the image. The self-timer lamp flashes and a beep sounds until the shutter operates...
Instruction Manual
Page 29
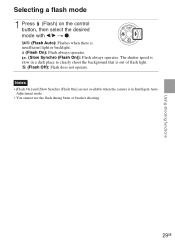
Notes • [Flash On] and [Slow Synchro (Flash On)] are not available when the camera is out of flash light. (Flash Off): Flash does not operate. The shutter speed is slow in a dark place to clearly shoot the background that ...
Notes • [Flash On] and [Slow Synchro (Flash On)] are not available when the camera is out of flash light. (Flash Off): Flash does not operate. The shutter speed is slow in a dark place to clearly shoot the background that ...


