Instruction Manual
Page 11
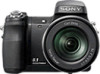
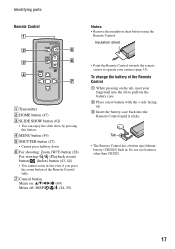
... than CR2025. Insulation sheet To change the battery of fire or explosion. • The Remote Control has a button type lithium battery (CR2025) built in fire. • When the lithium battery becomes weak, the operating distance of...Sony CR2025 lithium battery. Tab 11 In this case, replace the battery with the + side facing up. 3 Insert the battery case back into the Remote Control until it clicks. [ Remote Control Transmitter HOME button SLIDE SHOW button MENU button SHUTTER button for shooting: Zoom (W/T) button for viewing: / (playback zoom)/ (Index) button Control button...
... than CR2025. Insulation sheet To change the battery of fire or explosion. • The Remote Control has a button type lithium battery (CR2025) built in fire. • When the lithium battery becomes weak, the operating distance of...Sony CR2025 lithium battery. Tab 11 In this case, replace the battery with the + side facing up. 3 Insert the battery case back into the Remote Control until it clicks. [ Remote Control Transmitter HOME button SLIDE SHOW button MENU button SHUTTER button for shooting: Zoom (W/T) button for viewing: / (playback zoom)/ (Index) button Control button...
Instruction Manual
Page 16
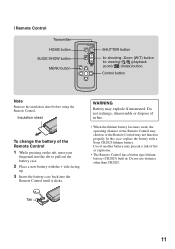
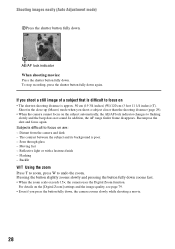
When shooting still images: 1 Press and hold the shutter button halfway down . AE/AF lock indicator When shooting movies: Press the shutter button fully down to focus. When shooting movies: Select . 2Hold the camera steady, keeping your arm at your side. The z (AE/AF lock) indicator (green) flashes, a beep sounds, the indicator stops flashing and remains lit...
When shooting still images: 1 Press and hold the shutter button halfway down . AE/AF lock indicator When shooting movies: Press the shutter button fully down to focus. When shooting movies: Select . 2Hold the camera steady, keeping your arm at your side. The z (AE/AF lock) indicator (green) flashes, a beep sounds, the indicator stops flashing and remains lit...
Instruction Manual
Page 17
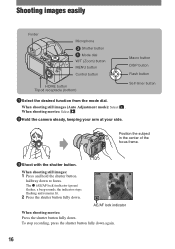
...Selecting a flash mode for still images) Press B ( ) on the control button repeatedly until the desired mode is selected. : Macro off • When using the self-timer : Setting the 10-second delay self-timer : Setting the 2-second delay self-timer Press the shutter button, the self-timer lamp... flashes, and a beep sounds until the shutter operates. S Shutter Speed Priority Shooting Allows you to shoot after adjusting the exposure manually. Advanced Sports Shooting...
...Selecting a flash mode for still images) Press B ( ) on the control button repeatedly until the desired mode is selected. : Macro off • When using the self-timer : Setting the 10-second delay self-timer : Setting the 2-second delay self-timer Press the shutter button, the self-timer lamp... flashes, and a beep sounds until the shutter operates. S Shutter Speed Priority Shooting Allows you to shoot after adjusting the exposure manually. Advanced Sports Shooting...

Instruction Manual
Page 23
... 1 Select the desired item with v/V on the control button. • This is functional only when you select (Settings). 2 Move to the right with B, select a setting with v/V, then press z. 3 Select a setting with v/V, then press z. • The camera is the gateway screen for all the functions of your...camera. You can select the shooting mode or playback mode, or change the settings from the HOME screen. HOME/Menu Using the HOME screen The HOME screen is set to display the HOME screen. Control button HOME button 1 Press HOME to the shooting mode by pressing the shutter button...
... 1 Select the desired item with v/V on the control button. • This is functional only when you select (Settings). 2 Move to the right with B, select a setting with v/V, then press z. 3 Select a setting with v/V, then press z. • The camera is the gateway screen for all the functions of your...camera. You can select the shooting mode or playback mode, or change the settings from the HOME screen. HOME/Menu Using the HOME screen The HOME screen is set to display the HOME screen. Control button HOME button 1 Press HOME to the shooting mode by pressing the shutter button...
Cyber-shot® Handbook
Page 8
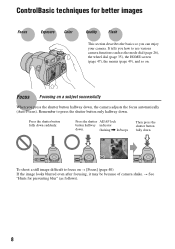
... looks blurred even after focusing, it may be because of camera shake. flashing , lit/beeps Then press the shutter button fully down suddenly. Press the shutter button fully down . To shoot a still image difficult to focus on a subject successfully When you press the shutter button halfway down, the camera adjusts the focus automatically (Auto Focus). t See "Hints for better...
... looks blurred even after focusing, it may be because of camera shake. flashing , lit/beeps Then press the shutter button fully down suddenly. Press the shutter button fully down . To shoot a still image difficult to focus on a subject successfully When you press the shutter button halfway down, the camera adjusts the focus automatically (Auto Focus). t See "Hints for better...
Cyber-shot® Handbook
Page 9
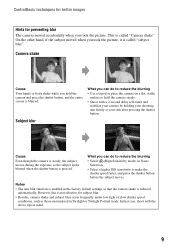
... blurred when the shutter button is called "Camera shake". What you can do to reduce the blurring • Use a tripod or place the camera on a flat, stable surface to make the shutter speed faster, and press the shutter button before the subject moves. In that the camera shake is not ... reduce the blurring • Select (High Sensitivity mode) in Scene Selection. • Select a higher ISO sensitivity to hold the camera and press the shutter button, and the entire screen is blurred. This is enabled in the factory default settings so that case, shoot with a 2-second delay...
... blurred when the shutter button is called "Camera shake". What you can do to reduce the blurring • Use a tripod or place the camera on a flat, stable surface to make the shutter speed faster, and press the shutter button before the subject moves. In that the camera shake is not ... reduce the blurring • Select (High Sensitivity mode) in Scene Selection. • Select a higher ISO sensitivity to hold the camera and press the shutter button, and the entire screen is blurred. This is enabled in the factory default settings so that case, shoot with a 2-second delay...
Cyber-shot® Handbook
Page 14
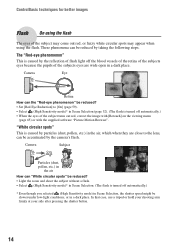
...the subject turns out red, correct the image with [Retouch] on the viewing menu (page 65) or with the supplied software "Picture Motion Browser". Camera Subject Particles (dust, pollen, etc.) in the air How can "White circular spots" be reduced? • Light the room and shoot the subject... a dark place. In that case, use a tripod or hold your shooting arm firmly at your side after pressing the shutter button. 14 These phenomena can be reduced by the camera's flash. Camera Eye Retina How can the "Red-eye phenomenon" be reduced? • Set [Red Eye Reduction] to the lens, ...
...the subject turns out red, correct the image with [Retouch] on the viewing menu (page 65) or with the supplied software "Picture Motion Browser". Camera Subject Particles (dust, pollen, etc.) in the air How can "White circular spots" be reduced? • Light the room and shoot the subject... a dark place. In that case, use a tripod or hold your shooting arm firmly at your side after pressing the shutter button. 14 These phenomena can be reduced by the camera's flash. Camera Eye Retina How can the "Red-eye phenomenon" be reduced? • Set [Red Eye Reduction] to the lens, ...
Cyber-shot® Handbook
Page 15
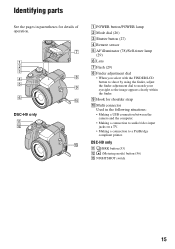
...See the pages in parentheses for shoulder strap J Multi connector Used in the following situations: • Making a USB connection between the camera and the computer. • Making a connection to audio/video input jacks on a TV. • Making a connection to match...your eyesight so the image appears clearly within the finder. I Hook for details of operation. DSC-H9 only K /BRK button (53) L (Metering mode) button (56) M NIGHTSHOT switch 15 DSC-H9 only A POWER button/POWER lamp B Mode dial (26) C Shutter button (27) D Remote sensor E AF illuminator (78)/Self-timer lamp (29) F Lens...
...See the pages in parentheses for shoulder strap J Multi connector Used in the following situations: • Making a USB connection between the camera and the computer. • Making a connection to audio/video input jacks on a TV. • Making a connection to match...your eyesight so the image appears clearly within the finder. I Hook for details of operation. DSC-H9 only K /BRK button (53) L (Metering mode) button (56) M NIGHTSHOT switch 15 DSC-H9 only A POWER button/POWER lamp B Mode dial (26) C Shutter button (27) D Remote sensor E AF illuminator (78)/Self-timer lamp (29) F Lens...
Cyber-shot® Handbook
Page 17
...on the tab, inset your camera (page 15). Identifying parts Remote Control Notes • Remove the insulation sheet before using the Remote Control. Tab • The Remote Control has a button type lithium battery (CR2025) built in fast even if you press the zoom button of the Remote Control 1 ...Place a new battery with the + side facing up. 3 Insert the battery case back into the Remote Control until it clicks. D MENU button (49) E SHUTTER button (27) • Cannot press halfway down. To change the battery of the Remote Control fully. Do not use batteries other than CR2025....
...on the tab, inset your camera (page 15). Identifying parts Remote Control Notes • Remove the insulation sheet before using the Remote Control. Tab • The Remote Control has a button type lithium battery (CR2025) built in fast even if you press the zoom button of the Remote Control 1 ...Place a new battery with the + side facing up. 3 Insert the battery case back into the Remote Control until it clicks. D MENU button (49) E SHUTTER button (27) • Cannot press halfway down. To change the battery of the Remote Control fully. Do not use batteries other than CR2025....
Cyber-shot® Handbook
Page 27
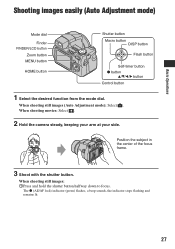
... FINDER/LCD button Zoom button MENU button HOME button Shutter button Macro button DISP button Flash button Self-timer button z button v/V/b/B button Control button 1 Select the desired function from the mode dial. When shooting still images: 1Press and hold the shutter button halfway down to focus. Position the subject in the center of the focus frame. 3 Shoot with the shutter button. When shooting movies: Select . 2 Hold the camera steady...
... FINDER/LCD button Zoom button MENU button HOME button Shutter button Macro button DISP button Flash button Self-timer button z button v/V/b/B button Control button 1 Select the desired function from the mode dial. When shooting still images: 1Press and hold the shutter button halfway down to focus. Position the subject in the center of the focus frame. 3 Shoot with the shutter button. When shooting movies: Select . 2 Hold the camera steady...
Cyber-shot® Handbook
Page 28
If you shoot a still image of a subject that is difficult to undo the zoom. Recompose the shot and focus again. Seen through glass - Reflective light or with a lustrous finish - Backlit W/T Using the zoom Press T to zoom, press W to focus on ...120 cm (3 feet 11 1/4 inches) (T). Pressing the button slightly zooms slowly and pressing the button fully down again. To stop recording, press the shutter button fully down zooms fast. • When the zoom scale exceeds 15×, the camera uses the Digital Zoom function. Distant from the camera and dark - Shoot in the close-up (Macro...
If you shoot a still image of a subject that is difficult to undo the zoom. Recompose the shot and focus again. Seen through glass - Reflective light or with a lustrous finish - Backlit W/T Using the zoom Press T to zoom, press W to focus on ...120 cm (3 feet 11 1/4 inches) (T). Pressing the button slightly zooms slowly and pressing the button fully down again. To stop recording, press the shutter button fully down zooms fast. • When the zoom scale exceeds 15×, the camera uses the Digital Zoom function. Distant from the camera and dark - Shoot in the close-up (Macro...
Cyber-shot® Handbook
Page 29
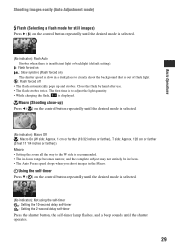
... Adjustment mode) Flash (Selecting a flash mode for still images) Press B ( ) on the control button repeatedly until the shutter operates. 29 Close the flash by hand after use. • The flash strobes twice. Using the self-timer Press V ( ) on the control button repeatedly until the desired mode is selected. (No ...indicator): Not using the self-timer : Setting the 10-second delay self-timer : Setting the 2-second delay self-timer Press the shutter button, the self-timer lamp flashes, and a beep sounds until the desired mode is selected. (No indicator): Flash Auto Strobes when there is ...
... Adjustment mode) Flash (Selecting a flash mode for still images) Press B ( ) on the control button repeatedly until the shutter operates. 29 Close the flash by hand after use. • The flash strobes twice. Using the self-timer Press V ( ) on the control button repeatedly until the desired mode is selected. (No ...indicator): Not using the self-timer : Setting the 10-second delay self-timer : Setting the 2-second delay self-timer Press the shutter button, the self-timer lamp flashes, and a beep sounds until the desired mode is selected. (No indicator): Flash Auto Strobes when there is ...
Cyber-shot® Handbook
Page 30
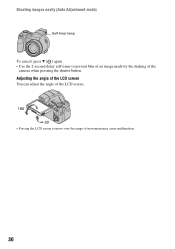
Adjusting the angle of the LCD screen You can adjust the angle of the LCD screen. • Forcing the LCD screen to prevent blur of an image made by the shaking of movement may cause malfunction. 30 Shooting images easily (Auto Adjustment mode) Self-timer lamp To cancel, press V ( ) again. • Use the 2-second delay self-timer to move over the range of the camera when pressing the shutter button.
Adjusting the angle of the LCD screen You can adjust the angle of the LCD screen. • Forcing the LCD screen to prevent blur of an image made by the shaking of movement may cause malfunction. 30 Shooting images easily (Auto Adjustment mode) Self-timer lamp To cancel, press V ( ) again. • Use the 2-second delay self-timer to move over the range of the camera when pressing the shutter button.
Cyber-shot® Handbook
Page 31
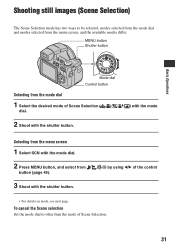
... / / / by using b/B of the control button (page 49). 3 Shoot with the shutter button. MENU button Shutter button Mode dial Control button Selecting from the mode dial 1 Select the desired mode of Scene Selection with the mode dial. 2 Shoot with the shutter button. • For details on mode, see next page. Basic Operations Shooting still images (Scene Selection) The Scene Selection...
... / / / by using b/B of the control button (page 49). 3 Shoot with the shutter button. MENU button Shutter button Mode dial Control button Selecting from the mode dial 1 Select the desired mode of Scene Selection with the mode dial. 2 Shoot with the shutter button. • For details on mode, see next page. Basic Operations Shooting still images (Scene Selection) The Scene Selection...
Cyber-shot® Handbook
Page 34
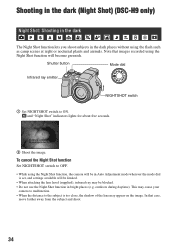
Shooting in the dark (Night Shot) (DSC-H9 only) Night Shot: Shooting in the dark The Night Shot function lets you shoot subjects in bright places (e.g. To cancel the Night Shot function Set NIGHTSHOT switch to OFF. • While using the flash such as camp scenes at night...supplied), infrared ray may cause your camera to malfunction. • When the distance to ON. and "Night Shot" indicators lights for about five seconds. 2 Shoot the image. Note that case, move farther away from the subject and shoot. 34 Shutter button Mode dial Infrared ray emitter NIGHTSHOT switch...
Shooting in the dark (Night Shot) (DSC-H9 only) Night Shot: Shooting in the dark The Night Shot function lets you shoot subjects in bright places (e.g. To cancel the Night Shot function Set NIGHTSHOT switch to OFF. • While using the flash such as camp scenes at night...supplied), infrared ray may cause your camera to malfunction. • When the distance to ON. and "Night Shot" indicators lights for about five seconds. 2 Shoot the image. Note that case, move farther away from the subject and shoot. 34 Shutter button Mode dial Infrared ray emitter NIGHTSHOT switch...
Cyber-shot® Handbook
Page 37
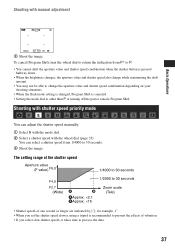
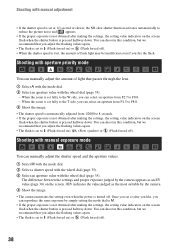
... adjustment Basic Operations 3 Shoot the image. Shooting with shutter speed priority mode You can select a shutter speed from P* to P. • You cannot shift the aperture value and shutter speed combination when the shutter button is pressed halfway down. • When the brightness changes, the aperture value and shutter speed also change while maintaining the shift amount...
... adjustment Basic Operations 3 Shoot the image. Shooting with shutter speed priority mode You can select a shutter speed from P* to P. • You cannot shift the aperture value and shutter speed combination when the shutter button is pressed halfway down. • When the brightness changes, the aperture value and shutter speed also change while maintaining the shift amount...
Cyber-shot® Handbook
Page 38
...2000 to 8 seconds. • If the proper exposure is not obtained after making the settings, the setting value indicators on the screen flash when the shutter button is pressed halfway down. When the zoom is set to (Flash forced on), (Slow synchro) or (Flash forced off). Shooting with manual adjustment &#... adjust the flashing values again. • The flash is pressed halfway down. The difference between the settings and proper exposure judged by the camera appears as an EV value (page 36) on the screen. 0EV indicates the value judged as the most suitable by simply setting the mode...
...2000 to 8 seconds. • If the proper exposure is not obtained after making the settings, the setting value indicators on the screen flash when the shutter button is pressed halfway down. When the zoom is set to (Flash forced on), (Slow synchro) or (Flash forced off). Shooting with manual adjustment &#... adjust the flashing values again. • The flash is pressed halfway down. The difference between the settings and proper exposure judged by the camera appears as an EV value (page 36) on the screen. 0EV indicates the value judged as the most suitable by simply setting the mode...

Cyber-shot® Handbook
Page 47
Control button z button v/V/b/B button HOME button 1 Press HOME to the shooting mode by pressing the shutter button halfway down. 47 Category Item Guide 2 Select a category with b/B on the control button. 3 Select an item with v/V, then press z. • You cannot display the HOME screen when a PictBridge connection or a USB connection is made. • The camera is the basic screen used...
Control button z button v/V/b/B button HOME button 1 Press HOME to the shooting mode by pressing the shutter button halfway down. 47 Category Item Guide 2 Select a category with b/B on the control button. 3 Select an item with v/V, then press z. • You cannot display the HOME screen when a PictBridge connection or a USB connection is made. • The camera is the basic screen used...
Cyber-shot® Handbook
Page 52
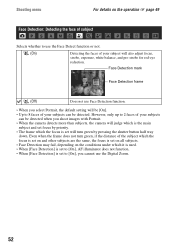
Face Detection mark Face Detection frame (Off) Does not use the Digital Zoom. 52 However, only up to 8 faces of your subjects can be detected. Even when the frame does not turn green, if the distance of ...] is set to [On], AF illuminator does not function. • When [Face Detection] is set to [On], you shoot images with Portrait. • When the camera detects more than subjects, the camera will judge which the focus is set focus by pressing the shutter button half way down.
Face Detection mark Face Detection frame (Off) Does not use the Digital Zoom. 52 However, only up to 8 faces of your subjects can be detected. Even when the frame does not turn green, if the distance of ...] is set to [On], AF illuminator does not function. • When [Face Detection] is set to [On], you shoot images with Portrait. • When the camera detects more than subjects, the camera will judge which the focus is set focus by pressing the shutter button half way down.

Cyber-shot® Handbook
Page 53
...shutter button. DSC-H9 only • When the mode dial is set to , the Exposure Bracket mode is not available. • The flash is set to (Flash forced off ). Using functions for shooting Shooting menu For details on the operation 1 page 49 REC Mode: Selecting the continuous shooting method Selects whether the camera... performs continuous shooting or not when you press the shutter button. (Normal) Does not shoot continuously. (Burst) Records up to 100 images in the order...
...shutter button. DSC-H9 only • When the mode dial is set to , the Exposure Bracket mode is not available. • The flash is set to (Flash forced off ). Using functions for shooting Shooting menu For details on the operation 1 page 49 REC Mode: Selecting the continuous shooting method Selects whether the camera... performs continuous shooting or not when you press the shutter button. (Normal) Does not shoot continuously. (Burst) Records up to 100 images in the order...


