Instruction Manual
Page 1
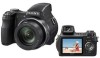
Operating Instructions Before operating the unit, please read this manual thoroughly, and retain it for future reference. © 2007 Sony Corporation 3-196-623-11(1) Digital Still Camera Instruction Manual GB DSC-H7/H9 For details on the advanced operations, please access "Cyber-shot Handbook" and "Cyber-shot Step-up Guide" contained on the supplied CD-ROM via a computer.
Operating Instructions Before operating the unit, please read this manual thoroughly, and retain it for future reference. © 2007 Sony Corporation 3-196-623-11(1) Digital Still Camera Instruction Manual GB DSC-H7/H9 For details on the advanced operations, please access "Cyber-shot Handbook" and "Cyber-shot Step-up Guide" contained on the supplied CD-ROM via a computer.
Instruction Manual
Page 7
... can be recorded/viewed .......... 32 Number of still images and recording time of contents IMPORTANT SAFEGUARDS 2 Read this first 4 Notes on using your camera 8 Getting started 10 Checking the accessories supplied 10 1 Preparing the battery pack 12 2 Inserting the battery pack/a "Memory Stick Duo" (not supplied...) ........ 13 3 Turning the camera on/setting the clock 15 Shooting images easily 16 Mode dial/Zoom/Flash/Macro/Self-timer/Display/Finder/Lens hood ...... 17 Shooting with manual...
... can be recorded/viewed .......... 32 Number of still images and recording time of contents IMPORTANT SAFEGUARDS 2 Read this first 4 Notes on using your camera 8 Getting started 10 Checking the accessories supplied 10 1 Preparing the battery pack 12 2 Inserting the battery pack/a "Memory Stick Duo" (not supplied...) ........ 13 3 Turning the camera on/setting the clock 15 Shooting images easily 16 Mode dial/Zoom/Flash/Macro/Self-timer/Display/Finder/Lens hood ...... 17 Shooting with manual...

Instruction Manual
Page 8
..., or cause image data breakdown, damage or loss. • Clean the flash surface before use . Insert a charged battery pack and turn off the camera or remove the battery pack or "Memory Stick Duo" while the access lamp is neither dust-proof, nor splashproof, nor water-proof. In addition to... manufacturing process and do not affect the recording in color) that constantly appear on the LCD screen or the LCD finder. Notes on using your camera [ Internal memory and "Memory Stick Duo" back up copy. [ Notes on recording/playback • Before you start recording, make a trial recording to make ...
..., or cause image data breakdown, damage or loss. • Clean the flash surface before use . Insert a charged battery pack and turn off the camera or remove the battery pack or "Memory Stick Duo" while the access lamp is neither dust-proof, nor splashproof, nor water-proof. In addition to... manufacturing process and do not affect the recording in color) that constantly appear on the LCD screen or the LCD finder. Notes on using your camera [ Internal memory and "Memory Stick Duo" back up copy. [ Notes on recording/playback • Before you start recording, make a trial recording to make ...

Instruction Manual
Page 9
[ No compensation for contents of the recording The contents of the recording cannot be compensated for if recording or playback is not possible due to a malfunction of your camera or recording media, etc. 9
[ No compensation for contents of the recording The contents of the recording cannot be compensated for if recording or playback is not possible due to a malfunction of your camera or recording media, etc. 9
Instruction Manual
Page 10
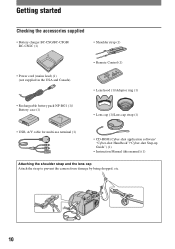
... Handbook"/"Cyber-shot Step-up Guide") (1) • Instruction Manual (this manual) (1) Attaching the shoulder strap and the lens cap Attach the strap to prevent the camera from damage by being dropped, etc. 10
... Handbook"/"Cyber-shot Step-up Guide") (1) • Instruction Manual (this manual) (1) Attaching the shoulder strap and the lens cap Attach the strap to prevent the camera from damage by being dropped, etc. 10

Instruction Manual
Page 13
.... • The displayed battery remaining indicator may not be correct under certain circumstances. • The Clock Set screen appears when the camera is no "Memory Stick Duo" inserted The camera records/plays back images using the internal memory (approx. 31 MB). [ To check the remaining battery time Press POWER button to turn...
.... • The displayed battery remaining indicator may not be correct under certain circumstances. • The Clock Set screen appears when the camera is no "Memory Stick Duo" inserted The camera records/plays back images using the internal memory (approx. 31 MB). [ To check the remaining battery time Press POWER button to turn...
Instruction Manual
Page 15
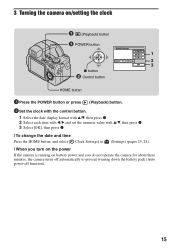
3 Turning the camera on/setting the clock (Playback) button POWER button 1 2 3 z button ɟ Control button HOME button 1 Press the POWER button or press (Playback) button. 2 Set the clock ... HOME button, and select [ Clock Settings] in (Settings) (pages 23, 24). [ When you turn on the power If the camera is running on battery power and you do not operate the camera for about three minutes, the camera turns off automatically to prevent wearing down the battery pack (Auto power-off function). 15
3 Turning the camera on/setting the clock (Playback) button POWER button 1 2 3 z button ɟ Control button HOME button 1 Press the POWER button or press (Playback) button. 2 Set the clock ... HOME button, and select [ Clock Settings] in (Settings) (pages 23, 24). [ When you turn on the power If the camera is running on battery power and you do not operate the camera for about three minutes, the camera turns off automatically to prevent wearing down the battery pack (Auto power-off function). 15
Instruction Manual
Page 16
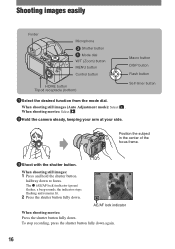
... (green) flashes, a beep sounds, the indicator stops flashing and remains lit. 2 Press the shutter button fully down again. 16 When shooting movies: Select . 2Hold the camera steady, keeping your arm at your side. To stop recording, press the shutter button fully down .
... (green) flashes, a beep sounds, the indicator stops flashing and remains lit. 2 Press the shutter button fully down again. 16 When shooting movies: Select . 2Hold the camera steady, keeping your arm at your side. To stop recording, press the shutter button fully down .
Instruction Manual
Page 19
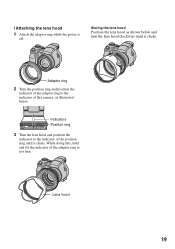
Indicators Position ring 3 Turn the lens hood and position the indicator to the indicator of this , hold and fix the indicator of the adaptor ring to the indicator of the position ring until it clicks. Lens hood 19 Adaptor ring 2 Turn the position ring and position the indicator of the adaptor ring to not turn the lens hood clockwise until it clicks. While doing this camera, as shown below . Storing the lens hood Position the lens hood as illustrated below and turn . [ Attaching the lens hood 1 Attach the adaptor ring while the power is off.
Indicators Position ring 3 Turn the lens hood and position the indicator to the indicator of this , hold and fix the indicator of the adaptor ring to the indicator of the position ring until it clicks. Lens hood 19 Adaptor ring 2 Turn the position ring and position the indicator of the adaptor ring to not turn the lens hood clockwise until it clicks. While doing this camera, as shown below . Storing the lens hood Position the lens hood as illustrated below and turn . [ Attaching the lens hood 1 Attach the adaptor ring while the power is off.
Instruction Manual
Page 21
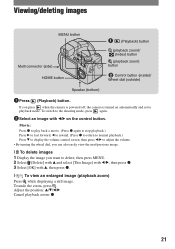
... turning the wheel dial, you can also easily view the next/previous image. [ To delete images 1 Display the image you press when the camera is powered off, the camera is turned on the control button. To undo the zoom, press . Viewing/deleting images MENU button Multi connector (side) HOME button (Playback) button...
... turning the wheel dial, you can also easily view the next/previous image. [ To delete images 1 Display the image you press when the camera is powered off, the camera is turned on the control button. To undo the zoom, press . Viewing/deleting images MENU button Multi connector (side) HOME button (Playback) button...
Instruction Manual
Page 22
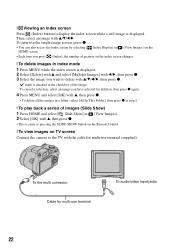
... index screen while a still image is same as pressing the SLIDE SHOW button on the Remote Control. [ To view images on TV screen Connect the camera to the TV with the cable for multi-use terminal To audio/video input jacks 22 To cancel a selection, select an image you press (Index...
... index screen while a still image is same as pressing the SLIDE SHOW button on the Remote Control. [ To view images on TV screen Connect the camera to the TV with the cable for multi-use terminal To audio/video input jacks 22 To cancel a selection, select an image you press (Index...

Instruction Manual
Page 23
... you select (Settings). 2 Move to the right with B, select a setting with v/V, then press z. 3 Select a setting with v/V, then press z. • The camera is the gateway screen for all the functions of your camera. HOME/Menu Using the HOME screen The HOME screen is set to display the HOME screen. Learning the various functions...
... you select (Settings). 2 Move to the right with B, select a setting with v/V, then press z. 3 Select a setting with v/V, then press z. • The camera is the gateway screen for all the functions of your camera. HOME/Menu Using the HOME screen The HOME screen is set to display the HOME screen. Learning the various functions...
Instruction Manual
Page 26
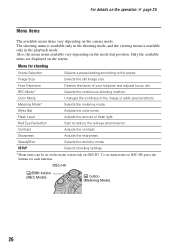
... screen. Only the available items are displayed on the mode dial position. Menu for each function. SteadyShot Selects the anti-blur mode. DSC-H9 /BRK button (REC Mode) button (Metering Mode) 26 White Bal Adjusts the color tones. Red Eye Reduction Sets to the ... flash light. REC Mode* Selects the continuous shooting method. SETUP Selects shooting settings. * Menu items can be set menu items on DSC-H9, press the buttons for shooting Scene Selection Selects a preset setting according to reduce the red-eye phenomenon. Contrast Adjusts the contrast....
... screen. Only the available items are displayed on the mode dial position. Menu for each function. SteadyShot Selects the anti-blur mode. DSC-H9 /BRK button (REC Mode) button (Metering Mode) 26 White Bal Adjusts the color tones. Red Eye Reduction Sets to the ... flash light. REC Mode* Selects the continuous shooting method. SETUP Selects shooting settings. * Menu items can be set menu items on DSC-H9, press the buttons for shooting Scene Selection Selects a preset setting according to reduce the red-eye phenomenon. Contrast Adjusts the contrast....
Instruction Manual
Page 28
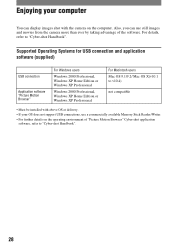
Enjoying your OS does not support USB connections, use still images and movies from the camera more than ever by taking advantage of "Picture Motion Browser" Cyber-shot application software, refer to "Cyber-shot Handbook". For details, refer to "Cyber-shot ... XP Home Edition or Windows XP Professional For Macintosh users Mac OS 9.1/9.2/ Mac OS X(v10.1 to v10.4) not compatible • Must be installed with the camera on the operating environment of the software. Also, you can display images shot with above OS at delivery. • If your computer You can use...
Enjoying your OS does not support USB connections, use still images and movies from the camera more than ever by taking advantage of "Picture Motion Browser" Cyber-shot application software, refer to "Cyber-shot Handbook". For details, refer to "Cyber-shot ... XP Home Edition or Windows XP Professional For Macintosh users Mac OS 9.1/9.2/ Mac OS X(v10.1 to v10.4) not compatible • Must be installed with the camera on the operating environment of the software. Also, you can display images shot with above OS at delivery. • If your computer You can use...
Instruction Manual
Page 32
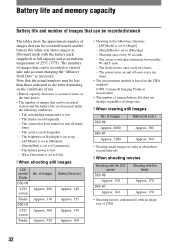
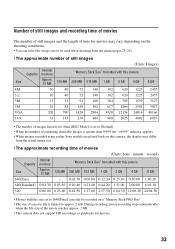
... to [On]. [ When shooting still images LCD screen/ Finder DSC-H9 LCD screen Finder DSC-H7 LCD screen Finder No. Note that the actual numbers may be less than those indicated in the table depending on the CIPA standard. (CIPA: Camera & Imaging Products Association) • The number of images/battery ... [ When shooting movies Shooting with the LCD screen DSC-H9 Approx. 150 DSC-H7 Approx. 160 Shooting with the finder Approx. 170 Approx. 170 • Shooting movies continuously with an image size of [320] 32 The zoom is low. - The camera has been turned on and off once every ten ...
... to [On]. [ When shooting still images LCD screen/ Finder DSC-H9 LCD screen Finder DSC-H7 LCD screen Finder No. Note that the actual numbers may be less than those indicated in the table depending on the CIPA standard. (CIPA: Camera & Imaging Products Association) • The number of images/battery ... [ When shooting movies Shooting with the LCD screen DSC-H9 Approx. 150 DSC-H7 Approx. 160 Shooting with the finder Approx. 170 Approx. 170 • Shooting movies continuously with an image size of [320] 32 The zoom is low. - The camera has been turned on and off once every ten ...
Instruction Manual
Page 33
...set to approx. 2 GB. During recording, movie recording stops automatically when the file size of the movie reaches approx. 2 GB. • This camera does not support HD recordings or playbacks for when [REC Mode] is set to [Normal]. • When the number of remaining shootable images is... greater than 9,999, the ">9999" indicator appears. • When images recorded using earlier Sony models are played back on this camera, the display may vary depending on the shooting conditions. • You can select the image size to be used when shooting from...
...set to approx. 2 GB. During recording, movie recording stops automatically when the file size of the movie reaches approx. 2 GB. • This camera does not support HD recordings or playbacks for when [REC Mode] is set to [Normal]. • When the number of remaining shootable images is... greater than 9,999, the ">9999" indicator appears. • When images recorded using earlier Sony models are played back on this camera, the display may vary depending on the shooting conditions. • You can select the image size to be used when shooting from...
Instruction Manual
Page 34
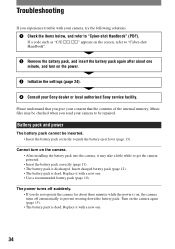
...files may take a little while to get the camera powered. • Insert the battery pack correctly... pack. Turn on , the camera turns off suddenly. • If you do not operate the camera for about one . 34 Replace...turn on the camera. • After installing the battery pack into the camera, it may be checked when you send your camera, try the...lever (page 13). Troubleshooting If you experience trouble with your camera to be repaired. If a code such as "C/E:ss:... again after about three minutes while the power is on the camera again (page 15). • The battery pack is dead...
...files may take a little while to get the camera powered. • Insert the battery pack correctly... pack. Turn on , the camera turns off suddenly. • If you do not operate the camera for about one . 34 Replace...turn on the camera. • After installing the battery pack into the camera, it may be checked when you send your camera, try the...lever (page 13). Troubleshooting If you experience trouble with your camera to be repaired. If a code such as "C/E:ss:... again after about three minutes while the power is on the camera again (page 15). • The battery pack is dead...

Instruction Manual
Page 35
...8226; The battery pack is attached. Cannot charge the battery pack. • You cannot charge the battery pack using a model other streaks appear on your camera, playback on the image. Change the "Memory Stick Duo". • You are shooting a very bright subject. • The smear phenomenon is occurring and ...; The image size is set the mode dial to [640(Fine)] when recording movies. Remove it is full, do one of your camera is not guaranteed. • The camera is not a malfunction. Set the image size to other than [640(Fine)]. - If it . This phenmenon is in an extremely ...
...8226; The battery pack is attached. Cannot charge the battery pack. • You cannot charge the battery pack using a model other streaks appear on your camera, playback on the image. Change the "Memory Stick Duo". • You are shooting a very bright subject. • The smear phenomenon is occurring and ...; The image size is set the mode dial to [640(Fine)] when recording movies. Remove it is full, do one of your camera is not guaranteed. • The camera is not a malfunction. Set the image size to other than [640(Fine)]. - If it . This phenmenon is in an extremely ...
Instruction Manual
Page 36
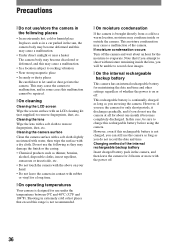
...LCD screen Wipe the screen surface with an LCD cleaning kit (not supplied) to let sand or dust get into the camera. Cleaning the camera surface Clean the camera surface with a soft cloth slightly moistened with water, then wipe the surface with a soft cloth to charge this malfunction cannot... be sure to remove fingerprints, dust, etc. This may cause the camera to malfunction, and in some cases this rechargeable battery before using the camera. Precautions [ Do not use/store the camera in the following as they may damage the finish or the casing. • ...
...LCD screen Wipe the screen surface with an LCD cleaning kit (not supplied) to let sand or dust get into the camera. Cleaning the camera surface Clean the camera surface with a soft cloth slightly moistened with water, then wipe the surface with a soft cloth to charge this malfunction cannot... be sure to remove fingerprints, dust, etc. This may cause the camera to malfunction, and in some cases this rechargeable battery before using the camera. Precautions [ Do not use/store the camera in the following as they may damage the finish or the casing. • ...
Instruction Manual
Page 37
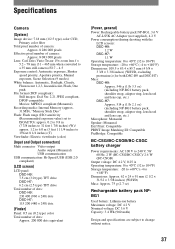
... Lens: Carl Zeiss Vario-Tessar 15× zoom lens f = 5.2 - 78 mm (31 - 465 mm when converted to a 35 mm still camera) F2.7 - 4.5 Exposure control: Automatic exposure, Shutter speed priority, Aperture priority, Manual exposure, Scene Selection (9 modes) White balance: Automatic, Daylight, ... general] Power: Rechargeable battery pack NP-BG1, 3.6 V AC-LS5K AC Adaptor (not supplied), 4.2 V Power consumption (during shooting with the LCD screen): DSC-H9: 1.2 W DSC-H7: 1.1 W Operating temperature: 0 to 40°C (32 to 104°F) Storage temperature: -20 to +60°C (-4 to +140°F) Dimensions:...
... Lens: Carl Zeiss Vario-Tessar 15× zoom lens f = 5.2 - 78 mm (31 - 465 mm when converted to a 35 mm still camera) F2.7 - 4.5 Exposure control: Automatic exposure, Shutter speed priority, Aperture priority, Manual exposure, Scene Selection (9 modes) White balance: Automatic, Daylight, ... general] Power: Rechargeable battery pack NP-BG1, 3.6 V AC-LS5K AC Adaptor (not supplied), 4.2 V Power consumption (during shooting with the LCD screen): DSC-H9: 1.2 W DSC-H7: 1.1 W Operating temperature: 0 to 40°C (32 to 104°F) Storage temperature: -20 to +60°C (-4 to +140°F) Dimensions:...


