Instruction Manual
Page 7
... the accessories supplied 9 Lens hood/Remote Control 10 1 Preparing the battery pack 12 2 Inserting the battery pack/a "Memory Stick Duo" (not supplied) ........ 13 3 Turning the camera on the screen 33 Battery life and memory capacity 36 Battery life and number of images you can record/view 36 Recordable number of still images and recordable...
... the accessories supplied 9 Lens hood/Remote Control 10 1 Preparing the battery pack 12 2 Inserting the battery pack/a "Memory Stick Duo" (not supplied) ........ 13 3 Turning the camera on the screen 33 Battery life and memory capacity 36 Battery life and number of images you can record/view 36 Recordable number of still images and recordable...
Instruction Manual
Page 9
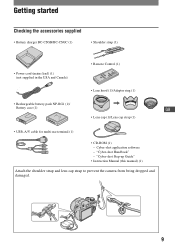
...lens cap strap to prevent the camera from being dropped and damaged. 9 Getting started Checking the accessories supplied • Battery charger BC-CSGB/BC-CSGC (1) • Shoulder strap (1) • Power cord (mains lead) (1) (not supplied in the USA and Canada) • Remote Control (1) • Lens hood... (1)/Adaptor ring (1) • Rechargeable battery pack NP-BG1 (1)/ Battery case (1) GB • Lens cap (1)/Lens cap strap (1) • USB, A/V cable for multi-use terminal (1) • CD-ROM (1) - "Cyber-shot Handbook" - Cyber-shot application software ...
...lens cap strap to prevent the camera from being dropped and damaged. 9 Getting started Checking the accessories supplied • Battery charger BC-CSGB/BC-CSGC (1) • Shoulder strap (1) • Power cord (mains lead) (1) (not supplied in the USA and Canada) • Remote Control (1) • Lens hood... (1)/Adaptor ring (1) • Rechargeable battery pack NP-BG1 (1)/ Battery case (1) GB • Lens cap (1)/Lens cap strap (1) • USB, A/V cable for multi-use terminal (1) • CD-ROM (1) - "Cyber-shot Handbook" - Cyber-shot application software ...
Instruction Manual
Page 10
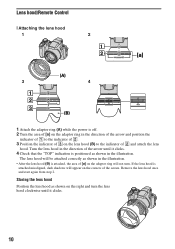
... of 2. 3 Position the indicator of 3 on the corners of 2 and attach the lens hood. Remove the lens hood once and start again from step 2. Turn the lens hood in the illustration. Storing the lens hood Position the lens hood as shown on the right and turn . The lens hood will be attached correctly as shown in the direction of the arrow until...
... of 2. 3 Position the indicator of 3 on the corners of 2 and attach the lens hood. Remove the lens hood once and start again from step 2. Turn the lens hood in the illustration. Storing the lens hood Position the lens hood as shown on the right and turn . The lens hood will be attached correctly as shown in the direction of the arrow until...

Cyber-shot® Handbook
Page 4
...the accessories 18 Lens hood/Adaptor ring Attaching the lens hood Storing the lens hood Attaching a conversion lens (not supplied)... Remote Control Indicators on a subject successfully 8 Exposure - Focusing on the screen 21 Changing the screen display 26 Using the internal memory 27 Basic Operations Using the mode dial 28 Shooting images (Auto Adjustment mode 29 Shooting still images (Scene Selection 33 Shooting in the dark (Night Shot... the metering mode Viewing images 50 Viewing still images as a slideshow 52 Deleting images ...
...the accessories 18 Lens hood/Adaptor ring Attaching the lens hood Storing the lens hood Attaching a conversion lens (not supplied)... Remote Control Indicators on a subject successfully 8 Exposure - Focusing on the screen 21 Changing the screen display 26 Using the internal memory 27 Basic Operations Using the mode dial 28 Shooting images (Auto Adjustment mode 29 Shooting still images (Scene Selection 33 Shooting in the dark (Night Shot... the metering mode Viewing images 50 Viewing still images as a slideshow 52 Deleting images ...

Cyber-shot® Handbook
Page 18
... clicks. Remove the lens hood once and start again from the lens hood before attaching them to the camera. 3 Position the indicator of 3 on the lens hood (B) to the indicator of 2. • After the lens hood (B) is attached, the area of [a] on the adaptor ring in flash. - Using the accessories Lens hood/Adaptor ring The lens hood is stored with the lens hood attached. •...
... clicks. Remove the lens hood once and start again from the lens hood before attaching them to the camera. 3 Position the indicator of 3 on the lens hood (B) to the indicator of 2. • After the lens hood (B) is attached, the area of [a] on the adaptor ring in flash. - Using the accessories Lens hood/Adaptor ring The lens hood is stored with the lens hood attached. •...

Cyber-shot® Handbook
Page 19
... lens hood can be attached in the reverse direction to do enhanced wide-angle shots or zoom-in shots on distant objects, attach a conversion lens. 1 Attach the adaptor ring. 2 Attach a conversion lens. • When shooting with the conversion lens, go through the settings of [Conversion Lens] (page 100). • For details, see the operating instructions supplied with the camera...
... lens hood can be attached in the reverse direction to do enhanced wide-angle shots or zoom-in shots on distant objects, attach a conversion lens. 1 Attach the adaptor ring. 2 Attach a conversion lens. • When shooting with the conversion lens, go through the settings of [Conversion Lens] (page 100). • For details, see the operating instructions supplied with the camera...

Cyber-shot® Handbook
Page 38
... displayed. 2 Shoot with the shutter button. Shooting in the dark (Night Shot) The Night Shot function lets you shoot subjects in bright places (e.g. This may cause your camera to malfunction. • When the distance to (Flash forced off). • When attaching the lens hood (supplied), infrared ray may appear on the image. outdoors during daytime...
... displayed. 2 Shoot with the shutter button. Shooting in the dark (Night Shot) The Night Shot function lets you shoot subjects in bright places (e.g. This may cause your camera to malfunction. • When the distance to (Flash forced off). • When attaching the lens hood (supplied), infrared ray may appear on the image. outdoors during daytime...

Cyber-shot® Handbook
Page 151
...High Sensitivity mode ..........34 Histogram 26 Holding the camera 29 HOME 58 I Identifying parts 15 Image ...43 J JPG 116 L Landscape mode 34 Language Setting 104 LCD Screen 26 Lens hood 18 M Macintosh computer ...........121 Recommended environment 121 Macro 31 Main Settings 1 ...-Purpose Resize 85 Music Tool 120 Music Transfer 120, 122 N Night Shot 38 Noise Reduction 72 NR slow shutter 22 NTSC 97 O One Push... Motion Browser .....112 Pixel 12 Playback zoom 50 Portrait mode 34 Precision digital zoom ..........99 Pressing halfway down...........8 Print 87, 124 Print order mark...
...High Sensitivity mode ..........34 Histogram 26 Holding the camera 29 HOME 58 I Identifying parts 15 Image ...43 J JPG 116 L Landscape mode 34 Language Setting 104 LCD Screen 26 Lens hood 18 M Macintosh computer ...........121 Recommended environment 121 Macro 31 Main Settings 1 ...-Purpose Resize 85 Music Tool 120 Music Transfer 120, 122 N Night Shot 38 Noise Reduction 72 NR slow shutter 22 NTSC 97 O One Push... Motion Browser .....112 Pixel 12 Playback zoom 50 Portrait mode 34 Precision digital zoom ..........99 Pressing halfway down...........8 Print 87, 124 Print order mark...


