
Instruction Manual
Page 8
... a normal result of the camera. • Do not use . However, some cases, the camera cannot be displayed on the LCD screen before operating the camera. • Avoid exposing the camera to continuous use . Insert a charged battery pack and turn off the camera, remove the battery pack,... capacity is not a malfunction. These dots are operational for Camera File system) universal standard established by JEITA (Japan Electronics and Information Technology Industries Association). • Sony does not guarantee that the camera will play back images recorded or edited with DCF (Design ...
... a normal result of the camera. • Do not use . However, some cases, the camera cannot be displayed on the LCD screen before operating the camera. • Avoid exposing the camera to continuous use . Insert a charged battery pack and turn off the camera, remove the battery pack,... capacity is not a malfunction. These dots are operational for Camera File system) universal standard established by JEITA (Japan Electronics and Information Technology Industries Association). • Sony does not guarantee that the camera will play back images recorded or edited with DCF (Design ...

Instruction Manual
Page 15
...use . x When there is running on the upper left of the LCD screen. High Low Notes • It takes about three minutes, the camera turns off automatically (Auto power-off function). 15GB Note • Never remove the "Memory Stick Duo" media/battery pack when the access lamp is also... no "Memory Stick Duo" media inserted Images are not compatible with the camera. Be sure not to be correct under certain circumstances. • If the NP-FG1 battery pack (sold separately) is used, the minute display is lit. x To remove the battery pack Battery eject lever Getting started x ...
...use . x When there is running on the upper left of the LCD screen. High Low Notes • It takes about three minutes, the camera turns off automatically (Auto power-off function). 15GB Note • Never remove the "Memory Stick Duo" media/battery pack when the access lamp is also... no "Memory Stick Duo" media inserted Images are not compatible with the camera. Be sure not to be correct under certain circumstances. • If the NP-FG1 battery pack (sold separately) is used, the minute display is lit. x To remove the battery pack Battery eject lever Getting started x ...

Instruction Manual
Page 16
Date & Time: Sets the date and time. Daylight Savings: Select Daylight Savings On/Off. Getting started Setting the clock 1 Press the ON/OFF (Power) button. ON/OFF (Power) button Control button 3 Set the numeric value and desired settings with v/V/b/ B, then press z. • Midnight is turned on. • It may take time for the power to turn on and allow operation. 2 Select a setting item with v/ V on the control button, then press z. Date & Time Format: Select the date and time display format. The camera is indicated as 12:00 AM, and noon as 12:00 PM. 16GB
Date & Time: Sets the date and time. Daylight Savings: Select Daylight Savings On/Off. Getting started Setting the clock 1 Press the ON/OFF (Power) button. ON/OFF (Power) button Control button 3 Set the numeric value and desired settings with v/V/b/ B, then press z. • Midnight is turned on. • It may take time for the power to turn on and allow operation. 2 Select a setting item with v/ V on the control button, then press z. Date & Time Format: Select the date and time display format. The camera is indicated as 12:00 AM, and noon as 12:00 PM. 16GB
Instruction Manual
Page 19
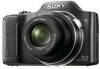
The last image shot is displayed. • When images on the "Memory Stick Duo" media recorded with v on this camera, view the images in [Folder View] (page 35). x Turning off the camera Press ON/OFF (Power) button. Control button Control button (Delete) button 19GB x Returning to shooting images Press the shutter button halfway down. ...image with B (next)/b (previous) on the control button. (Playback) button Shooting/viewing images x Deleting an image 1 Press (Delete) button. 2 Select [This Image] with other cameras cannot be played back on the control button, then press z.
The last image shot is displayed. • When images on the "Memory Stick Duo" media recorded with v on this camera, view the images in [Folder View] (page 35). x Turning off the camera Press ON/OFF (Power) button. Control button Control button (Delete) button 19GB x Returning to shooting images Press the shutter button halfway down. ...image with B (next)/b (previous) on the control button. (Playback) button Shooting/viewing images x Deleting an image 1 Press (Delete) button. 2 Select [This Image] with other cameras cannot be played back on the control button, then press z.

Instruction Manual
Page 31
... set to stop recording. Using shooting functions The difference between the settings and proper exposure judged by the camera appears as the most suitable by the camera. Button z B b V Playback feature Pause Fast forward Fast rewind Displays the volume control screen. Note • The flash is the value judged as an EV value on... with v/V. 31GB Notes • The operating sound of the lens or beep sound of buttons might be recorded while shooting a movie. • Even if you turn the lever fully, the camera zooms slowly while shooting a movie.
... set to stop recording. Using shooting functions The difference between the settings and proper exposure judged by the camera appears as the most suitable by the camera. Button z B b V Playback feature Pause Fast forward Fast rewind Displays the volume control screen. Note • The flash is the value judged as an EV value on... with v/V. 31GB Notes • The operating sound of the lens or beep sound of buttons might be recorded while shooting a movie. • Even if you turn the lever fully, the camera zooms slowly while shooting a movie.

Instruction Manual
Page 41
... MB or more (For playing/editing the High Definition movies: 1 GB or more) Hard Disk (Disk space required for installation): Approximately 500 MB Display: Screen resolution: 1,024 × 768 dots or more Video memory: 32 MB or more (Recommended: 64 MB or more) *1 64-bit editions... supported. *2 Starter (Edition) is complete. 41GB Connecting to complete the installation. 5 Remove the CD-ROM after the installation is not supported. 2 Turn on your computer environment. When you install "PMB," "Music Transfer" is also installed. • Log on the screen to other devices The installation ...
... MB or more (For playing/editing the High Definition movies: 1 GB or more) Hard Disk (Disk space required for installation): Approximately 500 MB Display: Screen resolution: 1,024 × 768 dots or more Video memory: 32 MB or more (Recommended: 64 MB or more) *1 64-bit editions... supported. *2 Starter (Edition) is complete. 41GB Connecting to complete the installation. 5 Remove the CD-ROM after the installation is not supported. 2 Turn on your computer environment. When you install "PMB," "Music Transfer" is also installed. • Log on the screen to other devices The installation ...
Instruction Manual
Page 45
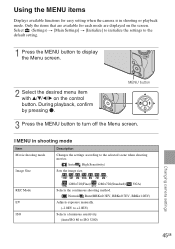
MENU button 3 Press the MENU button to display the Menu screen. 2 Select the desired menu item with v/V/b/B on the screen. Only the items that are available for easy setting when the camera is in shooting mode Item Movie shooting mode Image Size Description Changes the... Changing camera settings 45GB Select (Settings) t [Main Settings] t [Initialize] to initialize the settings to the default setting. 1 Press the MENU button to turn off the Menu screen. x MENU in shooting or playback mode. Using the MENU items Displays available functions for each mode are displayed on the...
MENU button 3 Press the MENU button to display the Menu screen. 2 Select the desired menu item with v/V/b/B on the screen. Only the items that are available for easy setting when the camera is in shooting mode Item Movie shooting mode Image Size Description Changes the... Changing camera settings 45GB Select (Settings) t [Main Settings] t [Initialize] to initialize the settings to the default setting. 1 Press the MENU button to turn off the Menu screen. x MENU in shooting or playback mode. Using the MENU items Displays available functions for each mode are displayed on the...
Instruction Manual
Page 48
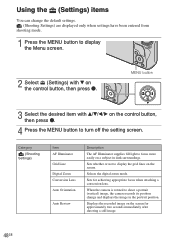
...camera records its position change the default settings. (Shooting Settings) are displayed only when settings have been entered from shooting mode. 1 Press the MENU button to display the Menu screen. 2 Select (Settings) with v/V/b/B on the control button, then press z. Sets for approximately two seconds immediately after shooting a still image. 48GB Selects the digital... zoom mode. Displays the recorded image on a subject in the portrait position. MENU button 3 Select the ...
...camera records its position change the default settings. (Shooting Settings) are displayed only when settings have been entered from shooting mode. 1 Press the MENU button to display the Menu screen. 2 Select (Settings) with v/V/b/B on the control button, then press z. Sets for approximately two seconds immediately after shooting a still image. 48GB Selects the digital... zoom mode. Displays the recorded image on a subject in the portrait position. MENU button 3 Select the ...

Instruction Manual
Page 49
...used for recording images. Selects the method used in the camera. Changing camera settings 49GB Initializes settings to images. Sets whether to display the function guide when you operate the camera. Deletes all images in "Memory Stick Duo" media. ...Display USB Connect Download Music Format Music ("Memory Stick" Tool) Format Create REC.Folder Change REC.Folder Delete REC.Folder Copy File Number (Internal Memory Tool) Format File Number (Clock Settings) Area Setting Date & Time Setting Description Selects or turns off the sound produced when you operate the camera...
...used for recording images. Selects the method used in the camera. Changing camera settings 49GB Initializes settings to images. Sets whether to display the function guide when you operate the camera. Deletes all images in "Memory Stick Duo" media. ...Display USB Connect Download Music Format Music ("Memory Stick" Tool) Format Create REC.Folder Change REC.Folder Delete REC.Folder Copy File Number (Internal Memory Tool) Format File Number (Clock Settings) Area Setting Date & Time Setting Description Selects or turns off the sound produced when you operate the camera...
Instruction Manual
Page 54
... pack. In this case, a message is displayed on the LCD screen before the power turns off. • If you experience trouble with the camera, try the following solutions. 1 Check the ...symptoms. Sony will not copy or save any of those data. Replace it with a new one . 54GB Replace it with a new one . • Use a recommended battery pack. Turn on the camera again ... the camera for about three minutes while the power is on, the camera turns off automatically to "Cyber-shot Handbook." 2 Remove the battery pack, wait for the camera to protect the camera. On repairing cameras with ...
... pack. In this case, a message is displayed on the LCD screen before the power turns off. • If you experience trouble with the camera, try the following solutions. 1 Check the ...symptoms. Sony will not copy or save any of those data. Replace it with a new one . 54GB Replace it with a new one . • Use a recommended battery pack. Turn on the camera again ... the camera for about three minutes while the power is on, the camera turns off automatically to "Cyber-shot Handbook." 2 Remove the battery pack, wait for the camera to protect the camera. On repairing cameras with ...

Instruction Manual
Page 55
... range (10°C to 30°C (50°F to charge the battery. If it is in Smile Shutter demonstration mode. When you repeatedly turn the power on and off. - Change the "Memory Stick Duo" media. • You cannot record images while charging the flash. • ... camera in the following : - Use the battery charger (supplied) to 86°F)). Set [Demo Mode] to correct the indication. • The battery pack is installed correctly. • The temperature may be lower than "Memory Stick PRO Duo" media, set the screen brightness higher using DISP (screen display)...
... range (10°C to 30°C (50°F to charge the battery. If it is in Smile Shutter demonstration mode. When you repeatedly turn the power on and off. - Change the "Memory Stick Duo" media. • You cannot record images while charging the flash. • ... camera in the following : - Use the battery charger (supplied) to 86°F)). Set [Demo Mode] to correct the indication. • The battery pack is installed correctly. • The temperature may be lower than "Memory Stick PRO Duo" media, set the screen brightness higher using DISP (screen display)...

