
Instruction Manual
Page 1
Getting started Shooting/viewing images Uploading images Using shooting functions Using viewing functions Connecting to other devices Changing camera settings GB © 2008 Sony Corporation 4-105-996-21(1) Digital Still Camera Instruction Manual DSC-G3 Before operating the unit, please read this manual thoroughly and retain it for future reference.
Getting started Shooting/viewing images Uploading images Using shooting functions Using viewing functions Connecting to other devices Changing camera settings GB © 2008 Sony Corporation 4-105-996-21(1) Digital Still Camera Instruction Manual DSC-G3 Before operating the unit, please read this manual thoroughly and retain it for future reference.

Instruction Manual
Page 5
... more detailed information about recycling of this product, please contact your local Civic Office, your authority to operate this DSC-G3 Digital Still Camera is no guarantee that interference will not occur in compliance with the essential requirements and other European countries with the...treated as household waste. These limits are cautioned that this product is disposed of this product. For Customers in Europe Hereby, Sony Corporation, declares that this equipment. [ Note: This equipment has been tested and found compliant with separate collection systems) This ...
... more detailed information about recycling of this product, please contact your local Civic Office, your authority to operate this DSC-G3 Digital Still Camera is no guarantee that interference will not occur in compliance with the essential requirements and other European countries with the...treated as household waste. These limits are cautioned that this product is disposed of this product. For Customers in Europe Hereby, Sony Corporation, declares that this equipment. [ Note: This equipment has been tested and found compliant with separate collection systems) This ...
Instruction Manual
Page 7
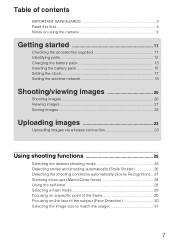
Table of contents IMPORTANT SAFEGUARDS 2 Read this first 4 Notes on using the camera 9 Getting started 11 Checking the accessories supplied 11 Identifying parts 12 Charging the battery pack 13 Inserting the battery pack 15 Setting the clock 17 ...
Table of contents IMPORTANT SAFEGUARDS 2 Read this first 4 Notes on using the camera 9 Getting started 11 Checking the accessories supplied 11 Identifying parts 12 Charging the battery pack 13 Inserting the battery pack 15 Setting the clock 17 ...
Instruction Manual
Page 8
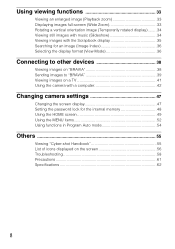
... 36 Connecting to other devices 38 Viewing images on "BRAVIA 38 Sending images to "BRAVIA 39 Viewing images on a TV 41 Using the camera with a computer 42 Changing camera settings 47 Changing the screen display 47 Setting the password lock for the internal memory 48 Using the HOME screen 49 Using the...
... 36 Connecting to other devices 38 Viewing images on "BRAVIA 38 Sending images to "BRAVIA 39 Viewing images on a TV 41 Using the camera with a computer 42 Changing camera settings 47 Changing the screen display 47 Setting the password lock for the internal memory 48 Using the HOME screen 49 Using the...

Instruction Manual
Page 9
...) universal standard established by JEITA (Japan Electronics and Information Technology Industries Association). • Sony does not guarantee that the camera will play back images. • Using the camera in insufficient light emission. Warning on copyright Television programs, films, videotapes, and other bright...-proof. No compensation for damaged content or recording failure Sony cannot compensate for failure to record or loss or damage of recorded content due to automatically create a management file. Otherwise, the camera may not properly record or play back images recorded or...
...) universal standard established by JEITA (Japan Electronics and Information Technology Industries Association). • Sony does not guarantee that the camera will play back images. • Using the camera in insufficient light emission. Warning on copyright Television programs, films, videotapes, and other bright...-proof. No compensation for damaged content or recording failure Sony cannot compensate for failure to record or loss or damage of recorded content due to automatically create a management file. Otherwise, the camera may not properly record or play back images recorded or...

Instruction Manual
Page 11
... through the loop to the wrist strap. • USB, A/V cable for multi-use terminal (1) • Wrist strap (1) Note • Do not carry the camera by being dropped. • Rechargeable battery pack NP-BD1 (1)/ Battery case (1) Hook • Paint pen (1) x Using the paint pen The paint pen is used... charger BC-CSD (1) • Power cord (mains lead) (1) (not supplied in the USA and Canada) • CD-ROM (1) - It attaches to prevent the camera from damage by holding the paint pen. The camera may fall off. • Station plate H (1) The station plate is used when mounting the...
... through the loop to the wrist strap. • USB, A/V cable for multi-use terminal (1) • Wrist strap (1) Note • Do not carry the camera by being dropped. • Rechargeable battery pack NP-BD1 (1)/ Battery case (1) Hook • Paint pen (1) x Using the paint pen The paint pen is used... charger BC-CSD (1) • Power cord (mains lead) (1) (not supplied in the USA and Canada) • CD-ROM (1) - It attaches to prevent the camera from damage by holding the paint pen. The camera may fall off. • Station plate H (1) The station plate is used when mounting the...

Instruction Manual
Page 14
Do not use with compatible Sony batteries. If some trouble occurs while using the battery charger, immediately shut...converter). of Images Approx. 200 Approx. 3400 • The measurement method is based on the CIPA standard. (CIPA: Camera & Imaging Products Association) Note • The battery life and the number of still images may vary depending on conditions of...; The table above shows the time required to charge a fully depleted battery pack at a temperature of use the camera, the battery charger (supplied), and the AC-LS5K AC Adaptor (not supplied) in any country or region where the...
Do not use with compatible Sony batteries. If some trouble occurs while using the battery charger, immediately shut...converter). of Images Approx. 200 Approx. 3400 • The measurement method is based on the CIPA standard. (CIPA: Camera & Imaging Products Association) Note • The battery life and the number of still images may vary depending on conditions of...; The table above shows the time required to charge a fully depleted battery pack at a temperature of use the camera, the battery charger (supplied), and the AC-LS5K AC Adaptor (not supplied) in any country or region where the...

Instruction Manual
Page 16
... Stick Duo" When a "Memory Stick Duo" is lit. Other types of images/time that allows you can also use a "Memory Stick" with the camera. x Copying images between recording media You cannot transfer images between the internal memory and a "Memory Stick Duo" inserted in once. 16 For details, refer...images to "PMB Guide" after installing "PMB" (page 43). This may cause damage to drop the battery pack. x Recording to internal memory The camera has an approximately 4GB internal memory that can be recorded, see page 32. "Memory Stick" You cannot use a "Memory Stick PRO Duo" or ...
... Stick Duo" When a "Memory Stick Duo" is lit. Other types of images/time that allows you can also use a "Memory Stick" with the camera. x Copying images between recording media You cannot transfer images between the internal memory and a "Memory Stick Duo" inserted in once. 16 For details, refer...images to "PMB Guide" after installing "PMB" (page 43). This may cause damage to drop the battery pack. x Recording to internal memory The camera has an approximately 4GB internal memory that can be recorded, see page 32. "Memory Stick" You cannot use a "Memory Stick PRO Duo" or ...

Instruction Manual
Page 17
...the CD-ROM (supplied), you can also turn on the LCD screen with the date. • If the camera is running on and you do not operate the camera for about three minutes, the camera turns off automatically (Auto power-off function). • It may take time for superimposing dates on the...2 Touch the desired date display format, then touch . x Setting the date and time again Touch t (Settings) t [Clock Settings] (page 51). 17 Notes • The camera does not have a feature for the power to set its numeric value. • Midnight is turned on. • You can print or save images with...
...the CD-ROM (supplied), you can also turn on the LCD screen with the date. • If the camera is running on and you do not operate the camera for about three minutes, the camera turns off automatically (Auto power-off function). • It may take time for superimposing dates on the...2 Touch the desired date display format, then touch . x Setting the date and time again Touch t (Settings) t [Clock Settings] (page 51). 17 Notes • The camera does not have a feature for the power to set its numeric value. • Midnight is turned on. • You can print or save images with...

Instruction Manual
Page 18
...Network] t t [ Network Settings] t . If you want to use t . Setting the wireless network A wireless LAN function is displayed t . Connect the camera to a network via an access point. 1 Press the POWER button to step 8. 18 POWER button 3 Touch [Time Zone] t t region in which you ...Create New] t [Auto Scan] t t access point you have selected [Disable], proceed to turn on the camera. The SSID information confirmation screen is displayed. 5 Confirm the SSID is equipped with this camera. If the SSID is not displayed, select [SSID] t Input using the keyboard t . 6 Select the designated...
...Network] t t [ Network Settings] t . If you want to use t . Setting the wireless network A wireless LAN function is displayed t . Connect the camera to a network via an access point. 1 Press the POWER button to step 8. 18 POWER button 3 Touch [Time Zone] t t region in which you ...Create New] t [Auto Scan] t t access point you have selected [Disable], proceed to turn on the camera. The SSID information confirmation screen is displayed. 5 Confirm the SSID is equipped with this camera. If the SSID is not displayed, select [SSID] t Input using the keyboard t . 6 Select the designated...

Instruction Manual
Page 19
An internet service provider (ISP) contract - Access point setting information (SSID) • If you do not operate the camera for about three minutes, the camera may disconnect from the network automatically to save battery power. Access point or wireless router - zUsing the keyboard When manual character ...input is the display language of the camera. 19 When you do not know the settings to make, be sure to check with the person who set up the access point, ...
An internet service provider (ISP) contract - Access point setting information (SSID) • If you do not operate the camera for about three minutes, the camera may disconnect from the network automatically to save battery power. Access point or wireless router - zUsing the keyboard When manual character ...input is the display language of the camera. 19 When you do not know the settings to make, be sure to check with the person who set up the access point, ...

Instruction Manual
Page 20
... to zoom in focus, a beep sounds and the z indicator lights. • The shortest shooting distance is in . Press the frame on . 2 Hold the camera steady as illustrated. The camera is shot. 20 Shutter button SteadyShot mark AE/AF lock The image is turned on the LCD screen with your thumb until it...
... to zoom in focus, a beep sounds and the z indicator lights. • The shortest shooting distance is in . Press the frame on . 2 Hold the camera steady as illustrated. The camera is shot. 20 Shutter button SteadyShot mark AE/AF lock The image is turned on the LCD screen with your thumb until it...

Instruction Manual
Page 21
...images Press the shutter button halfway down. x Turning off the camera Close the lens cover. • You can also turn off the camera by pressing the POWER button. 21 x Selecting next/previous image Touch (Next)/ (Previous) on this camera, view the images in [Folder View] (page 36). ...The last image shot is displayed. • When images on the "Memory Stick Duo" recorded with other cameras cannot be played back on the screen. Shooting/viewing images Viewing images...
...images Press the shutter button halfway down. x Turning off the camera Close the lens cover. • You can also turn off the camera by pressing the POWER button. 21 x Selecting next/previous image Touch (Next)/ (Previous) on this camera, view the images in [Folder View] (page 36). ...The last image shot is displayed. • When images on the "Memory Stick Duo" recorded with other cameras cannot be played back on the screen. Shooting/viewing images Viewing images...

Instruction Manual
Page 22
...can also organize large numbers of images using the desired View Mode and easily search through them anytime using the camera. 1 Export images to the camera and view them . Shooting/viewing images Storing images The camera has an approximately 4GB internal memory that can play back images stored in the... camera using "PMB". • For details on the computer connection or "PMB", see page 42. x Viewing stored images You can store many images....
...can also organize large numbers of images using the desired View Mode and easily search through them anytime using the camera. 1 Export images to the camera and view them . Shooting/viewing images Storing images The camera has an approximately 4GB internal memory that can play back images stored in the... camera using "PMB". • For details on the computer connection or "PMB", see page 42. x Viewing stored images You can store many images....

Instruction Manual
Page 26
... are showing. 26 When the smile level exceeds the b point on the indicator, the camera shoots images automatically. Face Detection frame Smile Detection Sensitivity indicator zHints for better capturing of the camera and be as level as possible. Detecting smiles and shooting automatically (Smile Shutter) 1 Touch... detecting a smile. When you touch (Smile icon) again, Smile Shutter ends. • If you press the shutter button during Smile Shutter, the camera shoots the image in front of smiles 1 Do not cover the eyes with the bangs. 2 Try to detect when the teeth are narrowed. 3 ...
... are showing. 26 When the smile level exceeds the b point on the indicator, the camera shoots images automatically. Face Detection frame Smile Detection Sensitivity indicator zHints for better capturing of the camera and be as level as possible. Detecting smiles and shooting automatically (Smile Shutter) 1 Touch... detecting a smile. When you touch (Smile icon) again, Smile Shutter ends. • If you press the shutter button during Smile Shutter, the camera shoots the image in front of smiles 1 Do not cover the eyes with the bangs. 2 Try to detect when the teeth are narrowed. 3 ...

Instruction Manual
Page 27
...(Auto Adjustment) t or . In addition, when the camera recognizes (Twilight), (Twilight Portrait), (Twilight using a tripod), (Backlight), (Backlight Portrait), (Landscape), (Macro) or (Portrait) appears. zWhen the camera recognizes the scene When the camera recognizes the scene. (Twilight), (Twilight Portrait), (Twilight ... Portrait), it switches to the optimal settings and shoots the image. (Advanced): When the camera recognizes the scene, it shoots another image. When the camera recognizes (Portrait), Anti Blink operates. Scene Recognition icon Setting value icon 27 t (Scene ...
...(Auto Adjustment) t or . In addition, when the camera recognizes (Twilight), (Twilight Portrait), (Twilight using a tripod), (Backlight), (Backlight Portrait), (Landscape), (Macro) or (Portrait) appears. zWhen the camera recognizes the scene When the camera recognizes the scene. (Twilight), (Twilight Portrait), (Twilight ... Portrait), it switches to the optimal settings and shoots the image. (Advanced): When the camera recognizes the scene, it shoots another image. When the camera recognizes (Portrait), Anti Blink operates. Scene Recognition icon Setting value icon 27 t (Scene ...

Instruction Manual
Page 28
...Self-Timer) t desired mode t . (Off): Not using the self-timer. (Self-Timer 10sec): Shooting starts after a two-second delay. Normally, put the camera in this setting if you want to include yourself in the image. Set Macro On when shooting close -up. To cancel, touch . (Self-Timer 2sec... You can shoot beautiful close-up images of small subjects such as insects or flowers. 1 Touch (Macro) t desired mode t . (Auto): The camera adjusts the focus automatically from distant subjects to close subjects. (Close focus enabled): Use this mode to shoot at even closer distances than Macro recording...
...Self-Timer) t desired mode t . (Off): Not using the self-timer. (Self-Timer 10sec): Shooting starts after a two-second delay. Normally, put the camera in this setting if you want to include yourself in the image. Set Macro On when shooting close -up. To cancel, touch . (Self-Timer 2sec... You can shoot beautiful close-up images of small subjects such as insects or flowers. 1 Touch (Macro) t desired mode t . (Auto): The camera adjusts the focus automatically from distant subjects to close subjects. (Close focus enabled): Use this mode to shoot at even closer distances than Macro recording...
Instruction Manual
Page 30
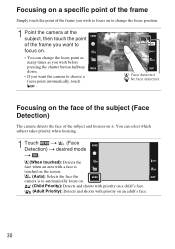
...(Face Detection) t desired mode t . (When touched): Detects the face when an area with a face is touched on the screen. (Auto): Selects the face the camera is to choose a focus point automatically, touch . : Face detected. : No face detected. Focusing on a specific point of the frame Simply touch the point of the...to change the focus point as many times as you wish before pressing the shutter button halfway down. • If you want the camera to automatically focus on. (Child Priority): Detects and shoots with priority on a child's face. (Adult Priority): Detects and shoots with priority ...
...(Face Detection) t desired mode t . (When touched): Detects the face when an area with a face is touched on the screen. (Auto): Selects the face the camera is to choose a focus point automatically, touch . : Face detected. : No face detected. Focusing on a specific point of the frame Simply touch the point of the...to change the focus point as many times as you wish before pressing the shutter button halfway down. • If you want the camera to automatically focus on. (Child Priority): Detects and shoots with priority on a child's face. (Adult Priority): Detects and shoots with priority ...

Instruction Manual
Page 32
... [Normal]. (Units: Images) Capacity Internal memory "Memory Stick Duo" formatted with the size set to only a "Memory Stick PRO Duo". • This camera does not support HD recordings or playbacks for all movie files. These are the total times for movies. • When an image shot with other... of images when [REC Mode] is greater than 9,999, the ">9999" indicator appears. • When using a "Memory Stick Duo", movies with this camera, the image may vary depending on the shooting conditions and the recording media. • When the number of movies may not appear in the actual...
... [Normal]. (Units: Images) Capacity Internal memory "Memory Stick Duo" formatted with the size set to only a "Memory Stick PRO Duo". • This camera does not support HD recordings or playbacks for all movie files. These are the total times for movies. • When an image shot with other... of images when [REC Mode] is greater than 9,999, the ">9999" indicator appears. • When using a "Memory Stick Duo", movies with this camera, the image may vary depending on the shooting conditions and the recording media. • When the number of movies may not appear in the actual...

Instruction Manual
Page 34
... your computer (page 43), then follow the steps below. 1 Touch t (View Images 2) t [Music Tool] t [Download Music]. 2 Make a USB connection between the camera and your CDs or MP3 files to the camera to play back during slideshow. zSelecting background music You can transfer a desired music file from your computer. 3 Start and operate "Music...
... your computer (page 43), then follow the steps below. 1 Touch t (View Images 2) t [Music Tool] t [Download Music]. 2 Make a USB connection between the camera and your CDs or MP3 files to the camera to play back during slideshow. zSelecting background music You can transfer a desired music file from your computer. 3 Start and operate "Music...


