Operating Instructions
Page 2
...Center. Increase the separation between the equipment and receiver. - Consult the dealer or an experienced radio/TV technician for a Class B digital device, pursuant to comply with the same or equivalent type recommended by the manufacturer. You are designed to radio communications. and CANADA...a residential installation. For the SONY Factory Service Center nearest you call 416-499-SONY (Canada only). Note: In some areas the disposal of used in accordance with the instructions, may be determined by one or more of explosion if battery is no guarantee that interference ...
...Center. Increase the separation between the equipment and receiver. - Consult the dealer or an experienced radio/TV technician for a Class B digital device, pursuant to comply with the same or equivalent type recommended by the manufacturer. You are designed to radio communications. and CANADA...a residential installation. For the SONY Factory Service Center nearest you call 416-499-SONY (Canada only). Note: In some areas the disposal of used in accordance with the instructions, may be determined by one or more of explosion if battery is no guarantee that interference ...
Operating Instructions
Page 3
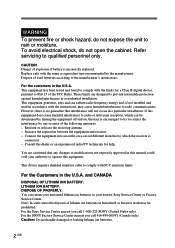
... 20 LCD Monitor 21 Viewfinder 22 Preparations Charging the Battery Pack 23 Installation of the Battery Pack 24 Setting the Time and Date 26 Preparing the Card 28 Initializing a Card 30 Attaching the Viewfinder Cap 31 Attaching the Neck Strap Belt 32 Putting the Camera in a Semi-Soft Case ........ 33 Taking a Picture Taking...
... 20 LCD Monitor 21 Viewfinder 22 Preparations Charging the Battery Pack 23 Installation of the Battery Pack 24 Setting the Time and Date 26 Preparing the Card 28 Initializing a Card 30 Attaching the Viewfinder Cap 31 Attaching the Neck Strap Belt 32 Putting the Camera in a Semi-Soft Case ........ 33 Taking a Picture Taking...
Operating Instructions
Page 5
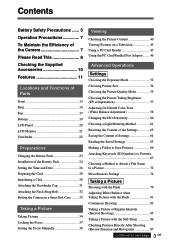
... below to battery packs) • Only charge the battery with the same or equivalent type recommended by the manufacturer. NOTES • Be sure the + or - signs are aligned correctly when inserting the battery. • Remove the battery when it is empty or if the camera is incorrectly replaced. If battery leakage occurs, wipe the battery case dry...
... below to battery packs) • Only charge the battery with the same or equivalent type recommended by the manufacturer. NOTES • Be sure the + or - signs are aligned correctly when inserting the battery. • Remove the battery when it is empty or if the camera is incorrectly replaced. If battery leakage occurs, wipe the battery case dry...
Operating Instructions
Page 6
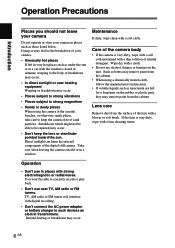
...digital still camera. TV, AM radio or FM tuners will interfere with a lens cleaning tissue. Take care when leaving the camera outside or in places such as those listed below. Care of the camera body • If the camera is very dirty, wipe with digital recording. • Don't connect the AC power adaptor or battery... record or play back. • Don't use in places with the windows closed in summer, warping to the breakdown of your camera in a window. Such solvents may remove paint from the cabinet. Operation • Don't use near heating equipment Warping or breakdown may...
...digital still camera. TV, AM radio or FM tuners will interfere with a lens cleaning tissue. Take care when leaving the camera outside or in places such as those listed below. Care of the camera body • If the camera is very dirty, wipe with digital recording. • Don't connect the AC power adaptor or battery... record or play back. • Don't use in places with the windows closed in summer, warping to the breakdown of your camera in a window. Such solvents may remove paint from the cabinet. Operation • Don't use near heating equipment Warping or breakdown may...
Operating Instructions
Page 8
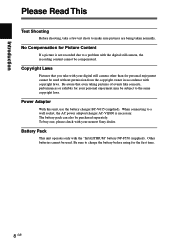
...take with your nearest Sony dealer. No Compensation for personal enjoyment cannot be purchased separately. Battery Pack This unit operates only with the digital still camera, the recording content cannot be used without permission from the copyright owner in accordance with your digital still camera other than for Picture ... for the first time. 8 GB Be aware that you take a few test shots to a problem with the "InfoLITHIUM" battery NP-F550 (supplied). Power Adaptor With this unit, use the battery charger BC-V615 (supplied). When connecting to a wall socket, the AC power ...
...take with your nearest Sony dealer. No Compensation for personal enjoyment cannot be purchased separately. Battery Pack This unit operates only with the digital still camera, the recording content cannot be used without permission from the copyright owner in accordance with your digital still camera other than for Picture ... for the first time. 8 GB Be aware that you take a few test shots to a problem with the "InfoLITHIUM" battery NP-F550 (supplied). Power Adaptor With this unit, use the battery charger BC-V615 (supplied). When connecting to a wall socket, the AC power ...
Operating Instructions
Page 10
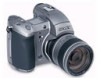
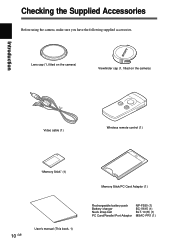
Checking the Supplied Accessories Before using the camera, make sure you have the following supplied accessories. Lens cap (1, fitted on the camera) Viewfinder cap (1, fitted on the camera) Introduction Video cable (1) Wireless remote control (1) "Memory Stick" (1) 10 GB User's manual (This book, 1) Memory Stick/PC Card Adaptor (1) Rechargeable battery pack Battery charger Neck strap belt PC Card/Parallel Port Adaptor NP-F550 (1) BC-V615 (1) BLT-10(H) (1) MSAC-PR1 (1)
Checking the Supplied Accessories Before using the camera, make sure you have the following supplied accessories. Lens cap (1, fitted on the camera) Viewfinder cap (1, fitted on the camera) Introduction Video cable (1) Wireless remote control (1) "Memory Stick" (1) 10 GB User's manual (This book, 1) Memory Stick/PC Card Adaptor (1) Rechargeable battery pack Battery charger Neck strap belt PC Card/Parallel Port Adaptor NP-F550 (1) BC-V615 (1) BLT-10(H) (1) MSAC-PR1 (1)
Operating Instructions
Page 12
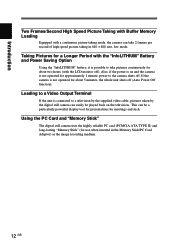
... not operated for approximately 1 minute, power to a television by the supplied video cable, pictures taken by the digital still camera can easily be a particularly powerful display tool for presentations for meetings and such. Loading to a Video Output Terminal If the unit ... played back on the television. If the camera is not operated for a Longer Period with the "InfoLITHIUM" Battery and Power Saving Option Using the "InfoLITHIUM" battery, it is connected to the camera shuts off. Using the PC Card and "Memory Stick" The digital still camera uses the highly reliable PC card (PCMCIA ...
... not operated for approximately 1 minute, power to a television by the supplied video cable, pictures taken by the digital still camera can easily be a particularly powerful display tool for presentations for meetings and such. Loading to a Video Output Terminal If the unit ... played back on the television. If the camera is not operated for a Longer Period with the "InfoLITHIUM" Battery and Power Saving Option Using the "InfoLITHIUM" battery, it is connected to the camera shuts off. Using the PC Card and "Memory Stick" The digital still camera uses the highly reliable PC card (PCMCIA ...

Operating Instructions
Page 19
Standards are as listed below. Locations and Functions of Parts Bottom 3 1 2 1 Tripod Hole Attach a tripod here. ISO Standard l=4.5mm +/- 0.2mm ASA Standard l=0.197 inch 2 Battery Cover Open or close this cover to insert or take out the battery pack. 3 Battery Cover Lock Slide this lock to insert or take out the battery pack. 19 GB
Standards are as listed below. Locations and Functions of Parts Bottom 3 1 2 1 Tripod Hole Attach a tripod here. ISO Standard l=4.5mm +/- 0.2mm ASA Standard l=0.197 inch 2 Battery Cover Open or close this cover to insert or take out the battery pack. 3 Battery Cover Lock Slide this lock to insert or take out the battery pack. 19 GB

Operating Instructions
Page 20
... Flash mode Interval/self-timer/ single picture/continuous picture taking indicator PLAY Mode Picture number Focus mode EV compensation Aperture Battery indicator Picture size Card indicator Picture quality WB (white balance) mode Battery indicator Card indicator 20 GB Note In CAM mode, when the release button is displayed as 99. Because the... is changed in two spaces, any time over 99 minutes is pressed while pressing the shift button, the shutter speed indicator changes to the remaining shot number indicator and the aperture indicator changes to remaining shooting time.
... Flash mode Interval/self-timer/ single picture/continuous picture taking indicator PLAY Mode Picture number Focus mode EV compensation Aperture Battery indicator Picture size Card indicator Picture quality WB (white balance) mode Battery indicator Card indicator 20 GB Note In CAM mode, when the release button is displayed as 99. Because the... is changed in two spaces, any time over 99 minutes is pressed while pressing the shift button, the shutter speed indicator changes to the remaining shot number indicator and the aperture indicator changes to remaining shooting time.

Operating Instructions
Page 21
...Date/Time Aperture Shutter speed * Usually remaining playback time is displayed. When the battery gets weak, the battery indicator illuminates. Usually the remaining shooting time is displayed. When the battery gets weak, the battery indicator illuminates. You can also choose from Guide90 or Guide0 (Page 76). *2...1234/12345 0 0.25EV 2000 F4.0 AF focusing indicator Picture number Picture size/quality Frame (AE frame)*1 Battery indicator (/Remaining shooting time*2) Remaining shot number Aperture Shutter speed EV compensation *1 The illustration above shows the monitor in AE frame.
...Date/Time Aperture Shutter speed * Usually remaining playback time is displayed. When the battery gets weak, the battery indicator illuminates. Usually the remaining shooting time is displayed. When the battery gets weak, the battery indicator illuminates. You can also choose from Guide90 or Guide0 (Page 76). *2...1234/12345 0 0.25EV 2000 F4.0 AF focusing indicator Picture number Picture size/quality Frame (AE frame)*1 Battery indicator (/Remaining shooting time*2) Remaining shot number Aperture Shutter speed EV compensation *1 The illustration above shows the monitor in AE frame.

Operating Instructions
Page 23
... continuous general photography at 20˚C (68˚F) with the flash off. Preparations Preparations Charging the Battery Pack Charge the battery pack using the camera for the first time, you need to charge the battery pack. Charge the battery when necessary, as indicated by repeatedly turning the power on and off LCD monitor on the...
... continuous general photography at 20˚C (68˚F) with the flash off. Preparations Preparations Charging the Battery Pack Charge the battery pack using the camera for the first time, you need to charge the battery pack. Charge the battery when necessary, as indicated by repeatedly turning the power on and off LCD monitor on the...
Operating Instructions
Page 24
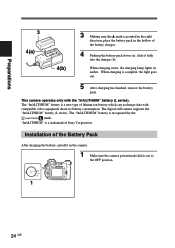
...video equipment about its battery consumption. The digital still camera supports the "InfoLITHIUM" battery (L series). When charging is recognized by the mark. The "InfoLITHIUM" battery is a new type of the Battery Pack After charging the battery, install it fully into the charger (b). The "InfoLITHIUM" battery is complete, the... AE-LOCK R-REVIEW DISP INDEX LCD 1 Make sure the camera power/mode dial is set to the OFF position. 24 GB Preparations 3 4(a) 4(b) 3 Making sure the 4 mark is pointed in the right direction, place the battery pack in the hollow of Sony Corporation.
...video equipment about its battery consumption. The digital still camera supports the "InfoLITHIUM" battery (L series). When charging is recognized by the mark. The "InfoLITHIUM" battery is a new type of the Battery Pack After charging the battery, install it fully into the charger (b). The "InfoLITHIUM" battery is complete, the... AE-LOCK R-REVIEW DISP INDEX LCD 1 Make sure the camera power/mode dial is set to the OFF position. 24 GB Preparations 3 4(a) 4(b) 3 Making sure the 4 mark is pointed in the right direction, place the battery pack in the hollow of Sony Corporation.

Operating Instructions
Page 25
Removing the Battery 1 Make sure the camera power/mode dial is set to the OFF position. 2 Slide the battery cover lock in place. 3 4 Close the battery cover. Preparations 2(a) 2 Slide the battery cover lock in the direction of the 4 mark (a), and open the battery cover (b). 2(b) 3 Insert the battery 4 mark side first until it firmly locks in the direction of the 4 mark and open the battery cover. 3 3 Rotate the battery cover lock to the outside and remove the battery pack. 25 GB
Removing the Battery 1 Make sure the camera power/mode dial is set to the OFF position. 2 Slide the battery cover lock in place. 3 4 Close the battery cover. Preparations 2(a) 2 Slide the battery cover lock in the direction of the 4 mark (a), and open the battery cover (b). 2(b) 3 Insert the battery 4 mark side first until it firmly locks in the direction of the 4 mark and open the battery cover. 3 3 Rotate the battery cover lock to the outside and remove the battery pack. 25 GB
Operating Instructions
Page 27
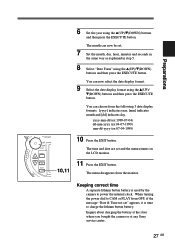
You can choose from the monitor. Keeping correct time A separate lithium button battery is time to power the internal clock. EXCUTE 11 Press the EXIT button....PLAY from OFF, if the message "Date & Time not set" appears, it is used by the camera to charge the lithium button battery. The month can now select the date display format. 9 Select the date display format using the 4(UP... set and the menu returns on MENU the LCD monitor. Inquire about charging the battery at the store where you bought the camera or at any Sony service center. 27 GB yyyy-mm-dd (ex:1999-07-04) dd-mm-...
You can choose from the monitor. Keeping correct time A separate lithium button battery is time to power the internal clock. EXCUTE 11 Press the EXIT button....PLAY from OFF, if the message "Date & Time not set" appears, it is used by the camera to charge the lithium button battery. The month can now select the date display format. 9 Select the date display format using the 4(UP... set and the menu returns on MENU the LCD monitor. Inquire about charging the battery at the store where you bought the camera or at any Sony service center. 27 GB yyyy-mm-dd (ex:1999-07-04) dd-mm-...
Operating Instructions
Page 103
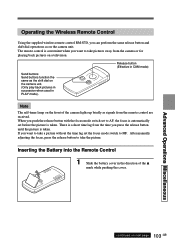
...Release button (Effective in CAM mode) Note The self-timer lamp on the camera unit. (Only play back pictures in succession when used in the direction of the camera lights up briefly as on the camera unit. There is a short time lag from the time you press the ...The remote control is taken. After manually adjusting the focus, press the release button to take the picture. Inserting the Battery into the Remote Control 1 Slide the battery cover in PLAY mode). Operating the Wireless Remote Control Using the supplied wireless remote control RM-S7D, you can perform the...
...Release button (Effective in CAM mode) Note The self-timer lamp on the camera unit. (Only play back pictures in succession when used in the direction of the camera lights up briefly as on the camera unit. There is a short time lag from the time you press the ...The remote control is taken. After manually adjusting the focus, press the release button to take the picture. Inserting the Battery into the Remote Control 1 Slide the battery cover in PLAY mode). Operating the Wireless Remote Control Using the supplied wireless remote control RM-S7D, you can perform the...

Operating Instructions
Page 104
2 Insert a lithium button battery CR2025 into the wall socket. 1 1 104 GB Advanced Operations Miscellaneous Using a Wall Socket To take or play back pictures without using a battery, plug the camera into a wall socket using the battery charger AC-VQ800 (not supplied) and DC power cable DK-415 (supplied with the AC-VQ800). 2 1 Connect the DC power cable and the AC power cable to the battery charger. 2 Plug the AC plug from the power cable into the battery case, making sure the + (plus) side is visible. 3 Return the battery cover to its original position.
2 Insert a lithium button battery CR2025 into the wall socket. 1 1 104 GB Advanced Operations Miscellaneous Using a Wall Socket To take or play back pictures without using a battery, plug the camera into a wall socket using the battery charger AC-VQ800 (not supplied) and DC power cable DK-415 (supplied with the AC-VQ800). 2 1 Connect the DC power cable and the AC power cable to the battery charger. 2 Plug the AC plug from the power cable into the battery case, making sure the + (plus) side is visible. 3 Return the battery cover to its original position.

Operating Instructions
Page 105
3 •OFF •CAM •PLAY •OFF •CAM •PLAY MENU EXCUTE EXIT AE-LOCK R-REVIEW DISP INDEX LCD 3 Make sure the power/mode dial on the camera is set to OFF. 4 Slide the battery cover lock in the direction of the 4 mark (a), and open the battery cover (b). 4 (a) 5 Remove the rubber from inside the battery cover. 4 (b) 6 Insert the DC power cable connector 4 mark side first into the battery case until it locks firmly into place. 6 7 Put the cable into the battery cover groove and close the battery cover. Advanced Operations Miscellaneous 105 GB
3 •OFF •CAM •PLAY •OFF •CAM •PLAY MENU EXCUTE EXIT AE-LOCK R-REVIEW DISP INDEX LCD 3 Make sure the power/mode dial on the camera is set to OFF. 4 Slide the battery cover lock in the direction of the 4 mark (a), and open the battery cover (b). 4 (a) 5 Remove the rubber from inside the battery cover. 4 (b) 6 Insert the DC power cable connector 4 mark side first into the battery case until it locks firmly into place. 6 7 Put the cable into the battery cover groove and close the battery cover. Advanced Operations Miscellaneous 105 GB
Operating Instructions
Page 112
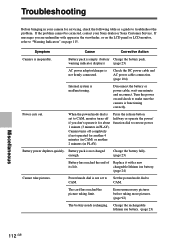
Symptom Cause Corrective Action Camera is not firmly connected. Disconnect the battery or power cable, wait one minute and reconnect. Turn the power on page 115. Charge the battery fully. (page 23) Battery has reached the end of Replace it for servicing, check the ...Set the power/mode dial to make sure the camera is malfunctioning. CAM. Battery power depletes quickly. Troubleshooting Before bringing in your Sony dealer or Sony Customer Service. If the problem cannot be corrected, contact your camera for about 1 minute (3 minutes in the viewfinder,...
Symptom Cause Corrective Action Camera is not firmly connected. Disconnect the battery or power cable, wait one minute and reconnect. Turn the power on page 115. Charge the battery fully. (page 23) Battery has reached the end of Replace it for servicing, check the ...Set the power/mode dial to make sure the camera is malfunctioning. CAM. Battery power depletes quickly. Troubleshooting Before bringing in your Sony dealer or Sony Customer Service. If the problem cannot be corrected, contact your camera for about 1 minute (3 minutes in the viewfinder,...

Operating Instructions
Page 114
...itself is interference on the card. Insert a card in the camera. There is write-protected. Change the picture quality or erase unnecessary pictures. background and the subject. The battery needs to OFF. Check the remaining shot number and try again. (pages 55, 92) Files names... for pictures recorded on the card. Install a new card and specify a starting number other than 99999. The camera is near equipment with strong ...
...itself is interference on the card. Insert a card in the camera. There is write-protected. Change the picture quality or erase unnecessary pictures. background and the subject. The battery needs to OFF. Check the remaining shot number and try again. (pages 55, 92) Files names... for pictures recorded on the card. Install a new card and specify a starting number other than 99999. The camera is near equipment with strong ...

Operating Instructions
Page 115
... No Shot Available If you press the release button when the picture file on the LCD monitor changes to the indicator.* * When using the AC power adaptor/charger, this indicator, erase pictures from the file or insert a new card. Low Battery Charge Indicator When the battery voltage becomes low, the remaining battery time indicator...
... No Shot Available If you press the release button when the picture file on the LCD monitor changes to the indicator.* * When using the AC power adaptor/charger, this indicator, erase pictures from the file or insert a new card. Low Battery Charge Indicator When the battery voltage becomes low, the remaining battery time indicator...


