
Operating Instructions
Page 4
... mentioned in each case in the leaflet. On the illustrations and screen shot used in this manual are of the DPP-FP95 unless noted otherwise. 4 GB Other trademarks and trade names are those of their respective companies. Any design data such... , "Memory Stick-ROM," , "MagicGate," and are trademarks of Sony Corporation. • HDMI, , and High-Definition Multimedia Interface are trademarks or registered trademarks of HDMI Licensing LLC. • Microsoft, Windows, Windows Vista and DirectX are either registered trademarks or trademarks of Microsoft Corporation in...
... mentioned in each case in the leaflet. On the illustrations and screen shot used in this manual are of the DPP-FP95 unless noted otherwise. 4 GB Other trademarks and trade names are those of their respective companies. Any design data such... , "Memory Stick-ROM," , "MagicGate," and are trademarks of Sony Corporation. • HDMI, , and High-Definition Multimedia Interface are trademarks or registered trademarks of HDMI Licensing LLC. • Microsoft, Windows, Windows Vista and DirectX are either registered trademarks or trademarks of Microsoft Corporation in...
Operating Instructions
Page 9
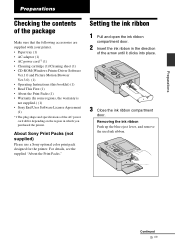
...• Paper tray (1) • AC adaptor (1) • AC power cord*1 (1) • Cleaning cartridge (1)/Cleaning sheet (1) • CD-ROM (Windows Printer Driver Software Ver.1.0 and Picture Motion Browser Ver.3.0) (1) • Operating Instructions (this booklet) (1) • Read This First (1) • About ...the Print Packs (1) • Warranty (In some regions, the warranty is not supplied.) (1) • Sony End User Software License Agreement (1) *1 The plug shape and specifications of the arrow until it clicks into place. 3 Close the ink ribbon ...
...• Paper tray (1) • AC adaptor (1) • AC power cord*1 (1) • Cleaning cartridge (1)/Cleaning sheet (1) • CD-ROM (Windows Printer Driver Software Ver.1.0 and Picture Motion Browser Ver.3.0) (1) • Operating Instructions (this booklet) (1) • Read This First (1) • About ...the Print Packs (1) • Warranty (In some regions, the warranty is not supplied.) (1) • Sony End User Software License Agreement (1) *1 The plug shape and specifications of the arrow until it clicks into place. 3 Close the ink ribbon ...

Operating Instructions
Page 23
... the range of light with the colorpick tool. 2Press g/G/f/F to specify the portion that you have selected "Cross Filter," "Painting," or "Single Color," the setting window is displayed with f/F, and then press ENTER. x Cross Filter 1Select "Level" with f/F and press ENTER, adjust the level with a fish-eye lens. 3 Press ENTER. Tip...
... the range of light with the colorpick tool. 2Press g/G/f/F to specify the portion that you have selected "Cross Filter," "Painting," or "Single Color," the setting window is displayed with f/F, and then press ENTER. x Cross Filter 1Select "Level" with f/F and press ENTER, adjust the level with a fish-eye lens. 3 Press ENTER. Tip...
Operating Instructions
Page 26
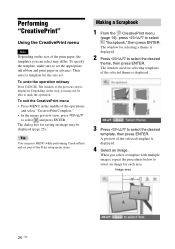
... CreativePrint and set . To specify the template, make sure to select and press ENTER. To exit the CreativePrint menu • Press MENU in advance. The window used for saving an image may differ. Image area 26 GB Depending on the size of the selected theme is displayed. 3 Press g/G/f/F to select an... displayed (page 25). A preview of the previous step is displayed. 4 Select an image. Tip You can select may be able to undo the operation. The window for each area. To undo the operation midway Press CANCEL The...
... CreativePrint and set . To specify the template, make sure to select and press ENTER. To exit the CreativePrint menu • Press MENU in advance. The window used for saving an image may differ. Image area 26 GB Depending on the size of the selected theme is displayed. 3 Press g/G/f/F to select an... displayed (page 25). A preview of the previous step is displayed. 4 Select an image. Tip You can select may be able to undo the operation. The window for each area. To undo the operation midway Press CANCEL The...

Operating Instructions
Page 27
..., or showing the red-eye phenomenon, when the button on the printer are pressed. To add a stamp, see page 25. The window used for adjusting the image is displayed. Making a Calendar 1 From the CreativePrint menu (page 19), press g/G/f/F to select the desired ...adjustment item, then press ENTER. The window used for selecting the calendar template, is pressed.(page 20) 6 Press g/G to the image area. Automatically adjusts a failed photo having problems...
..., or showing the red-eye phenomenon, when the button on the printer are pressed. To add a stamp, see page 25. The window used for adjusting the image is displayed. Making a Calendar 1 From the CreativePrint menu (page 19), press g/G/f/F to select the desired ...adjustment item, then press ENTER. The window used for selecting the calendar template, is pressed.(page 20) 6 Press g/G to the image area. Automatically adjusts a failed photo having problems...

Operating Instructions
Page 28
...the week (placed furthest left in the similar procedures. Then press ENTER. Modify You can set "Date color" in the calendar). The stamp selection window is displayed. 2Press g/G/f/F to select a desired stamp, and press ENTER. 2Press f/F to select the item that you adjust an image, the image ...a desired date for each area. Item Start Y/M Start Day Settings/Procedures Set the first month and the year starting the calendar. The calendar setting window is displayed. 4 Adjust the image. Press g/G to select the month or year and press f/F to set the number. For how to be ...
...the week (placed furthest left in the similar procedures. Then press ENTER. Modify You can set "Date color" in the calendar). The stamp selection window is displayed. 2Press g/G/f/F to select a desired stamp, and press ENTER. 2Press f/F to select the item that you adjust an image, the image ...a desired date for each area. Item Start Y/M Start Day Settings/Procedures Set the first month and the year starting the calendar. The calendar setting window is displayed. 4 Adjust the image. Press g/G to select the month or year and press f/F to set the number. For how to be ...

Operating Instructions
Page 29
...the image, see step 5 on a memory card. 1 From the CreativePrint menu (page 19), press g/G/f/F to be superimposed is displayed. Preview window is displayed in advance. Continued 29 GB To add a stamp, see "Superimposing a stamp" on a sheet of handwritten characters or illustrations you do...to trim a message, press ENTER. x To superimpose a handwritten message 1Press g/G to select an image for background, then press ENTER. The window used for selecting an image to select "Superimpose," then press ENTER. The trimming cursor is displayed. 2 Select an image for the background....
...the image, see step 5 on a memory card. 1 From the CreativePrint menu (page 19), press g/G/f/F to be superimposed is displayed. Preview window is displayed in advance. Continued 29 GB To add a stamp, see "Superimposing a stamp" on a sheet of handwritten characters or illustrations you do...to trim a message, press ENTER. x To superimpose a handwritten message 1Press g/G to select an image for background, then press ENTER. The window used for selecting an image to select "Superimpose," then press ENTER. The trimming cursor is displayed. 2 Select an image for the background....

Operating Instructions
Page 30
... for adjusting the message is displayed. A preview of the superimposed message on page 27. 5Press g/G to select and press ENTER. The color selection window is displayed. 30 GB For how to adjust an image, see step 5 on the background image is displayed. 3Press g/G/f/F to select the desired ...message and press ENTER. For how to adjust an image, see step 5 on the background image is displayed. The window used for adjusting the superimposed image is displayed. 4Press g/G/f/F to select trimming tool, and press ENTER. The color selection...
... for adjusting the message is displayed. A preview of the superimposed message on page 27. 5Press g/G to select and press ENTER. The color selection window is displayed. 30 GB For how to adjust an image, see step 5 on the background image is displayed. 3Press g/G/f/F to select the desired ...message and press ENTER. For how to adjust an image, see step 5 on the background image is displayed. The window used for adjusting the superimposed image is displayed. 4Press g/G/f/F to select trimming tool, and press ENTER. The color selection...

Operating Instructions
Page 31
... to select and press ENTER. To superimpose multiple handwritten characters or preset messages Press g/G to select (Stamp), then press ENTER. The window used for selecting a stamp is displayed. Continued 31 GB Direct printing x Superimposing a stamp 1Press g/G to select (Handwritten message) or ...(Standard format message) and repeat step 3. The window for adjusting the stamp is displayed. 2Press g/G/f/F to select the desired image, then press ENTER. The index view is displayed. To add...
... to select and press ENTER. To superimpose multiple handwritten characters or preset messages Press g/G to select (Stamp), then press ENTER. The window used for selecting a stamp is displayed. Continued 31 GB Direct printing x Superimposing a stamp 1Press g/G to select (Handwritten message) or ...(Standard format message) and repeat step 3. The window for adjusting the stamp is displayed. 2Press g/G/f/F to select the desired image, then press ENTER. The index view is displayed. To add...

Operating Instructions
Page 32
... select an image, see step 5 on page 31. 5 Press PRINT. For how to select the desired template, then press ENTER. When you select image(s), the window for each area. You can set the size or unit and then press ENTER. 4 If you select a template with multiple images, select an image for... the photo frame. • To specify the width: Select the figure box in the upper of an ID Photo is displayed. 4 Adjust an image. The window for setting the height and width of the photo frame. 3 Press f/F to select and press ENTER. Making layout prints 1 From the CreativePrint menu (page 19...
... select an image, see step 5 on page 31. 5 Press PRINT. For how to select the desired template, then press ENTER. When you select image(s), the window for each area. You can set the size or unit and then press ENTER. 4 If you select a template with multiple images, select an image for... the photo frame. • To specify the width: Select the figure box in the upper of an ID Photo is displayed. 4 Adjust an image. The window for setting the height and width of the photo frame. 3 Press f/F to select and press ENTER. Making layout prints 1 From the CreativePrint menu (page 19...
Operating Instructions
Page 33
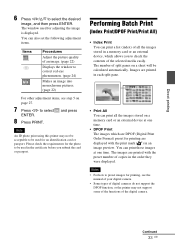
...with the preset number of split panes on page 27. 7 Press g/G to select the desired image, and then press ENTER. Continued 33 GB The window used for adjusting the image is displayed. Performing Batch Print (Index Print/DPOF Print/Print All) • Index Print You can print all the ...images at one time. You can also set the following adjustment items. Items Procedures Adjust the picture quality of an image. (page 22) Displays the window to correct red-eye phenomenon. (page 24) Makes an image into monochrome pictures. (page 22) For other adjustment items, see the manual of ...
...with the preset number of split panes on page 27. 7 Press g/G to select the desired image, and then press ENTER. Continued 33 GB The window used for adjusting the image is displayed. Performing Batch Print (Index Print/DPOF Print/Print All) • Index Print You can print all the ...images at one time. You can also set the following adjustment items. Items Procedures Adjust the picture quality of an image. (page 22) Displays the window to correct red-eye phenomenon. (page 24) Makes an image into monochrome pictures. (page 22) For other adjustment items, see the manual of ...

Operating Instructions
Page 34
... view. Viewing a slideshow Showing the slideshow 1 From the menu, press g/G to switch images. Items Manual Procedures Press g/G to select (Slideshow) and then press ENTER. The window used to cancel printing, and then press ENTER. The confirmation dialog box is displayed. Auto1 Simple The images are switched is displayed. 1 From the menu...
... view. Viewing a slideshow Showing the slideshow 1 From the menu, press g/G to switch images. Items Manual Procedures Press g/G to select (Slideshow) and then press ENTER. The window used to cancel printing, and then press ENTER. The confirmation dialog box is displayed. Auto1 Simple The images are switched is displayed. 1 From the menu...

Operating Instructions
Page 38
The setting is displayed. Note During the "CreativePrint" operations, you cannot select the items except for the selected item is displayed. 3 Press f/F to select the desired setting item, and press ENTER. The Print setup menu is fixed. The setting window for "Color Setting." (Setting items which cannot be selected and changed are displayed in gray.) 2 Press f/F to select the desired setting and press ENTER. Tip To exit the Print setup menu, press MENU. 38 GB Changing the Print setup 1 From the menu, press g/G to select (Print setup) and then press ENTER.
The setting is displayed. Note During the "CreativePrint" operations, you cannot select the items except for the selected item is displayed. 3 Press f/F to select the desired setting item, and press ENTER. The Print setup menu is fixed. The setting window for "Color Setting." (Setting items which cannot be selected and changed are displayed in gray.) 2 Press f/F to select the desired setting and press ENTER. Tip To exit the Print setup menu, press MENU. 38 GB Changing the Print setup 1 From the menu, press g/G to select (Print setup) and then press ENTER.

Operating Instructions
Page 41
... desired setting and press ENTER. The Display/Printer setup menu is fixed. Note During Edit or CreativePrint operations, some items cannot be changed . The setting window for the selected item is displayed (next page).
... desired setting and press ENTER. The Display/Printer setup menu is fixed. Note During Edit or CreativePrint operations, some items cannot be changed . The setting window for the selected item is displayed (next page).
Operating Instructions
Page 48
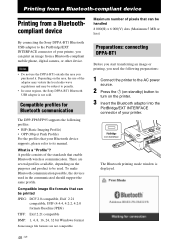
...device. Notes • Do not use of your printer, you can print an image from a Bluetoothcompliant device By connecting the Sony DPPA-BT1 Bluetooth USB adaptor to the PictBridge/EXT INTERFACE connector of the adaptor may violate the local radio wave regulations and ... into the PictBridge/EXT INTERFACE connector of the standards that enable Bluetooth wireless communication. The Bluetooth printing mode window is a "Profile"? Compatible profiles for Bluetooth communication The DPP-FP85/FP95 supports the following preparations: 1 Connect the printer to the AC power source. 2 Press the 1 (...
...device. Notes • Do not use of your printer, you can print an image from a Bluetoothcompliant device By connecting the Sony DPPA-BT1 Bluetooth USB adaptor to the PictBridge/EXT INTERFACE connector of the adaptor may violate the local radio wave regulations and ... into the PictBridge/EXT INTERFACE connector of the standards that enable Bluetooth wireless communication. The Bluetooth printing mode window is a "Profile"? Compatible profiles for Bluetooth communication The DPP-FP85/FP95 supports the following preparations: 1 Connect the printer to the AC power source. 2 Press the 1 (...
Operating Instructions
Page 49
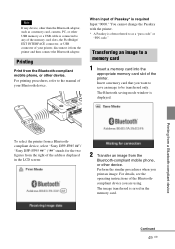
...memory card, camera, PC, or other device. Printing from a Bluetooth-compliant device To select the printer from a Bluetoothcompliant device, select "Sony DPP-FP85 ##"/ "Sony DPP-FP95 ##." ("##" stands for the two figures from the right of the address displayed in the memory card. Insert a memory card that you ..., the PictBridge/ EXT INTERFACE connector, or USB connecter of your Bluetooth device. When input of the printer. The Bluetooth saving mode window is connected to a memory card 1 Insert a memory card into the appropriate memory card slot of Passkey* is saved in the ...
...memory card, camera, PC, or other device. Printing from a Bluetooth-compliant device To select the printer from a Bluetoothcompliant device, select "Sony DPP-FP85 ##"/ "Sony DPP-FP95 ##." ("##" stands for the two figures from the right of the address displayed in the memory card. Insert a memory card that you ..., the PictBridge/ EXT INTERFACE connector, or USB connecter of your Bluetooth device. When input of the printer. The Bluetooth saving mode window is connected to a memory card 1 Insert a memory card into the appropriate memory card slot of Passkey* is saved in the ...

Operating Instructions
Page 51
...Printing from a PC Continued 51 GB Installation of the software is recommended.) Hard disk space: 400 MB or more (Depending on the Windows version you are not supported. CPU Pentium III 500MHz or faster (Pentium III 800MHz or faster is recommended.) RAM: 256 MB or... from a PC You can print the images from the PC. • Picture Motion Browser: Sony's original software application that meets the following software: • Printer driver for the DPP-FP85/FP95: The software describes the printer's requirements and enables printing from a PC by installing the supplied software...
...Printing from a PC Continued 51 GB Installation of the software is recommended.) Hard disk space: 400 MB or more (Depending on the Windows version you are not supported. CPU Pentium III 500MHz or faster (Pentium III 800MHz or faster is recommended.) RAM: 256 MB or... from a PC You can print the images from the PC. • Picture Motion Browser: Sony's original software application that meets the following software: • Printer driver for the DPP-FP85/FP95: The software describes the printer's requirements and enables printing from a PC by installing the supplied software...

Operating Instructions
Page 52
... red-eye reduction adjustment and newlyadded tone curve adjustment, the Picture Motion Browser also offers more USB devices, including other printers, are from Windows Vista, unless otherwise specified. You can when using a "Computer administrator" user account. • Be sure to your PC and the printer... between your PC, trouble may be failed. • When printing is failed, remove a USB cable and then connect it to Windows using the Cyber-shot Viewer, as the registered folders are displayed by the Picture Motion Browser. The installation procedures and the dialog boxes...
... red-eye reduction adjustment and newlyadded tone curve adjustment, the Picture Motion Browser also offers more USB devices, including other printers, are from Windows Vista, unless otherwise specified. You can when using a "Computer administrator" user account. • Be sure to your PC and the printer... between your PC, trouble may be failed. • When printing is failed, remove a USB cable and then connect it to Windows using the Cyber-shot Viewer, as the registered folders are displayed by the Picture Motion Browser. The installation procedures and the dialog boxes...
Operating Instructions
Page 53
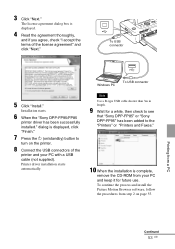
... printer and your PC and keep it for a while, then check to see that "Sony DPP-FP85" or "Sony DPP-FP95" has been added to turn on page 55. Printer driver installation starts automatically. Windows PC To USB connector Note Use a B-type USB cable shorter than 3m in length. ...9 Wait for future use. To USB connector 5 Click "Install." 3 Click "Next." Installation starts. 6 When the "Sony DPP-FP95/FP85 printer driver has been successfully installed."...
... printer and your PC and keep it for a while, then check to see that "Sony DPP-FP85" or "Sony DPP-FP95" has been added to turn on page 55. Printer driver installation starts automatically. Windows PC To USB connector Note Use a B-type USB cable shorter than 3m in length. ...9 Wait for future use. To USB connector 5 Click "Install." 3 Click "Next." Installation starts. 6 When the "Sony DPP-FP95/FP85 printer driver has been successfully installed."...
Operating Instructions
Page 54
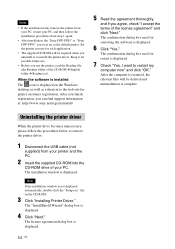
...Before you use the printer, read the Readme file (the Readme folder of the CD-ROM c English folder c Readme.txt). The installation window is displayed. 54 GB When the software is installed The icon is displayed. 6 Click "Yes." The confirmation dialog box used for restart ... want to remove the printer driver: 1 Disconnect the USB cable (not supplied) from step 1 again. • After installation, the "Sony DPP-FP85" or "Sony DPP-FP95" is complete. Keep it for removing the software is displayed on the CD-ROM. 3 Click "Installing Printer Driver." Uninstalling the printer driver...
...Before you use the printer, read the Readme file (the Readme folder of the CD-ROM c English folder c Readme.txt). The installation window is displayed. 54 GB When the software is installed The icon is displayed. 6 Click "Yes." The confirmation dialog box used for restart ... want to remove the printer driver: 1 Disconnect the USB cable (not supplied) from step 1 again. • After installation, the "Sony DPP-FP85" or "Sony DPP-FP95" is complete. Keep it for removing the software is displayed on the CD-ROM. 3 Click "Installing Printer Driver." Uninstalling the printer driver...


