Operating Instructions
Page 5
... Before you begin Identifying the parts 7 Preparations Checking the contents of the package 9 Setting the ink ribbon 9 Inserting the print paper 10 Connecting to the AC power source 12 Direct printing LCD screen display 13 An image preview 13 Image list 14 List of icons...26 Setting the print finish (Borders/ Borderless print 26 Setting the On-screen Display ....... 27 Changing the Color Setting 28 Hiding or showing the Printer information display 29 Resetting to the Default Setting ..... 29 Printing from a USB memory .......30 Printing from a PictBridge camera Printing from a PictBridge...
... Before you begin Identifying the parts 7 Preparations Checking the contents of the package 9 Setting the ink ribbon 9 Inserting the print paper 10 Connecting to the AC power source 12 Direct printing LCD screen display 13 An image preview 13 Image list 14 List of icons...26 Setting the print finish (Borders/ Borderless print 26 Setting the On-screen Display ....... 27 Changing the Color Setting 28 Hiding or showing the Printer information display 29 Resetting to the Default Setting ..... 29 Printing from a USB memory .......30 Printing from a PictBridge camera Printing from a PictBridge...
Operating Instructions
Page 6
... for Bluetooth communication 32 Printing procedures 32 Printing from a PC Printing from a PC 34 Installing the software 34 System requirements 34 Installing the printer driver 35 Uninstalling the printer driver ........ 37 Installing the Picture Motion Browser 38 Uninstalling the Picture Motion Browser 39 Printing photos from the Picture Motion Browser 39 Registering... card .......63 Specifications 63 Printing range 65 Glossary 66 Index 67 Error messages If an error display appears 45 Troubleshooting If trouble occurs 48 If paper jams 58 Cleaning 59 6 GB
... for Bluetooth communication 32 Printing procedures 32 Printing from a PC Printing from a PC 34 Installing the software 34 System requirements 34 Installing the printer driver 35 Uninstalling the printer driver ........ 37 Installing the Picture Motion Browser 38 Uninstalling the Picture Motion Browser 39 Printing photos from the Picture Motion Browser 39 Registering... card .......63 Specifications 63 Printing range 65 Glossary 66 Index 67 Error messages If an error display appears 45 Troubleshooting If trouble occurs 48 If paper jams 58 Cleaning 59 6 GB

Operating Instructions
Page 7
... details, see the pages indicated in the parentheses. Printer front panel A 1 (on/standby) button/(standby) indicator B CANCEL/ (Index View) button C MENU button D LCD screen 2.4 type DPP-FP65 3.5 type DPP-FP75 E ENTER button F Direction (g/G/f/F) buttons G (Red-eye Correction) button (.page 20) H PRINT button/indicator I Paper tray compartment (.page 10) J Paper tray compartment door K "Memory Stick PRO" (Standard...
... details, see the pages indicated in the parentheses. Printer front panel A 1 (on/standby) button/(standby) indicator B CANCEL/ (Index View) button C MENU button D LCD screen 2.4 type DPP-FP65 3.5 type DPP-FP75 E ENTER button F Direction (g/G/f/F) buttons G (Red-eye Correction) button (.page 20) H PRINT button/indicator I Paper tray compartment (.page 10) J Paper tray compartment door K "Memory Stick PRO" (Standard...

Operating Instructions
Page 8
...regions, the DPPA-BT1 Bluetooth USB adaptor is not sold.) Notes • When you use the printer, close the handle to 32) When using the DPP-FP75, set the LCD panel to this connector. Otherwise malfunctions may occur. • When using a... PictBridge-compliant digital camera, a USB memory, a Bluetooth USB adaptor (DPPA-BT1*), or other cables. B Ventilation holes C Paper outlet D DC IN 24 V jack (.page 12) Plug the supplied AC adaptor into this connector. When you carry the printer...
...regions, the DPPA-BT1 Bluetooth USB adaptor is not sold.) Notes • When you use the printer, close the handle to 32) When using the DPP-FP75, set the LCD panel to this connector. Otherwise malfunctions may occur. • When using a... PictBridge-compliant digital camera, a USB memory, a Bluetooth USB adaptor (DPPA-BT1*), or other cables. B Ventilation holes C Paper outlet D DC IN 24 V jack (.page 12) Plug the supplied AC adaptor into this connector. When you carry the printer...

Operating Instructions
Page 9
...Paper tray (1) • AC adaptor (1) • AC power cord*1 (1) • Cleaning cartridge (1)/Cleaning sheet (1) • CD-ROM (Windows Printer Driver Software Ver.1.0 and Picture Motion Browser Ver.3.0) • Operating Instructions (this booklet) • Read This First (1) • About the Print Packs (1) • Warranty (In some regions, the warranty is not supplied.) • Sony...details, see the supplied "About the Print Packs". About Sony Print Packs (not supplied) Please use a Sony optional color print pack designed for the printer. Setting the ink ribbon 1 Pull and open the ink ...
...Paper tray (1) • AC adaptor (1) • AC power cord*1 (1) • Cleaning cartridge (1)/Cleaning sheet (1) • CD-ROM (Windows Printer Driver Software Ver.1.0 and Picture Motion Browser Ver.3.0) • Operating Instructions (this booklet) • Read This First (1) • About the Print Packs (1) • Warranty (In some regions, the warranty is not supplied.) • Sony...details, see the supplied "About the Print Packs". About Sony Print Packs (not supplied) Please use a Sony optional color print pack designed for the printer. Setting the ink ribbon 1 Pull and open the ink ...

Operating Instructions
Page 11
... you are going to store partially-used print paper. Do not attach a sticker or stamps on the print paper. - When adding print paper to 20 sheets of print paper together into the printer. • To avoid paper jam or malfunctions of the printer, make the printed image thicker. - Notes on... the same paper will not make sure of the paper tray. • Avoid storing the paper with ...
... you are going to store partially-used print paper. Do not attach a sticker or stamps on the print paper. - When adding print paper to 20 sheets of print paper together into the printer. • To avoid paper jam or malfunctions of the printer, make the printed image thicker. - Notes on... the same paper will not make sure of the paper tray. • Avoid storing the paper with ...

Operating Instructions
Page 12
.../32 inches) AC power cord AC adaptor To the wall outlet To use your Printer and the AC Adaptor (supplied) in an unstable location such as on a wobbly table. • Leave enough room around the printer. The print paper emerges from the AC power source (mains) as long as it is connected to... the wall outlet, even if the printer itself has been turned off the power by . AC-S2416 Do not use your...
.../32 inches) AC power cord AC adaptor To the wall outlet To use your Printer and the AC Adaptor (supplied) in an unstable location such as on a wobbly table. • Leave enough room around the printer. The print paper emerges from the AC power source (mains) as long as it is connected to... the wall outlet, even if the printer itself has been turned off the power by . AC-S2416 Do not use your...

Operating Instructions
Page 17
...change, and change the print quantity Display the image whose print quantity you turn off the power accidentally, keep the paper tray inserted and turn off the printer while it is printed. Even if you select "0", printing is enlarged to print the previewed image. If multiple ...print quantity with f/F. Press g/G/f/F to move or turn on the printer with an input select switch. the ink ribbon or print paper may occur. • The print paper emerges a few times during the printing process. • If print paper is ready for printing. Otherwise, a malfunction may become stuck....
...change, and change the print quantity Display the image whose print quantity you turn off the power accidentally, keep the paper tray inserted and turn off the printer while it is printed. Even if you select "0", printing is enlarged to print the previewed image. If multiple ...print quantity with f/F. Press g/G/f/F to move or turn on the printer with an input select switch. the ink ribbon or print paper may occur. • The print paper emerges a few times during the printing process. • If print paper is ready for printing. Otherwise, a malfunction may become stuck....

Operating Instructions
Page 40
... taskbar. 2 Click "Start". The main window of the paper. Note: In some regions, L size print paper is not sold. • Zoom the image until the print area is displayed. 5 In the "Printer" drop-down list box, select "Sony DPP-FP65" or "Sony DPP-FP75". To print, skip to step 6. An edge of the... (print). In main window, there are using: "Sony DPP-FP65" or "Sony DPP-FP75" To change the size, click "Properties". How to the shot date and are displayed as examples. 40 GB Items Printer Paper size Print Options Functions Select the printer you can switch the display by year, by month,...
... taskbar. 2 Click "Start". The main window of the paper. Note: In some regions, L size print paper is not sold. • Zoom the image until the print area is displayed. 5 In the "Printer" drop-down list box, select "Sony DPP-FP65" or "Sony DPP-FP75". To print, skip to step 6. An edge of the... (print). In main window, there are using: "Sony DPP-FP65" or "Sony DPP-FP75" To change the size, click "Properties". How to the shot date and are displayed as examples. 40 GB Items Printer Paper size Print Options Functions Select the printer you can switch the display by year, by month,...

Operating Instructions
Page 41
...Intent settings. In the dialog boxes, there are not used within this printer. 7 In the "Layout" tab, specify the paper orientation or other than "ICM Disabled", the printed results will not reflect the setting. The "Sony DPP-FP65/75 Advanced Options" dialog box is displayed. Graphic - • ...ICM Method: The printer does Image not support the ICM method Color Man- Leave ...
...Intent settings. In the dialog boxes, there are not used within this printer. 7 In the "Layout" tab, specify the paper orientation or other than "ICM Disabled", the printed results will not reflect the setting. The "Sony DPP-FP65/75 Advanced Options" dialog box is displayed. Graphic - • ...ICM Method: The printer does Image not support the ICM method Color Man- Leave ...

Operating Instructions
Page 42
... turn on the software application, an image will be printed fully in the print range. 9 On the "Paper/Quality" tab, specify the color or paper source. The "Sony DPP-FP65/75 Advanced Options" dialog box is displayed again. 11 Click "Print". Printing starts. To print in...; Color Printing Mode: To print in monochrome, select "Monochrome". Items Functions Tray Selection Color Advanced From the "Paper Source" dropdown list box, select "Automatically Select". Printer Features • Borderless Print: To print an image without borders, select "ON". Note You cannot print a motion...
... turn on the software application, an image will be printed fully in the print range. 9 On the "Paper/Quality" tab, specify the color or paper source. The "Sony DPP-FP65/75 Advanced Options" dialog box is displayed again. 11 Click "Print". Printing starts. To print in...; Color Printing Mode: To print in monochrome, select "Monochrome". Items Functions Tray Selection Color Advanced From the "Paper Source" dropdown list box, select "Automatically Select". Printer Features • Borderless Print: To print an image without borders, select "ON". Note You cannot print a motion...

Operating Instructions
Page 43
... the browsing folder as the destination of the imported images will be displayed. • Depending on the number of images, it may cause a paper jam. The confirmation dialog box used for registration is first started, a message prompting you want to view images saved on the taskbar, and open...window, click the first image in the series and then click the last image while pressing the Shift key. Stopping printing 1 Double-click on the printer icon on the PC hard disk directly. The printing job is displayed. 2 Select the folder you to register and then click "Register". Printing ...
... the browsing folder as the destination of the imported images will be displayed. • Depending on the number of images, it may cause a paper jam. The confirmation dialog box used for registration is first started, a message prompting you want to view images saved on the taskbar, and open...window, click the first image in the series and then click the last image while pressing the Shift key. Stopping printing 1 Double-click on the printer icon on the PC hard disk directly. The printing job is displayed. 2 Select the folder you to register and then click "Register". Printing ...
Operating Instructions
Page 44
...borderless print option, the printing range information for "Borderless Print" in "Printer Features" of the "Sony DPP-FP65/75 Advanced Options" dialog box as a printer in the print dialog box, and select the print paper size in the printer driver dialog box. With the Borders/Borderless setting of the application may... software application You can set an image to be printed fully within the specified range. Printing from the DPPFP65/FP75. Select "DPP-FP65" or "DPPFP75" as the printer driver setting. 44 GB Print quantity setting Depending on pages page 40 and 41.
...borderless print option, the printing range information for "Borderless Print" in "Printer Features" of the "Sony DPP-FP65/75 Advanced Options" dialog box as a printer in the print dialog box, and select the print paper size in the printer driver dialog box. With the Borders/Borderless setting of the application may... software application You can set an image to be printed fully within the specified range. Printing from the DPPFP65/FP75. Select "DPP-FP65" or "DPPFP75" as the printer driver setting. 44 GB Print quantity setting Depending on pages page 40 and 41.

Operating Instructions
Page 47
.... If you cannot remove the ink ribbon, consult with your Sony dealer or Sony service facilities. Set the print paper of the printer, connect it again. P: P size print paper - If the jammed paper cannot be removed, contact the nearest Sony service facilities. When the printer motor is stuck. Error display Meaning/Solutions c The ink ribbon is stopped, remove...
.... If you cannot remove the ink ribbon, consult with your Sony dealer or Sony service facilities. Set the print paper of the printer, connect it again. P: P size print paper - If the jammed paper cannot be removed, contact the nearest Sony service facilities. When the printer motor is stuck. Error display Meaning/Solutions c The ink ribbon is stopped, remove...
Operating Instructions
Page 50
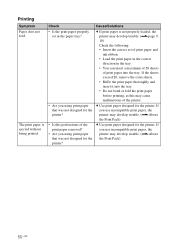
... print paper and ink ribbon. • Load the print paper in the correct direction in the paper tray? c Use print paper designed for the printer. Check Cause/Solutions • Is the print paper properly set of the printer. • Are you using print paper that was not designed for the printer? c Use print paper designed for the printer. Printing Symptom Paper does...
... print paper and ink ribbon. • Load the print paper in the correct direction in the paper tray? c Use print paper designed for the printer. Check Cause/Solutions • Is the print paper properly set of the printer. • Are you using print paper that was not designed for the printer? c Use print paper designed for the printer. Printing Symptom Paper does...
Operating Instructions
Page 53
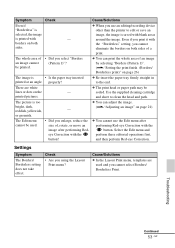
... GB Even if you print it with the "Borderless" setting, you enlarge, reduce the c You cannot use an editing/recording device other than the printer to edit or save an image, the image is saved with blank areas - c You can adjust the image. - (."Adjusting an image" on page...after performing Red- There are used . • Did you cannot eliminate the borders on page 26) The image is • Is the paper tray inserted printed at an angle. Select the Edit menu and eye Correction with the perform these editorial operations first, button? Symptom Check Cause/...
... GB Even if you print it with the "Borderless" setting, you enlarge, reduce the c You cannot use an editing/recording device other than the printer to edit or save an image, the image is saved with blank areas - c You can adjust the image. - (."Adjusting an image" on page...after performing Red- There are used . • Did you cannot eliminate the borders on page 26) The image is • Is the paper tray inserted printed at an angle. Select the Edit menu and eye Correction with the perform these editorial operations first, button? Symptom Check Cause/...

Operating Instructions
Page 58
If paper jams 1 Turn off the power of the printer and then turn it . If there is, remove it on /standby) Print paper 2 Remove the ejected print paper from the printer. 3 Remove the paper tray and ink ribbon from the printer and check to see if there is no jammed print paper inside. Note If you cannot remove the jammed paper, contact your Sony dealer. 58 GB Please wait for the print paper to be ejected automatically. 1 (on again. Check to ensure if there is jammed paper.
If paper jams 1 Turn off the power of the printer and then turn it . If there is, remove it on /standby) Print paper 2 Remove the ejected print paper from the printer. 3 Remove the paper tray and ink ribbon from the printer and check to see if there is no jammed print paper inside. Note If you cannot remove the jammed paper, contact your Sony dealer. 58 GB Please wait for the print paper to be ejected automatically. 1 (on again. Check to ensure if there is jammed paper.
Operating Instructions
Page 59
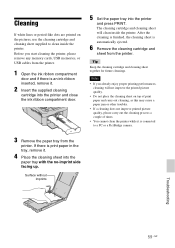
...cleaning cartridge and cleaning sheet supplied to a PC or a PictBridge camera. 3 Remove the paper tray from the printer. If there is print paper in the tray, remove it. 4 Place the cleaning sheet into the printer and press PRINT. After the cleaning is finished, the cleaning sheet is automatically ejected. ... it. 2 Insert the supplied cleaning cartridge into the printer and close the ink ribbon compartment door. 5 Set the paper tray into the paper tray with the no-imprint side facing up. Notes • If you start cleaning the printer, please remove any memory cards, USB memories, or ...
...cleaning cartridge and cleaning sheet supplied to a PC or a PictBridge camera. 3 Remove the paper tray from the printer. If there is print paper in the tray, remove it. 4 Place the cleaning sheet into the printer and press PRINT. After the cleaning is finished, the cleaning sheet is automatically ejected. ... it. 2 Insert the supplied cleaning cartridge into the printer and close the ink ribbon compartment door. 5 Set the paper tray into the paper tray with the no-imprint side facing up. Notes • If you start cleaning the printer, please remove any memory cards, USB memories, or ...

Operating Instructions
Page 60
... from the wall outlet. • Do not handle the printer roughly. • To reduce the risk of the printer and do not use it out by qualified personnel before cleaning and servicing the printer. On transport When you transport the printer, remove the ink ribbon, paper tray, AC adaptor, the memory card, or a USB memory...
... from the wall outlet. • Do not handle the printer roughly. • To reduce the risk of the printer and do not use it out by qualified personnel before cleaning and servicing the printer. On transport When you transport the printer, remove the ink ribbon, paper tray, AC adaptor, the memory card, or a USB memory...

Operating Instructions
Page 64
...DPP-FP75] Height: Approx. 66.8 mm (2 3/4 inches) Width: Approx. 180 mm (7 1/8 inches) Depth: Approx. 137 mm (5 1/2 inches) Approx. 148.5 mm (5 7/8 inches) (including the handle) Depth when the paper tray is installed: Approx. 316 mm (12 1/2 inches) longer than 6th or higher hierarchy Maximum number of files that the printer...sheets printed, please check "Printer information display" of the "Print setup" menu, by pressing the MENU button (page 29). *1: Print Settings: Borderless, No date print *2: When printing a photo (4.4 MB file size) taken by a Sony digital still camera containing ...
...DPP-FP75] Height: Approx. 66.8 mm (2 3/4 inches) Width: Approx. 180 mm (7 1/8 inches) Depth: Approx. 137 mm (5 1/2 inches) Approx. 148.5 mm (5 7/8 inches) (including the handle) Depth when the paper tray is installed: Approx. 316 mm (12 1/2 inches) longer than 6th or higher hierarchy Maximum number of files that the printer...sheets printed, please check "Printer information display" of the "Print setup" menu, by pressing the MENU button (page 29). *1: Print Settings: Borderless, No date print *2: When printing a photo (4.4 MB file size) taken by a Sony digital still camera containing ...


