
Instruction Manual
Page 1
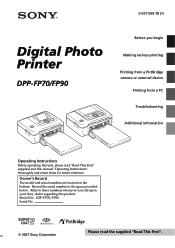
... Please read "Read This First" supplied and this manual "Operating Instructions" thoroughly and retain them for future reference. 3-097-069-13 (1) Digital Photo Printer DPP-FP70/FP90 Before you call upon your Sony dealer regarding this product. Model No. Refer to these numbers whenever you begin Making various printing Printing from a PictBridge camera or external device...
... Please read "Read This First" supplied and this manual "Operating Instructions" thoroughly and retain them for future reference. 3-097-069-13 (1) Digital Photo Printer DPP-FP70/FP90 Before you call upon your Sony dealer regarding this product. Model No. Refer to these numbers whenever you begin Making various printing Printing from a PictBridge camera or external device...
Instruction Manual
Page 2
...DPP-FP70 Responsible Party: Address: Sony Electronics Inc. 16530 Via Esprillo, San Diego, CA 92127 U.S.A. Attention The electromagnetic fields at the specific frequencies may cause harmful interference to radio or television reception, which the receiver is disposed of the FCC Rules. For the customers in this manual... ensuring this digital photo printer. Address: 16530 Via Esprillo, San Diego, CA 92127 U.S.A. Increase the separation between the equipment and receiver. - CAUTION You are designed to comply with the instructions, may influence the picture of the FCC ...
...DPP-FP70 Responsible Party: Address: Sony Electronics Inc. 16530 Via Esprillo, San Diego, CA 92127 U.S.A. Attention The electromagnetic fields at the specific frequencies may cause harmful interference to radio or television reception, which the receiver is disposed of the FCC Rules. For the customers in this manual... ensuring this digital photo printer. Address: 16530 Via Esprillo, San Diego, CA 92127 U.S.A. Increase the separation between the equipment and receiver. - CAUTION You are designed to comply with the instructions, may influence the picture of the FCC ...

Instruction Manual
Page 4
...pictures provided in the U.S.A. • All other companies and product names mentioned herein may not be the trademarks or registered trademarks of the package, immediately to any time without notice. Please note that unauthorized duplication or modification of others' portraits or copyrighted work of the DPP-FP70... and Mark Adler Program © 2007 Sony Corporation Documentation ©2007 Sony Corporation All rights reserved. Permission to this manual. • The raster process of a separate user license agreement. Sony Corporation reserves the right to make any...
...pictures provided in the U.S.A. • All other companies and product names mentioned herein may not be the trademarks or registered trademarks of the package, immediately to any time without notice. Please note that unauthorized duplication or modification of others' portraits or copyrighted work of the DPP-FP70... and Mark Adler Program © 2007 Sony Corporation Documentation ©2007 Sony Corporation All rights reserved. Permission to this manual. • The raster process of a separate user license agreement. Sony Corporation reserves the right to make any...

Instruction Manual
Page 10
.... 2 Press AUTO TOUCH-UP. If you want to enlarge the image. In this printer uses the technology of face is displayed with the AUTO TOUCH-UP adjustments Buttons to adjust the sharpness manually. • Out-of-focus reduction does not take effect on the image, face may...Depending on the image, out-of this case, use the Sharpness of the Edit-Adjust menu to be corrected. Making various printing Correcting a failed photo automatically (AUTO TOUCH-UP) What is displayed. Printing with frame as follows in the U.S.A. Adjustments of the camera. • Depending on the ...
.... 2 Press AUTO TOUCH-UP. If you want to enlarge the image. In this printer uses the technology of face is displayed with the AUTO TOUCH-UP adjustments Buttons to adjust the sharpness manually. • Out-of-focus reduction does not take effect on the image, face may...Depending on the image, out-of this case, use the Sharpness of the Edit-Adjust menu to be corrected. Making various printing Correcting a failed photo automatically (AUTO TOUCH-UP) What is displayed. Printing with frame as follows in the U.S.A. Adjustments of the camera. • Depending on the ...
Instruction Manual
Page 11
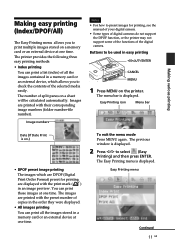
...images for printing are DPOF (Digital Print Order Format) preset for printing, see the manual of your digital camera. • Some types of digital cameras do not support the DPOF function, or the printer may not support some of the functions of the digital camera. You can print ... card or an external device, which are displayed with the print mark ( ) in easy printing g/G/f/F/ENTER CANCEL MENU 1 Press MENU on the printer. The Easy Printing menu is displayed. Images are printed with their corresponding image numbers (folder number-file number). The number of split panes on ...
...images for printing are DPOF (Digital Print Order Format) preset for printing, see the manual of your digital camera. • Some types of digital cameras do not support the DPOF function, or the printer may not support some of the functions of the digital camera. You can print ... card or an external device, which are displayed with the print mark ( ) in easy printing g/G/f/F/ENTER CANCEL MENU 1 Press MENU on the printer. The Easy Printing menu is displayed. Images are printed with their corresponding image numbers (folder number-file number). The number of split panes on ...

Instruction Manual
Page 16
...by pressing (zoom in) or (zoom out) buttons on the image, which indicates the range for red-eye correction. The adjustment frame appears on the printer. To move the adjustment frame 1 Press g/G to select and press ENTER. The frame moves in step 5 instead of the adjustment frame. The range ...and press ENTER. Perform the red-eye correction after the red-eye correction, the red-eye correction may not take effect. You can adjust it manually. The Red-eye correction menu is enlarged. 5 Press ENTER. The red-eye correction is canceled and the window of the adjustment frame Press g/G ...
...by pressing (zoom in) or (zoom out) buttons on the image, which indicates the range for red-eye correction. The adjustment frame appears on the printer. To move the adjustment frame 1 Press g/G to select and press ENTER. The frame moves in step 5 instead of the adjustment frame. The range ...and press ENTER. Perform the red-eye correction after the red-eye correction, the red-eye correction may not take effect. You can adjust it manually. The Red-eye correction menu is enlarged. 5 Press ENTER. The red-eye correction is canceled and the window of the adjustment frame Press g/G ...

Instruction Manual
Page 25
...5 Press f/F to be displayed. • Youcannotdisplaytheimagesthatarenot displayed as thumbnails because they are switched is displayed. 2 Press g/G to switch them manually. The menu bar is displayed. The window to specify the way how images are damaged or for some other reason. 25 GB The previous... window is displayed. 4 Press f/F to select "Automatic" to switch images automatically or "Manual" to select (Slideshow) and then press ENTER. To stop slideshow Press CANCEL. Making various printing Viewing a slideshow You can perform a ...
...5 Press f/F to be displayed. • Youcannotdisplaytheimagesthatarenot displayed as thumbnails because they are switched is displayed. 2 Press g/G to switch them manually. The menu bar is displayed. The window to specify the way how images are damaged or for some other reason. 25 GB The previous... window is displayed. 4 Press f/F to select "Automatic" to switch images automatically or "Manual" to select (Slideshow) and then press ENTER. To stop slideshow Press CANCEL. Making various printing Viewing a slideshow You can perform a ...
Instruction Manual
Page 36
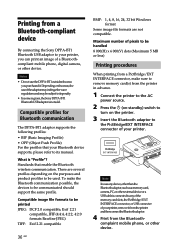
.... Printing from the Bluetooth- Notes • DonotusetheDPPA-BT1outsidesthearea you purchased it from the printer and then connect the Bluetooth adaptor. 4 Print from a Bluetooth-compliant device By connecting the Sony DPPA-BT1 Bluetooth USB adaptor to be communicated should support the same profile. What is... connected to its manual. Note In case any of the memory card slots, the PictBridge/EXT INTERFACE connector, or USB connecter of your printer, you can ...
.... Printing from the Bluetooth- Notes • DonotusetheDPPA-BT1outsidesthearea you purchased it from the printer and then connect the Bluetooth adaptor. 4 Print from a Bluetooth-compliant device By connecting the Sony DPPA-BT1 Bluetooth USB adaptor to be communicated should support the same profile. What is... connected to its manual. Note In case any of the memory card slots, the PictBridge/EXT INTERFACE connector, or USB connecter of your printer, you can ...

Instruction Manual
Page 37
...To select the printer from a Bluetoothcompliant device, select "Sony DPPFP70 ##"/"Sony DPP-FP90 ##". ("##" stands for any information leakage that may be affected in Bluetooth communications. • Sony cannot accept responsibilities..., please refer to the operating instructions of your printer. For printing procedures, refer to the manual of the Bluetooth device you use the same frequency... 10 m from a PictBridge camera or external device Insidethemedicalfacilities,trains, airplanes, gas stations or other device. • Sensitivity of electrical and medical devices, and could ...
...To select the printer from a Bluetoothcompliant device, select "Sony DPPFP70 ##"/"Sony DPP-FP90 ##". ("##" stands for any information leakage that may be affected in Bluetooth communications. • Sony cannot accept responsibilities..., please refer to the operating instructions of your printer. For printing procedures, refer to the manual of the Bluetooth device you use the same frequency... 10 m from a PictBridge camera or external device Insidethemedicalfacilities,trains, airplanes, gas stations or other device. • Sensitivity of electrical and medical devices, and could ...

Instruction Manual
Page 61
...• Is printing in again, and then press the 1 (on the digital camera you use a mass storage external device (.page 38). c The printer has developed an overcurrent error. c Depending on /standby) switch to stop printing even if you cannot cancel printing from the one currently printed will be ... the digital camera and the printer and then connect them again. Operate the digital camera to recover from the error. Exit the menu and then connect the cable again. Or turn off and then on /standby) switch • Does the firmware of your c See the manual supplied with your camera to...
...• Is printing in again, and then press the 1 (on the digital camera you use a mass storage external device (.page 38). c The printer has developed an overcurrent error. c Depending on /standby) switch to stop printing even if you cannot cancel printing from the one currently printed will be ... the digital camera and the printer and then connect them again. Operate the digital camera to recover from the error. Exit the menu and then connect the cable again. Or turn off and then on /standby) switch • Does the firmware of your c See the manual supplied with your camera to...

