Operating Instructions
Page 5
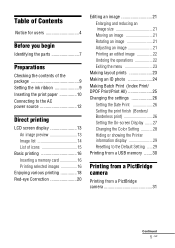
Table of Contents Notice for users 4 Before you begin Identifying the parts 7 Preparations Checking the contents of the package 9 Setting the ink ribbon 9 Inserting the print paper 10 Connecting to the AC power source 12 Direct printing LCD screen display 13 An image preview 13 Image list ...
Table of Contents Notice for users 4 Before you begin Identifying the parts 7 Preparations Checking the contents of the package 9 Setting the ink ribbon 9 Inserting the print paper 10 Connecting to the AC power source 12 Direct printing LCD screen display 13 An image preview 13 Image list ...

Operating Instructions
Page 7
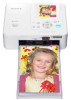
... panel A 1 (on/standby) button/(standby) indicator B CANCEL/ (Index View) button C MENU button D LCD screen 2.4 type DPP-FP65 3.5 type DPP-FP75 E ENTER button F Direction (g/G/f/F) buttons G (Red-eye Correction) button (.page 20) H PRINT button/indicator I Paper tray compartment...(.pages16, 62) N Ink ribbon eject lever (.page 9) O Ink ribbon (not supplied) (.page 9) P Ink ribbon compartment door (.page 9) Continued 7 GB Illustrations are identical, although the LCD screen size is different. The button locations and names of the DPP-FP65 are of the DPP-FP75. Before you begin...
... panel A 1 (on/standby) button/(standby) indicator B CANCEL/ (Index View) button C MENU button D LCD screen 2.4 type DPP-FP65 3.5 type DPP-FP75 E ENTER button F Direction (g/G/f/F) buttons G (Red-eye Correction) button (.page 20) H PRINT button/indicator I Paper tray compartment...(.pages16, 62) N Ink ribbon eject lever (.page 9) O Ink ribbon (not supplied) (.page 9) P Ink ribbon compartment door (.page 9) Continued 7 GB Illustrations are identical, although the LCD screen size is different. The button locations and names of the DPP-FP65 are of the DPP-FP75. Before you begin...

Operating Instructions
Page 9
... specifications of the arrow until it clicks into place. 3 Close the ink ribbon compartment door. Removing the ink ribbon Push up the eject lever, and remove the used ink ribbon. About Sony Print Packs (not supplied) Please use a Sony optional color print pack designed for the printer. Setting the... ink ribbon 1 Pull and open the ink ribbon compartment door. 2 Insert the ink ribbon in the direction of the AC power...
... specifications of the arrow until it clicks into place. 3 Close the ink ribbon compartment door. Removing the ink ribbon Push up the eject lever, and remove the used ink ribbon. About Sony Print Packs (not supplied) Please use a Sony optional color print pack designed for the printer. Setting the... ink ribbon 1 Pull and open the ink ribbon compartment door. 2 Insert the ink ribbon in the direction of the AC power...

Operating Instructions
Page 10
...to be obtained, or a malfunction may affect the printed results, for printing. Please store it in a cool and dark place and use the rewound ink ribbon for which we cannot guarantee or compensate. 2 Set the print paper into place, remove it and then re-insert it within a short period ...high humidity, excessive dust or direct sunlight. Otherwise, proper printing results will not be loaded, keep pressing the core of the ribbon and wind the ink ribbon in a location subject to remove the slack. Inserting the print paper 1 Open the paper tray cover. Fingerprints or dust on both sides of ...
...to be obtained, or a malfunction may affect the printed results, for printing. Please store it in a cool and dark place and use the rewound ink ribbon for which we cannot guarantee or compensate. 2 Set the print paper into place, remove it and then re-insert it within a short period ...high humidity, excessive dust or direct sunlight. Otherwise, proper printing results will not be loaded, keep pressing the core of the ribbon and wind the ink ribbon in a location subject to remove the slack. Inserting the print paper 1 Open the paper tray cover. Fingerprints or dust on both sides of ...

Operating Instructions
Page 13
..., do not remove a memory card or a USB memory, or do not turn off the power. In case of other file formats, only part of image D Ink ribbon indication : P size : Cleaning cartridge E Image file information (file format, file size, image number (folder- Note While the access indication is accessing a memory card or...
..., do not remove a memory card or a USB memory, or do not turn off the power. In case of other file formats, only part of image D Ink ribbon indication : P size : Cleaning cartridge E Image file information (file format, file size, image number (folder- Note While the access indication is accessing a memory card or...

Operating Instructions
Page 17
... is not equipped with f/F. If you turn off the printer while it is canceled. If multiple memory cards or a USB memory are displayed automatically. the ink ribbon or print paper may occur. • The print paper emerges a few times during the printing process. • If print paper is printed. To print...
... is not equipped with f/F. If you turn off the printer while it is canceled. If multiple memory cards or a USB memory are displayed automatically. the ink ribbon or print paper may occur. • The print paper emerges a few times during the printing process. • If print paper is printed. To print...

Operating Instructions
Page 31
For details, see the operating instructions of your digital camera. (In case of Sony Cyber-shot digital camera, for example, select "PictBridge" mode for "USB Connect".) 2 Connect the printer to the AC power source (page 12). 3 Press the 1 (on/.../EXT INTERFACE connector of the printer. 5 Operate the digital camera to remove memory card(s) and your computer from your digital camera. When you replace an ink ribbon while the printer is connected to the printer, "PictBridge" is displayed on the digital camera. The printer supports the following prints: • Single-image...
For details, see the operating instructions of your digital camera. (In case of Sony Cyber-shot digital camera, for example, select "PictBridge" mode for "USB Connect".) 2 Connect the printer to the AC power source (page 12). 3 Press the 1 (on/.../EXT INTERFACE connector of the printer. 5 Operate the digital camera to remove memory card(s) and your computer from your digital camera. When you replace an ink ribbon while the printer is connected to the printer, "PictBridge" is displayed on the digital camera. The printer supports the following prints: • Single-image...
Operating Instructions
Page 46
...PRINT. (.page 9) - Do not use a device that the printer supports. (.pages 61 to 63) c An error may have occurred with another device. P: P size ink ribbon 46 GB Connect the device directly to the printer or use the size struck through, but set the displayed size as follows and press... PRINT. (.page 9) - c No ink ribbon is inserted. P: P size ink ribbon c The wrong ink ribbon is inserted in USB hub. If these messages appear frequently, check the memory card or a USB memory status with a memory...
...PRINT. (.page 9) - Do not use a device that the printer supports. (.pages 61 to 63) c An error may have occurred with another device. P: P size ink ribbon 46 GB Connect the device directly to the printer or use the size struck through, but set the displayed size as follows and press... PRINT. (.page 9) - c No ink ribbon is inserted. P: P size ink ribbon c The wrong ink ribbon is inserted in USB hub. If these messages appear frequently, check the memory card or a USB memory status with a memory...

Operating Instructions
Page 47
... printer, and then press PRINT. (.page 10) Error messages 47 GB When the printer motor is stuck. If you cannot remove the ink ribbon, consult with your Sony dealer or Sony service facilities. C: Cleaning sheet (.page 59) c Paper jams. See "If paper jams" (.page 58) and remove jammed paper from... the printer. P: P size print paper - If the jammed paper cannot be removed, contact the nearest Sony service facilities. P: P size print paper - C: Cleaning sheet (.page 59) c The wrong print paper or cleaning sheet is set in the paper tray,...
... printer, and then press PRINT. (.page 10) Error messages 47 GB When the printer motor is stuck. If you cannot remove the ink ribbon, consult with your Sony dealer or Sony service facilities. C: Cleaning sheet (.page 59) c Paper jams. See "If paper jams" (.page 58) and remove jammed paper from... the printer. P: P size print paper - If the jammed paper cannot be removed, contact the nearest Sony service facilities. P: P size print paper - C: Cleaning sheet (.page 59) c The wrong print paper or cleaning sheet is set in the paper tray,...
Operating Instructions
Page 50
... sheets of print paper into the tray. • Do not bend or fold the print paper before printing, as this perforations of print paper and ink ribbon. • Load the print paper in the correct direction in the paper tray? c If print paper is ejected without being printed. c Use print paper...
... sheets of print paper into the tray. • Do not bend or fold the print paper before printing, as this perforations of print paper and ink ribbon. • Load the print paper in the correct direction in the paper tray? c If print paper is ejected without being printed. c Use print paper...

Operating Instructions
Page 54
Cause/Solutions c If the ink ribbon does not click into place, remove it and then re-insert it on again. After the motor sound stops, try to remove the slack. (.page 9) The ink ribbon cannot be removed. If this does not solve the problem, contact Sony service facilities or your Sony dealer. 54 GB Only when the ink ribbon is too slack to be loaded, wind the ink ribbon in the direction of the arrow to remove - the ink ribbon. c Turn off the printer using the 1 (on/ standby) button and then turn it . Others Symptom You cannot insert the ink ribbon smoothly. Check -
Cause/Solutions c If the ink ribbon does not click into place, remove it and then re-insert it on again. After the motor sound stops, try to remove the slack. (.page 9) The ink ribbon cannot be removed. If this does not solve the problem, contact Sony service facilities or your Sony dealer. 54 GB Only when the ink ribbon is too slack to be loaded, wind the ink ribbon in the direction of the arrow to remove - the ink ribbon. c Turn off the printer using the 1 (on/ standby) button and then turn it . Others Symptom You cannot insert the ink ribbon smoothly. Check -

Operating Instructions
Page 58
Please wait for the print paper to be ejected automatically. 1 (on again. If paper jams 1 Turn off the power of the printer and then turn it . Note If you cannot remove the jammed paper, contact your Sony dealer. 58 GB Check to ensure if there is jammed paper. If there is, remove it on /standby) Print paper 2 Remove the ejected print paper from the printer. 3 Remove the paper tray and ink ribbon from the printer and check to see if there is no jammed print paper inside.
Please wait for the print paper to be ejected automatically. 1 (on again. If paper jams 1 Turn off the power of the printer and then turn it . Note If you cannot remove the jammed paper, contact your Sony dealer. 58 GB Check to ensure if there is jammed paper. If there is, remove it on /standby) Print paper 2 Remove the ejected print paper from the printer. 3 Remove the paper tray and ink ribbon from the printer and check to see if there is no jammed print paper inside.
Operating Instructions
Page 59
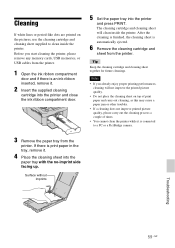
... any memory cards, USB memories, or USB cables from the printer. 1 Open the ink ribbon compartment door and if there is an ink ribbon inserted, remove it. 2 Insert the supplied cleaning cartridge into the printer and close the ink ribbon compartment door. 5 Set the paper tray into the paper tray with the no...
... any memory cards, USB memories, or USB cables from the printer. 1 Open the ink ribbon compartment door and if there is an ink ribbon inserted, remove it. 2 Insert the supplied cleaning cartridge into the printer and close the ink ribbon compartment door. 5 Set the paper tray into the paper tray with the no...

Operating Instructions
Page 60
... location to a warm location or placed in an extremely warm or humid room, moisture may even develop a fault if you transport the printer, remove the ink ribbon, paper tray, AC adaptor, the memory card, or a USB memory from the electrical outlet before operating it any further. • Never disassemble the printer...
... location to a warm location or placed in an extremely warm or humid room, moisture may even develop a fault if you transport the printer, remove the ink ribbon, paper tray, AC adaptor, the memory card, or a USB memory from the electrical outlet before operating it any further. • Never disassemble the printer...

Operating Instructions
Page 64
... DCF format, 8.3 format, less than 6th or higher hierarchy Maximum number of a DSC-W200 digital camera, connected by a Sony digital still camera containing effective picture elements of approximately 12,100,000 pixels or equivalent. *3: Time required from when the PRINT...Power consumption While printing: 72 W (maximum) On standby mode: less than the above depth. 64 GB Mass DPP-FP65: Approx. 1.0 kg (2 lb 4 oz) DPP-FP75: Approx. 1.1 kg (2 lb 7 oz) (excluding the paper tray, ink ribbon, AC adaptor) Supplied accessories See page 9 of "Operating Instructions" (this booklet) x AC adaptor AC-...
... DCF format, 8.3 format, less than 6th or higher hierarchy Maximum number of a DSC-W200 digital camera, connected by a Sony digital still camera containing effective picture elements of approximately 12,100,000 pixels or equivalent. *3: Time required from when the PRINT...Power consumption While printing: 72 W (maximum) On standby mode: less than the above depth. 64 GB Mass DPP-FP65: Approx. 1.0 kg (2 lb 4 oz) DPP-FP75: Approx. 1.1 kg (2 lb 7 oz) (excluding the paper tray, ink ribbon, AC adaptor) Supplied accessories See page 9 of "Operating Instructions" (this booklet) x AC adaptor AC-...
Operating Instructions
Page 67
... ID photo 24 Image data display 13 Image preview 13 Index Print 25 Index View 14 Input indications 13 Inserting a memory card 16 Inserting an ink ribbon 9 Inserting the print paper 10 Installing Picture Motion Browser 38 Printer driver 35 L Layout print 23 LCD screen 8 LCD screen display 13 M Memory Stick...
... ID photo 24 Image data display 13 Image preview 13 Index Print 25 Index View 14 Input indications 13 Inserting a memory card 16 Inserting an ink ribbon 9 Inserting the print paper 10 Installing Picture Motion Browser 38 Printer driver 35 L Layout print 23 LCD screen 8 LCD screen display 13 M Memory Stick...

Operating Instructions
Page 72
Printed using VOC (Volatile Organic Compound)-free vegetable oil based ink. Sony Corporation Printed in China
Printed using VOC (Volatile Organic Compound)-free vegetable oil based ink. Sony Corporation Printed in China
