Operating Instructions
Page 3
...be used. Furthermore, "™" and "®" are operational for damages. Unless you change the fuse. The screen may be forbidden. Sony shall assume no responsibility for any way. • Images may be subject to direct sunlight for the materials to infringe the provisions of ... PRO", Duo", , "Memory Stick , "Memory Stick , "Memory Stick PRO Duo" , "MagicGate", and are trademarks of Sony Corporation. • Microsoft, Windows® and DirectX are registered trademarks of Microsoft Corporation in part on the work of the printer or memory card. When using ...
...be used. Furthermore, "™" and "®" are operational for damages. Unless you change the fuse. The screen may be forbidden. Sony shall assume no responsibility for any way. • Images may be subject to direct sunlight for the materials to infringe the provisions of ... PRO", Duo", , "Memory Stick , "Memory Stick , "Memory Stick PRO Duo" , "MagicGate", and are trademarks of Sony Corporation. • Microsoft, Windows® and DirectX are registered trademarks of Microsoft Corporation in part on the work of the printer or memory card. When using ...

Operating Instructions
Page 10
Sony DPP-FP55 Printer Driver Software for 120V only. Cleaning cartridge (1) 10 GB The plug shape and specifications of the package Make sure that the following accessories are ..., 10 sheets) • Operating Instructions (this booklet, 1) • Quick Start Guide (1) • Warranty (1)* • Sony End User Software License Agreement (1) * In some regions, the warranty is for Windows® XP Professional/Windows® XP Home Edition/Windows® 2000 Professional/Windows® Millennium Edition - AC power cord * (1) * The AC power cord illustrated is not supplied...
Sony DPP-FP55 Printer Driver Software for 120V only. Cleaning cartridge (1) 10 GB The plug shape and specifications of the package Make sure that the following accessories are ..., 10 sheets) • Operating Instructions (this booklet, 1) • Quick Start Guide (1) • Warranty (1)* • Sony End User Software License Agreement (1) * In some regions, the warranty is for Windows® XP Professional/Windows® XP Home Edition/Windows® 2000 Professional/Windows® Millennium Edition - AC power cord * (1) * The AC power cord illustrated is not supplied...

Operating Instructions
Page 26
... used in the image list. 2 Press MENU on the printer. Edit menu icon Menu bar To exit the menu mode Press MENU again. The previous window is displayed. Adjusts the picture quality of the Set Up menu items. 26 GB Saves the edited image. Moves an image. Adds an filter to... can display the Edit menu and edit or add an effect to edit. Reduces the red-eye phenomenon. Display the image in the image preview window or move the Cursor to the desired image in the Edit menu g/G/f/F/ENTER PRINT CANCEL MENU 1 Display the image that you want to an image...
... used in the image list. 2 Press MENU on the printer. Edit menu icon Menu bar To exit the menu mode Press MENU again. The previous window is displayed. Adjusts the picture quality of the Set Up menu items. 26 GB Saves the edited image. Moves an image. Adds an filter to... can display the Edit menu and edit or add an effect to edit. Reduces the red-eye phenomenon. Display the image in the image preview window or move the Cursor to the desired image in the Edit menu g/G/f/F/ENTER PRINT CANCEL MENU 1 Display the image that you want to an image...

Operating Instructions
Page 30
... on the printer. Each time you select (save the image is displayed. The adjustment takes effect. The red-eye reduction adjustment is canceled and the window of red-eye reduction adjustment is displayed. The dialog box to 5. Tip Make the size of the adjustment frame Press g/G to start printing. 2 Move the...
... on the printer. Each time you select (save the image is displayed. The adjustment takes effect. The red-eye reduction adjustment is canceled and the window of red-eye reduction adjustment is displayed. The dialog box to 5. Tip Make the size of the adjustment frame Press g/G to start printing. 2 Move the...

Operating Instructions
Page 31
... card from the printer. Buttons to be damaged. For example, when "100-0001" is displayed, "100" is folder number and "0001" is displayed. The previous window is file number. 3 Press ENTER. Continued 31 GB The dialog box to select the day, month or year. Making split images and a calendar (Creative Print...
... card from the printer. Buttons to be damaged. For example, when "100-0001" is displayed, "100" is folder number and "0001" is displayed. The previous window is file number. 3 Press ENTER. Continued 31 GB The dialog box to select the day, month or year. Making split images and a calendar (Creative Print...
Operating Instructions
Page 32
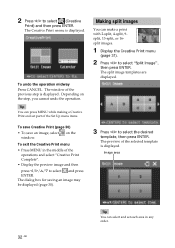
... or 16split images. 1 Display the Creative Print menu (page 31). 2 Press g/G to select and press ENTER. The Creative Print menu is displayed. The window of the operations and select "Creative Print Complete". • Display the preview image and then press g/G/f/F to select "Split Image", then press ENTER. on...then press ENTER. To undo the operation midway Press CANCEL. To save Creative Print (page 30) • To save an image, select window. The preview of the Set Up menu items. Making split images You can select and set each area in the middle of the previous step...
... or 16split images. 1 Display the Creative Print menu (page 31). 2 Press g/G to select and press ENTER. The Creative Print menu is displayed. The window of the operations and select "Creative Print Complete". • Display the preview image and then press g/G/f/F to select "Split Image", then press ENTER. on...then press ENTER. To undo the operation midway Press CANCEL. To save Creative Print (page 30) • To save an image, select window. The preview of the Set Up menu items. Making split images You can select and set each area in the middle of the previous step...

Operating Instructions
Page 33
... selecting an image is displayed. The window used for each area. The selected image is added to select the desired adjustment item, then press ENTER. Press g/G to the image area. Each time ...
... selecting an image is displayed. The window used for each area. The selected image is added to select the desired adjustment item, then press ENTER. Press g/G to the image area. Each time ...

Operating Instructions
Page 34
The window used for selecting the calendar template, is selected and displayed in any order. 34 GB 2 Press ... with your favorite images. 1 Display the Creative Print menu (page 31). 2 Press g/G to select "Calendar", then press ENTER. The window used for adjusting the image size and position is displayed. The image is displayed. 3 Press g/G to select the desired template, and then...the calendar. 1 Press g/G/f/F to select the calendar area and press ENTER to display the calendar setting window. The image list is displayed (page 32). 2 Press g/G/f/F to select and then press ENTER.
The window used for selecting the calendar template, is selected and displayed in any order. 34 GB 2 Press ... with your favorite images. 1 Display the Creative Print menu (page 31). 2 Press g/G to select "Calendar", then press ENTER. The window used for adjusting the image size and position is displayed. The image is displayed. 3 Press g/G to select the desired template, and then...the calendar. 1 Press g/G/f/F to select the calendar area and press ENTER to display the calendar setting window. The image list is displayed (page 32). 2 Press g/G/f/F to select and then press ENTER.

Operating Instructions
Page 36
... bar is complete and the print paper automatically emerges, remove the printed paper from the paper tray. When you can proceed with printing. The previous window is printed (page 43). 3 Press f/F to preset images for printing, see the manual of your digital camera. • Some types of digital camera do not...
... bar is complete and the print paper automatically emerges, remove the printed paper from the paper tray. When you can proceed with printing. The previous window is printed (page 43). 3 Press f/F to preset images for printing, see the manual of your digital camera. • Some types of digital camera do not...

Operating Instructions
Page 37
... 1 Press MENU. Notes • Depending on the image, it may take time to switch them manually. Buttons to select "Switch", and then press ENTER. The window to specify the way how images are switched is displayed. 4 Press f/F to select "Automatic" to switch images automatically or "Manual" to be used in the...
... 1 Press MENU. Notes • Depending on the image, it may take time to switch them manually. Buttons to select "Switch", and then press ENTER. The window to specify the way how images are switched is displayed. 4 Press f/F to select "Automatic" to switch images automatically or "Manual" to be used in the...

Operating Instructions
Page 38
... then press ENTER. Image Search menu Tip To search for : Starting image number Ending image number To exit the menu mode Press MENU. The previous window is displayed. 4 Press g/G to select an item and press f/F to specify numbers. • When you select "By File No.": Specify the starting and ending dates...
... then press ENTER. Image Search menu Tip To search for : Starting image number Ending image number To exit the menu mode Press MENU. The previous window is displayed. 4 Press g/G to select an item and press f/F to specify numbers. • When you select "By File No.": Specify the starting and ending dates...

Operating Instructions
Page 40
... is formatted. To delete other images, repeat steps 4 through 5. The menu bar is displayed. 2 Press g/G to select (Delete/ Format) and then press ENTER. The previous window is displayed. 2 Press g/G to select (Delete/ Format) and then press ENTER. Delete/Format menu 3 Press f/F to -print indication ( ) displayed. Notes • When you delete an...
... is formatted. To delete other images, repeat steps 4 through 5. The menu bar is displayed. 2 Press g/G to select (Delete/ Format) and then press ENTER. The previous window is displayed. 2 Press g/G to select (Delete/ Format) and then press ENTER. Delete/Format menu 3 Press f/F to -print indication ( ) displayed. Notes • When you delete an...

Operating Instructions
Page 41
... (next page). 4 Press f/F to select (Set Up) and then press ENTER. Tip To exit the Set Up menu, press MENU. Continued 41 GB The setting window for the selected item is displayed. Set Up menu CANCEL MENU 1 Press MENU. Making various printing Changing the print settings (Set Up) The Set Up... the desired setting item, and press ENTER. Buttons to be selected. 3 Press f/F to change various print settings listed on pages 42 and 43. The previous window is displayed.
... (next page). 4 Press f/F to select (Set Up) and then press ENTER. Tip To exit the Set Up menu, press MENU. Continued 41 GB The setting window for the selected item is displayed. Set Up menu CANCEL MENU 1 Press MENU. Making various printing Changing the print settings (Set Up) The Set Up... the desired setting item, and press ENTER. Buttons to be selected. 3 Press f/F to change various print settings listed on pages 42 and 43. The previous window is displayed.

Operating Instructions
Page 44
...setting and press ENTER. The Option menu is displayed. The menu bar is displayed. To display the hidden setting items, scroll the window with f/F. The previous window is displayed. 3 Press f/F to change the preferences listed on page 45. The setting is displayed (next page). Note Items which... cannot be selected. 4 Press f/F to select (Option) and then press ENTER. Option menu CANCEL MENU 1 Press MENU. The setting window for the selected item is fixed. Tip To exit the Set Up menu, press MENU. 44 GB Changing the printer preferences (Option) The Option...
...setting and press ENTER. The Option menu is displayed. The menu bar is displayed. To display the hidden setting items, scroll the window with f/F. The previous window is displayed. 3 Press f/F to change the preferences listed on page 45. The setting is displayed (next page). Note Items which... cannot be selected. 4 Press f/F to select (Option) and then press ENTER. Option menu CANCEL MENU 1 Press MENU. The setting window for the selected item is fixed. Tip To exit the Set Up menu, press MENU. 44 GB Changing the printer preferences (Option) The Option...
Operating Instructions
Page 45
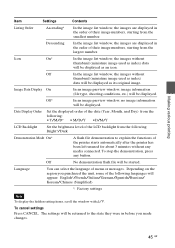
..., etc.) will appear: English*/French/Italian/German/Spanish/Russian/ Korean/Chinese (Simplified) *: Factory settings Note To display the hidden setting items, scroll the window with f/F. Date Display Order Set the displayed order of the date (Year, Month, and Day) from the following: • Y/M/D* • M/D/Y ...as index) data will be displayed as an icon. To stop the demonstration, press any media connected. Descending In the image list window, the images are displayed in before you purchased the unit, some of the following : Bright*/Dark Demonstration Mode On* A flash ...
..., etc.) will appear: English*/French/Italian/German/Spanish/Russian/ Korean/Chinese (Simplified) *: Factory settings Note To display the hidden setting items, scroll the window with f/F. Date Display Order Set the displayed order of the date (Year, Month, and Day) from the following: • Y/M/D* • M/D/Y ...as index) data will be displayed as an icon. To stop the demonstration, press any media connected. Descending In the image list window, the images are displayed in before you purchased the unit, some of the following : Bright*/Dark Demonstration Mode On* A flash ...
Operating Instructions
Page 46
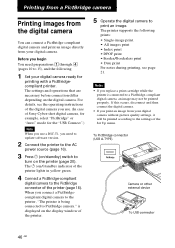
When you connect a PictBridgecompliant digital camera to the printer, "The printer is displayed on the display window of the printer. 5 Operate the digital camera to turn on /standby) switch to print an image. Notes • If you begin You need to update ... 10 to the PictBridge connector of the Set Up menu. The settings and operations that are necessary before connection differ depending on /standby) indicator of Sony Cyber-shot digital camera, for example, select "PictBridge" or "Auto" mode for the "USB Connect".) Note When you use a DSC-T1, you print an image...
When you connect a PictBridgecompliant digital camera to the printer, "The printer is displayed on the display window of the printer. 5 Operate the digital camera to turn on /standby) switch to print an image. Notes • If you begin You need to update ... 10 to the PictBridge connector of the Set Up menu. The settings and operations that are necessary before connection differ depending on /standby) indicator of Sony Cyber-shot digital camera, for example, select "PictBridge" or "Auto" mode for the "USB Connect".) Note When you use a DSC-T1, you print an image...

Operating Instructions
Page 47
...To handle image data, you connect the printer to your PC for DPP-FP55: The software describes the printer's requirements and enables printing from another ...Windows ® XP Professional/Windows ® XP Home Edition/Windows® 2000 Professional/Windows ® Millennium Edition, pre-installed (IBM PC/AT compatible) (Windows 95, Windows 98 Gold Edition, Windows 98 Second Edition, Windows ...8226; You cannot operate the printer from the computer. • Picture Motion Browser: Sony's original software application that allows you use the supplied printer driver and Picture Motion Browser...
...To handle image data, you connect the printer to your PC for DPP-FP55: The software describes the printer's requirements and enables printing from another ...Windows ® XP Professional/Windows ® XP Home Edition/Windows® 2000 Professional/Windows ® Millennium Edition, pre-installed (IBM PC/AT compatible) (Windows 95, Windows 98 Gold Edition, Windows 98 Second Edition, Windows ...8226; You cannot operate the printer from the computer. • Picture Motion Browser: Sony's original software application that allows you use the supplied printer driver and Picture Motion Browser...

Operating Instructions
Page 48
... the Cyber-shot Viewer will be overwritten and replaced by group when viewing folders. The "Sony DPP-FP55 - Notes • Be sure to the printer during printing. InstallShield Wizard" dialog box appears. The setup starts automatically and the installation window is disconnected from or connect it outside.+- You can when using a "Computer administrator" user...
... the Cyber-shot Viewer will be overwritten and replaced by group when viewing folders. The "Sony DPP-FP55 - Notes • Be sure to the printer during printing. InstallShield Wizard" dialog box appears. The setup starts automatically and the installation window is disconnected from or connect it outside.+- You can when using a "Computer administrator" user...
Operating Instructions
Page 49
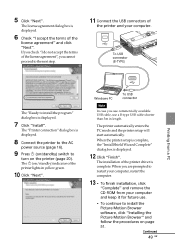
... agreement", you are prompted to install the program" dialog box is complete. Continued 49 GB The license agreement dialog box is displayed. 12 Click "Finish". Windows PC To USB connector Note In case you use commercially available USB cable, use . • To continue to install the Picture Motion Browser software, click...
... agreement", you are prompted to install the program" dialog box is complete. Continued 49 GB The license agreement dialog box is displayed. 12 Click "Finish". Windows PC To USB connector Note In case you use commercially available USB cable, use . • To continue to install the Picture Motion Browser software, click...

Operating Instructions
Page 50
... during the installation, specify the following directory: C:\WINDOWS\Temp\dpp-fp55 Replace "C:\WINDOWS" with the Windows folder location of your PC. • The supplied CD-ROM will be required when you use the printer, read the Readme file (the Readme folder of the CDROMcEnglish foldercReadme.txt). The "Sony DPP-FP55 - The dialog box used for possible future use...
... during the installation, specify the following directory: C:\WINDOWS\Temp\dpp-fp55 Replace "C:\WINDOWS" with the Windows folder location of your PC. • The supplied CD-ROM will be required when you use the printer, read the Readme file (the Readme folder of the CDROMcEnglish foldercReadme.txt). The "Sony DPP-FP55 - The dialog box used for possible future use...


