
Operating Instructions
Page 4
By breaking the seal of the envelope of print paper 11 Optional print packs 11 3 Loading the print cartridge 12 4 Inserting the print paper 13 5 Connecting the AC power source ... 16 Inserting a memory card 17 Inserting a "Memory Stick 17 Inserting...with the rest of personal use. Notice for the purpose of the package, immediately to any time without prior written approval from Sony Corporation. Any unauthorized duplication of this printer .......... 6 Identifying the parts 8 Preparations 1 Checking the contents of the package 10 2 Preparing the print pack 11 Size of ...
By breaking the seal of the envelope of print paper 11 Optional print packs 11 3 Loading the print cartridge 12 4 Inserting the print paper 13 5 Connecting the AC power source ... 16 Inserting a memory card 17 Inserting a "Memory Stick 17 Inserting...with the rest of personal use. Notice for the purpose of the package, immediately to any time without prior written approval from Sony Corporation. Any unauthorized duplication of this printer .......... 6 Identifying the parts 8 Preparations 1 Checking the contents of the package 10 2 Preparing the print pack 11 Size of ...
Operating Instructions
Page 8
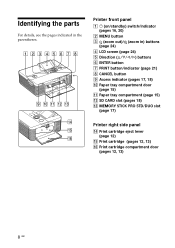
... SD CARD slot (pages 18) qd MEMORY STICK PRO STD/DUO slot (page 17) Printer right side panel qf Print cartridge eject lever (page 12) qg Print cartridge (pages 12, 13) qh Print cartridge compartment door (pages 12, 13) 8 GB Printer front panel 1 1 (on/standby) switch/indicator (pages 16, 20) 2 MENU button 3 (zoom out)/ (zoom...
... SD CARD slot (pages 18) qd MEMORY STICK PRO STD/DUO slot (page 17) Printer right side panel qf Print cartridge eject lever (page 12) qg Print cartridge (pages 12, 13) qh Print cartridge compartment door (pages 12, 13) 8 GB Printer front panel 1 1 (on/standby) switch/indicator (pages 16, 20) 2 MENU button 3 (zoom out)/ (zoom...

Operating Instructions
Page 10
... Home Edition/Windows® 2000 Professional/Windows® Millennium Edition - Cleaning cartridge (1) 10 GB Paper tray (1) AC adaptor (AC-S2425) (1) CD-ROM (1) - The plug shape and specifications of the package Make sure that the following accessories are supplied with your printer. Sony DPP-FP55 Printer Driver Software for 120V only. AC power cord * (1) * The AC power...
... Home Edition/Windows® 2000 Professional/Windows® Millennium Edition - Cleaning cartridge (1) 10 GB Paper tray (1) AC adaptor (AC-S2425) (1) CD-ROM (1) - The plug shape and specifications of the package Make sure that the following accessories are supplied with your printer. Sony DPP-FP55 Printer Driver Software for 120V only. AC power cord * (1) * The AC power...

Operating Instructions
Page 11
...printouts under plastic desk mats. 11 GB Notes on storing printouts Do not affix cellophane tape or plastic erasers to the printer. • Please do not disassemble the print cartridge. • Do not pull out the ribbon from the date of print pack, printing may not be possible or ... without the imprinting is contaminated with dust or fingerprints. Note on using print packs • Always use the print pack designed for the printer. sheet-pack x 6) • 3 print cartridges each for 40 prints SVM-F80P • 80 sheets of 4 x 6 inch print paper (20- Size of print paper The size ...
...printouts under plastic desk mats. 11 GB Notes on storing printouts Do not affix cellophane tape or plastic erasers to the printer. • Please do not disassemble the print cartridge. • Do not pull out the ribbon from the date of print pack, printing may not be possible or ... without the imprinting is contaminated with dust or fingerprints. Note on using print packs • Always use the print pack designed for the printer. sheet-pack x 6) • 3 print cartridges each for 40 prints SVM-F80P • 80 sheets of 4 x 6 inch print paper (20- Size of print paper The size ...

Operating Instructions
Page 21
... automatically emerges, remove the printed paper from the paper tray. One image preview changes to fix the quantity. In case you turn on the printer. Making basic printing To print multiple copies 1 Press ENTER to display the print quantity. 2 Press f/F to increase or decrease the print quantity...printing; 2 Press g/G/f/F repeatedly until the image that you want to print appears. Tip When the printer is ready for the print paper to see that the print paper and print cartridge are displayed in the image list Press (zoom out). The images are properly set.) 4 When printing...
... automatically emerges, remove the printed paper from the paper tray. One image preview changes to fix the quantity. In case you turn on the printer. Making basic printing To print multiple copies 1 Press ENTER to display the print quantity. 2 Press f/F to increase or decrease the print quantity...printing; 2 Press g/G/f/F repeatedly until the image that you want to print appears. Tip When the printer is ready for the print paper to see that the print paper and print cartridge are displayed in the image list Press (zoom out). The images are properly set.) 4 When printing...

Operating Instructions
Page 36
..."No" to cancel printing, and then press ENTER. Tips • Even if the remaining volume of the digital camera. 1 Press MENU on the printer. The Easy Printing menu is displayed. 36 GB The confirmation dialog box is displayed. Easy Printing menu Note If there are printing multiple copies, the... the manual of your digital camera. • Some types of digital camera do not support the DPOF function, or the printer may not support some of the functions of the print cartridge is printed (page 43). 3 Press f/F to select "Index Print", "DPOF Print", or "Print All" and then press ENTER...
..."No" to cancel printing, and then press ENTER. Tips • Even if the remaining volume of the digital camera. 1 Press MENU on the printer. The Easy Printing menu is displayed. 36 GB The confirmation dialog box is displayed. Easy Printing menu Note If there are printing multiple copies, the... the manual of your digital camera. • Some types of digital camera do not support the DPOF function, or the printer may not support some of the functions of the print cartridge is printed (page 43). 3 Press f/F to select "Index Print", "DPOF Print", or "Print All" and then press ENTER...
Operating Instructions
Page 46
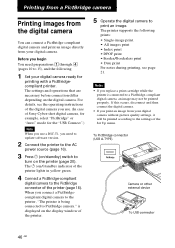
...Set your digital camera. If this occurs, disconnect and then connect the digital camera. • If you replace a print cartridge while the printer is being connected to a PictBridge-compliant digital camera, an image may not be printed according to print an image. Printing ...Date print For notes during printing, see the operating instructions of Sony Cyber-shot digital camera, for example, select "PictBridge" or "Auto" mode for printing with a PictBridgecompliant printer. The 1 (on/standby) indicator of the printer lights in yellow green. 4 Connect a PictBridge-compliant digital camera...
...Set your digital camera. If this occurs, disconnect and then connect the digital camera. • If you replace a print cartridge while the printer is being connected to a PictBridge-compliant digital camera, an image may not be printed according to print an image. Printing ...Date print For notes during printing, see the operating instructions of Sony Cyber-shot digital camera, for example, select "PictBridge" or "Auto" mode for printing with a PictBridgecompliant printer. The 1 (on/standby) indicator of the printer lights in yellow green. 4 Connect a PictBridge-compliant digital camera...

Operating Instructions
Page 65
... is not properly loaded, set of print paper and print cartridge loaded? (.page 11) • Is the print paper loaded in the correct direction in process. As the print paper emerges from the rear a few times during printing. the printer may emerge a few times during printing in the tray? ... thoroughly? • Did you bend or fold the print paper before printing? • Are you using print paper that was not designed for the printer? Do not touch nor pull the emerged paper. c The print paper may develop trouble. Printing Symptom Paper does not feed. c Use print paper...
... is not properly loaded, set of print paper and print cartridge loaded? (.page 11) • Is the print paper loaded in the correct direction in process. As the print paper emerges from the rear a few times during printing. the printer may emerge a few times during printing in the tray? ... thoroughly? • Did you bend or fold the print paper before printing? • Are you using print paper that was not designed for the printer? Do not touch nor pull the emerged paper. c The print paper may develop trouble. Printing Symptom Paper does not feed. c Use print paper...
Operating Instructions
Page 69
...) Troubleshooting 69 GB The image is stretched horizontally when printed. • Did you rotate the image or add other process? Use the supplied cleaning cartridge to "Yes"? Even if "Borders" is printed. c The print head or paper path may not be printed covering the entire printable area. whole... at an angle. • Is the paper tray inserted cRe-insert the paper tray firmly straight properly? This is not because of trouble with the printer, but because the image was rewritten with "Borders" set to "No". (.page 42) Only part of an • Did you set "Borders" in ...
...) Troubleshooting 69 GB The image is stretched horizontally when printed. • Did you rotate the image or add other process? Use the supplied cleaning cartridge to "Yes"? Even if "Borders" is printed. c The print head or paper path may not be printed covering the entire printable area. whole... at an angle. • Is the paper tray inserted cRe-insert the paper tray firmly straight properly? This is not because of trouble with the printer, but because the image was rewritten with "Borders" set to "No". (.page 42) Only part of an • Did you set "Borders" in ...
Operating Instructions
Page 72
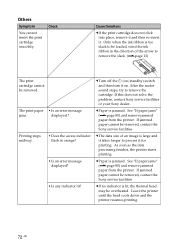
... the Sony service facilities. c Paper is jammed. After the motor sound stops, try to be overheated. c Paper is jammed. See "If paper jams" (.page 80) and remove jammed paper from the printer. Others Symptom You cannot insert the print cartridge smoothly. Leave the printer until the...lit? If this does not solve the problem, contact Sony service facilities or your Sony dealer. If jammed paper cannot be removed, contact the Sony service facilities. c If no indicator is too slack to remove the cartridge. As soon as the data processing finishes, the printer starts printing.
... the Sony service facilities. c Paper is jammed. After the motor sound stops, try to be overheated. c Paper is jammed. See "If paper jams" (.page 80) and remove jammed paper from the printer. Others Symptom You cannot insert the print cartridge smoothly. Leave the printer until the...lit? If this does not solve the problem, contact Sony service facilities or your Sony dealer. If jammed paper cannot be removed, contact the Sony service facilities. c If no indicator is too slack to remove the cartridge. As soon as the data processing finishes, the printer starts printing.
Operating Instructions
Page 78
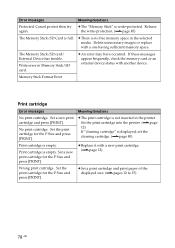
... free memory space in the selected media. c There is empty. Write error in the printer. c An error may have occurred. Memory Stick Format Error Print cartridge Error messages Meaning/Solutions No print cartridge. c The print cartridge is empty. Set a new print cartridge for the P Size and press [PRINT]. c Replace it with another device. The Memory...
... free memory space in the selected media. c There is empty. Write error in the printer. c An error may have occurred. Memory Stick Format Error Print cartridge Error messages Meaning/Solutions No print cartridge. c The print cartridge is empty. Set a new print cartridge for the P Size and press [PRINT]. c Replace it with another device. The Memory...

Operating Instructions
Page 79
... not placed. Insert the protective sheet into the paper tray and set the paper tray into the printer. (.pages 13 to 15) Cleaning sheet is not set in the printer. - Check the print cartridge size actually loaded in the tray and set the print paper for the P Size and press [PRINT... set the paper tray into the printer. (.page 80) c The print paper and print cartridge do not match. Paper jam. Set the print paper for the P Size and press [PRINT]. If the jammed paper cannot be removed, contact the Sony service facilities. The paper tray is no cleaning sheet (protective sheet)...
... not placed. Insert the protective sheet into the paper tray and set the paper tray into the printer. (.pages 13 to 15) Cleaning sheet is not set in the printer. - Check the print cartridge size actually loaded in the tray and set the print paper for the P Size and press [PRINT... set the paper tray into the printer. (.page 80) c The print paper and print cartridge do not match. Paper jam. Set the print paper for the P Size and press [PRINT]. If the jammed paper cannot be removed, contact the Sony service facilities. The paper tray is no cleaning sheet (protective sheet)...

Operating Instructions
Page 80
Note If you cannot remove the jammed paper, contact your Sony dealer. If paper jams If the print paper jams, an error message is a print cartridge, remove it (page 12). 2 Insert the supplied cleaning cartridge into the printer and close the cartridge compartment door. 3 Remove the paper tray from the tray.... is displayed and printing stops. Tip You can also use the cleaning cartridge supplied and the protective sheet of the supplied printing pack to clean inside the printer. Unplug the AC power cord of the printer If white lines or periodical dots are printed on the pictures, use...
Note If you cannot remove the jammed paper, contact your Sony dealer. If paper jams If the print paper jams, an error message is a print cartridge, remove it (page 12). 2 Insert the supplied cleaning cartridge into the printer and close the cartridge compartment door. 3 Remove the paper tray from the tray.... is displayed and printing stops. Tip You can also use the cleaning cartridge supplied and the protective sheet of the supplied printing pack to clean inside the printer. Unplug the AC power cord of the printer If white lines or periodical dots are printed on the pictures, use...

Operating Instructions
Page 81
... 6 Remove the cleaning cartridge and protective sheet from the printer. When cleaning ends Set the print cartridge and print paper into the printer. Notes • Carry out cleaning only when there are using is the one designed for future cleaning. The cleaning cartridge and protective sheet will not... been inserted with the no -imprint side facing up . Troubleshooting 81 GB Tip Keep the cleaning cartridge and protective sheet together for this printer. 5 Set the paper tray into the printer and press PRINT. 4 Place the protective sheet into the paper tray with the no -imprint side...
... 6 Remove the cleaning cartridge and protective sheet from the printer. When cleaning ends Set the print cartridge and print paper into the printer. Notes • Carry out cleaning only when there are using is the one designed for future cleaning. The cleaning cartridge and protective sheet will not... been inserted with the no -imprint side facing up . Troubleshooting 81 GB Tip Keep the cleaning cartridge and protective sheet together for this printer. 5 Set the paper tray into the printer and press PRINT. 4 Place the protective sheet into the paper tray with the no -imprint side...
Operating Instructions
Page 82
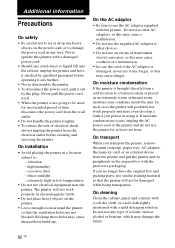
...Be careful not to set or drop any heavy objects on the printer. • Leave enough room around the printer so that the printer will not work properly and may even develop a fault if you transport the printer, remove the print cartridge, paper tray, AC adaptor, the memory card, or an ...external device from the electrical outlet before operating it any further. • Never disassemble the printer. • To disconnect the power cord, pull it ...
...Be careful not to set or drop any heavy objects on the printer. • Leave enough room around the printer so that the printer will not work properly and may even develop a fault if you transport the printer, remove the print cartridge, paper tray, AC adaptor, the memory card, or an ...external device from the electrical outlet before operating it any further. • Never disassemble the printer. • To disconnect the power cord, pull it ...

Operating Instructions
Page 87
...DCF 2.0 compatible, Exif 2.21 compatible, JFIF*7 TIFF: Exif 2.21 compatible BMP*8: 24bit Windows format Some image file formats are not compatible. Specifications x Printer Printing method Dye sublimation printing (Yellow/ Magenta/Cyan 3 pass) Resolution 300 (H) x 300 (V) dpi Equivalent to 3 color Ink-Jet 4800 dpi x...PictBridge mode*5: Approx. 71 seconds PC mode*6: Approx. 60 seconds Input/Output connectors USB for a memory card/an external device Print cartridge/Print Paper See "Preparing the print pack" on page 10. Continued 87 GB Additional information LCD panel 5.0 cm (2.0 type) ...
...DCF 2.0 compatible, Exif 2.21 compatible, JFIF*7 TIFF: Exif 2.21 compatible BMP*8: 24bit Windows format Some image file formats are not compatible. Specifications x Printer Printing method Dye sublimation printing (Yellow/ Magenta/Cyan 3 pass) Resolution 300 (H) x 300 (V) dpi Equivalent to 3 color Ink-Jet 4800 dpi x...PictBridge mode*5: Approx. 71 seconds PC mode*6: Approx. 60 seconds Input/Output connectors USB for a memory card/an external device Print cartridge/Print Paper See "Preparing the print pack" on page 10. Continued 87 GB Additional information LCD panel 5.0 cm (2.0 type) ...
Operating Instructions
Page 91
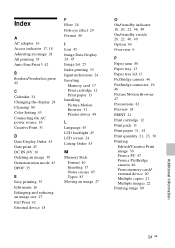
...I Icon 45 Image Data Display 24, 45 Image list 25 Index printing 35 Input indications 24 Inserting Memory card 17 Print cartridge 12 Print paper 13 Installing Picture Motion Browser 51 Printer driver 48 L Language 45 LCD backlight 45 LCD screen 24 Listing Order 45 M Memory Stick Format 40 Inserting 17 Notes... Paper tray 13 Paper tray lid 13 PictBridge camera 46 PictBridge connector 19, 46 Picture Motion Browser 47 Precautions 82 Preview 24 PRINT 21 Print cartridge 12 Print pack 11 Print paper 11, 14 Print quantity 21, 23, 30 Printing Edited/Creative Print image 30 From a PC 47 From a PictBridge ...
...I Icon 45 Image Data Display 24, 45 Image list 25 Index printing 35 Input indications 24 Inserting Memory card 17 Print cartridge 12 Print paper 13 Installing Picture Motion Browser 51 Printer driver 48 L Language 45 LCD backlight 45 LCD screen 24 Listing Order 45 M Memory Stick Format 40 Inserting 17 Notes... Paper tray 13 Paper tray lid 13 PictBridge camera 46 PictBridge connector 19, 46 Picture Motion Browser 47 Precautions 82 Preview 24 PRINT 21 Print cartridge 12 Print pack 11 Print paper 11, 14 Print quantity 21, 23, 30 Printing Edited/Creative Print image 30 From a PC 47 From a PictBridge ...

Quick Start Guide
Page 1
... be used for 40 prints x 2 SVM-F120P • 120 sheets of the printer. Use the print cartridge designed for this leaflet) * • Warranty (In some regions, the warranty is not supplied.) • Sony End User Software License Agreement • CD-ROM (Sony DPP-FP55 Printer Driver Software and Picture Motion Browser Ver. 1.1) Optional print packs For 4 x 6 inch...
... be used for 40 prints x 2 SVM-F120P • 120 sheets of the printer. Use the print cartridge designed for this leaflet) * • Warranty (In some regions, the warranty is not supplied.) • Sony End User Software License Agreement • CD-ROM (Sony DPP-FP55 Printer Driver Software and Picture Motion Browser Ver. 1.1) Optional print packs For 4 x 6 inch...


