Operating Instructions
Page 3
...duplicated, use of those materials beyond this manual. 3 GB On trademarks and copyrights •VAIO is the trademark of Sony Corporation. • Microsoft and Windows® are registered trademarks or trademarks of Microsoft Corporation in the United States and other countries. •IBM and PC...1998, 1999 Glenn RandersPehrson • Zlib © 1995- 2002 Jean-loup Gailly and Mark Adler •This product uses "Exif Toolkit For Windows Ver.2.4 (Copyright © 1998 FUJI PHOTO FILM CO., LTD. For some demonstrations, performances, or exhibits, photography may be the trademarks or ...
...duplicated, use of those materials beyond this manual. 3 GB On trademarks and copyrights •VAIO is the trademark of Sony Corporation. • Microsoft and Windows® are registered trademarks or trademarks of Microsoft Corporation in the United States and other countries. •IBM and PC...1998, 1999 Glenn RandersPehrson • Zlib © 1995- 2002 Jean-loup Gailly and Mark Adler •This product uses "Exif Toolkit For Windows Ver.2.4 (Copyright © 1998 FUJI PHOTO FILM CO., LTD. For some demonstrations, performances, or exhibits, photography may be the trademarks or ...
Operating Instructions
Page 10
... spot. 10 GB You can print up to 25 sheets for Post Card size and 30 sheets for the Post Card and 3.5 x 5 inch size prints. Windows PC support with a convenient USB connection (page 85) By connecting the printer to your computer. ** PictBridge is a standard that you can print an image easily...
... spot. 10 GB You can print up to 25 sheets for Post Card size and 30 sheets for the Post Card and 3.5 x 5 inch size prints. Windows PC support with a convenient USB connection (page 85) By connecting the printer to your computer. ** PictBridge is a standard that you can print an image easily...
Operating Instructions
Page 11
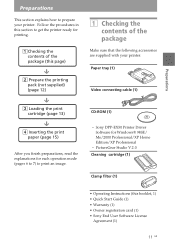
... (this booklet, 1) • Quick Start Guide (1) • Warranty (1) • Owner registration card (1) • Sony End User Software License Agreement (1) 11 GB Sony DPP-EX50 Printer Driver Software for each operation mode (pages 6 to 7) to print an image. 1 Checking the contents of the package...x 3 Loading the print cartridge (page 13) x 4 Inserting the print paper (page 15) After you finish preparations, read the explanations for Windows® 98SE/ Me/2000 Professional/XP Home Edition/XP Professional - Paper tray (1) Video connecting cable (1) CD-ROM (1) - Follow the procedures in...
... (this booklet, 1) • Quick Start Guide (1) • Warranty (1) • Owner registration card (1) • Sony End User Software License Agreement (1) 11 GB Sony DPP-EX50 Printer Driver Software for each operation mode (pages 6 to 7) to print an image. 1 Checking the contents of the package...x 3 Loading the print cartridge (page 13) x 4 Inserting the print paper (page 15) After you finish preparations, read the explanations for Windows® 98SE/ Me/2000 Professional/XP Home Edition/XP Professional - Paper tray (1) Video connecting cable (1) CD-ROM (1) - Follow the procedures in...

Operating Instructions
Page 31
Displaying the EDIT menu 1 Follow step 1 on an image (page 36). The previous window is displayed. 3 Press the arrow (B/b) button to display its preview image. Adjusts the picture quality of an image or item (page 32). Resets the editing (...
Displaying the EDIT menu 1 Follow step 1 on an image (page 36). The previous window is displayed. 3 Press the arrow (B/b) button to display its preview image. Adjusts the picture quality of an image or item (page 32). Resets the editing (...

Operating Instructions
Page 36
... the right and left eye separately. 4 Press the arrow (B/b/V/v) button to execute the red-eye reduction adjustment. The red-eye reduction is canceled and the window of red-eye reduction adjustment is enlarged. 5 Press ENTER to select "Execute" and press ENTER. To reset the adjustment Press CANCEL in step 5. Select a character...
... the right and left eye separately. 4 Press the arrow (B/b/V/v) button to execute the red-eye reduction adjustment. The red-eye reduction is canceled and the window of red-eye reduction adjustment is enlarged. 5 Press ENTER to select "Execute" and press ENTER. To reset the adjustment Press CANCEL in step 5. Select a character...

Operating Instructions
Page 37
.... The characters are input in the "FONT" button. The changed font and color will be applied to select "COLOR" and press ENTER. The color selection window is displayed: Note You cannot specify multiple fonts and colors for each line of 5 lines. You can enter the maximum of characters. 5 Press the arrow...
.... The characters are input in the "FONT" button. The changed font and color will be applied to select "COLOR" and press ENTER. The color selection window is displayed: Note You cannot specify multiple fonts and colors for each line of 5 lines. You can enter the maximum of characters. 5 Press the arrow...

Operating Instructions
Page 38
... adjust the size and position of input characters is large, you press ENTER, the characters rotate 90° counterclockwise. The characters are superimposed on the window and then press ENTER repeatedly until the cursor (|) moves to the position where you want to insert a character. 6 After you press ENTER, the characters rotate...
... adjust the size and position of input characters is large, you press ENTER, the characters rotate 90° counterclockwise. The characters are superimposed on the window and then press ENTER repeatedly until the cursor (|) moves to the position where you want to insert a character. 6 After you press ENTER, the characters rotate...

Operating Instructions
Page 39
... of 80 characters, can be registered. 1 Follow steps 1 through 5 in "Superimposing characters" (pages 36 and 37) to enter characters that you want to display the window used characters as a message You can load them later onto the character input box. Note The characters having been input in the input box. 2 Press...
... of 80 characters, can be registered. 1 Follow steps 1 through 5 in "Superimposing characters" (pages 36 and 37) to enter characters that you want to display the window used characters as a message You can load them later onto the character input box. Note The characters having been input in the input box. 2 Press...

Operating Instructions
Page 41
... menu bar is displayed. 2 Press the arrow (B/b) button to select "OK" and press ENTER. To save an edited image, follow the steps in the EDIT window and reset the edited image to its original status. Resetting the editing You can change some printer settings or option menu items such as "Finish...
... menu bar is displayed. 2 Press the arrow (B/b) button to select "OK" and press ENTER. To save an edited image, follow the steps in the EDIT window and reset the edited image to its original status. Resetting the editing You can change some printer settings or option menu items such as "Finish...

Operating Instructions
Page 43
... 136 and 137. 1 Display the Creative Print menu (page 43). 2 Press the arrow (B/b/V/v) button to make an original free layout print. The print size selection window is displayed. Continued 43 GB The Creative Print menu is displayed. 2 Press the arrow (B/b) button to select (Creative Print) and then press ENTER. Making a Creative... (MONITOR OUT mode) Displaying the Creative Print menu 1 Press MENU. Creative Print menu icon Menu bar To exit the menu mode Press MENU. The previous window is displayed.
... 136 and 137. 1 Display the Creative Print menu (page 43). 2 Press the arrow (B/b/V/v) button to make an original free layout print. The print size selection window is displayed. Continued 43 GB The Creative Print menu is displayed. 2 Press the arrow (B/b) button to select (Creative Print) and then press ENTER. Making a Creative... (MONITOR OUT mode) Displaying the Creative Print menu 1 Press MENU. Creative Print menu icon Menu bar To exit the menu mode Press MENU. The previous window is displayed.

Operating Instructions
Page 44
3 Press the arrow (B/b) button to select (Image) and press ENTER. The wallpaper selection window is displayed. If you do not want to use a frame, select "No Frame." If you do not want to select the desired wallpaper, then press ...ENTER. When you want to place wallpaper on the image, select "No Wallpaper." The frame selection window is displayed. 44 GB The image list is displayed. The preview window of the selected wallpaper is displayed. 5 Press the arrow (B/b/V/v) button to select the print size, then press ENTER. Selected...
3 Press the arrow (B/b) button to select (Image) and press ENTER. The wallpaper selection window is displayed. If you do not want to use a frame, select "No Frame." If you do not want to select the desired wallpaper, then press ...ENTER. When you want to place wallpaper on the image, select "No Wallpaper." The frame selection window is displayed. 44 GB The image list is displayed. The preview window of the selected wallpaper is displayed. 5 Press the arrow (B/b/V/v) button to select the print size, then press ENTER. Selected...

Operating Instructions
Page 45
... image rotates 90° counterclockwise. 10 Press the arrow (B/b/V/v) button to select "Execute" and press ENTER. Continued 45 GB The window used for adjusting the image size and position is displayed. Each time you press ENTER, the framed image becomes larger. Items Procedures Each... time you press ENTER, the image becomes smaller. The window used for adjusting the framed image size and position is displayed. Adjustment tools 9 Press the arrow (B/b/V/v) button to select the desired adjustment...
... image rotates 90° counterclockwise. 10 Press the arrow (B/b/V/v) button to select "Execute" and press ENTER. Continued 45 GB The window used for adjusting the image size and position is displayed. Each time you press ENTER, the framed image becomes larger. Items Procedures Each... time you press ENTER, the image becomes smaller. The window used for adjusting the framed image size and position is displayed. Adjustment tools 9 Press the arrow (B/b/V/v) button to select the desired adjustment...

Operating Instructions
Page 46
...the arrow (B/b/V/v) button to select "Execute" and press ENTER. 11 Press the arrow (B/b/V/v) button to select the desired stamp, then press ENTER. The window used for adjusting the stamp size and position is displayed. The framed image is displayed. 46 GB Items you can add to the print Preview...effects to the print x Adding a stamp 1 Press the arrow (B/b/V/v) button to 49). Using the items in this window, you can add your Creative print. The stamp selection window is displayed. 12 Check the preview, then save and print your favorite effects on the print (pages 46 to select ...
...the arrow (B/b/V/v) button to select "Execute" and press ENTER. 11 Press the arrow (B/b/V/v) button to select the desired stamp, then press ENTER. The window used for adjusting the stamp size and position is displayed. The framed image is displayed. 46 GB Items you can add to the print Preview...effects to the print x Adding a stamp 1 Press the arrow (B/b/V/v) button to 49). Using the items in this window, you can add your Creative print. The stamp selection window is displayed. 12 Check the preview, then save and print your favorite effects on the print (pages 46 to select ...

Operating Instructions
Page 47
... and position is displayed. 2 Press the arrow (B/b/V/v) button to select the desired message, then press ENTER. The window of the message. The character color selection window is displayed. 4 Press the arrow (B/b/V/v) button to select the desired color and then press ENTER. To cancel the...page 45. 5 Press the arrow (B/b/V/v) button to select (Message) and press ENTER. For information on adjustment, see step 8 on page 45. The window of the stamp. x Adding a message 1 Press the arrow (B/b/V/v) button to select "Execute" and then press ENTER. The selected stamp is pasted on...
... and position is displayed. 2 Press the arrow (B/b/V/v) button to select the desired message, then press ENTER. The window of the message. The character color selection window is displayed. 4 Press the arrow (B/b/V/v) button to select the desired color and then press ENTER. To cancel the...page 45. 5 Press the arrow (B/b/V/v) button to select (Message) and press ENTER. For information on adjustment, see step 8 on page 45. The window of the stamp. x Adding a message 1 Press the arrow (B/b/V/v) button to select "Execute" and then press ENTER. The selected stamp is pasted on...

Operating Instructions
Page 48
... for Sunday and Saturday. Press the arrow (B/b) to select the month or year and press the arrow (V/ v) button to select "Sunday" or "Monday." The window of the previous step is displayed. 2 Press the arrow (B/b/V/v) button to select the desired calendar type and press ENTER. Press the arrow (B/b) button to set ... select the desired color for selecting a calendar type is displayed. 48 GB x Adding a calendar 1 Press the arrow (B/b/V/v) button to select an option. The calendar setting window is displayed. 3 Set the calendar. Then press ENTER.
... for Sunday and Saturday. Press the arrow (B/b) to select the month or year and press the arrow (V/ v) button to select "Sunday" or "Monday." The window of the previous step is displayed. 2 Press the arrow (B/b/V/v) button to select the desired calendar type and press ENTER. Press the arrow (B/b) button to set ... select the desired color for selecting a calendar type is displayed. 48 GB x Adding a calendar 1 Press the arrow (B/b/V/v) button to select an option. The calendar setting window is displayed. 3 Set the calendar. Then press ENTER.

Operating Instructions
Page 49
.... For information on adjustment, see "Superimposing characters" on page 45. 6 Press the arrow (B/b/V/v) button to 39. 5 Adjust the size and position of the calendar. The window used for adjusting the calendar size and position is displayed. x Superimposing characters Press the arrow (B/b/V/v) button to select "Execute" and then press ENTER. 4 Press the...
.... For information on adjustment, see "Superimposing characters" on page 45. 6 Press the arrow (B/b/V/v) button to 39. 5 Adjust the size and position of the calendar. The window used for adjusting the calendar size and position is displayed. x Superimposing characters Press the arrow (B/b/V/v) button to select "Execute" and then press ENTER. 4 Press the...

Operating Instructions
Page 50
...Press the arrow (B/b) button to select the desired template, then press ENTER. When you select "Postcard size" 50 GB The image list is displayed. The window used for each area. 1 Press the arrow (B/b/V/v) button to select an image for selecting the calendar type is displayed. 4 Press the arrow (B/b/V/v) button... to select the print size, then press ENTER. The print size selection window is displayed. Making a calendar You can select and set an image area or calendar area in any order. 5 Select an image.
...Press the arrow (B/b) button to select the desired template, then press ENTER. When you select "Postcard size" 50 GB The image list is displayed. The window used for each area. 1 Press the arrow (B/b/V/v) button to select an image for selecting the calendar type is displayed. 4 Press the arrow (B/b/V/v) button... to select the print size, then press ENTER. The print size selection window is displayed. Making a calendar You can select and set an image area or calendar area in any order. 5 Select an image.

Operating Instructions
Page 51
Move the image with the arrow (B/b/V/v) button, and then press ENTER. Each time you press ENTER, the image becomes smaller. The calendar setting window is displayed. The window used for adjusting the image size and position is displayed. Each time you press ENTER, the image rotates 90° clockwise. Each time you press...
Move the image with the arrow (B/b/V/v) button, and then press ENTER. Each time you press ENTER, the image becomes smaller. The calendar setting window is displayed. The window used for adjusting the image size and position is displayed. Each time you press ENTER, the image rotates 90° clockwise. Each time you press...

Operating Instructions
Page 53
... procedures below . 1 Display the Creative Print menu (page 43). 2 Press the arrow (B/b/V/v) button to select the image area, then press ENTER. The print size selection window is displayed. 4 Press the arrow (B/b/V/v) button to select the print size, then press ENTER. Printing using a TV monitor (MONITOR OUT mode) Making a card You can...
... procedures below . 1 Display the Creative Print menu (page 43). 2 Press the arrow (B/b/V/v) button to select the image area, then press ENTER. The print size selection window is displayed. 4 Press the arrow (B/b/V/v) button to select the print size, then press ENTER. Printing using a TV monitor (MONITOR OUT mode) Making a card You can...

Operating Instructions
Page 54
...arrow (B/b/V/v) button to select the desired image, then press ENTER. Each time you press ENTER, the image becomes larger. The color selection window for adjusting the image size and position is displayed. Item Procedures Each time you press ENTER, the image becomes smaller. Each time you... press ENTER, the image rotates 90° clockwise. The message selection window is selected and displayed in the relevant area. 6 Enter a message. 1 Press the arrow (B/b/V/v) button to select the message area, then press ...
...arrow (B/b/V/v) button to select the desired image, then press ENTER. Each time you press ENTER, the image becomes larger. The color selection window for adjusting the image size and position is displayed. Item Procedures Each time you press ENTER, the image becomes smaller. Each time you... press ENTER, the image rotates 90° clockwise. The message selection window is selected and displayed in the relevant area. 6 Enter a message. 1 Press the arrow (B/b/V/v) button to select the message area, then press ...


