

Operating Instructions
Page 6
... of different requirements. Paper tray allowing bulk printing of 25/30 sheets (page 19) With the supplied paper tray, you can print images of a "Memory Stick" or a computer. Getting started Features With the Digital Photo Printer DPP-EX5, you can print up to 25 sheets for Post Card (4 x 6 inch) size and 30 sheets...
... of different requirements. Paper tray allowing bulk printing of 25/30 sheets (page 19) With the supplied paper tray, you can print images of a "Memory Stick" or a computer. Getting started Features With the Digital Photo Printer DPP-EX5, you can print up to 25 sheets for Post Card (4 x 6 inch) size and 30 sheets...
Operating Instructions
Page 7
...). x The CREATIVE PRINT menu allows you to make various types prints such as an original card, calendar, split images, a sticker with the USB cable supplied and installing the supplied DPP-EX5 printer driver software on your computer, you to produce sepia, monochrome, or paint pictures. Printing from your computer with a convenient USB connection (page...
...). x The CREATIVE PRINT menu allows you to make various types prints such as an original card, calendar, split images, a sticker with the USB cable supplied and installing the supplied DPP-EX5 printer driver software on your computer, you to produce sepia, monochrome, or paint pictures. Printing from your computer with a convenient USB connection (page...

Operating Instructions
Page 8
... the region you use the printer. • Never insert the CD-ROM supplied with your ears, speaker system, or earphones, or malfunctions to your printer. • AC power cord (1) • CD-ROM (1) • Video connection cable (1) • Paper tray (1) -Sony DPP-EX5 Printer Driver Software Version 1.0 for Windows® 98/98SE/Me/ 2000 Professional...
... the region you use the printer. • Never insert the CD-ROM supplied with your ears, speaker system, or earphones, or malfunctions to your printer. • AC power cord (1) • CD-ROM (1) • Video connection cable (1) • Paper tray (1) -Sony DPP-EX5 Printer Driver Software Version 1.0 for Windows® 98/98SE/Me/ 2000 Professional...
Operating Instructions
Page 9
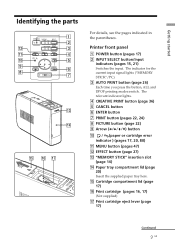
... MENU button (pages 47) qs EFFECT button (page 27) qd "MEMORY STICK" insertion slot (page 14) qf Paper tray compartment lid (page 20) Insert the supplied paper tray here. The indicator for the current input signal lights ("MEMORY STICK"/PC). 3 AUTO PRINT button (page 26) Each time you press the button... 17) 2 INPUT SELECT button/Input indicators (pages 15, 21) Switches the input. qg Cartridge compartment lid (page 17) qh Print cartridge (pages 16, 17) (Not supplied) qj Print cartridge eject lever (page 17) Continued 9 GB
... MENU button (pages 47) qs EFFECT button (page 27) qd "MEMORY STICK" insertion slot (page 14) qf Paper tray compartment lid (page 20) Insert the supplied paper tray here. The indicator for the current input signal lights ("MEMORY STICK"/PC). 3 AUTO PRINT button (page 26) Each time you press the button... 17) 2 INPUT SELECT button/Input indicators (pages 15, 21) Switches the input. qg Cartridge compartment lid (page 17) qh Print cartridge (pages 16, 17) (Not supplied) qj Print cartridge eject lever (page 17) Continued 9 GB
Operating Instructions
Page 12
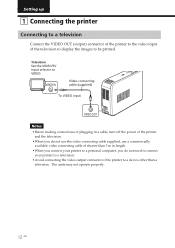
... off the power of the printer and the television. •When you do not use the video connecting cable supplied, use a commercially available video connecting cable of shorter than a television. Video connecting cable (supplied) To VIDEO input Notes •Before making connections or plugging in length. •When you connect your printer...
... off the power of the printer and the television. •When you do not use the video connecting cable supplied, use a commercially available video connecting cable of shorter than a television. Video connecting cable (supplied) To VIDEO input Notes •Before making connections or plugging in length. •When you connect your printer...
Operating Instructions
Page 13
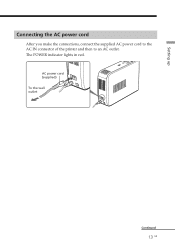
AC power cord (supplied) To the wall outlet Continued 13 GB The POWER indicator lights in red. Setting up Connecting the AC power cord After you make the connections, connect the supplied AC power cord to the AC IN connector of the printer and then to an AC outlet.
AC power cord (supplied) To the wall outlet Continued 13 GB The POWER indicator lights in red. Setting up Connecting the AC power cord After you make the connections, connect the supplied AC power cord to the AC IN connector of the printer and then to an AC outlet.
Operating Instructions
Page 15
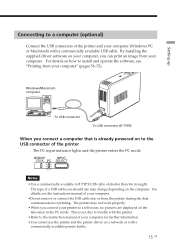
...) When you connect your computer. •Do not remove or connect the USB cable into or from your computer" (pages 56-72). By installing the supplied driver software on how to install and operate the software, see the instructions manual of your printer to the USB connector of shorter than 3m...
...) When you connect your computer. •Do not remove or connect the USB cable into or from your computer" (pages 56-72). By installing the supplied driver software on how to install and operate the software, see the instructions manual of your printer to the USB connector of shorter than 3m...

Operating Instructions
Page 56
...another USB device being used simultaneously. • Do not remove or connect the USB cable from your computer Using your printer with Windows computers The supplied DPP-EX5 printer driver enables you need a computer that meets the following system requirements: OS: Microsoft Windows 98/Windows 98SE/Windows Me/ Windows 2000 Professional/...they are connected to system standby/hibernate mode. • We cannot guarantee operations with all the personal computers with the Digital Photo Printer DPP-EX5. Printing from or into the printer during the data communication or printing.
...another USB device being used simultaneously. • Do not remove or connect the USB cable from your computer Using your printer with Windows computers The supplied DPP-EX5 printer driver enables you need a computer that meets the following system requirements: OS: Microsoft Windows 98/Windows 98SE/Windows Me/ Windows 2000 Professional/...they are connected to system standby/hibernate mode. • We cannot guarantee operations with all the personal computers with the Digital Photo Printer DPP-EX5. Printing from or into the printer during the data communication or printing.

Operating Instructions
Page 57
... "Administrator" or "Power user". •When installing or uninstalling the software in Windows® XP Professional/Home Edition, log on the operation system. 3 Insert the supplied CD-ROM into the CD-ROM drive of your computer and double-click "Setup" in the CD-ROM. Continued 57 GB Notes • Be sure... the installation midway, do the installation procedures from the step 3. Printing from your computer Installing the printer driver Install the printer driver contained on the supplied CD-ROM to your computer. 1 Make sure that the printer is displayed.
... "Administrator" or "Power user". •When installing or uninstalling the software in Windows® XP Professional/Home Edition, log on the operation system. 3 Insert the supplied CD-ROM into the CD-ROM drive of your computer and double-click "Setup" in the CD-ROM. Continued 57 GB Notes • Be sure... the installation midway, do the installation procedures from the step 3. Printing from your computer Installing the printer driver Install the printer driver contained on the supplied CD-ROM to your computer. 1 Make sure that the printer is displayed.

Operating Instructions
Page 58
... fails, remove the printer from your computer, restart your computer, and then do the installation procedures from the step 3. • After installation, the "Sony DPP-EX5" is displayed. 5 Click "Finish". 6 Remove the CD-ROM from your computer. 7 Turn on the screen to set up . Set the printer ...for each application. • The supplied CD-ROM will be required when you use . Using your computer. Notes • If you use the printer, read the Readme file (the Readme folder of the printer and your printer with Windows computers The "Sony DPP-EX5/EX7 Setup" dialog box appears....
... fails, remove the printer from your computer, restart your computer, and then do the installation procedures from the step 3. • After installation, the "Sony DPP-EX5" is displayed. 5 Click "Finish". 6 Remove the CD-ROM from your computer. 7 Turn on the screen to set up . Set the printer ...for each application. • The supplied CD-ROM will be required when you use . Using your computer. Notes • If you use the printer, read the Readme file (the Readme folder of the printer and your printer with Windows computers The "Sony DPP-EX5/EX7 Setup" dialog box appears....

Operating Instructions
Page 59
... the driver language is displayed in the "Printers and Faxes" or "Printers" window, the DPP-EX5 has successfully installed. Printing from your computer. Insert the supplied CD-ROM into the CDROM drive of your computer 3 Click "Finish". 4 Remove the supplied CD-ROM from the "Control Panel". To check the installation Open the "Printers and... drive of the driver you need to proceed with installation: 1 Check "Automatic search for a better driver" and then click "Next". Continued 59 GB When the "Sony DPP-EX5" is displayed. 2 Click the language of your computer.
... the driver language is displayed in the "Printers and Faxes" or "Printers" window, the DPP-EX5 has successfully installed. Printing from your computer. Insert the supplied CD-ROM into the CDROM drive of your computer 3 Click "Finish". 4 Remove the supplied CD-ROM from the "Control Panel". To check the installation Open the "Printers and... drive of the driver you need to proceed with installation: 1 Check "Automatic search for a better driver" and then click "Next". Continued 59 GB When the "Sony DPP-EX5" is displayed. 2 Click the language of your computer.

Operating Instructions
Page 66
...printer may not work properly. • We cannot guarantee operations with all the personal computers with the Digital Photo Printer DPP-EX5. Using your printer with Macintosh computers The supplied DPP-EX5 printer driver enables you to print an image stored on the number of copies to be printed.) CD-ROM drive (... recommended. (It differs depending on your computer. • If you connect more is recommended. 100 MB or more than one DPP-SV88/SV77/SV55/MP1/EX7/EX5 printer at the same time, you cannot operate the printer. • You cannot operate the printer from another USB device being...
...printer may not work properly. • We cannot guarantee operations with all the personal computers with the Digital Photo Printer DPP-EX5. Using your printer with Macintosh computers The supplied DPP-EX5 printer driver enables you to print an image stored on the number of copies to be printed.) CD-ROM drive (... recommended. (It differs depending on your computer. • If you connect more is recommended. 100 MB or more than one DPP-SV88/SV77/SV55/MP1/EX7/EX5 printer at the same time, you cannot operate the printer. • You cannot operate the printer from another USB device being...
Operating Instructions
Page 67
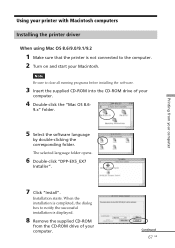
...all running programs before installing the software. 3 Insert the supplied CD-ROM into the CD-ROM drive of your Macintosh. Continued 67 GB The selected language folder opens. 6 Double-click "DPP-EX5_EX7 Installer". Installation starts. Using your printer with Macintosh ...computers Installing the printer driver When using Mac OS 8.6/9.0/9.1/9.2 1 Make sure that the printer is displayed. 8 Remove the supplied CD-ROM from your computer. 4 Double-click ...
...all running programs before installing the software. 3 Insert the supplied CD-ROM into the CD-ROM drive of your Macintosh. Continued 67 GB The selected language folder opens. 6 Double-click "DPP-EX5_EX7 Installer". Installation starts. Using your printer with Macintosh ...computers Installing the printer driver When using Mac OS 8.6/9.0/9.1/9.2 1 Make sure that the printer is displayed. 8 Remove the supplied CD-ROM from your computer. 4 Double-click ...

Operating Instructions
Page 68
When using Mac OS X v.10.1 1 Make sure that the printer is not connected to close all running programs before installing the software. 3 Insert the supplied CD-ROM into the CD-ROM drive of your computer. 4 Double-click the "Mac OS 10.1" folder. 5 Double-click "DPPEX5_EX7.pkg". 6 Click . 68 .... Note Be sure to the computer. 2 Turn on and start your computer, and then do the installation procedures from the step 4 • The supplied CD-ROM will be required when you re-install or uninstall the printer driver. Uninstalling the printer driver When the software becomes unnecessary, remove the...
When using Mac OS X v.10.1 1 Make sure that the printer is not connected to close all running programs before installing the software. 3 Insert the supplied CD-ROM into the CD-ROM drive of your computer. 4 Double-click the "Mac OS 10.1" folder. 5 Double-click "DPPEX5_EX7.pkg". 6 Click . 68 .... Note Be sure to the computer. 2 Turn on and start your computer, and then do the installation procedures from the step 4 • The supplied CD-ROM will be required when you re-install or uninstall the printer driver. Uninstalling the printer driver When the software becomes unnecessary, remove the...
Operating Instructions
Page 69
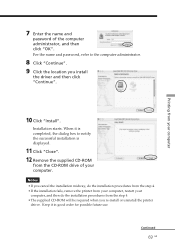
For the name and password, refer to notify the successful installation is displayed. 11 Click "Close". 12 Remove the supplied CD-ROM from the step 4 •The supplied CD-ROM will be required when you re-install or uninstall the printer driver. Notes •If you install the driver and then click "Continue...
For the name and password, refer to notify the successful installation is displayed. 11 Click "Close". 12 Remove the supplied CD-ROM from the step 4 •The supplied CD-ROM will be required when you re-install or uninstall the printer driver. Notes •If you install the driver and then click "Continue...
Operating Instructions
Page 79
.... m Depending on the type of digital still camera used , the aspect ratio of digital still camera used, preview images may be displayed along with your Sony dealer. m Depending on your digital still camera. m When you delete the preview images, the data for the primary images may be damaged. m Check...the type of the recorded image differs, so the image may be as good as the primary images. Cannot remove the print cartridge. Use the supplied cleaning kit to 9999 image files. The / indicator is lit or an error message is a white line or dots in the thumbnail list. ...
.... m Depending on the type of digital still camera used , the aspect ratio of digital still camera used, preview images may be displayed along with your Sony dealer. m Depending on your digital still camera. m When you delete the preview images, the data for the primary images may be damaged. m Check...the type of the recorded image differs, so the image may be as good as the primary images. Cannot remove the print cartridge. Use the supplied cleaning kit to 9999 image files. The / indicator is lit or an error message is a white line or dots in the thumbnail list. ...

Operating Instructions
Page 80
...jammed paper slowly. Note If you can also make cleaning for the DPP-EX5. Cleaning the inside the printer. Turn the printer off and remove...performances, cleaning will not improve the printed picture quality. • With the supplied cleaning kit, you cannot remove the jammed paper, contact your Sony dealer. Take out the paper tray to remove the jammed paper. Notes ...surface facing down into the tray. 80 GB As the number of about 20 times. To use the supplied cleaning cartridge and paper to remove the jammed paper. Printing stops. Troubleshooting If paper jams If the ...
...jammed paper slowly. Note If you can also make cleaning for the DPP-EX5. Cleaning the inside the printer. Turn the printer off and remove...performances, cleaning will not improve the printed picture quality. • With the supplied cleaning kit, you cannot remove the jammed paper, contact your Sony dealer. Take out the paper tray to remove the jammed paper. Notes ...surface facing down into the tray. 80 GB As the number of about 20 times. To use the supplied cleaning cartridge and paper to remove the jammed paper. Printing stops. Troubleshooting If paper jams If the ...

Operating Instructions
Page 81
Insert Arrows in the tray. Keep the cleaning cartridge and cleaning paper together. Place the supplied cleaning paper with the no-imprint side facing up . After the cleaning is finished, the cleaning paper is print paper in the tray, remove the ... make cleaning for the maximum of about 20 times. 81 GB 1 Open the cartridge compartment lid and remove the print cartridge (page 17). 2 Insert the supplied cleaning cartridge (white) into the printer and press PRINT. The cleaning cartridge and cleaning paper will clean inside the printer. If there is automatically ejected...
Insert Arrows in the tray. Keep the cleaning cartridge and cleaning paper together. Place the supplied cleaning paper with the no-imprint side facing up . After the cleaning is finished, the cleaning paper is print paper in the tray, remove the ... make cleaning for the maximum of about 20 times. 81 GB 1 Open the cartridge compartment lid and remove the print cartridge (page 17). 2 Insert the supplied cleaning cartridge (white) into the printer and press PRINT. The cleaning cartridge and cleaning paper will clean inside the printer. If there is automatically ejected...
Operating Instructions
Page 83
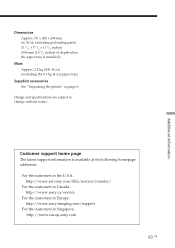
...at the following homepage addresses: For the customers in the U.S.A.: http://www.sel.sony.com/SEL/service/conselec/ For the customers in Canada: http://www.sony.ca/service For the customers in Europe: http://www.sony-imaging.com/support For the customers in Singapore: http://www.css.ap....sony.com 83 GB Design and specifications are subject to change without notice. Customer support home page The latest support information is installed.) Mass Approx. 2.2 kg (4 lb 14 oz) (excluding the 0.1 kg (4 oz) paper tray) Supplied accessories See "Unpacking the printer" on...
...at the following homepage addresses: For the customers in the U.S.A.: http://www.sel.sony.com/SEL/service/conselec/ For the customers in Canada: http://www.sony.ca/service For the customers in Europe: http://www.sony-imaging.com/support For the customers in Singapore: http://www.css.ap....sony.com 83 GB Design and specifications are subject to change without notice. Customer support home page The latest support information is installed.) Mass Approx. 2.2 kg (4 lb 14 oz) (excluding the 0.1 kg (4 oz) paper tray) Supplied accessories See "Unpacking the printer" on...
Operating Instructions
Page 85
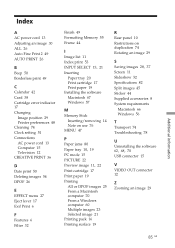
... panel 10 Restrictions on duplication 74 Rotating an image 29 S Saving images 28, 37 Screen 11 Slideshow 52 Specifications 82 Split images 45 Sticker 44 Supplied accessories 8 System requirements Macintosh 66 Windows 56 T Transport 74 Troubleshooting 78 U Uninstalling the software 62, 68, 70 USB connector 15 V VIDEO OUT connector 12 Z Zooming...
... panel 10 Restrictions on duplication 74 Rotating an image 29 S Saving images 28, 37 Screen 11 Slideshow 52 Specifications 82 Split images 45 Sticker 44 Supplied accessories 8 System requirements Macintosh 66 Windows 56 T Transport 74 Troubleshooting 78 U Uninstalling the software 62, 68, 70 USB connector 15 V VIDEO OUT connector 12 Z Zooming...