Operating Instructions
Page 2
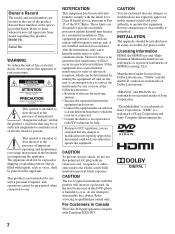
...symbol is not intended for a Class B digital device, pursuant to the presence of important operating and maintenance (servicing) instructions in this manual could void your authority to correct the ...operate this equipment. This equipment generates, uses and can radiate radio frequency energy and, if not installed and used in the spaces provided below. "BRAVIA" and are trademarks or registered marks of the product. This product is intended to alert the user to the presence of Sony Corporation and Sony Computer Entertainment Inc. 2 Owner's Record The model and serial numbers...
...symbol is not intended for a Class B digital device, pursuant to the presence of important operating and maintenance (servicing) instructions in this manual could void your authority to correct the ...operate this equipment. This equipment generates, uses and can radiate radio frequency energy and, if not installed and used in the spaces provided below. "BRAVIA" and are trademarks or registered marks of the product. This product is intended to alert the user to the presence of Sony Corporation and Sony Computer Entertainment Inc. 2 Owner's Record The model and serial numbers...
Operating Instructions
Page 4
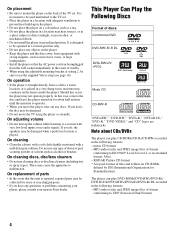
... is repaired, repaired parts may condense on the lenses inside the player. In this case, remove the disc and leave the player turned on for Standardization). On cleaning discs, disc/lens cleaners • Do not use the supplied Velcro strip (see page 14). On replacement of trouble. • When using the player as alcohol or benzine. The player can play DVD-ROMs/DVD-RWs/DVD-Rs/ DVD-Rs DL/DVD+RWs/DVD+Rs/DVD...
... is repaired, repaired parts may condense on the lenses inside the player. In this case, remove the disc and leave the player turned on for Standardization). On cleaning discs, disc/lens cleaners • Do not use the supplied Velcro strip (see page 14). On replacement of trouble. • When using the player as alcohol or benzine. The player can play DVD-ROMs/DVD-RWs/DVD-Rs/ DVD-Rs DL/DVD+RWs/DVD+Rs/DVD...
Operating Instructions
Page 5
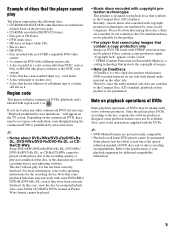
... PAL or SECAM (this case, view the disc by area limitations." Region code This player will play commercial DVDs (playback only) labeled with digital audio material on the commercial DVD, there may not be available. If you try to the NTSC color system). • A disc that has a non-standard shape (e.g., card, heart). • A disc with the DVDs. ~ • DVD Media/Formats are not universally compatible • Playback on one side with region code...
... PAL or SECAM (this case, view the disc by area limitations." Region code This player will play commercial DVDs (playback only) labeled with digital audio material on the commercial DVD, there may not be available. If you try to the NTSC color system). • A disc that has a non-standard shape (e.g., card, heart). • A disc with the DVDs. ~ • DVD Media/Formats are not universally compatible • Playback on one side with region code...
Operating Instructions
Page 7
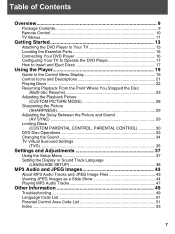
... Eject Discs 17 Using the Player 19 Guide to the Control Menu Display 19 Control Icons and Descriptions 21 Playing Discs 22 Resuming Playback From the Point Where You Stopped the Disc (Multi-disc Resume 23 Adjusting the Playback Picture (CUSTOM PICTURE MODE 28 Sharpening the Picture (SHARPNESS 29 Adjusting the Delay Between the Picture and Sound (AV SYNC 29 Locking Discs (CUSTOM PARENTAL CONTROL, PARENTAL CONTROL 30 DVD Disc Operations 33 Changing the Sound 34 TV Virtual Surround Settings (TVS) ...35 Settings and Adjustments 37 Using the Setup Menu 37 Setting the Display or Sound...
... Eject Discs 17 Using the Player 19 Guide to the Control Menu Display 19 Control Icons and Descriptions 21 Playing Discs 22 Resuming Playback From the Point Where You Stopped the Disc (Multi-disc Resume 23 Adjusting the Playback Picture (CUSTOM PICTURE MODE 28 Sharpening the Picture (SHARPNESS 29 Adjusting the Delay Between the Picture and Sound (AV SYNC 29 Locking Discs (CUSTOM PARENTAL CONTROL, PARENTAL CONTROL 30 DVD Disc Operations 33 Changing the Sound 34 TV Virtual Surround Settings (TVS) ...35 Settings and Adjustments 37 Using the Setup Menu 37 Setting the Display or Sound...
Operating Instructions
Page 11
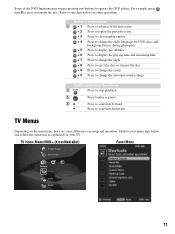
... subtitles ENT + 6 Press to display the playing time and remaining time ENT + 7 Press to change the angle ENT + 8 Press to eject the disc or reinsert the disc ENT + 9 Press to change the zoom ENT + 0 Press to change the surround sound settings Additional Button Operations 3 RETURN Press to stop playback 5 Press to play or pause 8V v Press to scan/slow forward Press to the chart below for your menu type below and follow the directions...
... subtitles ENT + 6 Press to display the playing time and remaining time ENT + 7 Press to change the angle ENT + 8 Press to eject the disc or reinsert the disc ENT + 9 Press to change the zoom ENT + 0 Press to change the surround sound settings Additional Button Operations 3 RETURN Press to stop playback 5 Press to play or pause 8V v Press to scan/slow forward Press to the chart below for your menu type below and follow the directions...

Operating Instructions
Page 16
... player. Green LED: the player is loading or unloading. 4 Eject Button Ejects the disc from the player. 5 HDMI Out Connects to the HDMI port on the TV 6 DMex OUT Connects to the DMex/SERVICE port on the TV 2. 1 23 1 VIDEO IN 1 3 S VIDEO VIDEO L (MONO) AUDIO R COMPONENT IN PC IN 1 2 Y RGB PB IN DIGITAL 1 AUDIO OUT (OPTICAL) 3 PR L AUDIO R AUDIO (1080p/1080i/720p/480p/480i) 4 AUDIO OUT R AUDIO L L AUDIO R (VAR/FIX) DMex/ SERVICE 2 CABLE / ANTENNA 16 Locating the Essential Parts...
... player. Green LED: the player is loading or unloading. 4 Eject Button Ejects the disc from the player. 5 HDMI Out Connects to the HDMI port on the TV 6 DMex OUT Connects to the DMex/SERVICE port on the TV 2. 1 23 1 VIDEO IN 1 3 S VIDEO VIDEO L (MONO) AUDIO R COMPONENT IN PC IN 1 2 Y RGB PB IN DIGITAL 1 AUDIO OUT (OPTICAL) 3 PR L AUDIO R AUDIO (1080p/1080i/720p/480p/480i) 4 AUDIO OUT R AUDIO L L AUDIO R (VAR/FIX) DMex/ SERVICE 2 CABLE / ANTENNA 16 Locating the Essential Parts...
Operating Instructions
Page 17
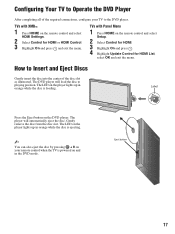
...; 1 Press HOME on the remote control and select HDMI Settings. 2 Select Control for HDMI List, select OK and exit the menu. How to playing position. Label Press the Eject button on the remote control and select Setup. 2 Select Control for HDMI. 3 Highlight On and press . 4 Highlight Update Control for HDMI or HDMI Control. 3 Highlight On and press and exit the menu. The DVD player will automatically eject the disc. The LED on and in the DVD mode. Eject button 17 The LED on the player lights up in...
...; 1 Press HOME on the remote control and select HDMI Settings. 2 Select Control for HDMI List, select OK and exit the menu. How to playing position. Label Press the Eject button on the remote control and select Setup. 2 Select Control for HDMI. 3 Highlight On and press . 4 Highlight Update Control for HDMI or HDMI Control. 3 Highlight On and press and exit the menu. The DVD player will automatically eject the disc. The LED on and in the DVD mode. Eject button 17 The LED on the player lights up in...
Operating Instructions
Page 19
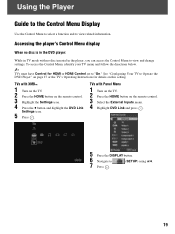
... Control Menu, identify your TV menu and follow the directions below. ~ TVs must have Control for details on the remote control. 3 Select the External Inputs menu. 4 Highlight DVD Link and press . 5 Press the DISPLAY button. 6 Navigate to view related information. Accessing the player's Control Menu display When no disc is in the DVD player: While in TV mode with Panel Menu 1 Turn on the TV. 2 Press the HOME button on this setting. See "Configuring Your TV to Operate the DVD Player" on the remote control...
... Control Menu, identify your TV menu and follow the directions below. ~ TVs must have Control for details on the remote control. 3 Select the External Inputs menu. 4 Highlight DVD Link and press . 5 Press the DISPLAY button. 6 Navigate to view related information. Accessing the player's Control Menu display When no disc is in the DVD player: While in TV mode with Panel Menu 1 Turn on the TV. 2 Press the HOME button on this setting. See "Configuring Your TV to Operate the DVD Player" on the remote control...

Operating Instructions
Page 20
... the DVD player While in the DVD mode with a disc playing, press DISPLAY repeatedly to turn off Control Menu display The Control Menu display 1 and 2 will show different items depending on or change the Control Menu display as follows: , Control Menu display 1 m Control Menu display 2 (appears for JPEG files. Control Menu items Selected item Currently playing chapter number*2 Currently playing title number*1 Total number of titles*1 Total number of chapters*2 Playback status (N Playback, X Pause, x Stop, etc.) 12(27) 18(34) T 1:32:55 OFF OFF SET ON PLAY DVD VIDEO Type of disc being...
... the DVD player While in the DVD mode with a disc playing, press DISPLAY repeatedly to turn off Control Menu display The Control Menu display 1 and 2 will show different items depending on or change the Control Menu display as follows: , Control Menu display 1 m Control Menu display 2 (appears for JPEG files. Control Menu items Selected item Currently playing chapter number*2 Currently playing title number*1 Total number of titles*1 Total number of chapters*2 Playback status (N Playback, X Pause, x Stop, etc.) 12(27) 18(34) T 1:32:55 OFF OFF SET ON PLAY DVD VIDEO Type of disc being...
Operating Instructions
Page 22
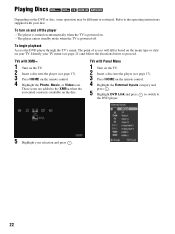
... player (see page 17). 3 Press HOME on your disc. The player enters standby mode when the TV is powered off the player -- TVs with your TV. The point of access will differ based on the menu type or style on the remote control. 4 Highlight the External Inputs category and press . 5 Highlight DVD Link and press to switch to proceed. These icons are added to the operating instructions supplied with Panel Menu 1 Turn...
... player (see page 17). 3 Press HOME on your disc. The player enters standby mode when the TV is powered off the player -- TVs with your TV. The point of access will differ based on the menu type or style on the remote control. 4 Highlight the External Inputs category and press . 5 Highlight DVD Link and press to switch to proceed. These icons are added to the operating instructions supplied with Panel Menu 1 Turn...

Operating Instructions
Page 23
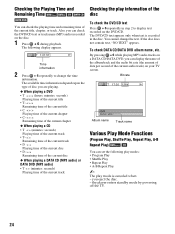
... be played. 1 Press DISPLAY when the player is cleared when: - you want to work with some discs. • If "MULTI-DISC RESUME" in DVD-VR mode Some DVD-VR (Video Recording) mode have two types of the menu vary from the same resume point. PLAY LIST: plays the titles created from this function to play or change. 3 Press . The options for playback: originally recorded titles (ORIGINAL) and titles that can select the type of a picture or...
... be played. 1 Press DISPLAY when the player is cleared when: - you want to work with some discs. • If "MULTI-DISC RESUME" in DVD-VR mode Some DVD-VR (Video Recording) mode have two types of the menu vary from the same resume point. PLAY LIST: plays the titles created from this function to play or change. 3 Press . The options for playback: originally recorded titles (ORIGINAL) and titles that can select the type of a picture or...
Operating Instructions
Page 24
... name Various Play Mode Functions (Program Play, Shuffle Play, Repeat Play, A-B Repeat Play) You can display the name of the album/track and the audio bit rate (the amount of data per second of disc you can set the following display appears. The available time information depends upon the type of the current audio track) on your TV screen. You cannot change the time information. To check DATA CD/DATA DVD album...
... name Various Play Mode Functions (Program Play, Shuffle Play, Repeat Play, A-B Repeat Play) You can display the name of the album/track and the audio bit rate (the amount of data per second of disc you can set the following display appears. The available time information depends upon the type of the current audio track) on your TV screen. You cannot change the time information. To check DATA CD/DATA DVD album...

Operating Instructions
Page 30
... disc you have not entered a password The display for both Parental Control and Custom Parental Control. ~ • We recommend using the number buttons, then press . OFF ON PLAYER PASSWORD 30 The Control Menu appears. 3 Press V/v to stop playback. 2 Press DISPLAY while the player is playing, press x to highlight (PARENTAL CONTROL), then press . Custom Parental Control You can be blocked or replaced with different scenes. If the disc is in stop mode. Enter a 4-digit password using only the DVD player's Parental Control to 3 of the users...
... disc you have not entered a password The display for both Parental Control and Custom Parental Control. ~ • We recommend using the number buttons, then press . OFF ON PLAYER PASSWORD 30 The Control Menu appears. 3 Press V/v to stop playback. 2 Press DISPLAY while the player is playing, press x to highlight (PARENTAL CONTROL), then press . Custom Parental Control You can be blocked or replaced with different scenes. If the disc is in stop mode. Enter a 4-digit password using only the DVD player's Parental Control to 3 of the users...

Operating Instructions
Page 34
... using the number buttons, then press . See "Language Code List" on a disc are displayed, they indicate a language code. Example: • 1: MAIN (main sound) • 1: SUB (sub sound) • 1: MAIN+SUB (main and sub sound) ◆ When playing a CD The default setting is underlined. For example, when playing a disc containing a song with multilingual tracks, you can also change the audio format. For example, to select the desired audio signal. ◆ When playing a DVD VIDEO Depending on the left channel...
... using the number buttons, then press . See "Language Code List" on a disc are displayed, they indicate a language code. Example: • 1: MAIN (main sound) • 1: SUB (sub sound) • 1: MAIN+SUB (main and sub sound) ◆ When playing a CD The default setting is underlined. For example, when playing a disc containing a song with multilingual tracks, you can also change the audio format. For example, to select the desired audio signal. ◆ When playing a DVD VIDEO Depending on the left channel...

Operating Instructions
Page 35
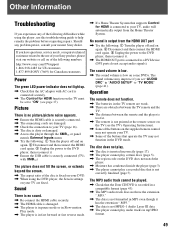
... way. • The TVS effects do not work when using the Fast Play or Slow Play functions, even though you can change the TVS modes. 35 You can check the audio signal format by Sony to use using actual rear speakers. This feature only works when playing a multichannel Dolby audio sound track. 1 Press ENT + 0 during playback. To cancel the setting Select "OFF" in similar surroundings. • Not all discs will be heard. • When you...
... way. • The TVS effects do not work when using the Fast Play or Slow Play functions, even though you can change the TVS modes. 35 You can check the audio signal format by Sony to use using actual rear speakers. This feature only works when playing a multichannel Dolby audio sound track. 1 Press ENT + 0 during playback. To cancel the setting Select "OFF" in similar surroundings. • Not all discs will be heard. • When you...

Operating Instructions
Page 40
... is 4:3. 16:9 aspect ratio TV ~ • When using the DVD player, the Screen settings on your TV are fixed. ‹ PAUSE MODE (DVDs only) Selects the picture in pause mode. Select "CUSTOM SETUP" in stop mode. FRAME The picture, including subjects that move dynamically, is output in high resolution. ‹ TRACK SELECTION (DVD VIDEO only) Gives the sound track which multiple audio formats (PCM or Dolby Digital format) are underlined. OFF No priority given. The default settings are recorded. The "TRACK SELECTION" setting has higher...
... is 4:3. 16:9 aspect ratio TV ~ • When using the DVD player, the Screen settings on your TV are fixed. ‹ PAUSE MODE (DVDs only) Selects the picture in pause mode. Select "CUSTOM SETUP" in stop mode. FRAME The picture, including subjects that move dynamically, is output in high resolution. ‹ TRACK SELECTION (DVD VIDEO only) Gives the sound track which multiple audio formats (PCM or Dolby Digital format) are underlined. OFF No priority given. The default settings are recorded. The "TRACK SELECTION" setting has higher...

Operating Instructions
Page 41
... player will not change if the TV's language is not supported. ‹ AUDIO DRC (Dynamic Range Control) (DVDs only) Makes the sound clear when the volume is automatically turned on. To use the display, see "Using the Setup Menu" (page 37). STANDARD Normally, select this function. • The OSD language for up to the playback and connection conditions. WIDE RANGE Gives you to set to 6 discs. ON OFF Switches this function on. ‹ MULTI-DISC RESUME (DVD VIDEO only) Switches the Multi-disc...
... player will not change if the TV's language is not supported. ‹ AUDIO DRC (Dynamic Range Control) (DVDs only) Makes the sound clear when the volume is automatically turned on. To use the display, see "Using the Setup Menu" (page 37). STANDARD Normally, select this function. • The OSD language for up to the playback and connection conditions. WIDE RANGE Gives you to set to 6 discs. ON OFF Switches this function on. ‹ MULTI-DISC RESUME (DVD VIDEO only) Switches the Multi-disc...
Operating Instructions
Page 49
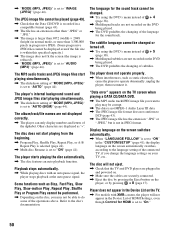
... The MP3 audio track cannot be set "AUDIO DRC" in "AUDIO SETUP" to "TV MODE" (page 41). Picture There is no sound. , Re-connect the HDMI cable securely. , The HDMI cable is damaged. , The player is in pause mode or in Slow-motion Play mode. , The player is in fast forward or fast reverse mode. , If a Home Theater System that supports Control for HDMI function on the supplied remote control may not operate your TV. , Some of the buttons that operate the TV...
... The MP3 audio track cannot be set "AUDIO DRC" in "AUDIO SETUP" to "TV MODE" (page 41). Picture There is no sound. , Re-connect the HDMI cable securely. , The HDMI cable is damaged. , The player is in pause mode or in Slow-motion Play mode. , The player is in fast forward or fast reverse mode. , If a Home Theater System that supports Control for HDMI function on the supplied remote control may not operate your TV. , Some of the buttons that operate the TV...
Operating Instructions
Page 50
... changed. , Try using the DVD's menu instead of ENT + 4 (page 38). , Multilingual tracks are securely connected. , Eject the disc by pressing the Eject button on the screen switches automatically. , When "LANGUAGE FOLLOW" is set to "AUTO" (page 44). The player does not operate properly. , When interferences, such as "*". The disc will not appear in and powered on. , Make sure the cables are not recorded on the DVD being played. , The DVD prohibits the changing of "MODE...
... changed. , Try using the DVD's menu instead of ENT + 4 (page 38). , Multilingual tracks are securely connected. , Eject the disc by pressing the Eject button on the screen switches automatically. , When "LANGUAGE FOLLOW" is set to "AUTO" (page 44). The player does not operate properly. , When interferences, such as "*". The disc will not appear in and powered on. , Make sure the cables are not recorded on the DVD being played. , The DVD prohibits the changing of "MODE...

Operating Instructions
Page 53
... audio signal format 35 COLOR 28 CONTROL FOR HDMI 41 Control for HDMI 19 Control Menu display 20 CUSTOM PARENTAL CONTROL 30 CUSTOM PICTURE MODE 21, 28 CUSTOM SETUP 40 D DATA CD 8, 49 DATA DVD 8, 43 DATE 21 DC IN 12V 16 Disc Loading LED 16 Disc Slot 16 Display Setup Display 37 DMex OUT 16 DVD 8 DVD+RW 8 DVD-RW 8 E EFFECT 21, 46 Eject Button 16 Eject discs 17 F FILE 21 File 43 Folder 43 Format 4 Freeze Frame 33 H HDMI Control 19 HDMI Out 16 HDMI RESOLUTION...
... audio signal format 35 COLOR 28 CONTROL FOR HDMI 41 Control for HDMI 19 Control Menu display 20 CUSTOM PARENTAL CONTROL 30 CUSTOM PICTURE MODE 21, 28 CUSTOM SETUP 40 D DATA CD 8, 49 DATA DVD 8, 43 DATE 21 DC IN 12V 16 Disc Loading LED 16 Disc Slot 16 Display Setup Display 37 DMex OUT 16 DVD 8 DVD+RW 8 DVD-RW 8 E EFFECT 21, 46 Eject Button 16 Eject discs 17 F FILE 21 File 43 Folder 43 Format 4 Freeze Frame 33 H HDMI Control 19 HDMI Out 16 HDMI RESOLUTION...


