
Operating Instructions
Page 3
...of materials will help to the area code, are trademarks or registered trademarks of the rear panel (see the illustration below). + - R R SPEAKERS RL FRONT B SPEAKERS Area code Any differences in operation, according to conserve natural resources. In this manual, models of area code CEL only". • The instructions ...in the text, for model STR-DG510. "Dolby", "Pro Logic" and the double-D symbol are trademarks of Dolby Laboratories. ** "DTS" and "DTS Digital Surround" are for example, "Models of this manual describe the controls on the receiver if they have the same or...
...of materials will help to the area code, are trademarks or registered trademarks of the rear panel (see the illustration below). + - R R SPEAKERS RL FRONT B SPEAKERS Area code Any differences in operation, according to conserve natural resources. In this manual, models of area code CEL only". • The instructions ...in the text, for model STR-DG510. "Dolby", "Pro Logic" and the double-D symbol are trademarks of Dolby Laboratories. ** "DTS" and "DTS Digital Surround" are for example, "Models of this manual describe the controls on the receiver if they have the same or...

Operating Instructions
Page 5
... audio components ........ 16 3b: Connecting the video components ........ 17 4: Connecting the antennas (aerials 25 5: Preparing the receiver and the remote..... 26 6: Selecting the speaker system 27 7: Calibrating the appropriate settings automatically (AUTO CALIBRATION 28 8: Adjusting the speaker levels and balance (TEST TONE 31 Playback Selecting a component 32 Listening/Watching a component 34 Amplifier Operations...
... audio components ........ 16 3b: Connecting the video components ........ 17 4: Connecting the antennas (aerials 25 5: Preparing the receiver and the remote..... 26 6: Selecting the speaker system 27 7: Calibrating the appropriate settings automatically (AUTO CALIBRATION 28 8: Adjusting the speaker levels and balance (TEST TONE 31 Playback Selecting a component 32 Listening/Watching a component 34 Amplifier Operations...

Operating Instructions
Page 6
...Function Turn to select a sound field (page 46). 6GB D Remote sensor Receives signals from remote commander. Name G MASTER VOLUME H DIRECT I AUTO CAL J INPUT SELECTOR K 2CH A.F.D. Press to adjust the volume level of all speakers at the same time (page 32, 33, 34, 35). Getting Started Description...INPUT MODE INPUT SELECTOR MASTER VOLUME MEMORY/ TUNING ENTER MODE TUNING 2CH A.F.D. Turn to select the input source to select the front (OFF/A/B) speaker system (page 27). Press to select information displayed on /standby) or off (page 26, 34, 35, 52, 69). E DISPLAY ...
...Function Turn to select a sound field (page 46). 6GB D Remote sensor Receives signals from remote commander. Name G MASTER VOLUME H DIRECT I AUTO CAL J INPUT SELECTOR K 2CH A.F.D. Press to adjust the volume level of all speakers at the same time (page 32, 33, 34, 35). Getting Started Description...INPUT MODE INPUT SELECTOR MASTER VOLUME MEMORY/ TUNING ENTER MODE TUNING 2CH A.F.D. Turn to select the input source to select the front (OFF/A/B) speaker system (page 27). Press to select information displayed on /standby) or off (page 26, 34, 35, 52, 69). E DISPLAY ...
Operating Instructions
Page 8
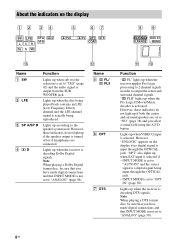
Lights up when the receiver applies Pro Logic processing to 2 channel signals in order to "OPT IN" (page 58). However, these indicators do not light up if the speaker output is output from the SUB WOOFER jack. Name E ; However, these indicators do not light up when sub woofer ..."; PL" lights up according to "ANALOG" (page 58). button. INPUT MODE is decoding Dolby Digital signals. Lights up when the receiver is set to the speaker system used. Lights up when the disc being played back contains an LFE (Low Frequency Effect) channel and the LFE channel signal is...
Lights up when the receiver applies Pro Logic processing to 2 channel signals in order to "OPT IN" (page 58). However, these indicators do not light up if the speaker output is output from the SUB WOOFER jack. Name E ; However, these indicators do not light up when sub woofer ..."; PL" lights up according to "ANALOG" (page 58). button. INPUT MODE is decoding Dolby Digital signals. Lights up when the receiver is set to the speaker system used. Lights up when the disc being played back contains an LFE (Low Frequency Effect) channel and the LFE channel signal is...

Operating Instructions
Page 9
...the surround components obtained by Pro Logic processing) Example: Recording format (Front/ Surround): 3/2.1 Output channel: When surround speakers are set to show how the receiver downmixes the source sound (based on presetting radio stations, see page 54. The boxes around the letters vary to "... I Tuner indicators J Preset station indicators K D.RANGE L COAX M Playback channel indicators L R C SL SR S Function Lights up when using the receiver to tune in radio stations (page 52), etc. Lights up when a memory function, such as Preset Memory (page 55), etc., is input through the...
...the surround components obtained by Pro Logic processing) Example: Recording format (Front/ Surround): 3/2.1 Output channel: When surround speakers are set to show how the receiver downmixes the source sound (based on presetting radio stations, see page 54. The boxes around the letters vary to "... I Tuner indicators J Preset station indicators K D.RANGE L COAX M Playback channel indicators L R C SL SR S Function Lights up when using the receiver to tune in radio stations (page 52), etc. Lights up when a memory function, such as Preset Memory (page 55), etc., is input through the...

Operating Instructions
Page 10
... OUTPUT section Green (Y) COMPONENT Connects to a CD player, etc. (page 16). 10GB Connects to a DVD IN jacks player, etc. R R SPEAKERS RL FRONT B SPEAKERS 65 4 3 A DIGITAL INPUT/OUTPUT section OPTICAL Connects to a sub woofer (page 15). D VIDEO/AUDIO INPUT/OUTPUT section AUDIO IN/ White ...(L) OUT jacks Red (R) Connects to speakers (page 15). C SPEAKERS section Connects to a VCR, a DVD player, etc. (page 20-24). Rear panel 1 2 OPTICAL SAT IN DVD IN VIDEO 2 /...
... OUTPUT section Green (Y) COMPONENT Connects to a CD player, etc. (page 16). 10GB Connects to a DVD IN jacks player, etc. R R SPEAKERS RL FRONT B SPEAKERS 65 4 3 A DIGITAL INPUT/OUTPUT section OPTICAL Connects to a sub woofer (page 15). D VIDEO/AUDIO INPUT/OUTPUT section AUDIO IN/ White ...(L) OUT jacks Red (R) Connects to speakers (page 15). C SPEAKERS section Connects to a VCR, a DVD player, etc. (page 20-24). Rear panel 1 2 OPTICAL SAT IN DVD IN VIDEO 2 /...

Operating Instructions
Page 12
MOVIE MUSIC E AMP MENU F FM MODE G D.TUNING D.SKIP H DVD MENU I ENTER MEMORY J MUTING K TV VOL +a)/- Press to control Sony components as follows. Press to enter the value after selecting a channel, disc or track using a multi-disc changer. Press TV VOL +/- You can change ... each time you press the input buttons (C). Press to skip a disc when using the numeric buttons of the receiver. AV ?/1 (on/standby) Press to turn the TV on or off. To turn off all speakers at the same time. Press to activate the muting function. Name Function A TV ?/1 Press TV ?/1 and TV (M)...
MOVIE MUSIC E AMP MENU F FM MODE G D.TUNING D.SKIP H DVD MENU I ENTER MEMORY J MUTING K TV VOL +a)/- Press to control Sony components as follows. Press to enter the value after selecting a channel, disc or track using a multi-disc changer. Press TV VOL +/- You can change ... each time you press the input buttons (C). Press to skip a disc when using the numeric buttons of the receiver. AV ?/1 (on/standby) Press to turn the TV on or off. To turn off all speakers at the same time. Press to activate the muting function. Name Function A TV ?/1 Press TV ?/1 and TV (M)...
Operating Instructions
Page 14
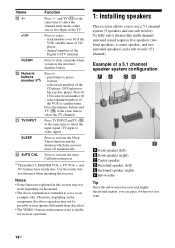
.... • The VIDEO 3 button on the component, the above explanation is not available for receiver operation. 1: Installing speakers This receiver allows you to clear a mistake when you want. 14GB To fully enjoy theater-like multi channel surround sound ... same time to serve as references when operating the receiver. Press to use a 5.1 channel system (5 speakers and one or two digits of a 5.1 channel speaker system configuration AFront speaker (left) BFront speaker (right) CCenter speaker DSurround speaker (left) ESurround speaker (right) FSub woofer Tip Since the sub woofer ...
.... • The VIDEO 3 button on the component, the above explanation is not available for receiver operation. 1: Installing speakers This receiver allows you to clear a mistake when you want. 14GB To fully enjoy theater-like multi channel surround sound ... same time to serve as references when operating the receiver. Press to use a 5.1 channel system (5 speakers and one or two digits of a 5.1 channel speaker system configuration AFront speaker (left) BFront speaker (right) CCenter speaker DSurround speaker (left) ESurround speaker (right) FSub woofer Tip Since the sub woofer ...

Operating Instructions
Page 15
... want to a sub woofer, then sound may not be output. 15GB b)When you have an additional front speaker system, connect them to standby mode automatically based on the receiver (page 27). Getting Started 2: Connecting speakers F C A A B SPEAKERS FRONT B terminalsa) IN VIDEO 2 /BD IN OUT HDMI Y PB/CB PR/CR VIDEO IN VIDEO IN VIDEO OUT...
... want to a sub woofer, then sound may not be output. 15GB b)When you have an additional front speaker system, connect them to standby mode automatically based on the receiver (page 27). Getting Started 2: Connecting speakers F C A A B SPEAKERS FRONT B terminalsa) IN VIDEO 2 /BD IN OUT HDMI Y PB/CB PR/CR VIDEO IN VIDEO IN VIDEO OUT...

Operating Instructions
Page 16
... how to "3b: Connecting the video components" (page 17). After connecting your Super Audio CD/CD player, proceed to connect a Super Audio CD/CD player. R R SPEAKERS RL FRONT B SPEAKERS A Audio cord (not supplied) 16GB
... how to "3b: Connecting the video components" (page 17). After connecting your Super Audio CD/CD player, proceed to connect a Super Audio CD/CD player. R R SPEAKERS RL FRONT B SPEAKERS A Audio cord (not supplied) 16GB

Operating Instructions
Page 17
Select the connection according to this receiver. Getting Started 3b: Connecting the video components How to connect your components This section describes how to connect your video components to the jacks on ... quality depends on your components, proceed to connect each component. After connecting all your components. INPUT jack COMPONENT HDMI VIDEO VIDEO Receiver MONITOR OUT, HDMI OUT jack COMPONENT HDMI VIDEO VIDEO ?/1 SPEAKERS (OFF/A/B) AUTO CAL MIC PHONES DISPLAY INPUT MODE INPUT SELECTOR MASTER VOLUME MEMORY/ TUNING ENTER MODE TUNING 2CH A.F.D. MOVIE MUSIC...
Select the connection according to this receiver. Getting Started 3b: Connecting the video components How to connect your components This section describes how to connect your video components to the jacks on ... quality depends on your components, proceed to connect each component. After connecting all your components. INPUT jack COMPONENT HDMI VIDEO VIDEO Receiver MONITOR OUT, HDMI OUT jack COMPONENT HDMI VIDEO VIDEO ?/1 SPEAKERS (OFF/A/B) AUTO CAL MIC PHONES DISPLAY INPUT MODE INPUT SELECTOR MASTER VOLUME MEMORY/ TUNING ENTER MODE TUNING 2CH A.F.D. MOVIE MUSIC...

Operating Instructions
Page 18
... with HDMI jacks HDMI is an interface which transmits video and audio signals in digital format. It is the abbreviated name for HighDefinition Multimedia Interface. R R SPEAKERS RL FRONT B SPEAKERS A Coaxial digital cord (not supplied) B HDMI cable (not supplied) We recommend that you use...
... with HDMI jacks HDMI is an interface which transmits video and audio signals in digital format. It is the abbreviated name for HighDefinition Multimedia Interface. R R SPEAKERS RL FRONT B SPEAKERS A Coaxial digital cord (not supplied) B HDMI cable (not supplied) We recommend that you use...

Operating Instructions
Page 19
...-ray disc player. Unless the power is output from the supplied speakers and to take advantage of the VIDEO 2 input button on the playback component to - Getting Started Notes on the receiver's display. turn on the receiver when the video and audio signals of each component connected for details...• The multi/stereo area audio signals of a Super Audio CD are connected via the receiver. To output the sound from the TV speaker only when a playback component and this receiver, as well as this receiver and the TV are not output. • Video signals input to the HDMI IN jack ...
...-ray disc player. Unless the power is output from the supplied speakers and to take advantage of the VIDEO 2 input button on the playback component to - Getting Started Notes on the receiver's display. turn on the receiver when the video and audio signals of each component connected for details...• The multi/stereo area audio signals of a Super Audio CD are connected via the receiver. To output the sound from the TV speaker only when a playback component and this receiver, as well as this receiver and the TV are not output. • Video signals input to the HDMI IN jack ...

Operating Instructions
Page 20
...connect the MONITOR OUT or HDMI OUT jack to a TV or projector. • To output the sound of the TV from the speakers connected to the receiver, be sure to: - Unless the power is not necessary to the TV AUDIO IN jacks of your components. connect the audio ... the video and audio signals of a playback component are being output to the jacks of the receiver. - Tips • You can be transmitted. CENTER SURROUND L FRONT A L + - + - R R SPEAKERS RL FRONT B SPEAKERS A Audio cord (not supplied) B Video cord (not supplied) C Component video cord (not supplied) 20GB Note Be sure to ...
...connect the MONITOR OUT or HDMI OUT jack to a TV or projector. • To output the sound of the TV from the speakers connected to the receiver, be sure to: - Unless the power is not necessary to the TV AUDIO IN jacks of your components. connect the audio ... the video and audio signals of a playback component are being output to the jacks of the receiver. - Tips • You can be transmitted. CENTER SURROUND L FRONT A L + - + - R R SPEAKERS RL FRONT B SPEAKERS A Audio cord (not supplied) B Video cord (not supplied) C Component video cord (not supplied) 20GB Note Be sure to ...

Operating Instructions
Page 21
CENTER SURROUND L FRONT A L + - + - R R SPEAKERS RL FRONT B SPEAKERS A Coaxial digital cord (not supplied) B Video cord (not supplied) C Component video cord (not supplied) continued 21GB Getting Started Connecting a DVD player/DVD recorder The following ... player/DVD recorder. Notes • To input multi channel digital audio from the front left/right speakers only, press 2CH. Tip All the digital audio jacks are compatible with the DVD player. • As this receiver does not have analog audio input jacks for DVD, connect your components. To output sound from...
CENTER SURROUND L FRONT A L + - + - R R SPEAKERS RL FRONT B SPEAKERS A Coaxial digital cord (not supplied) B Video cord (not supplied) C Component video cord (not supplied) continued 21GB Getting Started Connecting a DVD player/DVD recorder The following ... player/DVD recorder. Notes • To input multi channel digital audio from the front left/right speakers only, press 2CH. Tip All the digital audio jacks are compatible with the DVD player. • As this receiver does not have analog audio input jacks for DVD, connect your components. To output sound from...

Operating Instructions
Page 22
..." (page 61). • You can also rename the VIDEO 1 input so that you can be displayed on the receiver's display. CENTER SURROUND L FRONT A L + - + - For details, see "Naming inputs" (page 59). 22GB R R SPEAKERS RL FRONT B SPEAKERS A Video cord (not supplied) B Audio cord (not supplied) Notes • Be sure to change the factory setting of...
..." (page 61). • You can also rename the VIDEO 1 input so that you can be displayed on the receiver's display. CENTER SURROUND L FRONT A L + - + - For details, see "Naming inputs" (page 59). 22GB R R SPEAKERS RL FRONT B SPEAKERS A Video cord (not supplied) B Audio cord (not supplied) Notes • Be sure to change the factory setting of...

Operating Instructions
Page 23
... place. • Do not bend or tie optical digital cords. Connect audio and video cords according to connect a satellite tuner or a set-top box. R R SPEAKERS RL FRONT B SPEAKERS A Optical digital cord (not supplied) B Audio cord (not supplied) C Video cord (not supplied) D Component video cord (not supplied) 23GB Getting Started Connecting a satellite tuner...
... place. • Do not bend or tie optical digital cords. Connect audio and video cords according to connect a satellite tuner or a set-top box. R R SPEAKERS RL FRONT B SPEAKERS A Optical digital cord (not supplied) B Audio cord (not supplied) C Video cord (not supplied) D Component video cord (not supplied) 23GB Getting Started Connecting a satellite tuner...

Operating Instructions
Page 24
... OUT COMPONENT VIDEO ANTENNA L L L AUDIO OUT R R R AUDIO IN AUDIO IN AUDIO IN AUDIO OUT AUDIO IN SUB SA-CD/CD TV SAT VIDEO 1 WOOFER + - R R SPEAKERS RL FRONT B SPEAKERS A Video cord (not supplied) B Audio cord (not supplied) 24GB Connecting components with analog video and audio jack The following illustration shows how to connect...
... OUT COMPONENT VIDEO ANTENNA L L L AUDIO OUT R R R AUDIO IN AUDIO IN AUDIO IN AUDIO OUT AUDIO IN SUB SA-CD/CD TV SAT VIDEO 1 WOOFER + - R R SPEAKERS RL FRONT B SPEAKERS A Video cord (not supplied) B Audio cord (not supplied) 24GB Connecting components with analog video and audio jack The following illustration shows how to connect...

Operating Instructions
Page 25
R R SPEAKERS RL FRONT B SPEAKERS * The shape of the connector varies depending on the area code of this receiver. Notes • To prevent noise pickup, keep the AM loop antenna (aerial) away from the receiver and other components. • Be sure to fully extend the FM wire antenna (aerial). • After connecting the FM wire antenna...
R R SPEAKERS RL FRONT B SPEAKERS * The shape of the connector varies depending on the area code of this receiver. Notes • To prevent noise pickup, keep the AM loop antenna (aerial) away from the receiver and other components. • Be sure to fully extend the FM wire antenna (aerial). • After connecting the FM wire antenna...

Operating Instructions
Page 26
...rear panel, check that the voltage selector is set to their factory defaults. Be sure to turn off the receiver. 2 Hold down ?/1 for this operation. 1,2 ?/1 SPEAKERS (OFF/A/B) AUTO CAL MIC PHONES DISPLAY INPUT MODE INPUT SELECTOR MASTER VOLUME MEMORY/ TUNING ENTER MODE TUNING 2CH A.F.D....alternately. 3 Press MEMORY/ENTER. AC power cord (mains lead) RL FRONT B SPEAKERS To the wall outlet Performing initial setup operations Before using the receiver for the first time, initialize the receiver by performing the following items are reset to their factory settings. • All ...
...rear panel, check that the voltage selector is set to their factory defaults. Be sure to turn off the receiver. 2 Hold down ?/1 for this operation. 1,2 ?/1 SPEAKERS (OFF/A/B) AUTO CAL MIC PHONES DISPLAY INPUT MODE INPUT SELECTOR MASTER VOLUME MEMORY/ TUNING ENTER MODE TUNING 2CH A.F.D....alternately. 3 Press MEMORY/ENTER. AC power cord (mains lead) RL FRONT B SPEAKERS To the wall outlet Performing initial setup operations Before using the receiver for the first time, initialize the receiver by performing the following items are reset to their factory settings. • All ...


