Operating Guide
Page 8
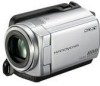
...) (1) A/V connecting cable (1) USB cable (1) Rechargeable battery pack Only for DCR-SR47/SR48/SR67: NP-FH30 (1) Only for DCR-SR87: NP-FH50 (1) CD-ROM "Handycam Application Software" (1) (p. 25) "PMB" (software) including "PMB Guide" "Handycam Handbook" (PDF) "Operating Guide" (This manual) (1) See page 39 for help. In this camcorder. Supplied items...
...) (1) A/V connecting cable (1) USB cable (1) Rechargeable battery pack Only for DCR-SR47/SR48/SR67: NP-FH30 (1) Only for DCR-SR87: NP-FH50 (1) CD-ROM "Handycam Application Software" (1) (p. 25) "PMB" (software) including "PMB Guide" "Handycam Handbook" (PDF) "Operating Guide" (This manual) (1) See page 39 for help. In this camcorder. Supplied items...

Operating Guide
Page 26
.... Depending on the computer, you may not work correctly. See page 45 on the "Handycam Handbook". Confirm that your camcorder is not connected to the computer. Turn on the computer. Log on as an Administrator for...USB cable. The installation screen appears. If the screen does not appear, click [Start] [Computer] (in the disc drive of the license agreement carefully. US 26 The [USB SELECT] screen appears on the camcorder screen automatically. Touch [ USB CONNECT] on the camcorder screen. If the [USB...
.... Depending on the computer, you may not work correctly. See page 45 on the "Handycam Handbook". Confirm that your camcorder is not connected to the computer. Turn on the computer. Log on as an Administrator for...USB cable. The installation screen appears. If the screen does not appear, click [Start] [Computer] (in the disc drive of the license agreement carefully. US 26 The [USB SELECT] screen appears on the camcorder screen automatically. Touch [ USB CONNECT] on the camcorder screen. If the [USB...

Operating Guide
Page 27
... computer [Safely remove USB Mass Storage Device]. Touch [END] [YES] on the camcorder screen. Disconnect the USB cable. Remove the CD-ROM from ...USB cable. Saving movies and photos with one touch (One Touch Disc Burn) You can save movies and photos recorded on the internal hard disk only. 1 Turn on your camcorder, and connect it down. 2 Turn on your camcorder.... Creating a disc with a computer US 27 To disconnect your camcorder from your computer. ...
... computer [Safely remove USB Mass Storage Device]. Touch [END] [YES] on the camcorder screen. Disconnect the USB cable. Remove the CD-ROM from ...USB cable. Saving movies and photos with one touch (One Touch Disc Burn) You can save movies and photos recorded on the internal hard disk only. 1 Turn on your camcorder, and connect it down. 2 Turn on your camcorder.... Creating a disc with a computer US 27 To disconnect your camcorder from your computer. ...
Operating Guide
Page 28
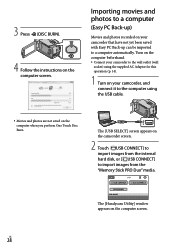
...Handycam Utility] window appears on the camcorder screen. 2 Touch [ USB CONNECT] to import images from the internal hard disk, or [ USB CONNECT] to import images from the "Memory Stick PRO Duo" media. The [USB SELECT] screen appears on the computer screen. Turn on the computer beforehand. Connect your camcorder... to the wall outlet (wall socket) using the USB cable. Movies and photos are not saved on your camcorder that have not yet been saved with Easy PC Back-up ) ...
...Handycam Utility] window appears on the camcorder screen. 2 Touch [ USB CONNECT] to import images from the internal hard disk, or [ USB CONNECT] to import images from the "Memory Stick PRO Duo" media. The [USB SELECT] screen appears on the computer screen. Turn on the computer beforehand. Connect your camcorder... to the wall outlet (wall socket) using the USB cable. Movies and photos are not saved on your camcorder that have not yet been saved with Easy PC Back-up ) ...
Operating Guide
Page 31
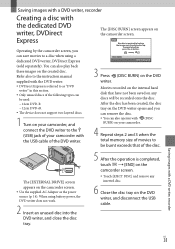
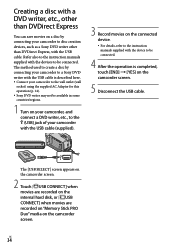
.... 6 Close the disc tray on the DVD writer, and disconnect the USB cable. Saving images with a DVD writer, recorder Creating a disc with the dedicated DVD writer, DVDirect Express The [DISC BURN] screen appears on the camcorder screen. Use the supplied AC Adaptor as "DVD writer" in... Only unused discs of the following types can also operate with (DISC BURN) on your camcorder with the USB cable of the disc. 5 After the operation is completed, touch [END] on the camcorder screen. Touch [EJECT DISC] and remove any discs will be used: 12cm ...
.... 6 Close the disc tray on the DVD writer, and disconnect the USB cable. Saving images with a DVD writer, recorder Creating a disc with the dedicated DVD writer, DVDirect Express The [DISC BURN] screen appears on the camcorder screen. Use the supplied AC Adaptor as "DVD writer" in... Only unused discs of the following types can also operate with (DISC BURN) on your camcorder with the USB cable of the disc. 5 After the operation is completed, touch [END] on the camcorder screen. Touch [EJECT DISC] and remove any discs will be used: 12cm ...

Operating Guide
Page 32
...to create many of the same disc. Do not do any of the following when creating a disc. Turn off the camcorder Disconnect the USB cable or the AC Adaptor Subject the camcorder to mechanical shock or vibration Eject the "Memory Stick PRO Duo" media from your.... The disc tray on the DVD writer opens after the operation is completed. Press and disconnect the USB cable. Be sure to the (USB) jack of your camcorder with the selected images To dub a desired image onto the disc or to make sure dubbing was performed correctly...
...to create many of the same disc. Do not do any of the following when creating a disc. Turn off the camcorder Disconnect the USB cable or the AC Adaptor Subject the camcorder to mechanical shock or vibration Eject the "Memory Stick PRO Duo" media from your.... The disc tray on the DVD writer opens after the operation is completed. Press and disconnect the USB cable. Be sure to the (USB) jack of your camcorder with the selected images To dub a desired image onto the disc or to make sure dubbing was performed correctly...
Operating Guide
Page 34
... a disc with a DVD writer, etc., other than DVDirect Express You can save movies on a disc by connecting your camcorder to a Sony DVD writer with the USB cable is completed, touch [END] [YES] on the camcorder screen. 5 Disconnect the USB cable. Refer also to the instruction manuals supplied with the devices to disc creation devices, such as...
... a disc with a DVD writer, etc., other than DVDirect Express You can save movies on a disc by connecting your camcorder to a Sony DVD writer with the USB cable is completed, touch [END] [YES] on the camcorder screen. 5 Disconnect the USB cable. Refer also to the instruction manuals supplied with the devices to disc creation devices, such as...
Operating Guide
Page 47
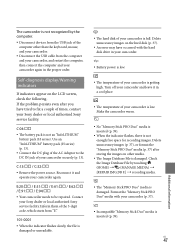
... be repaired. Self-diagnosis display/Warning indicators If indicators appear on other than the keyboard, mouse, and your camcorder. Disconnect the USB cable from "E." 101-0001 When the indicator flashes slowly, the file is not enough free space for ...61: / E:62: / E:91: / E:94: Your camcorder needs to the DC IN jack of your Sony dealer or local authorized Sony service facility. The camcorder is not recognized by touching (HOME) (MANAGE MEDIA) [REPAIR IMG.DB F.] recording...
... be repaired. Self-diagnosis display/Warning indicators If indicators appear on other than the keyboard, mouse, and your camcorder. Disconnect the USB cable from "E." 101-0001 When the indicator flashes slowly, the file is not enough free space for ...61: / E:62: / E:91: / E:94: Your camcorder needs to the DC IN jack of your Sony dealer or local authorized Sony service facility. The camcorder is not recognized by touching (HOME) (MANAGE MEDIA) [REPAIR IMG.DB F.] recording...
Operating Guide
Page 58
Index A A/V connecting cable...........24, 35 B Backlight 38 Battery 13 C Capturing photos from a movie 30 ... 35 DST SET 15 Dubbing 40 DVDirect Express 31 DVD writer 31 E Easy Handycam operation.........20 Easy PC Back-up 28 Editing movies 30 F Format 37 H Handycam Handbook 45 HELP function 41 HOME MENU 41, 42 I Install 25 L Language... Software 25 Specifications 51 Supplied items 8 T Tripod 38 Troubleshooting 46 Turning the power on 15 TV 24 TV Type 24 U USB 25, 31 Using a wall outlet (wall socket) as a power source 14 V VISUAL INDEX 21 Volume 22 W Warning indicators...
Index A A/V connecting cable...........24, 35 B Backlight 38 Battery 13 C Capturing photos from a movie 30 ... 35 DST SET 15 Dubbing 40 DVDirect Express 31 DVD writer 31 E Easy Handycam operation.........20 Easy PC Back-up 28 Editing movies 30 F Format 37 H Handycam Handbook 45 HELP function 41 HOME MENU 41, 42 I Install 25 L Language... Software 25 Specifications 51 Supplied items 8 T Tripod 38 Troubleshooting 46 Turning the power on 15 TV 24 TV Type 24 U USB 25, 31 Using a wall outlet (wall socket) as a power source 14 V VISUAL INDEX 21 Volume 22 W Warning indicators...


