
Camera Operations Guide
Page 4
... or a computer with a USB or i.LINK cable, be damaged, or this manual are using the touch panel, place your camcorder correctly. • When you see. Be careful when placing the camera near a window or outdoors. • Do not aim at dusk. Note on using this manual The images of the LCD screen... and the viewfinder used for long periods of time may cause a malfunction of the LCD panel to malfunction. Notes on the back side of your camcorder. If you insert...
... or a computer with a USB or i.LINK cable, be damaged, or this manual are using the touch panel, place your camcorder correctly. • When you see. Be careful when placing the camera near a window or outdoors. • Do not aim at dusk. Note on using this manual The images of the LCD screen... and the viewfinder used for long periods of time may cause a malfunction of the LCD panel to malfunction. Notes on the back side of your camcorder. If you insert...

Camera Operations Guide
Page 8
... page 13. a Slide the battery release lever and b Slide the battery pack in its window-side facing Close the cassette lid after the direction of the up, then push the center the cassette compartment arrow to the camcorder. of the back of the arrow until it clicks. comes out automatically. Quick Start...
... page 13. a Slide the battery release lever and b Slide the battery pack in its window-side facing Close the cassette lid after the direction of the up, then push the center the cassette compartment arrow to the camcorder. of the back of the arrow until it clicks. comes out automatically. Quick Start...

Camera Operations Guide
Page 20
... automatically comes out. 2 Take out the cassette, then press . Step 6: Inserting the recording media Inserting a cassette tape 2 Insert a cassette with its window-side facing up . 4 Close the lid. b Note • Do not force the cassette into the compartment. OPEN/ZEJECT lever Lid Push the center ...of the back of the arrow and open the lid. The cassette compartment automatically slides back in . Window-side You can use mini DV cassettes only. protection), see page 116. The cassette compartment automatically slides back in . 3 Close the ...
... automatically comes out. 2 Take out the cassette, then press . Step 6: Inserting the recording media Inserting a cassette tape 2 Insert a cassette with its window-side facing up . 4 Close the lid. b Note • Do not force the cassette into the compartment. OPEN/ZEJECT lever Lid Push the center ...of the back of the arrow and open the lid. The cassette compartment automatically slides back in . Window-side You can use mini DV cassettes only. protection), see page 116. The cassette compartment automatically slides back in . 3 Close the ...

Camera Operations Guide
Page 33
... the selected point. 4 Touch [END]. Flexible spot meter You can adjust and fix the exposure to [MANUAL]. When recording indoors on people next to the window by manually fixing the exposure to that it from the (CAMERA SET) menu. If the item is automatically set to [AUTO] (p. 33). 3 Touch [MANUAL]. ,continued...
... the selected point. 4 Touch [END]. Flexible spot meter You can adjust and fix the exposure to [MANUAL]. When recording indoors on people next to the window by manually fixing the exposure to that it from the (CAMERA SET) menu. If the item is automatically set to [AUTO] (p. 33). 3 Touch [MANUAL]. ,continued...

Camera Operations Guide
Page 36
b Notes • You cannot use the expanded focus It will not be adjusted any further. 9 changes to focus on , set [EXP. To record a subject behind a window covered with little contrast between the subject and its original size. Tips for 3 seconds in the (CAMERA SET) menu to the recording conditions. FOCUS] in ...
b Notes • You cannot use the expanded focus It will not be adjusted any further. 9 changes to focus on , set [EXP. To record a subject behind a window covered with little contrast between the subject and its original size. Tips for 3 seconds in the (CAMERA SET) menu to the recording conditions. FOCUS] in ...

Camera Operations Guide
Page 58
...spotlight) ( ) Select this when not using PROGRAM AE. SPORTS* (sports Select to prevent people's faces from focusing on glass or metal mesh in windows that can select items listed below on the CAMERA SET menu. To select items, see "Selecting menu items" (p. 56). PROGRAM AE You can adjust ... you can record pictures easily in a theater or at a beach in tennis or golf. PORTRAIT (soft Select to maintain the atmosphere of your camcorder from appearing ) dark in strong light or reflected light, such as sunsets, general night views, fireworks, () and neon signs. SUNSET&MOON Select...
...spotlight) ( ) Select this when not using PROGRAM AE. SPORTS* (sports Select to prevent people's faces from focusing on glass or metal mesh in windows that can select items listed below on the CAMERA SET menu. To select items, see "Selecting menu items" (p. 56). PROGRAM AE You can adjust ... you can record pictures easily in a theater or at a beach in tennis or golf. PORTRAIT (soft Select to maintain the atmosphere of your camcorder from appearing ) dark in strong light or reflected light, such as sunsets, general night views, fireworks, () and neon signs. SUNSET&MOON Select...

Camera Operations Guide
Page 118
...on the model. If you insert a "Memory Stick Duo" without a Memory Stick Duo adaptor by the Windows OS or using Macintosh computers does not have guaranteed compatibility with your camcorder in the wrong direction. If you use. Note on using the "Memory Stick Duo" You can use or...- Places with the terminal. 118 Additional Information • On a "Memory Stick" formatted on a computer: A "Memory Stick" formatted by mistake, hold the camcorder so the "Memory Stick" slot is facing down, then hold the lid aside using a toothpick or similar object to let the "Memory Stick Duo" slide...
...on the model. If you insert a "Memory Stick Duo" without a Memory Stick Duo adaptor by the Windows OS or using Macintosh computers does not have guaranteed compatibility with your camcorder in the wrong direction. If you use. Note on using the "Memory Stick Duo" You can use or...- Places with the terminal. 118 Additional Information • On a "Memory Stick" formatted on a computer: A "Memory Stick" formatted by mistake, hold the camcorder so the "Memory Stick" slot is facing down, then hold the lid aside using a toothpick or similar object to let the "Memory Stick Duo" slide...

Camera Operations Guide
Page 122
...when the power is brought directly from a cold place to the head drum and be damaged or your camcorder on again. This is opened. Sandy beach or anywhere dusty. Near windows or outdoors, where the LCD screen, the viewfinder, or the lens may not operate correctly. Be ...8226; When you use the accessories recommended in the sun. The camcorder may malfunction or become deformed. - This damages the inside . In this malfunction cannot be exposed to temperatures above 60°C (140°F), such as by a Sony dealer before operating it on the surface of the lens. •...
...when the power is brought directly from a cold place to the head drum and be damaged or your camcorder on again. This is opened. Sandy beach or anywhere dusty. Near windows or outdoors, where the LCD screen, the viewfinder, or the lens may not operate correctly. Be ...8226; When you use the accessories recommended in the sun. The camcorder may malfunction or become deformed. - This damages the inside . In this malfunction cannot be exposed to temperatures above 60°C (140°F), such as by a Sony dealer before operating it on the surface of the lens. •...
Computer Applications Guide
Page 2
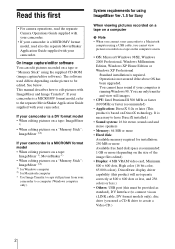
... on a tape: ImageMixer 1) • When editing pictures on a "Memory Stick": ImageMixer 1) 2) If your camcorder is a MICROMV format model • When editing pictures on a tape: ImageMixer 1), MovieShaker 1) • When editing pictures on a "Memory Stick": ImageMixer 1) 2) 1) for Windows computer 2) for Sony When viewing pictures recorded on a tape on a computer b Note • When you cannot view...
... on a tape: ImageMixer 1) • When editing pictures on a "Memory Stick": ImageMixer 1) 2) If your camcorder is a MICROMV format model • When editing pictures on a tape: ImageMixer 1), MovieShaker 1) • When editing pictures on a "Memory Stick": ImageMixer 1) 2) 1) for Windows computer 2) for Sony When viewing pictures recorded on a tape on a computer b Note • When you cannot view...

Computer Applications Guide
Page 3
... registered trademarks of Intel Corporation. On trademarks • "Memory Stick" and are registered trademarks of Sony Corporation. • Microsoft and Windows are registered trademarks of Microsoft Corporation in the United States and/or other product names mentioned herein may... vary depending on a computer Windows • OS: Microsoft Windows 98, Windows 98SE, Windows 2000 Professional, Windows Millennium Edition, Windows XP Home Edition or Windows XP Professional Standard installation is not assured if the above OS has ...
... registered trademarks of Intel Corporation. On trademarks • "Memory Stick" and are registered trademarks of Sony Corporation. • Microsoft and Windows are registered trademarks of Microsoft Corporation in the United States and/or other product names mentioned herein may... vary depending on a computer Windows • OS: Microsoft Windows 98, Windows 98SE, Windows 2000 Professional, Windows Millennium Edition, Windows XP Home Edition or Windows XP Professional Standard installation is not assured if the above OS has ...
Computer Applications Guide
Page 4
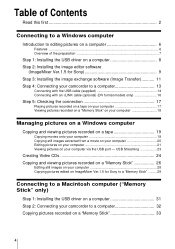
...Stick 26 Editing still images on your computer 28 Copying pictures edited on ImageMixer Ver.1.5 for Sony 9 Step 3: Installing the image exchange software (Image Transfer 11 Step 4: Connecting your camcorder to a computer 13 Connecting with the USB cable (supplied 14 Connecting with an i.LINK...Editing pictures on your computer 21 Viewing pictures on your camcorder to a Macintosh computer ("Memory Stick" only) Step 1: Installing the USB driver on a "Memory Stick 33 4 Table of Contents Read this first 2 Connecting to a Windows computer Introduction to editing pictures on a computer 6 ...
...Stick 26 Editing still images on your computer 28 Copying pictures edited on ImageMixer Ver.1.5 for Sony 9 Step 3: Installing the image exchange software (Image Transfer 11 Step 4: Connecting your camcorder to a computer 13 Connecting with the USB cable (supplied 14 Connecting with an i.LINK...Editing pictures on your computer 21 Viewing pictures on your camcorder to a Macintosh computer ("Memory Stick" only) Step 1: Installing the USB driver on a "Memory Stick 33 4 Table of Contents Read this first 2 Connecting to a Windows computer Introduction to editing pictures on a computer 6 ...

Computer Applications Guide
Page 6
... movies live on the Internet using your computer without storing data on your computer. Connecting to a Windows computer Introduction to editing pictures on a computer Features You can copy movies and still images recorded on your camcorder as digital data to your hard disk. 6 Connecting to your own original video You can superimpose...
... movies live on the Internet using your computer without storing data on your computer. Connecting to a Windows computer Introduction to editing pictures on a computer Features You can copy movies and still images recorded on your camcorder as digital data to your hard disk. 6 Connecting to your own original video You can superimpose...

Computer Applications Guide
Page 7
...Image Transfer).* CD-ROM (supplied) Connecting to a Windows computer On your camcorder Step 4: Connect your camcorder to a computer. Now, start from the CD-ROM "SPVD-010 USB Driver" supplied with your camcorder. There are two ways to connect your camcorder to a computer. • Connecting with a USB... cable (supplied) • Connecting with an i.LINK cable (optional) See "Step 4: Connecting your camcorder to a computer" (p. 13) for the first...
...Image Transfer).* CD-ROM (supplied) Connecting to a Windows computer On your camcorder Step 4: Connect your camcorder to a computer. Now, start from the CD-ROM "SPVD-010 USB Driver" supplied with your camcorder. There are two ways to connect your camcorder to a computer. • Connecting with a USB... cable (supplied) • Connecting with an i.LINK cable (optional) See "Step 4: Connecting your camcorder to a computer" (p. 13) for the first...
Computer Applications Guide
Page 8
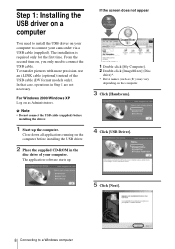
...your computer to connect your computer. For Windows 2000/Windows XP Log on , you only need to install the USB driver on the computer. 3 Click [Handycam]. 4 Click [USB Driver]. 5 Click [Next]. 8 Connecting to a Windows computer b Note • Do not... connect the USB cable (supplied) before installing the USB driver. 2 Place the supplied CD-ROM in Step 1 are not necessary. To transfer pictures with more precision, use an i.LINK cable (optional) instead of your camcorder...
...your computer to connect your computer. For Windows 2000/Windows XP Log on , you only need to install the USB driver on the computer. 3 Click [Handycam]. 4 Click [USB Driver]. 5 Click [Next]. 8 Connecting to a Windows computer b Note • Do not... connect the USB cable (supplied) before installing the USB driver. 2 Place the supplied CD-ROM in Step 1 are not necessary. To transfer pictures with more precision, use an i.LINK cable (optional) instead of your camcorder...
Computer Applications Guide
Page 9
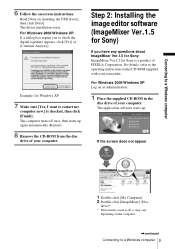
...with your computer. For Windows 2000/Windows XP If a dialog box urging you have any questions about ImageMixer Ver.1.5 for Sony ImageMixer Ver.1.5 for Sony) If you to restart my computer now.] is a product of your camcorder. For details, refer to a Windows computer 9 The application ... drive of PIXELA Corporation. Step 2: Installing the image editor software (ImageMixer Ver.1.5 for Sony is checked, then click [Finish]. Read [Note on -screen instructions. Connecting to a Windows computer 6 Follow the on installing the USB driver], then click [Next]. The computer ...
...with your computer. For Windows 2000/Windows XP If a dialog box urging you have any questions about ImageMixer Ver.1.5 for Sony ImageMixer Ver.1.5 for Sony) If you to restart my computer now.] is a product of your camcorder. For details, refer to a Windows computer 9 The application ... drive of PIXELA Corporation. Step 2: Installing the image editor software (ImageMixer Ver.1.5 for Sony is checked, then click [Finish]. Read [Note on -screen instructions. Connecting to a Windows computer 6 Follow the on installing the USB driver], then click [Next]. The computer ...

Computer Applications Guide
Page 10
... is complete. 8 Click [OK], then install WINASPI* following the on-screen instructions. * You need this software personally, enter [Personal] etc. If Windows XP, or DirectX 8.0a or a later version is complete. The computer restarts automatically. z Tips • If you use this software to copy the... on to step 10 to install DirectX 8.0a. for WINASPI is installed on your computer Go on the screen, click [Finish], then [OK]. 2 Click [Handycam]. 3 Click [ImageMixer]. • Read the [Readme.txt] file (Memo Pad) when it appears, then click (Close) to close Memo Pad. 7 Click...
... is complete. 8 Click [OK], then install WINASPI* following the on-screen instructions. * You need this software personally, enter [Personal] etc. If Windows XP, or DirectX 8.0a or a later version is complete. The computer restarts automatically. z Tips • If you use this software to copy the... on to step 10 to install DirectX 8.0a. for WINASPI is installed on your computer Go on the screen, click [Finish], then [OK]. 2 Click [Handycam]. 3 Click [ImageMixer]. • Read the [Readme.txt] file (Memo Pad) when it appears, then click (Close) to close Memo Pad. 7 Click...
Computer Applications Guide
Page 11
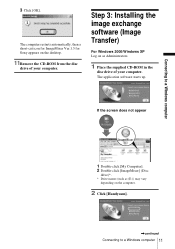
... (such as Administrators. 1 Place the supplied CD-ROM in the disc drive of your computer. Step 3: Installing the image exchange software (Image Transfer) For Windows 2000/Windows XP Log on as (E:)) may vary depending on the desktop. 11Remove the CD-ROM from the disc drive of your computer. The computer restarts automatically...
... (such as Administrators. 1 Place the supplied CD-ROM in the disc drive of your computer. Step 3: Installing the image exchange software (Image Transfer) For Windows 2000/Windows XP Log on as (E:)) may vary depending on the desktop. 11Remove the CD-ROM from the disc drive of your computer. The computer restarts automatically...

Computer Applications Guide
Page 12
... folder, then click [Next]. Make sure [Image Transfer] is closed. 3 Click [Image Transfer]. 4 Select the language for the installation, then click [OK]. 8 Click [Finish] to a Windows computer
... folder, then click [Next]. Make sure [Image Transfer] is closed. 3 Click [Image Transfer]. 4 Select the language for the installation, then click [OK]. 8 Click [Finish] to a Windows computer
Computer Applications Guide
Page 13
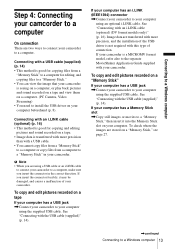
.... Connecting to a Windows computer Step 4: Connecting your camcorder to a computer On connection There are two ways to connect your computer using an optional i.LINK cable. Connecting with this type of connection. To check where the images are stored on your camcorder. See "Connecting with... copy files from a "Memory Stick" to a computer or copy files from a "Memory Stick" to a computer. If your camcorder is a MICROMV format model, refer also to a Windows computer 13 To copy and edit pictures recorded on a "Memory Stick" If your computer has a USB jack ,Connect your...
.... Connecting to a Windows computer Step 4: Connecting your camcorder to a computer On connection There are two ways to connect your computer using an optional i.LINK cable. Connecting with this type of connection. To check where the images are stored on your camcorder. See "Connecting with... copy files from a "Memory Stick" to a computer or copy files from a "Memory Stick" to a computer. If your camcorder is a MICROMV format model, refer also to a Windows computer 13 To copy and edit pictures recorded on a "Memory Stick" If your computer has a USB jack ,Connect your...

Computer Applications Guide
Page 14
...Camera Operations Guide supplied with the Handycam Station, connect the USB cable to the USB jack on the Handycam Station, then set the USB ON/OFF switch to ON. 5 Connect the other end of the USB cable to a Windows computer The location of your camcorder. 7 Disconnect the USB cable ...from your camcorder. 8 Insert a recorded "Memory Stick" into your camcorder. 14 Connecting to the USB...
...Camera Operations Guide supplied with the Handycam Station, connect the USB cable to the USB jack on the Handycam Station, then set the USB ON/OFF switch to ON. 5 Connect the other end of the USB cable to a Windows computer The location of your camcorder. 7 Disconnect the USB cable ...from your camcorder. 8 Insert a recorded "Memory Stick" into your camcorder. 14 Connecting to the USB...


