User Manual
Page 2
..., and (2) this device must accept any interference received, including interference that any changes or modifications not expressly approved in this manual could void your authority to the following two conditions: (1) This device may not cause harmful interference, and (2) this device ...harmful interference in accordance with the instructions, may cause harmful interference to Part 15 of Conformity Trade Name: SONY Model No.: DCR-HC54E Responsible Party: Sony Electronics Inc. Regulatory Information Declaration of the FCC Rules. Operation is encouraged to try to correct the ...
..., and (2) this device must accept any interference received, including interference that any changes or modifications not expressly approved in this manual could void your authority to the following two conditions: (1) This device may not cause harmful interference, and (2) this device ...harmful interference in accordance with the instructions, may cause harmful interference to Part 15 of Conformity Trade Name: SONY Model No.: DCR-HC54E Responsible Party: Sony Electronics Inc. Regulatory Information Declaration of the FCC Rules. Operation is encouraged to try to correct the ...
User Manual
Page 4
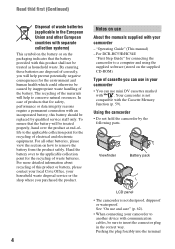
...camcorder is not compatible with the Cassette Memory function (p. 59). The recycling of the materials will help to the applicable collection point for safety, performance or data integrity reasons require a permanent connection with an incorporated battery, this battery should be treated as household waste. For DCR... household waste disposal service or the shop where you purchased the product. 4 Notes on use About the manuals supplied with your camcorder to another device with communication cables, be caused by the following parts. By ensuring these batteries are disposed...
...camcorder is not compatible with the Cassette Memory function (p. 59). The recycling of the materials will help to the applicable collection point for safety, performance or data integrity reasons require a permanent connection with an incorporated battery, this battery should be treated as household waste. For DCR... household waste disposal service or the shop where you purchased the product. 4 Notes on use About the manuals supplied with your camcorder to another device with communication cables, be caused by the following parts. By ensuring these batteries are disposed...
User Manual
Page 5
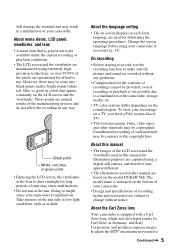
...DCR-HC54E. Black point White, red, blue or green point • Exposing the LCD screen, the viewfinder, or the lens to a malfunction of time may cause malfunctions. • Do not aim at dusk. Change the screen language before using your camcorder... appear different. • The illustrations used on this manual are based on the bottom of your camcorder. • Design and specifications of the manufacturing process ..., and Sony Corporation, and produces superior images. About this manual • The images of the LCD screen and the viewfinder used in this manual for illustration...
...DCR-HC54E. Black point White, red, blue or green point • Exposing the LCD screen, the viewfinder, or the lens to a malfunction of time may cause malfunctions. • Do not aim at dusk. Change the screen language before using your camcorder... appear different. • The illustrations used on this manual are based on the bottom of your camcorder. • Design and specifications of the manufacturing process ..., and Sony Corporation, and produces superior images. About this manual • The images of the LCD screen and the viewfinder used in this manual for illustration...
User Manual
Page 7
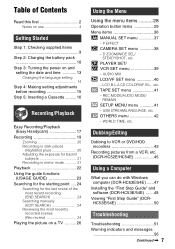
... recording 15 Step 5: Inserting a Cassette ......... 16 Recording/Playback Easy Recording/Playback (Easy Handycam 17 Recording 19 Zooming 20 Recording in dark places (NightShot plus 20 Adjusting the exposure ... 24 Searching for the last scene of the most recent recording (END SEARCH 24 Searching manually (EDIT SEARCH 24 Reviewing the most recently recorded scenes (Rec review 24 Playing the picture... a VCR, etc. (DCR-HC52E/HC54E 45 Using a Computer What you can do with Windows computer (DCR-HC53E/54E) ......47 Installing the "First Step Guide" and software (DCR-HC53E/54E) .......48 Viewing...
... recording 15 Step 5: Inserting a Cassette ......... 16 Recording/Playback Easy Recording/Playback (Easy Handycam 17 Recording 19 Zooming 20 Recording in dark places (NightShot plus 20 Adjusting the exposure ... 24 Searching for the last scene of the most recent recording (END SEARCH 24 Searching manually (EDIT SEARCH 24 Reviewing the most recently recorded scenes (Rec review 24 Playing the picture... a VCR, etc. (DCR-HC52E/HC54E 45 Using a Computer What you can do with Windows computer (DCR-HC53E/54E) ......47 Installing the "First Step Guide" and software (DCR-HC53E/54E) .......48 Viewing...
User Manual
Page 9
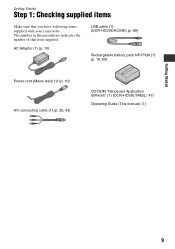
AC Adaptor (1) (p. 10) USB cable (1) (DCR-HC53E/HC54E) (p. 69) Rechargeable battery pack NP-FH30 (1) (p. 10, 60) Power cord (Mains lead) (1) (p. 10) A/V connecting cable (1) (p. 26, 43) CD-ROM "Handycam Application Software" (1) (DCR-HC53E/54E)(p. 47) Operating Guide (This manual) (1) Getting Started 9 The number in the parentheses indicates the number of that you have following items supplied with your camcorder. Getting Started Step 1: Checking supplied items Make sure that item supplied.
AC Adaptor (1) (p. 10) USB cable (1) (DCR-HC53E/HC54E) (p. 69) Rechargeable battery pack NP-FH30 (1) (p. 10, 60) Power cord (Mains lead) (1) (p. 10) A/V connecting cable (1) (p. 26, 43) CD-ROM "Handycam Application Software" (1) (DCR-HC53E/54E)(p. 47) Operating Guide (This manual) (1) Getting Started 9 The number in the parentheses indicates the number of that you have following items supplied with your camcorder. Getting Started Step 1: Checking supplied items Make sure that item supplied.

User Manual
Page 20
...zoom. If you want to zoom to a level greater than 40 ×. Remove the conversion lens (optional) if it is attached. • Adjust the focus manually ([FOCUS], p. 29) when it further for a faster zoom. Recording in dark places (NightShot plus) Wider range of the power zoom lever may cause a malfunction...; You can magnify images up to 40 times the original size with the zoom buttons on the LCD frame. • The minimum possible distance between camcorder and subject while maintaining sharp focus is about 1 cm (about 13/32 in.) for wide angle and about 80 cm (about 2 5/8 feet) for ...
...zoom. If you want to zoom to a level greater than 40 ×. Remove the conversion lens (optional) if it is attached. • Adjust the focus manually ([FOCUS], p. 29) when it further for a faster zoom. Recording in dark places (NightShot plus) Wider range of the power zoom lever may cause a malfunction...; You can magnify images up to 40 times the original size with the zoom buttons on the LCD frame. • The minimum possible distance between camcorder and subject while maintaining sharp focus is about 1 cm (about 13/32 in.) for wide angle and about 80 cm (about 2 5/8 feet) for ...
User Manual
Page 24
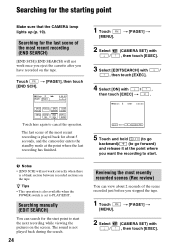
... the starting point Make sure that the CAMERA lamp lights up (p. 19). Searching manually (EDIT SEARCH) You can search for the last scene of the most recently recorded scenes (Rec review) You can view about 5 seconds, and the camcorder enters the standby mode at the point where you stopped the tape. 1 Touch...
... the starting point Make sure that the CAMERA lamp lights up (p. 19). Searching manually (EDIT SEARCH) You can search for the last scene of the most recently recorded scenes (Rec review) You can view about 5 seconds, and the camcorder enters the standby mode at the point where you stopped the tape. 1 Touch...
User Manual
Page 26
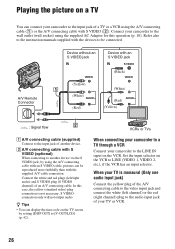
... the red (right channel) plug to be reproduced more faithfully than with the supplied A/V cable connection. Set the input selector on the VCR. Connect your camcorder to the wall outlet (wall socket) using the A/V connecting cable (1) or the A/V connecting cable with S VIDEO (2). z Tips • You can ...display the time code on a TV You can be connected. Refer also to the instruction manuals supplied with the devices to the audio input jack of your TV or VCR. 26 Playing the picture on the TV screen by using the...
... the red (right channel) plug to be reproduced more faithfully than with the supplied A/V cable connection. Set the input selector on the VCR. Connect your camcorder to the wall outlet (wall socket) using the A/V connecting cable (1) or the A/V connecting cable with S VIDEO (2). z Tips • You can ...display the time code on a TV You can be connected. Refer also to the instruction manuals supplied with the devices to the audio input jack of your TV or VCR. 26 Playing the picture on the TV screen by using the...

User Manual
Page 29
...2 1 Touch the point where you want to focus on in the frame. 9 appears. 2 Touch [END]. The available functions during Easy Handycam operation are marked with B. See page 28 for details on close range, move the power zoom lever to a subject not located in the center...32 in parentheses appear when the items are marked with "*". b Notes • The minimum possible distance between camcorder and subject while maintaining sharp focus is easier to focus on distant subjects) to [MANUAL]. The indicators in .) for wide angle and about 80 cm (about 2 5/8 feet) for recording. ...
...2 1 Touch the point where you want to focus on in the frame. 9 appears. 2 Touch [END]. The available functions during Easy Handycam operation are marked with B. See page 28 for details on close range, move the power zoom lever to a subject not located in the center...32 in parentheses appear when the items are marked with "*". b Notes • The minimum possible distance between camcorder and subject while maintaining sharp focus is easier to focus on distant subjects) to [MANUAL]. The indicators in .) for wide angle and about 80 cm (about 2 5/8 feet) for recording. ...
User Manual
Page 30
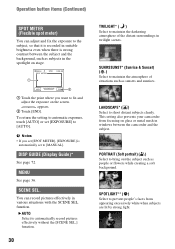
... See page 36. function. B AUTO Select to automatically record pictures effectively without the [SCENE SEL.] function. 30 TWILIGHT* ( ) Select to [MANUAL]. PORTRAIT (Soft portrait) ( ) Select to [AUTO]. To return the setting to automatic exposure, touch [AUTO] or set [EXPOSURE] to bring... even when there is automatically set [SPOT METER], [EXPOSURE] is strong contrast between the camcorder and the subject. appears. 2 Touch [END]. This setting also prevents your camcorder from appearing excessively white when subjects are lit by strong light. Operation button items (Continued...
... See page 36. function. B AUTO Select to automatically record pictures effectively without the [SCENE SEL.] function. 30 TWILIGHT* ( ) Select to [MANUAL]. PORTRAIT (Soft portrait) ( ) Select to [AUTO]. To return the setting to automatic exposure, touch [AUTO] or set [EXPOSURE] to bring... even when there is automatically set [SPOT METER], [EXPOSURE] is strong contrast between the camcorder and the subject. appears. 2 Touch [END]. This setting also prevents your camcorder from appearing excessively white when subjects are lit by strong light. Operation button items (Continued...
User Manual
Page 31
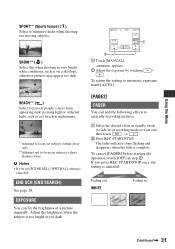
... Adjusted to focus on subjects farther away only. **Adjusted not to automatic exposure, touch [AUTO]. [PAGE2] FADER You can fix the brightness of a picture manually. To cancel [FADER] before starting the operation, touch [OFF] in Continued , 31 If you set [SCENE SEL], [WHT BAL] setting is canceled. ... in ) or recording mode (to minimize shake when shooting fast moving subjects. END SCH (END SEARCH) See page 24. AL EXPOSURE 2 1 Touch [MANUAL]. b Notes • If you press REC START/STOP once, the setting is canceled. Using the Menu SPORT** (Sports lesson) ( ) Select to ...
... Adjusted to focus on subjects farther away only. **Adjusted not to automatic exposure, touch [AUTO]. [PAGE2] FADER You can fix the brightness of a picture manually. To cancel [FADER] before starting the operation, touch [OFF] in Continued , 31 If you set [SCENE SEL], [WHT BAL] setting is canceled. ... in ) or recording mode (to minimize shake when shooting fast moving subjects. END SCH (END SEARCH) See page 24. AL EXPOSURE 2 1 Touch [MANUAL]. b Notes • If you press REC START/STOP once, the setting is canceled. Using the Menu SPORT** (Sports lesson) ( ) Select to ...
User Manual
Page 36
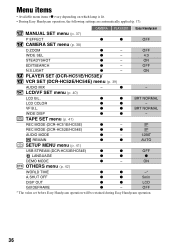
...AUDIO MODE z - 12BIT REMAIN z z AUTO SETUP MENU menu (p. 41) USB STREAM (DCR-HC53E/HC54E) z z OFF LANGUAGE z z z DEMO MODE z - OFF * The value set before Easy Handycam operation will be retained during Easy Handycam operation. 36 z z BRT NORMAL LCD COLOR z z - z z BRT NORMAL WIDE...) REC MODE (DCR-HC51E/HC53E) z - Menu items • Available menu items (z) vary depending on which lamp is lit. • During Easy Handycam operation, the following settings are automatically applied (p. 17). z - CAMERA PLAY/EDIT Easy Handycam MANUAL SET menu (p. ...
...AUDIO MODE z - 12BIT REMAIN z z AUTO SETUP MENU menu (p. 41) USB STREAM (DCR-HC53E/HC54E) z z OFF LANGUAGE z z z DEMO MODE z - OFF * The value set before Easy Handycam operation will be retained during Easy Handycam operation. 36 z z BRT NORMAL LCD COLOR z z - z z BRT NORMAL WIDE...) REC MODE (DCR-HC51E/HC53E) z - Menu items • Available menu items (z) vary depending on which lamp is lit. • During Easy Handycam operation, the following settings are automatically applied (p. 17). z - CAMERA PLAY/EDIT Easy Handycam MANUAL SET menu (p. ...

User Manual
Page 37
... are reversed. z Tips • You can record pictures edited with special effects on selecting menu items. P EFFECT (Picture effect) You can be output. • For DCR-HC52E/HC54E: You cannot add effects to the playback pictures are not output via the DV Interface (i.LINK). Using the Menu 37 P EFFECT The default...] setting. Only the original pictures can add special effects to a picture during playback. See page 28 for details on another VCR/DVD device, etc. (p. 43). MANUAL SET menu - PASTEL* Pictures appear as an illustration with B. B&W Pictures appear in sepia.
... are reversed. z Tips • You can record pictures edited with special effects on selecting menu items. P EFFECT (Picture effect) You can be output. • For DCR-HC52E/HC54E: You cannot add effects to the playback pictures are not output via the DV Interface (i.LINK). Using the Menu 37 P EFFECT The default...] setting. Only the original pictures can add special effects to a picture during playback. See page 28 for details on another VCR/DVD device, etc. (p. 43). MANUAL SET menu - PASTEL* Pictures appear as an illustration with B. B&W Pictures appear in sepia.
User Manual
Page 43
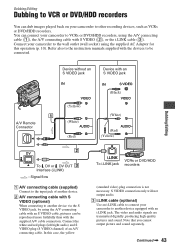
... cable (3). The video and audio signals are transmitted digitally, producing high quality pictures and sound. Continued , 43 You can connect your camcorder to another device. Refer also to the instruction manuals supplied with an i.LINK jack. S VIDEO connection only will not output audio. Note that you cannot output picture and sound separately...
... cable (3). The video and audio signals are transmitted digitally, producing high quality pictures and sound. Continued , 43 You can connect your camcorder to another device. Refer also to the instruction manuals supplied with an i.LINK jack. S VIDEO connection only will not output audio. Note that you cannot output picture and sound separately...

User Manual
Page 45
...) 3 Slide the POWER switch repeatedly to turn on a tape. Be sure to recording pause mode. You can record pictures from a VCR, etc. (DCRHC52E/HC54E) Using an i.LINK cable (optional), you cannot output picture and sound separately. 1 Connect your VCR, etc., to the wall outlet (wall socket)... using the supplied AC Adaptor for recording in your camcorder beforehand. Refer also to the instruction manuals supplied with the devices to a VCR or an i.LINK-compatible device using an i.LINK cable, the video and audio signals...
...) 3 Slide the POWER switch repeatedly to turn on a tape. Be sure to recording pause mode. You can record pictures from a VCR, etc. (DCRHC52E/HC54E) Using an i.LINK cable (optional), you cannot output picture and sound separately. 1 Connect your VCR, etc., to the wall outlet (wall socket)... using the supplied AC Adaptor for recording in your camcorder beforehand. Refer also to the instruction manuals supplied with the devices to a VCR or an i.LINK-compatible device using an i.LINK cable, the video and audio signals...

User Manual
Page 47
... guide, click the [?] mark on a Macintosh computer. x Exporting movies from your camcorder, back to view as thumbnails. About "First Step Guide" The "First Step Guide" is an instruction manual you can export movies that have DirectX installed.) Sound system: Direct Sound compatible sound card...the Help guide for further detailed operations after reading the "First Step Guide" thoroughly. Using a Computer What you can do with your camcorder You can edit imported movies on a computer. Main functions x Importing/Viewing movies taken with Windows computer (DCRHC53E/54E) Using a ...
... guide, click the [?] mark on a Macintosh computer. x Exporting movies from your camcorder, back to view as thumbnails. About "First Step Guide" The "First Step Guide" is an instruction manual you can export movies that have DirectX installed.) Sound system: Direct Sound compatible sound card...the Help guide for further detailed operations after reading the "First Step Guide" thoroughly. Using a Computer What you can do with your camcorder You can edit imported movies on a computer. Main functions x Importing/Viewing movies taken with Windows computer (DCRHC53E/54E) Using a ...

User Manual
Page 53
... • Set the write-protect tab to REC or insert a new cassette (p. 59). • The tape is noisier during Easy Handycam operation (p. 18). Adjust the focus manually (p. 29). [STEADYSHOT] does not function. • Set [STEADYSHOT] to moisture condensation. A vertical band appears when recording a bright ...display does not appear while using the AC Adaptor, rewind/fast forward speed increases (compared with Cassette Memory. • This camcorder does not support Cassette Memory, so the indicator does not appear. A vertical band appears when recording candlelight or electric light in...
... • Set the write-protect tab to REC or insert a new cassette (p. 59). • The tape is noisier during Easy Handycam operation (p. 18). Adjust the focus manually (p. 29). [STEADYSHOT] does not function. • Set [STEADYSHOT] to moisture condensation. A vertical band appears when recording a bright ...display does not appear while using the AC Adaptor, rewind/fast forward speed increases (compared with Cassette Memory. • This camcorder does not support Cassette Memory, so the indicator does not appear. A vertical band appears when recording candlelight or electric light in...

User Manual
Page 67
...8482; and "®" are subject to 104 °F) Type Lithium ion Design and specifications are not mentioned in each case in this manual. Rechargeable battery pack (NP-FH30) Maximum output voltage DC 8.4 V Output voltage DC 7.2 V Capacity 3.6 Wh (500 mAh) Dimensions...;F to change without notice. Additional Information 67 On trademarks • "Handycam" and are registered trademarks of Sony Corporation. • "InfoLITHIUM" is a trademark of Sony Corporation. • i.LINK and are trademarks of Sony Corporation. • is a trademark. • Microsoft, Windows, Windows...
...8482; and "®" are subject to 104 °F) Type Lithium ion Design and specifications are not mentioned in each case in this manual. Rechargeable battery pack (NP-FH30) Maximum output voltage DC 8.4 V Output voltage DC 7.2 V Capacity 3.6 Wh (500 mAh) Dimensions...;F to change without notice. Additional Information 67 On trademarks • "Handycam" and are registered trademarks of Sony Corporation. • "InfoLITHIUM" is a trademark of Sony Corporation. • i.LINK and are trademarks of Sony Corporation. • is a trademark. • Microsoft, Windows, Windows...

User Manual
Page 72
... (41) Upper right Indicator Meaning DV input (45) Center Indicator % Z Meaning NightShot plus (20) Warning (56) Bottom Indicator 9 . 72 Meaning Flexible spot meter (30)/ Manual exposure (31) Manual focus (29) Backlight (21) Indicator Meaning SCENE SEL. (30) n / EDIT + Picture effect (37) White balance (32) Wide select (38) SteadyShot off (38) EDITSEARCH (38...
... (41) Upper right Indicator Meaning DV input (45) Center Indicator % Z Meaning NightShot plus (20) Warning (56) Bottom Indicator 9 . 72 Meaning Flexible spot meter (30)/ Manual exposure (31) Manual focus (29) Backlight (21) Indicator Meaning SCENE SEL. (30) n / EDIT + Picture effect (37) White balance (32) Wide select (38) SteadyShot off (38) EDITSEARCH (38...
User Manual
Page 74
... DATE/TIME 13, 33, 72 DEMO MODE 41 74 DISP GUIDE (Display guide 72 DISP OUT (Display output 42 Display indicators 71 Dubbing 43 E Easy Handycam 17, 28 EDITSEARCH 24, 38 END SCH (END SEARCH 24, 53 EXPOSURE 31 F FADER 31 First Step Guide 47, 50 Flexible spot meter 30 FOCUS... bright) ...... 33 LCD B.L. (LCD back light). 40 LCD COLOR 40 LCD screen 15 LCD/VF SET menu 40 LETTER BOX 40 LP (Long Play 41 M MANUAL SET menu .......... 37 Menu 28, 36 Mirror mode 21 Moisture condensation .........62 MONOTONE 32 MOSAIC 37 MOSC.
... DATE/TIME 13, 33, 72 DEMO MODE 41 74 DISP GUIDE (Display guide 72 DISP OUT (Display output 42 Display indicators 71 Dubbing 43 E Easy Handycam 17, 28 EDITSEARCH 24, 38 END SCH (END SEARCH 24, 53 EXPOSURE 31 F FADER 31 First Step Guide 47, 50 Flexible spot meter 30 FOCUS... bright) ...... 33 LCD B.L. (LCD back light). 40 LCD COLOR 40 LCD screen 15 LCD/VF SET menu 40 LETTER BOX 40 LP (Long Play 41 M MANUAL SET menu .......... 37 Menu 28, 36 Mirror mode 21 Moisture condensation .........62 MONOTONE 32 MOSAIC 37 MOSC.


