Operating Guide
Page 3
... through openings as they may be blocked or covered. - Overloading Do not overload wall outlets, extension cords or convenience receptacles beyond their capacity, since this manual for example, near a bathtub, washbowl, kitchen sink, or laundry tub, in the cabinet are provided for cleaning the exterior of power source indicated on an...
... through openings as they may be blocked or covered. - Overloading Do not overload wall outlets, extension cords or convenience receptacles beyond their capacity, since this manual for example, near a bathtub, washbowl, kitchen sink, or laundry tub, in the cabinet are provided for cleaning the exterior of power source indicated on an...
Operating Guide
Page 5
... does cause harmful interference to radio or television reception, which can be determined by returning your used in this manual could void your authority to provide reasonable protection against harmful interference in a particular installation. and CANADA RECYCLING LITHIUM-ION...used rechargeable batteries to radio communications. This Class B digital apparatus complies with Part 15 of Conformity Trade Name: SONY Model No.: DCR-HC38 Responsible Party: Sony Electronics Inc. Regulatory Information Declaration of the FCC Rules. Telephone Number: 858-942-2230 This device complies with...
... does cause harmful interference to radio or television reception, which can be determined by returning your used in this manual could void your authority to provide reasonable protection against harmful interference in a particular installation. and CANADA RECYCLING LITHIUM-ION...used rechargeable batteries to radio communications. This Class B digital apparatus complies with Part 15 of Conformity Trade Name: SONY Model No.: DCR-HC38 Responsible Party: Sony Electronics Inc. Regulatory Information Declaration of the FCC Rules. Telephone Number: 858-942-2230 This device complies with...

Operating Guide
Page 6
...another device with two kinds of the pixels are normal Reorient or relocate the receiving antenna. - "Operating Guide" (This manual) - See "On use Your camcorder is not dustproof, dripproof or waterproof. Connect the equipment into an outlet on use and care" (p. 61). •... Before connecting your Sony dealer regarding this first (Continued) the user is encouraged to try to which the receiver is connected. - However, there may apply, See www.dtsc.ca.gov/hazardouswaste/perchlorate Perchlorate Material: Lithium battery contains perchlorate. DCR-HC38 Serial No.
...another device with two kinds of the pixels are normal Reorient or relocate the receiving antenna. - "Operating Guide" (This manual) - See "On use Your camcorder is not dustproof, dripproof or waterproof. Connect the equipment into an outlet on use and care" (p. 61). •... Before connecting your Sony dealer regarding this first (Continued) the user is encouraged to try to which the receiver is connected. - However, there may apply, See www.dtsc.ca.gov/hazardouswaste/perchlorate Perchlorate Material: Lithium battery contains perchlorate. DCR-HC38 Serial No.
Operating Guide
Page 7
...any problems. • Compensation for the contents of the LCD screen and the viewfinder used for illustrating the operating procedures. About this manual • The images of recordings cannot be contrary to make sure the picture and sound are recorded without notice. Take pictures of light...playback is equipped with a Carl Zeiss lens, which was developed jointly by Carl Zeiss, in Germany, and Sony Corporation, and produces superior images. Doing so might cause your camcorder if necessary (p. 14). It adopts the MTF* measurement system for video cameras and offers a quality typical ...
...any problems. • Compensation for the contents of the LCD screen and the viewfinder used for illustrating the operating procedures. About this manual • The images of recordings cannot be contrary to make sure the picture and sound are recorded without notice. Take pictures of light...playback is equipped with a Carl Zeiss lens, which was developed jointly by Carl Zeiss, in Germany, and Sony Corporation, and produces superior images. Doing so might cause your camcorder if necessary (p. 14). It adopts the MTF* measurement system for video cameras and offers a quality typical ...
Operating Guide
Page 8
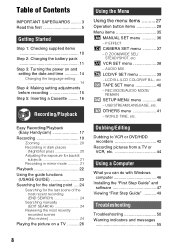
... setting 14 Step 4: Making setting adjustments before recording 15 Step 5: Inserting a Cassette ......... 16 Recording/Playback Easy Recording/Playback (Easy Handycam 17 Recording 19 Zooming 20 Recording in dark places (NightShot plus 20 Adjusting the exposure for backlit subjects 21 Recording in mirror mode ... GUIDE 23 Searching for the starting point .... 24 Searching for the last scene of the most recent recording (END SEARCH 24 Searching manually (EDIT SEARCH 24 Reviewing the most recently recorded scenes (Rec review 24 Playing the picture on a TV .......... 26 Using the Menu...
... setting 14 Step 4: Making setting adjustments before recording 15 Step 5: Inserting a Cassette ......... 16 Recording/Playback Easy Recording/Playback (Easy Handycam 17 Recording 19 Zooming 20 Recording in dark places (NightShot plus 20 Adjusting the exposure for backlit subjects 21 Recording in mirror mode ... GUIDE 23 Searching for the starting point .... 24 Searching for the last scene of the most recent recording (END SEARCH 24 Searching manually (EDIT SEARCH 24 Reviewing the most recently recorded scenes (Rec review 24 Playing the picture on a TV .......... 26 Using the Menu...
Operating Guide
Page 10
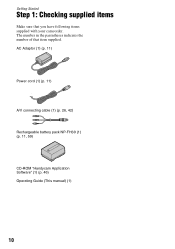
AC Adaptor (1) (p. 11) Power cord (1) (p. 11) A/V connecting cable (1) (p. 26, 42) Rechargeable battery pack NP-FH30 (1) (p. 11, 59) CD-ROM "Handycam Application Software" (1) (p. 46) Operating Guide (This manual) (1) 10 Getting Started Step 1: Checking supplied items Make sure that item supplied. The number in the parentheses indicates the number of that you have following items supplied with your camcorder.
AC Adaptor (1) (p. 11) Power cord (1) (p. 11) A/V connecting cable (1) (p. 26, 42) Rechargeable battery pack NP-FH30 (1) (p. 11, 59) CD-ROM "Handycam Application Software" (1) (p. 46) Operating Guide (This manual) (1) 10 Getting Started Step 1: Checking supplied items Make sure that item supplied. The number in the parentheses indicates the number of that you have following items supplied with your camcorder.
Operating Guide
Page 20
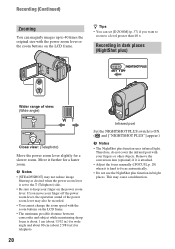
... may also be recorded. • You cannot change the zoom speed with the zoom buttons on the LCD frame. • The minimum possible distance between camcorder and subject while maintaining sharp focus is hard to ON. ( and ["NIGHTSHOT PLUS"] appear.) b Notes • The NightShot plus function in bright places. Move it... your finger on the LCD frame. This may not reduce image blurring as desired when the power zoom lever is attached. • Adjust the focus manually ([FOCUS], p. 28) when it further for a slower zoom. b Notes • [STEADYSHOT] may cause a malfunction.
... may also be recorded. • You cannot change the zoom speed with the zoom buttons on the LCD frame. • The minimum possible distance between camcorder and subject while maintaining sharp focus is hard to ON. ( and ["NIGHTSHOT PLUS"] appear.) b Notes • The NightShot plus function in bright places. Move it... your finger on the LCD frame. This may not reduce image blurring as desired when the power zoom lever is attached. • Adjust the focus manually ([FOCUS], p. 28) when it further for a slower zoom. b Notes • [STEADYSHOT] may cause a malfunction.

Operating Guide
Page 24
...[END SCH] will not work correctly when there is played back for the starting point Make sure that the CAMERA lamp lights up (p. 19). Searching manually (EDIT SEARCH) You can view a few seconds of the scene recorded just before you stopped the tape. 1 Touch [MENU]. The sound is set... SEARCH) will not work once you eject the cassette after you want the recording to start . SEL. Searching for about 5 seconds, and the camcorder enters the standby mode at the point where you have recorded on the tape. Searching for the start point to start the next recording while...
...[END SCH] will not work correctly when there is played back for the starting point Make sure that the CAMERA lamp lights up (p. 19). Searching manually (EDIT SEARCH) You can view a few seconds of the scene recorded just before you stopped the tape. 1 Touch [MENU]. The sound is set... SEARCH) will not work once you eject the cassette after you want the recording to start . SEL. Searching for about 5 seconds, and the camcorder enters the standby mode at the point where you have recorded on the tape. Searching for the start point to start the next recording while...

Operating Guide
Page 26
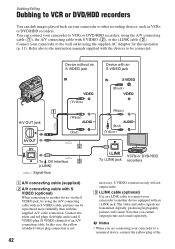
... connecting cable with S VIDEO (optional) When connecting to be reproduced more faithfully than with the supplied A/V cable connection. Refer also to the instruction manuals supplied with the devices to another device via the S VIDEO jack, by setting [DISP OUT] to LINE (VIDEO 1, VIDEO 2, etc.), if the... VCR has an input selector. VCRs or TVs When connecting your camcorder to a TV through a VCR Connect your camcorder to the wall outlet using the A/V connecting cable (1) or the A/V connecting cable with an S VIDEO cable, pictures can be...
... connecting cable with S VIDEO (optional) When connecting to be reproduced more faithfully than with the supplied A/V cable connection. Refer also to the instruction manuals supplied with the devices to another device via the S VIDEO jack, by setting [DISP OUT] to LINE (VIDEO 1, VIDEO 2, etc.), if the... VCR has an input selector. VCRs or TVs When connecting your camcorder to a TV through a VCR Connect your camcorder to the wall outlet using the A/V connecting cable (1) or the A/V connecting cable with an S VIDEO cable, pictures can be...
Operating Guide
Page 28
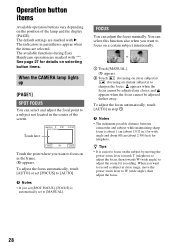
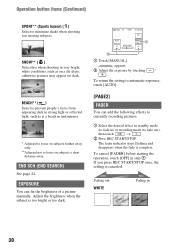
...the CAMERA lamp lights up [PAGE1] SPOT FOCUS You can adjust the focus manually. Operation button items Available operation buttons vary depending on in the frame. 9 appears. The available functions during Easy Handycam operation are selected. You can select this function also when you want to ... be adjusted any closer, and appears when the focus cannot be adjusted farther away. b Notes • The minimum possible distance between camcorder and subject while maintaining sharp focus is about 1 cm (about 13/32 in step 1. The default settings are marked with "*". FOCUS...
...the CAMERA lamp lights up [PAGE1] SPOT FOCUS You can adjust the focus manually. Operation button items Available operation buttons vary depending on in the frame. 9 appears. The available functions during Easy Handycam operation are selected. You can select this function also when you want to ... be adjusted any closer, and appears when the focus cannot be adjusted farther away. b Notes • The minimum possible distance between camcorder and subject while maintaining sharp focus is about 1 cm (about 13/32 in step 1. The default settings are marked with "*". FOCUS...

Operating Guide
Page 29
...[MANUAL]. b Notes • If you want to shoot distant subjects clearly. You can adjust and fix the exposure to the subject, so that it is recorded in suitable brightness even when there is automatically set [SPOT METER], [EXPOSURE] is strong contrast between the camcorder ...and the subject. This setting also prevents your camcorder from appearing excessively white when subjects are lit by strong light. function. DISP GUIDE (Display Guide)* See...
...[MANUAL]. b Notes • If you want to shoot distant subjects clearly. You can adjust and fix the exposure to the subject, so that it is recorded in suitable brightness even when there is automatically set [SPOT METER], [EXPOSURE] is strong contrast between the camcorder ...and the subject. This setting also prevents your camcorder from appearing excessively white when subjects are lit by strong light. function. DISP GUIDE (Display Guide)* See...
Operating Guide
Page 30
SNOW** ( ) Select this when shooting in step 1. Adjust the brightness when the subject is canceled. AL 2 1 Touch [MANUAL]. To cancel [FADER] before starting the operation, touch [OFF] in very bright, white conditions, such as at a beach in midsummer. * ... otherwise pictures may appear too dark. To return the setting to automatic exposure, touch [AUTO]. [PAGE2] FADER You can fix the brightness of a picture manually. Operation button items (Continued) SPORT** (Sports lesson) ( ) Select to minimize shake when shooting fast moving subjects. END SCH (END SEARCH) See page ...
SNOW** ( ) Select this when shooting in step 1. Adjust the brightness when the subject is canceled. AL 2 1 Touch [MANUAL]. To cancel [FADER] before starting the operation, touch [OFF] in very bright, white conditions, such as at a beach in midsummer. * ... otherwise pictures may appear too dark. To return the setting to automatic exposure, touch [AUTO]. [PAGE2] FADER You can fix the brightness of a picture manually. Operation button items (Continued) SPORT** (Sports lesson) ( ) Select to minimize shake when shooting fast moving subjects. END SCH (END SEARCH) See page ...
Operating Guide
Page 35
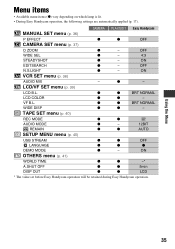
... Easy Handycam MANUAL SET menu (p. 36) P EFFECT z z OFF CAMERA SET menu (p. 37) D ZOOM z - ON EDITSEARCH z - ON OTHERS menu (p. 41) WORLD TIME z z -* A.SHUT OFF z z 5min DISP OUT z z LCD * The value set before Easy Handycam operation will be retained during Easy Handycam operation.... items • Available menu items (z) vary depending on which lamp is lit. • During Easy Handycam operation, the following settings are automatically applied (p. 17). OFF WIDE SEL z - 4:3 STEADYSHOT z - z z BRT NORMAL LCD COLOR z z - VF B.L.
... Easy Handycam MANUAL SET menu (p. 36) P EFFECT z z OFF CAMERA SET menu (p. 37) D ZOOM z - ON EDITSEARCH z - ON OTHERS menu (p. 41) WORLD TIME z z -* A.SHUT OFF z z 5min DISP OUT z z LCD * The value set before Easy Handycam operation will be retained during Easy Handycam operation.... items • Available menu items (z) vary depending on which lamp is lit. • During Easy Handycam operation, the following settings are automatically applied (p. 17). OFF WIDE SEL z - 4:3 STEADYSHOT z - z z BRT NORMAL LCD COLOR z z - VF B.L.

Operating Guide
Page 36
... when the items are reversed. Only the original pictures can add special effects to the playback pictures are not output via the DV Interface (i.LINK). MANUAL SET menu - P EFFECT The default setting is marked with strong contrast. NEG.ART The color and brightness are selected. appears. MOSAIC* Pictures appear mosaic-patterned...
... when the items are reversed. Only the original pictures can add special effects to the playback pictures are not output via the DV Interface (i.LINK). MANUAL SET menu - P EFFECT The default setting is marked with strong contrast. NEG.ART The color and brightness are selected. appears. MOSAIC* Pictures appear mosaic-patterned...
Operating Guide
Page 42
...manuals supplied with the devices to be reproduced more faithfully than with the supplied A/V cable connection. Connect the white and red plugs (left/right audio) and S VIDEO plug (S VIDEO channel) of the S VIDEO connection only will not output audio. b Notes • When you cannot output picture and sound separately. Connect your camcorder... jack, by using the A/V connecting cable with an S VIDEO cable, pictures can be connected. You can connect your camcorder to other recording devices, such as VCRs or DVD/HDD recorders. In this operation (p. 11). Note that you are ...
...manuals supplied with the devices to be reproduced more faithfully than with the supplied A/V cable connection. Connect the white and red plugs (left/right audio) and S VIDEO plug (S VIDEO channel) of the S VIDEO connection only will not output audio. b Notes • When you cannot output picture and sound separately. Connect your camcorder... jack, by using the A/V connecting cable with an S VIDEO cable, pictures can be connected. You can connect your camcorder to other recording devices, such as VCRs or DVD/HDD recorders. In this operation (p. 11). Note that you are ...
Operating Guide
Page 44
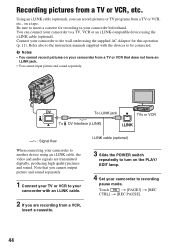
... that does not have an i.LINK jack. • You cannot input picture and sound separately. Using an i.LINK cable (optional), you can connect your camcorder to the instruction manuals supplied with an i.LINK cable. 2 If you cannot output picture and sound separately. 1 Connect your TV or VCR to your... camcorder beforehand. Be sure to recording pause mode. You can record pictures or TV programs from a TV or VCR, etc. Refer also to a TV, ...
... that does not have an i.LINK jack. • You cannot input picture and sound separately. Using an i.LINK cable (optional), you can connect your camcorder to the instruction manuals supplied with an i.LINK cable. 2 If you cannot output picture and sound separately. 1 Connect your TV or VCR to your... camcorder beforehand. Be sure to recording pause mode. You can record pictures or TV programs from a TV or VCR, etc. Refer also to a TV, ...
Operating Guide
Page 46
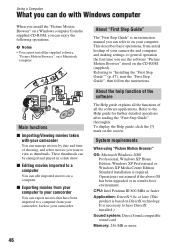
...manual you can edit imported movies on a computer. It is not assured if the above OS has been upgraded or in a slide show. This describes basic operations, from the supplied CD-ROM, you can be enlarged and played in a multi-boot environment. Using a Computer What you can do with your camcorder... compatible sound card Memory: 256 MB or more 46 About the help function of the software The Help guide explains all the functions of your camcorder. CPU: Intel Pentium III 800 MHz or faster Application: DirectX 9.0c or later (This product is required. To display the Help guide, ...
...manual you can edit imported movies on a computer. It is not assured if the above OS has been upgraded or in a slide show. This describes basic operations, from the supplied CD-ROM, you can be enlarged and played in a multi-boot environment. Using a Computer What you can do with your camcorder... compatible sound card Memory: 256 MB or more 46 About the help function of the software The Help guide explains all the functions of your camcorder. CPU: Intel Pentium III 800 MHz or faster Application: DirectX 9.0c or later (This product is required. To display the Help guide, ...
Operating Guide
Page 52
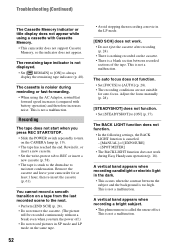
... Cassette Memory, so the indicator does not appear. The remaining tape indicator is canceled. - [MANUAL] of the tape. The cassette is too high. Remove the cassette and leave your camcorder for auto focus. A vertical band appears when recording a bright subject. • This phenomenon is... not a malfunction. Recording The tape does not start when you turn on the cassette. • There is a blank section between the subject and the background is noisier during Easy Handycam...
... Cassette Memory, so the indicator does not appear. The remaining tape indicator is canceled. - [MANUAL] of the tape. The cassette is too high. Remove the cassette and leave your camcorder for auto focus. A vertical band appears when recording a bright subject. • This phenomenon is... not a malfunction. Recording The tape does not start when you turn on the cassette. • There is a blank section between the subject and the background is noisier during Easy Handycam...
Operating Guide
Page 66
...a trademark or registered trademark of Intel Corporation. • Adobe and Adobe Reader are not mentioned in each case in this manual. 66 and other countries. • Macintosh is a trademark. • Microsoft, Windows, and Windows Media are subject to ...;C to 40 °C (32 °F to change without notice. On trademarks • "Handycam" and are registered trademarks of Sony Corporation. • "InfoLITHIUM" is a trademark of Sony Corporation. • i.LINK and are trademarks of Sony Corporation. • is a registered trademark of Apple Computer, Inc in the U.S.
...a trademark or registered trademark of Intel Corporation. • Adobe and Adobe Reader are not mentioned in each case in this manual. 66 and other countries. • Macintosh is a trademark. • Microsoft, Windows, and Windows Media are subject to ...;C to 40 °C (32 °F to change without notice. On trademarks • "Handycam" and are registered trademarks of Sony Corporation. • "InfoLITHIUM" is a trademark of Sony Corporation. • i.LINK and are trademarks of Sony Corporation. • is a registered trademark of Apple Computer, Inc in the U.S.

Operating Guide
Page 70
... use [DISP GUIDE] (p. 71) to check the function of the indicators may not appear when you use [DISP GUIDE]. Meaning Flexible spot meter (29)/ Manual exposure (30) Manual focus (28) Backlight (21) Upper left Indicator Center Meaning AUDIO MODE (40) Upper right Indicator Meaning DV input (44) Center Indicator % Z Meaning NightShot plus...
... use [DISP GUIDE] (p. 71) to check the function of the indicators may not appear when you use [DISP GUIDE]. Meaning Flexible spot meter (29)/ Manual exposure (30) Manual focus (28) Backlight (21) Upper left Indicator Center Meaning AUDIO MODE (40) Upper right Indicator Meaning DV input (44) Center Indicator % Z Meaning NightShot plus...


