
Operating Guide
Page 2
...the presence of uninsulated "dangerous voltage" within the product's enclosure that may be of sufficient magnitude to these numbers whenever you call upon your Sony dealer regarding this product. This symbol is intended to alert the user to the presence of electric shock to persons. WARNING To reduce fire ...or shock hazard, do not expose the unit to excessive heat such as sunshine, fire or the like. Do not expose the batteries to rain or moisture. Owner's Record The model and serial numbers are located on the bottom. Model No. Model No. ACSerial No. Refer to...
...the presence of uninsulated "dangerous voltage" within the product's enclosure that may be of sufficient magnitude to these numbers whenever you call upon your Sony dealer regarding this product. This symbol is intended to alert the user to the presence of electric shock to persons. WARNING To reduce fire ...or shock hazard, do not expose the unit to excessive heat such as sunshine, fire or the like. Do not expose the batteries to rain or moisture. Owner's Record The model and serial numbers are located on the bottom. Model No. Model No. ACSerial No. Refer to...
Operating Guide
Page 5
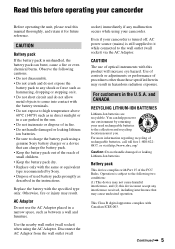
... recommended by returning your camcorder. CAUTION Battery pack If the battery pack is mishandled, the battery pack can charge the battery pack. • Keep the battery pack out of the reach of in fire. • Do not handle damaged or leaking lithium ion batteries. • Be sure to charge the battery pack using a genuine Sony battery charger or a device that...
... recommended by returning your camcorder. CAUTION Battery pack If the battery pack is mishandled, the battery pack can charge the battery pack. • Keep the battery pack out of the reach of in fire. • Do not handle damaged or leaking lithium ion batteries. • Be sure to charge the battery pack using a genuine Sony battery charger or a device that...
Operating Guide
Page 7
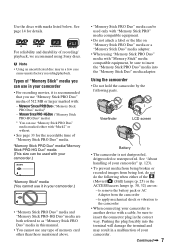
...a "Memory Stick Duo" media adaptor. • When using Sony discs. Using the camcorder • Do not hold the camcorder by the following when either with marks listed below. See "About handling of your camcorder to another device with : - to apply mechanical shock or vibration... to the camcorder • When connecting your camcorder" (p. 123). • To prevent media from being broken or recorded images from the camcorder - Viewfinder LCD screen Battery • The camcorder is recommended that you can be used only with "Memory...
...a "Memory Stick Duo" media adaptor. • When using Sony discs. Using the camcorder • Do not hold the camcorder by the following when either with marks listed below. See "About handling of your camcorder to another device with : - to apply mechanical shock or vibration... to the camcorder • When connecting your camcorder" (p. 123). • To prevent media from being broken or recorded images from the camcorder - Viewfinder LCD screen Battery • The camcorder is recommended that you can be used only with "Memory...

Operating Guide
Page 10
... media 28 Step 6: Inserting a disc or "Memory Stick PRO Duo" media 30 Recording/Playback Recording and playing back with ease (Easy Handycam operation) ....... 34 Recording 38 Zooming 40 10 Recording sound with more presence (5.1ch surround recording) (DCR-DVD850) ........ 40 Adjusting the ...various "Media" according to your needs 13 Media for your camcorder 14 Using your camcorder 54 Protecting images 57 Dividing movies 60 Creating the Playlist 61 Dubbing movies to VCR or DVD/HDD recorders 64 Checking battery information ........ 66 Utilizing Media (MANAGE MEDIA) category 67 ...
... media 28 Step 6: Inserting a disc or "Memory Stick PRO Duo" media 30 Recording/Playback Recording and playing back with ease (Easy Handycam operation) ....... 34 Recording 38 Zooming 40 10 Recording sound with more presence (5.1ch surround recording) (DCR-DVD850) ........ 40 Adjusting the ...various "Media" according to your needs 13 Media for your camcorder 14 Using your camcorder 54 Protecting images 57 Dividing movies 60 Creating the Playlist 61 Dubbing movies to VCR or DVD/HDD recorders 64 Checking battery information ........ 66 Utilizing Media (MANAGE MEDIA) category 67 ...
Operating Guide
Page 11
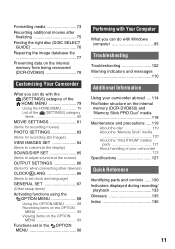
...Computer What you can do with Windows computer 95 Troubleshooting Troubleshooting 102 Warning indicators and messages 110 Additional Information Using your camcorder abroad ....114 File/folder structure on the internal memory (DCR-DVD850) and "Memory Stick PRO Duo" media 118 Maintenance... and precautions .....119 About the disc 119 About the "Memory Stick" media 120 About the "InfoLITHIUM" battery pack 121 About handling of your camcorder 123 Specifications 127 Quick Reference Identifying parts and controls ......130 Indicators displayed during recording/ playback 133 Glossary 135...
...Computer What you can do with Windows computer 95 Troubleshooting Troubleshooting 102 Warning indicators and messages 110 Additional Information Using your camcorder abroad ....114 File/folder structure on the internal memory (DCR-DVD850) and "Memory Stick PRO Duo" media 118 Maintenance... and precautions .....119 About the disc 119 About the "Memory Stick" media 120 About the "InfoLITHIUM" battery pack 121 About handling of your camcorder 123 Specifications 127 Quick Reference Identifying parts and controls ......130 Indicators displayed during recording/ playback 133 Glossary 135...
Operating Guide
Page 18
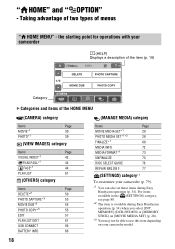
...*1 FILM ROLL*1 FACE*1 PLAYLIST Page 42 44 44 61 (OTHERS) category Items DELETE*2 PHOTO CAPTURE*3 MOVIE DUB*3 PHOTO COPY*3 EDIT PLAYLIST EDIT USB CONNECT BATTERY INFO Page 50 53 54 55 57 61 95 66 Items MOVIE MEDIA SET*1 PHOTO MEDIA SET*1*3 FINALIZE*1 Page 28 28 68 MEDIA INFO 72... MEDIA FORMAT*1 73 UNFINALIZE 75 DISC SELECT GUIDE 76 REPAIR IMG.DB F. 77 (SETTINGS) category*1 To customize your camcorder (p. 79). *1 You can also set these items during Easy Handycam operation (p. 34) when you select [INT. the starting point for operations with your...
...*1 FILM ROLL*1 FACE*1 PLAYLIST Page 42 44 44 61 (OTHERS) category Items DELETE*2 PHOTO CAPTURE*3 MOVIE DUB*3 PHOTO COPY*3 EDIT PLAYLIST EDIT USB CONNECT BATTERY INFO Page 50 53 54 55 57 61 95 66 Items MOVIE MEDIA SET*1 PHOTO MEDIA SET*1*3 FINALIZE*1 Page 28 28 68 MEDIA INFO 72... MEDIA FORMAT*1 73 UNFINALIZE 75 DISC SELECT GUIDE 76 REPAIR IMG.DB F. 77 (SETTINGS) category*1 To customize your camcorder (p. 79). *1 You can also set these items during Easy Handycam operation (p. 34) when you select [INT. the starting point for operations with your...
Operating Guide
Page 21
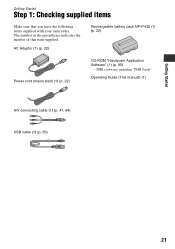
AC Adaptor (1) (p. 22) Rechargeable battery pack NP-FH30 (1) (p. 22) Power cord (mains lead) (1) (p. 22) CD-ROM "Handycam Application Software" (1) (p. 95) - The number in the parentheses indicates the number of that you have the following items supplied with your camcorder. PMB (software) including "PMB Guide" Operating Guide (This manual) (1) A/V connecting cable (1) (p. 47, 64) USB cable (1) (p. 65) 21 Getting Started Getting Started Step 1: Checking supplied items Make sure that item supplied.
AC Adaptor (1) (p. 22) Rechargeable battery pack NP-FH30 (1) (p. 22) Power cord (mains lead) (1) (p. 22) CD-ROM "Handycam Application Software" (1) (p. 95) - The number in the parentheses indicates the number of that you have the following items supplied with your camcorder. PMB (software) including "PMB Guide" Operating Guide (This manual) (1) A/V connecting cable (1) (p. 47, 64) USB cable (1) (p. 65) 21 Getting Started Getting Started Step 1: Checking supplied items Make sure that item supplied.
Operating Guide
Page 22
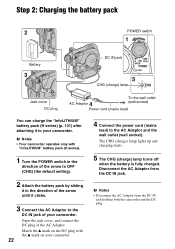
... attaching it clicks. 3 Connect the AC Adaptor to your camcorder. Disconnect the AC Adaptor from the DC IN jack holding both the camcorder and the DC plug. b Notes • Your camcorder operates only with the v mark on the DC plug with "InfoLITHIUM" battery pack (H series). 1 Turn the POWER switch in the ...until it to the DC IN jack of the AC Adaptor. Match the v mark on your camcorder. The CHG (charge) lamp lights up and charging starts. 5 The CHG (charge) lamp turns off when the battery is fully charged. b Notes • Disconnect the AC Adaptor from the DC IN jack. Open...
... attaching it clicks. 3 Connect the AC Adaptor to your camcorder. Disconnect the AC Adaptor from the DC IN jack holding both the camcorder and the DC plug. b Notes • Your camcorder operates only with the v mark on the DC plug with "InfoLITHIUM" battery pack (H series). 1 Turn the POWER switch in the ...until it to the DC IN jack of the AC Adaptor. Match the v mark on your camcorder. The CHG (charge) lamp lights up and charging starts. 5 The CHG (charge) lamp turns off when the battery is fully charged. b Notes • Disconnect the AC Adaptor from the DC IN jack. Open...
Operating Guide
Page 23
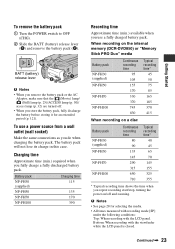
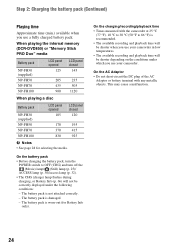
... Approximate time (min.) available when you use a power source from a wall outlet (wall socket) Make the same connections as you store the battery pack, fully discharge the battery before storing it for selecting the media. • All times measured with recording mode [SP] under the following conditions: Top: When recording with...recording time 95 105 155 170 330 370 745 830 Typical recording time* 45 50 75 85 165 185 370 415 When recording on a disc Battery pack NP-FH30 (supplied) NP-FH50 NP-FH70 NP-FH100 Continuous recording time 80 90 135 145 290 315 650 710 Typical recording time* ...
... Approximate time (min.) available when you use a power source from a wall outlet (wall socket) Make the same connections as you store the battery pack, fully discharge the battery before storing it for selecting the media. • All times measured with recording mode [SP] under the following conditions: Top: When recording with...recording time 95 105 155 170 330 370 745 830 Typical recording time* 45 50 75 85 165 185 370 415 When recording on a disc Battery pack NP-FH30 (supplied) NP-FH50 NP-FH70 NP-FH100 Continuous recording time 80 90 135 145 290 315 650 710 Typical recording time* ...
Operating Guide
Page 24
.... On the AC Adaptor • Do not short-circuit the DC plug of the AC Adaptor or battery terminal with the camcorder at 25 °C (77 °F). 10 °C to 30 °C (50 °F to OFF (CHG) and turn off the (Movie) lamp/ (Still) lamp (p. 25...)/ ACCESS lamp (p. 30)/access lamp (p. 32). • The CHG (charge) lamp flashes during charging, or Battery Info (p. 66) will be correctly displayed under which you use your camcorder. This may cause a malfunction. 24 On the charging/recording/playback time • Times measured with any metallic objects. On the...
.... On the AC Adaptor • Do not short-circuit the DC plug of the AC Adaptor or battery terminal with the camcorder at 25 °C (77 °F). 10 °C to 30 °C (50 °F to OFF (CHG) and turn off the (Movie) lamp/ (Still) lamp (p. 25...)/ ACCESS lamp (p. 30)/access lamp (p. 32). • The CHG (charge) lamp flashes during charging, or Battery Info (p. 66) will be correctly displayed under which you use your camcorder. This may cause a malfunction. 24 On the charging/recording/playback time • Times measured with any metallic objects. On the...

Operating Guide
Page 26
.../ LANG] t [ LANGUAGE SET], then select the desired language. 26 In that case, charge the built-in rechargeable battery and then set the date and time again (p. 126). • It takes a few seconds for your camcorder during playback ([DATA CODE], p. 84). • See page 117 for approximately 5 minutes, to be displayed during this...
.../ LANG] t [ LANGUAGE SET], then select the desired language. 26 In that case, charge the built-in rechargeable battery and then set the date and time again (p. 126). • It takes a few seconds for your camcorder during playback ([DATA CODE], p. 84). • See page 117 for approximately 5 minutes, to be displayed during this...

Operating Guide
Page 27
...LCD panel 90 degrees to the camcorder (1), then rotate it 180 degrees to the lens side, you can view images using the viewfinder to avoid wearing down the battery, or when the image seen ...on the LCD frame accidentally when you open the LCD panel 90 degrees to the camcorder, then rotate it to the best angle... the grip belt as illustrated, and hold your eyesight. After recording, set the LENS COVER switch to CLOSE to the camcorder • Touch (HOME) t (SETTINGS) t [SOUND/DISP SET] t [LCD BRIGHT] (p. 85), and adjust ...
...LCD panel 90 degrees to the camcorder (1), then rotate it 180 degrees to the lens side, you can view images using the viewfinder to avoid wearing down the battery, or when the image seen ...on the LCD frame accidentally when you open the LCD panel 90 degrees to the camcorder, then rotate it to the best angle... the grip belt as illustrated, and hold your eyesight. After recording, set the LENS COVER switch to CLOSE to the camcorder • Touch (HOME) t (SETTINGS) t [SOUND/DISP SET] t [LCD BRIGHT] (p. 85), and adjust ...
Operating Guide
Page 33
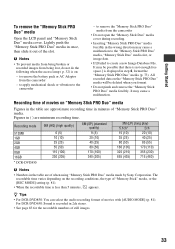
...4, format the "Memory Stick PRO Duo" media (p. 73). to remove the "Memory Stick PRO Duo" media from the camcorder • Do not open the "Memory Stick Duo" media cover during recording. • Inserting "Memory Stick PRO Duo...the recording conditions, the type of still images. 33 to remove the battery pack or AC Adaptor from being broken or recorded images from the camcorder - Figures in the table are minimum recording time. It may be... format of when using "Memory Stick PRO Duo" media made by Sony Corporation. For DCR-DVD650: Sound is less than 5 minutes, appears.
...4, format the "Memory Stick PRO Duo" media (p. 73). to remove the "Memory Stick PRO Duo" media from the camcorder • Do not open the "Memory Stick Duo" media cover during recording. • Inserting "Memory Stick PRO Duo...the recording conditions, the type of still images. 33 to remove the battery pack or AC Adaptor from being broken or recorded images from the camcorder - Figures in the table are minimum recording time. It may be... format of when using "Memory Stick PRO Duo" media made by Sony Corporation. For DCR-DVD650: Sound is less than 5 minutes, appears.

Operating Guide
Page 38
...; You can check the free media space for the "Memory Stick PRO Duo" media you can use in your camcorder, and do not remove the battery pack or the AC Adaptor. • In the case that [INT. Still images are recorded on "Memory Stick PRO Duo" media only. PHOTO F (HOME) E START/...
...; You can check the free media space for the "Memory Stick PRO Duo" media you can use in your camcorder, and do not remove the battery pack or the AC Adaptor. • In the case that [INT. Still images are recorded on "Memory Stick PRO Duo" media only. PHOTO F (HOME) E START/...
Operating Guide
Page 49
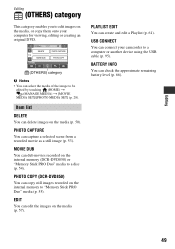
... or "Memory Stick PRO Duo" media to "Memory Stick PRO Duo" media (p. 55). PHOTO CAPTURE You can check the approximate remaining battery level (p. 66). 49 BATTERY INFO You can capture a selected scene from a recorded movie as a still image (p. 53). MOVIE DUB You can copy still images recorded... DELETE You can edit the images on the media (p. 50). USB CONNECT You can connect your computer for viewing, editing or creating an original DVD. (OTHERS) category b Notes • You can create and edit a Playlist (p. 61). Editing Editing (OTHERS) category This category enables you ...
... or "Memory Stick PRO Duo" media to "Memory Stick PRO Duo" media (p. 55). PHOTO CAPTURE You can check the approximate remaining battery level (p. 66). 49 BATTERY INFO You can capture a selected scene from a recorded movie as a still image (p. 53). MOVIE DUB You can copy still images recorded... DELETE You can edit the images on the media (p. 50). USB CONNECT You can connect your computer for viewing, editing or creating an original DVD. (OTHERS) category b Notes • You can create and edit a Playlist (p. 61). Editing Editing (OTHERS) category This category enables you ...
Operating Guide
Page 51
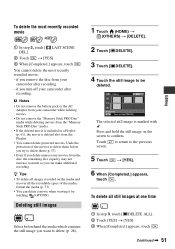
... recording. - b Notes • Do not remove the battery pack or the AC Adaptor from your camcorder after recording. Touch to return to delete them before you try to the previous screen. 5 Touch t [YES]. 6 When [Completed.] appears, touch . if you remove the disc from your camcorder while deleting movies. • Do not remove the...
... recording. - b Notes • Do not remove the battery pack or the AC Adaptor from your camcorder after recording. Touch to return to delete them before you try to the previous screen. 5 Touch t [YES]. 6 When [Completed.] appears, touch . if you remove the disc from your camcorder while deleting movies. • Do not remove the...
Operating Guide
Page 58
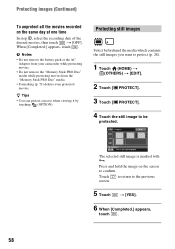
When [Completed.] appears, touch . b Notes • Do not remove the battery pack or the AC Adaptor from your camcorder while protecting movies. • Do not remove the "Memory Stick PRO Duo" media while protecting movies from the "Memory Stick PRO Duo" media. • Formatting (p. ...
When [Completed.] appears, touch . b Notes • Do not remove the battery pack or the AC Adaptor from your camcorder while protecting movies. • Do not remove the "Memory Stick PRO Duo" media while protecting movies from the "Memory Stick PRO Duo" media. • Formatting (p. ...
Operating Guide
Page 59
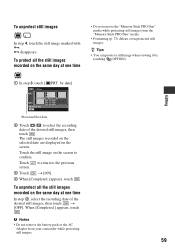
... still image on the same day at one time • Do not remove the "Memory Stick PRO Duo" media while protecting still images from your camcorder while protecting still images. 59 Touch to return to the previous screen. 3 Touch t [ON]. 4 When [Completed.] appears, touch . To unprotect all the... recorded on the screen to select the recording date of the desired still images, then touch t [OFF]. b Notes • Do not remove the battery pack or the AC Adaptor from the "Memory Stick PRO Duo" media. • Formatting (p. 73) deletes even protected still images. To protect all ...
... still image on the same day at one time • Do not remove the "Memory Stick PRO Duo" media while protecting still images from your camcorder while protecting still images. 59 Touch to return to the previous screen. 3 Touch t [ON]. 4 When [Completed.] appears, touch . To unprotect all the... recorded on the screen to select the recording date of the desired still images, then touch t [OFF]. b Notes • Do not remove the battery pack or the AC Adaptor from the "Memory Stick PRO Duo" media. • Formatting (p. 73) deletes even protected still images. To protect all ...
Operating Guide
Page 60
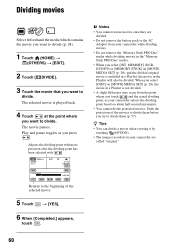
... where you press . The selected movie is not divided. • A slight difference may occur from your camcorder are divided. • Do not remove the battery pack or the AC Adaptor from the point where you select [INT. Adjusts the dividing point with more precision...(p. 28). 1 Touch (HOME) t (OTHERS) t [EDIT]. 2 Touch [ DIVIDE]. 3 Touch the movie that you try to divide them (p. 57). MEMORY] (DCRDVD850) or [MEMORY STICK] on about half-second increments. • You cannot divide protected movies. Undo the protection of the selected movie. 5 Touch t [YES]. 6 ...
... where you press . The selected movie is not divided. • A slight difference may occur from your camcorder are divided. • Do not remove the battery pack or the AC Adaptor from the point where you select [INT. Adjusts the dividing point with more precision...(p. 28). 1 Touch (HOME) t (OTHERS) t [EDIT]. 2 Touch [ DIVIDE]. 3 Touch the movie that you try to divide them (p. 57). MEMORY] (DCRDVD850) or [MEMORY STICK] on about half-second increments. • You cannot divide protected movies. Undo the protection of the selected movie. 5 Touch t [YES]. 6 ...
Operating Guide
Page 62
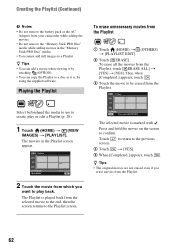
...) t [PLAYLIST]. to return to a Playlist. The selected movie is marked with . Creating the Playlist (Continued) b Notes • Do not remove the battery pack or the AC Adaptor from your camcorder while adding the movies. • Do not remove the "Memory Stick PRO Duo" media while adding movies in the Playlist screen appear...
...) t [PLAYLIST]. to return to a Playlist. The selected movie is marked with . Creating the Playlist (Continued) b Notes • Do not remove the battery pack or the AC Adaptor from your camcorder while adding the movies. • Do not remove the "Memory Stick PRO Duo" media while adding movies in the Playlist screen appear...


