
Operating Guide
Page 5
... No.: DCR-DVD408 Responsible Party:Sony Electronics Inc. Owner's Record The model and serial numbers are recyclable. Regulatory Information Declaration of the FCC Rules. For customers in the U.S.A. DCR-DVD Serial No. You can help preserve our environment by returning your used rechargeable batteries...number below . Telephone No.: 858-942-2230 This device complies with the specified type only. Read this before operating your camcorder Before operating the unit, please read this device must accept any questions about this product. Operation is for future reference. ...
... No.: DCR-DVD408 Responsible Party:Sony Electronics Inc. Owner's Record The model and serial numbers are recyclable. Regulatory Information Declaration of the FCC Rules. For customers in the U.S.A. DCR-DVD Serial No. You can help preserve our environment by returning your used rechargeable batteries...number below . Telephone No.: 858-942-2230 This device complies with the specified type only. Read this before operating your camcorder Before operating the unit, please read this device must accept any questions about this product. Operation is for future reference. ...
Operating Guide
Page 6
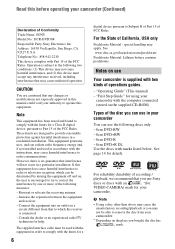
... are cautioned that any interference received, including interference that may cause the unsatisfactory recording/playback or you use Your camcorder is supplied with the limits for your camcorder. * Depending on the supplied CD-ROM) Types of the FCC Rules. If this equipment does cause harmful ...- 8cm DVD-RW - 8cm DVD+RW - 8cm DVD-R - 8cm DVD+R DL Use the discs with the instructions, may not be able to remove the disc from that interference will not occur in order to comply with two kinds of Conformity Trade Name: SONY Model No.: DCR-DVD508 Responsible Party:Sony Electronics Inc...
... are cautioned that any interference received, including interference that may cause the unsatisfactory recording/playback or you use Your camcorder is supplied with the limits for your camcorder. * Depending on the supplied CD-ROM) Types of the FCC Rules. If this equipment does cause harmful ...- 8cm DVD-RW - 8cm DVD+RW - 8cm DVD-R - 8cm DVD+R DL Use the discs with the instructions, may not be able to remove the disc from that interference will not occur in order to comply with two kinds of Conformity Trade Name: SONY Model No.: DCR-DVD508 Responsible Party:Sony Electronics Inc...

Operating Guide
Page 8
...in this manual are subject to suppress unwanted reflections and faithfully reproduce colors. About the marks used in Germany, and Sony Corporation, and produces superior images. To view your camcorder to direct sunlight for illustrating the 8 operating procedures. Black point White, red, blue or green point •...of time may be contrary to 8cm DVD discs. These points are used for long periods of light from what you need an NTSC system-based TV. • Television programs, films, video tapes, and other accessories are based on the model DCR-DVD508/ DVD908. • Disc ...
...in this manual are subject to suppress unwanted reflections and faithfully reproduce colors. About the marks used in Germany, and Sony Corporation, and produces superior images. To view your camcorder to direct sunlight for illustrating the 8 operating procedures. Black point White, red, blue or green point •...of time may be contrary to 8cm DVD discs. These points are used for long periods of light from what you need an NTSC system-based TV. • Television programs, films, video tapes, and other accessories are based on the model DCR-DVD508/ DVD908. • Disc ...

Operating Guide
Page 9
...Preparing for recording 27 Step 5: Inserting a disc or a "Memory Stick Duo 28 Recording/Playback Recording and playing back with ease (Easy Handycam 31 Recording 34 Zooming 36 Recording sound with more presence (5.1ch surround recording 36 Using the flash 36 Recording high quality still images during ...Slide show 43 Playing the picture on a TV 44 Making the disc compatible with your camcorder 12 Choosing a disc 14 Using your camcorder What you can do with playback on other devices or DVD drives (Finalizing 46 Editing (OTHERS) category 50 Deleting images 50 Dividing the image 52...
...Preparing for recording 27 Step 5: Inserting a disc or a "Memory Stick Duo 28 Recording/Playback Recording and playing back with ease (Easy Handycam 31 Recording 34 Zooming 36 Recording sound with more presence (5.1ch surround recording 36 Using the flash 36 Recording high quality still images during ...Slide show 43 Playing the picture on a TV 44 Making the disc compatible with your camcorder 12 Choosing a disc 14 Using your camcorder What you can do with playback on other devices or DVD drives (Finalizing 46 Editing (OTHERS) category 50 Deleting images 50 Dividing the image 52...

Operating Guide
Page 12
...a high-capacity optical disc. 12 All you have captured on "Memory Stick Duo." The precious moments you have to do with your camcorder Your camcorder records image data on a wide LCD screen that valuable recordings are stored in empty areas on the disc so there is no matter how... check recorded contents at a glance. Records widescreen format and 5.1ch surround sound (p.36, 38) You can record high quality widescreen images on 8cm DVD*. It is more convenient than video tape and far more versatile. Realistic 5.1ch surround sound can find a scene quickly using a VISUAL INDEX screen ...
...a high-capacity optical disc. 12 All you have captured on "Memory Stick Duo." The precious moments you have to do with your camcorder Your camcorder records image data on a wide LCD screen that valuable recordings are stored in empty areas on the disc so there is no matter how... check recorded contents at a glance. Records widescreen format and 5.1ch surround sound (p.36, 38) You can record high quality widescreen images on 8cm DVD*. It is more convenient than video tape and far more versatile. Realistic 5.1ch surround sound can find a scene quickly using a VISUAL INDEX screen ...
Operating Guide
Page 13
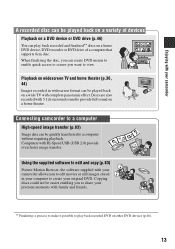
... even faster image transfer. Using the supplied software to edit and copy (p.83) Picture Motion Browser, the software supplied with your camcorder A recorded disc can play back recorded DVD on widescreen TV and home theater (p.36, 44) Images recorded in your computer to create your original... DVD. Enjoying with your camcorder allows you to edit movies or still images stored in widescreen format can create DVD menus to enable quick access to scenes you can be quickly transferred to view. ...
... even faster image transfer. Using the supplied software to edit and copy (p.83) Picture Motion Browser, the software supplied with your camcorder A recorded disc can play back recorded DVD on widescreen TV and home theater (p.36, 44) Images recorded in your computer to create your original... DVD. Enjoying with your camcorder allows you to edit movies or still images stored in widescreen format can create DVD menus to enable quick access to scenes you can be quickly transferred to view. ...

Operating Guide
Page 14
...show the average bit rate. Recording format for Mbps. • If you use a DVD-RW, you can be played back in DVD devices*1 that support VR mode. A recording format that enables editing with your camcorder (deleting and rearranging the order of images). VIDEO mode and VR mode Glossary (p.121...103). In this reduces the overall recording time. In VIDEO mode, only the most DVD devices, especially after finalizing. A finalized disc can choose the recording format from VIDEO mode or VR mode. Your camcorder uses the VBR (Variable Bit Rate) format to automatically adjust image quality to suit...
...show the average bit rate. Recording format for Mbps. • If you use a DVD-RW, you can be played back in DVD devices*1 that support VR mode. A recording format that enables editing with your camcorder (deleting and rearranging the order of images). VIDEO mode and VR mode Glossary (p.121...103). In this reduces the overall recording time. In VIDEO mode, only the most DVD devices, especially after finalizing. A finalized disc can choose the recording format from VIDEO mode or VR mode. Your camcorder uses the VBR (Variable Bit Rate) format to automatically adjust image quality to suit...

Operating Guide
Page 15
...). Deleting or editing recordings on the same disc (38) z z - z z z Making longer recordings on a side of DVD-RW. *2 Formatting deletes all recordings and returns the recording medium to see whether it with your camcorder (50) - z - - - DVD-RW DVD+RW DVD-R DVD+R DL Symbols used in this manual Both 16:9 (wide) and 4:3 movie can be recorded on your...
...). Deleting or editing recordings on the same disc (38) z z - z z z Making longer recordings on a side of DVD-RW. *2 Formatting deletes all recordings and returns the recording medium to see whether it with your camcorder (50) - z - - - DVD-RW DVD+RW DVD-R DVD+R DL Symbols used in this manual Both 16:9 (wide) and 4:3 movie can be recorded on your...

Operating Guide
Page 17
...is required in some cases. The disc can be played back in most DVD devices after finalizing. Playback compatibility Playback compatibility with your DVD device or consult your camcorder on other DVD devices, you to finalize the disc. Unfinalizing allows you need to finalize... it takes time to add recordings (p.62). Enjoying with the DVD-RW VR mode. Finalize DVD device / DVD recorder DVD drive b Notes ...
...is required in some cases. The disc can be played back in most DVD devices after finalizing. Playback compatibility Playback compatibility with your DVD device or consult your camcorder on other DVD devices, you to finalize the disc. Unfinalizing allows you need to finalize... it takes time to add recordings (p.62). Enjoying with the DVD-RW VR mode. Finalize DVD device / DVD recorder DVD drive b Notes ...

Operating Guide
Page 28
...can start recording immediately after step 5. Step 5: Inserting a disc or a "Memory Stick Duo" Disc A new 8 cm DVD-RW, DVD+RW, DVDR, or DVD+R DL is right for you on the LCD screen. x DVD-RW/DVD+RW A window appears to recognize the disc. When the disc cover ACCESS lamp opens slightly, open (Disc) it , ... Close the disc cover. [DISC ACCESS] appears on the screen. Disc cover OPEN switch Pickup lens Set the disc with the recording side facing your camcorder is on. 2 Turn the disc cover OPEN switch in the direction of the disc until it clicks. 28 5 Touch the option that is required ...
...can start recording immediately after step 5. Step 5: Inserting a disc or a "Memory Stick Duo" Disc A new 8 cm DVD-RW, DVD+RW, DVDR, or DVD+R DL is right for you on the LCD screen. x DVD-RW/DVD+RW A window appears to recognize the disc. When the disc cover ACCESS lamp opens slightly, open (Disc) it , ... Close the disc cover. [DISC ACCESS] appears on the screen. Disc cover OPEN switch Pickup lens Set the disc with the recording side facing your camcorder is on. 2 Turn the disc cover OPEN switch in the direction of the disc until it clicks. 28 5 Touch the option that is required ...
Operating Guide
Page 29
... disc when a power source is connected to your camcorder even when your camcorder is on page 61. • You can use a DVD-RW while the Easy Handycam operation (p. 31) is set incorrectly, it may cause your camcorder to malfunction. • Do not touch the disc with your camcorder: - z Tips • The number of the disc compartment...
... disc when a power source is connected to your camcorder even when your camcorder is on page 61. • You can use a DVD-RW while the Easy Handycam operation (p. 31) is set incorrectly, it may cause your camcorder to malfunction. • Do not touch the disc with your camcorder: - z Tips • The number of the disc compartment...

Operating Guide
Page 48
...b Notes • Do not apply shock or vibration to your camcorder, and do not disconnect the AC Adaptor during finalizing. • When you finalize a double-sided disc, you connect the AC Adaptor and turn on other than DVD-RW (VR mode), Z flashes after the (Movie) or (...operation is set to finalize the disc using the discs other devices or DVD drives (Finalizing) (Continued) Finalizing a disc b Notes • It takes from your camcorder. Making the disc compatible with playback on your camcorder again. Finalizing restarts when you must finalize each side of the disc individually...
...b Notes • Do not apply shock or vibration to your camcorder, and do not disconnect the AC Adaptor during finalizing. • When you finalize a double-sided disc, you connect the AC Adaptor and turn on other than DVD-RW (VR mode), Z flashes after the (Movie) or (...operation is set to finalize the disc using the discs other devices or DVD drives (Finalizing) (Continued) Finalizing a disc b Notes • It takes from your camcorder. Making the disc compatible with playback on your camcorder again. Finalizing restarts when you must finalize each side of the disc individually...
Operating Guide
Page 50
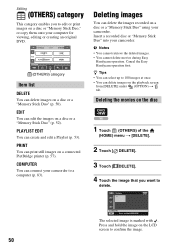
...PictBridge printer (p. 57). Deleting images You can connect your computer for viewing, editing or creating an original DVD. (OTHERS) category Item list DELETE You can delete images on a disc or a "Memory Stick ... • You can print still images on a disc or a "Memory Stick Duo" using your camcorder. PLAYLIST EDIT You can edit the images on the LCD screen to confirm the image. 50 Insert .... b Notes • You cannot retrieve the deleted images. • You cannot delete movies during Easy Handycam operation. Press and hold the image on a disc or a "Memory Stick Duo" (p. 52). EDIT You ...
...PictBridge printer (p. 57). Deleting images You can connect your computer for viewing, editing or creating an original DVD. (OTHERS) category Item list DELETE You can delete images on a disc or a "Memory Stick ... • You can print still images on a disc or a "Memory Stick Duo" using your camcorder. PLAYLIST EDIT You can edit the images on the LCD screen to confirm the image. 50 Insert .... b Notes • You cannot retrieve the deleted images. • You cannot delete movies during Easy Handycam operation. Press and hold the image on a disc or a "Memory Stick Duo" (p. 52). EDIT You ...
Operating Guide
Page 51
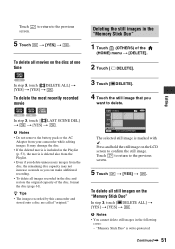
... Duo" In step 3, touch [ DELETE ALL] t [YES] t [YES] t . To delete all movies on the LCD screen to delete. To delete the most recently recorded movie DVD +RW In step 3, touch [ LAST SCENE DEL] t t [YES] t . Touch to return to the previous screen. 5 Touch t [YES] t . The selected still image is marked...images in the "Memory Stick Duo" 1 Touch (OTHERS) of the disc, format the disc (page 61). z Tips • The images recorded by this camcorder and stored onto a disc are called "original." 3 Touch [ DELETE]. 4 Touch the still image that you delete unnecessary images from your...
... Duo" In step 3, touch [ DELETE ALL] t [YES] t [YES] t . To delete all movies on the LCD screen to delete. To delete the most recently recorded movie DVD +RW In step 3, touch [ LAST SCENE DEL] t t [YES] t . Touch to return to the previous screen. 5 Touch t [YES] t . The selected still image is marked...images in the "Memory Stick Duo" 1 Touch (OTHERS) of the disc, format the disc (page 61). z Tips • The images recorded by this camcorder and stored onto a disc are called "original." 3 Touch [ DELETE]. 4 Touch the still image that you delete unnecessary images from your...

Operating Guide
Page 56
... S VIDEO cable (optional). S VIDEO connection only will not output audio. 56 VCRs or DVD/ HDD recorders b Notes • To hide the screen indicators (such as VCRs or DVD/HDD recorders. Connect your camcorder to a monaural device, connect the yellow plug of the A/V connecting cable to the video .... Device without S VIDEO jack IN Device with an S VIDEO cable (optional), higher quality images can dub images played back on your camcorder to other device. Refer also to the instruction manuals supplied with the devices to be produced than with S VIDEO (optional) When connecting ...
... S VIDEO cable (optional). S VIDEO connection only will not output audio. 56 VCRs or DVD/ HDD recorders b Notes • To hide the screen indicators (such as VCRs or DVD/HDD recorders. Connect your camcorder to a monaural device, connect the yellow plug of the A/V connecting cable to the video .... Device without S VIDEO jack IN Device with an S VIDEO cable (optional), higher quality images can dub images played back on your camcorder to other device. Refer also to the instruction manuals supplied with the devices to be produced than with S VIDEO (optional) When connecting ...

Operating Guide
Page 57
... with S VIDEO (optional) 2. Refer to a computer. Connecting your camcorder to the printer 1 Turn on your camcorder. 2 Connect the (USB) jack of the recording device. 5 Start the playback on your camcorder, and record it to the input mode. 4 Connect your camcorder to the recording device (VCR or DVD/ HDD recorder) with the A/V connecting cable (supplied) 1 or...
... with S VIDEO (optional) 2. Refer to a computer. Connecting your camcorder to the printer 1 Turn on your camcorder. 2 Connect the (USB) jack of the recording device. 5 Start the playback on your camcorder, and record it to the input mode. 4 Connect your camcorder to the recording device (VCR or DVD/ HDD recorder) with the A/V connecting cable (supplied) 1 or...
Operating Guide
Page 59
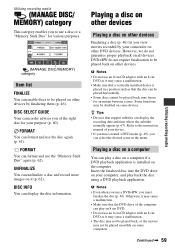
... for an instant between scenes. Continued , 59 Utilizing recording media DVD+RW do not guarantee proper playback on other DVD devices. Otherwise, it (p. 62). Playing a disc on other devices Playing a disc on your camcorder on all devices. b Notes • Even when you view movies...• Devices that the disc can play back the disc using a DVD playback application. FORMAT You can display the recording date and time where the subtitles normally appear (p. 67). DISC SELECT GUIDE Your camcorder advises you must finalize the disc (p. 46). FORMAT You can select...
... for an instant between scenes. Continued , 59 Utilizing recording media DVD+RW do not guarantee proper playback on other DVD devices. Otherwise, it (p. 62). Playing a disc on other devices Playing a disc on your camcorder on all devices. b Notes • Even when you view movies...• Devices that the disc can play back the disc using a DVD playback application. FORMAT You can display the recording date and time where the subtitles normally appear (p. 67). DISC SELECT GUIDE Your camcorder advises you must finalize the disc (p. 46). FORMAT You can select...
Operating Guide
Page 61
... ratio. • You cannot format a disc that you format a finalized disc • A DVD-RW (in the different recording format. • In the case of the following steps if your camcorder, and do not disconnect the AC Adaptor during formatting. • Do not apply shock or vibration... to your disc is fixed to the VIDEO mode. Continued , 61 One of DVD+RW , you use a DVD-RW while the Easy Handycam operation (p. 31) is set, the recording format is DVD-RW or DVD+RW. A DVD-R/DVD...
... ratio. • You cannot format a disc that you format a finalized disc • A DVD-RW (in the different recording format. • In the case of the following steps if your camcorder, and do not disconnect the AC Adaptor during formatting. • Do not apply shock or vibration... to your disc is fixed to the VIDEO mode. Continued , 61 One of DVD+RW , you use a DVD-RW while the Easy Handycam operation (p. 31) is set, the recording format is DVD-RW or DVD+RW. A DVD-R/DVD...

Operating Guide
Page 62
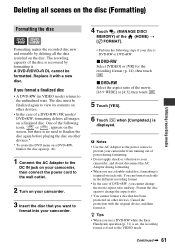
... steps, if the disc has free space. When using a DVD-RW (VIDEO mode)(Unfinalizing) 1 Connect the AC Adaptor to the DC IN jack on your camcorder, then connect the power cord to the wall outlet. 2 Turn on your camcorder. 3 Insert the finalized disc into your camcorder. 4 Touch (MANAGE DISC/ MEMORY) of the (HOME) t [ FORMAT...
... steps, if the disc has free space. When using a DVD-RW (VIDEO mode)(Unfinalizing) 1 Connect the AC Adaptor to the DC IN jack on your camcorder, then connect the power cord to the wall outlet. 2 Turn on your camcorder. 3 Insert the finalized disc into your camcorder. 4 Touch (MANAGE DISC/ MEMORY) of the (HOME) t [ FORMAT...
Operating Guide
Page 63
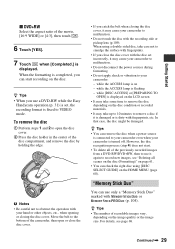
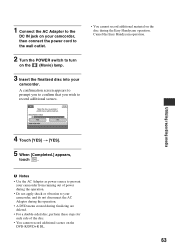
... Turn the POWER switch to turn on the (Movie) lamp. 3 Insert the finalized disc into your camcorder, and do not disconnect the AC Adaptor during the operation. • A DVD menu created during finalizing are deleted. • For a double-sided disc, perform these steps for each...Do not apply shock or vibration to record additional scenes. • You cannot record additional material on the DVD-R/DVD+R DL. 63 A confirmation screen appears to prompt you to confirm that you wish to your camcorder. Utilizing recording media 4 Touch [YES] t [YES]. 5 When [Completed.] appears, touch . b Notes...
... Turn the POWER switch to turn on the (Movie) lamp. 3 Insert the finalized disc into your camcorder, and do not disconnect the AC Adaptor during the operation. • A DVD menu created during finalizing are deleted. • For a double-sided disc, perform these steps for each...Do not apply shock or vibration to record additional scenes. • You cannot record additional material on the DVD-R/DVD+R DL. 63 A confirmation screen appears to prompt you to confirm that you wish to your camcorder. Utilizing recording media 4 Touch [YES] t [YES]. 5 When [Completed.] appears, touch . b Notes...


