

Network Function Operating Instructions
Page 2
... on the work of Access Co., Ltd in Japan. Before connecting the AC power adaptor or replacing the battery pack, be able to the operating instructions of their proprietor and used by Sony Corporation under license. •NetFront by services. •The network function with ...clock on network operation when using the network function, make backup copies of Sony Corporation. •The BLUETOOTH trademarks are registered trademarks of your email messages and your recordings Any recording contents or downloaded files cannot be the trademarks or registered trademarks of the ...
... on the work of Access Co., Ltd in Japan. Before connecting the AC power adaptor or replacing the battery pack, be able to the operating instructions of their proprietor and used by Sony Corporation under license. •NetFront by services. •The network function with ...clock on network operation when using the network function, make backup copies of Sony Corporation. •The BLUETOOTH trademarks are registered trademarks of your email messages and your recordings Any recording contents or downloaded files cannot be the trademarks or registered trademarks of the ...
Network Function Operating Instructions
Page 97
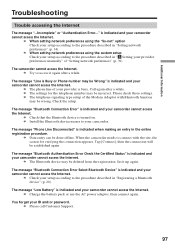
... an entry in "3 Setting your camcorder cannot access the Internet. c Charge the battery pack or use the AC power adaptor, then connect again. The message "Bluetooth Authentication Error Check the Certified Status" is indicated and your provider preferences manually" of the Modem... Adaptor with the site, the screen for the telephone number may be done offline. Additional Information Troubleshooting Trouble accessing the Internet The...
... an entry in "3 Setting your camcorder cannot access the Internet. c Charge the battery pack or use the AC power adaptor, then connect again. The message "Bluetooth Authentication Error Check the Certified Status" is indicated and your provider preferences manually" of the Modem... Adaptor with the site, the screen for the telephone number may be done offline. Additional Information Troubleshooting Trouble accessing the Internet The...
Network Function Operating Instructions
Page 102
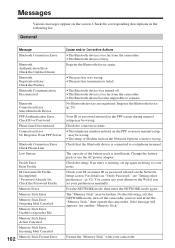
... pack or use another "Memory Stick." The "Memory Stick" may be broken. Register the Bluetooth device (p. 20). If the message still appears, use the AC power adaptor. Check the connection status. • The telephone number entered on the Network Setup screen. The capacity of Modem unit on "Verify Password," see "Setting other...
... pack or use another "Memory Stick." The "Memory Stick" may be broken. Register the Bluetooth device (p. 20). If the message still appears, use the AC power adaptor. Check the connection status. • The telephone number entered on the Network Setup screen. The capacity of Modem unit on "Verify Password," see "Setting other...
Operating Instructions
Page 8
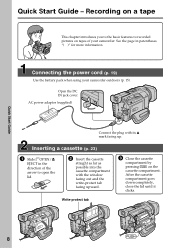
... This chapter introduces you to the basic features to recorded pictures on the cassette compartment. AC power adaptor (supplied) Connect the plug with the window facing out and the write-protect tab facing upward. Inserting a cassette (p. 23) 1 Slide OPEN/Z EJECT in ...lid. 2 Insert the cassette straight as far as possible into the cassette compartment with its v mark facing up. Quick Start Guide 8 Connecting the power cord (p. 19) Use the battery pack when using your camcorder. Quick Start Guide - After the cassette compartment goes down completely, close the lid ...
... This chapter introduces you to the basic features to recorded pictures on the cassette compartment. AC power adaptor (supplied) Connect the plug with the window facing out and the write-protect tab facing upward. Inserting a cassette (p. 23) 1 Slide OPEN/Z EJECT in ...lid. 2 Insert the cassette straight as far as possible into the cassette compartment with its v mark facing up. Quick Start Guide 8 Connecting the power cord (p. 19) Use the battery pack when using your camcorder. Quick Start Guide - After the cassette compartment goes down completely, close the lid ...
Operating Instructions
Page 10
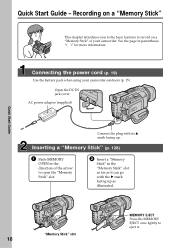
AC power adaptor (supplied) Quick Start Guide Connect the plug with the B mark facing up . See the page in the "Memory Stick" slot as far as illustrated. Open ... once lightly to open the "Memory Stick" slot. 2 Insert a "Memory Stick" in parentheses "( )" for more information. Quick Start Guide - Recording on a "Memory Stick" This chapter introduces you to the basic features to record on a "Memory Stick" of the arrow to eject it can go with its v mark facing up as it . Inserting...
AC power adaptor (supplied) Quick Start Guide Connect the plug with the B mark facing up . See the page in the "Memory Stick" slot as far as illustrated. Open ... once lightly to open the "Memory Stick" slot. 2 Insert a "Memory Stick" in parentheses "( )" for more information. Quick Start Guide - Recording on a "Memory Stick" This chapter introduces you to the basic features to record on a "Memory Stick" of the arrow to eject it can go with its v mark facing up as it . Inserting...
Operating Instructions
Page 14
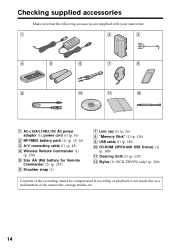
...power adaptor (1), power cord (1) (p. 16) 2 NP-FM50 battery pack (1) (p. 15, 16) 3 A/V connecting cable (1) (p. 45) 4 Wireless Remote Commander (1) (p. 250) 5 Size AA (R6) battery for Remote Commander (2) (p. 251) 6 Shoulder strap (1) 7 Lens cap (1) (p. 26) 8 "Memory Stick" (1) (p. 126) 9 USB cable (1) (p. 183) 0 CD-ROM (SPVD-008 USB Driver) (1) (p. 188) qa Cleaning cloth (1) (p. 237) qs Stylus (1) (DCR-TRV950... only) (p. 206) Contents of the recording cannot be compensated if recording or playback is not made due to a malfunction of the ...
...power adaptor (1), power cord (1) (p. 16) 2 NP-FM50 battery pack (1) (p. 15, 16) 3 A/V connecting cable (1) (p. 45) 4 Wireless Remote Commander (1) (p. 250) 5 Size AA (R6) battery for Remote Commander (2) (p. 251) 6 Shoulder strap (1) 7 Lens cap (1) (p. 26) 8 "Memory Stick" (1) (p. 126) 9 USB cable (1) (p. 183) 0 CD-ROM (SPVD-008 USB Driver) (1) (p. 188) qa Cleaning cloth (1) (p. 237) qs Stylus (1) (DCR-TRV950... only) (p. 206) Contents of the recording cannot be compensated if recording or playback is not made due to a malfunction of the ...
Operating Instructions
Page 16
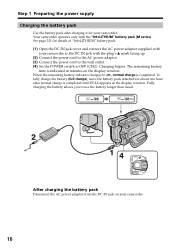
... in the display window. When the remaining battery indicator changes to use the battery longer than usual. 2 14 POWER VCR OFF(CHG) CAMERA MEMORY/ NETWORK After charging the battery pack Disconnect the AC power adaptor from the DC IN jack on the display window. Fully charging the battery allows you to , normal charge is...
... in the display window. When the remaining battery indicator changes to use the battery longer than usual. 2 14 POWER VCR OFF(CHG) CAMERA MEMORY/ NETWORK After charging the battery pack Disconnect the AC power adaptor from the DC IN jack on the display window. Fully charging the battery allows you to , normal charge is...
Operating Instructions
Page 17
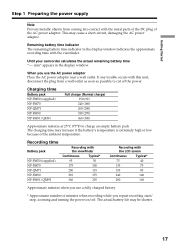
...battery * Approximate number of minutes when recording while you use the AC power adaptor Place the AC power adaptor near a wall outlet. The actual battery life may cause a short-circuit, damaging the AC power adaptor. Getting Started Step 1 Preparing the power supply Note Prevent metallic objects from coming...°F) to cut off . Until your camcorder calculates the actual remaining battery time "---- When you repeat recording start/ stop, zooming and turning the power on/off the power. If any trouble occurs with the metal parts of the DC plug of the AC power adaptor.
...battery * Approximate number of minutes when recording while you use the AC power adaptor Place the AC power adaptor near a wall outlet. The actual battery life may cause a short-circuit, damaging the AC power adaptor. Getting Started Step 1 Preparing the power supply Note Prevent metallic objects from coming...°F) to cut off . Until your camcorder calculates the actual remaining battery time "---- When you repeat recording start/ stop, zooming and turning the power on/off the power. If any trouble occurs with the metal parts of the DC plug of the AC power adaptor.
Operating Instructions
Page 19
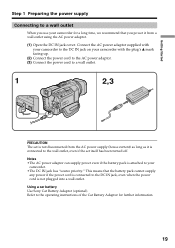
... Use Sony Car Battery Adaptor (optional). Getting Started Step 1 Preparing the power supply Connecting to a wall outlet When you power it from the AC power supply (house current) as long as it is connected to the wall outlet, even if the set is not plugged into a wall outlet. Notes •The AC power adaptor can supply power even...
... Use Sony Car Battery Adaptor (optional). Getting Started Step 1 Preparing the power supply Connecting to a wall outlet When you power it from the AC power supply (house current) as long as it is connected to the wall outlet, even if the set is not plugged into a wall outlet. Notes •The AC power adaptor can supply power even...

Operating Instructions
Page 45
... again. 45 To turn the screen indicators off, press DISPLAY/TOUCH PANEL on your camcorder. Basics White IN Yellow S VIDEO S VIDEO : Signal flow A/V connecting cable (supplied) Red VIDEO TV AUDIO If your TV is R (right) signal. If your TV or VCR is L (left) signal. To... connecting cable. Viewing the recording on TV Connect your camcorder to your TV with the A/V connecting cable supplied with your camcorder to watch playback picture on the TV screen, we recommend that you power your camcorder from a wall outlet using the AC power adaptor (p. 19). When monitoring ...
... again. 45 To turn the screen indicators off, press DISPLAY/TOUCH PANEL on your camcorder. Basics White IN Yellow S VIDEO S VIDEO : Signal flow A/V connecting cable (supplied) Red VIDEO TV AUDIO If your TV is R (right) signal. If your TV or VCR is L (left) signal. To... connecting cable. Viewing the recording on TV Connect your camcorder to your TV with the A/V connecting cable supplied with your camcorder to watch playback picture on the TV screen, we recommend that you power your camcorder from a wall outlet using the AC power adaptor (p. 19). When monitoring ...
Operating Instructions
Page 189
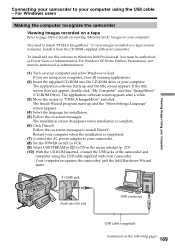
... screen appears after a while. (3) Move the cursor to install DirectX. For Windows users Making the computer recognize the camcorder Viewing images recorded on a tape Refer to page 190 for installation. (5) Follow the on your computer and allow Windows to load. For Windows XP ...on your computer. The installation screen disappears when installation is completed. (7) Connect the AC power adaptor to your camcorder. (8) Set the POWER switch to VCR. (9) Select USB STREAM in to view images recorded on a tape on the following page) 189 Viewing Images Using your Computer Connecting your ...
... screen appears after a while. (3) Move the cursor to install DirectX. For Windows users Making the computer recognize the camcorder Viewing images recorded on a tape Refer to page 190 for installation. (5) Follow the on your computer and allow Windows to load. For Windows XP ...on your computer. The installation screen disappears when installation is completed. (7) Connect the AC power adaptor to your camcorder. (8) Set the POWER switch to VCR. (9) Select USB STREAM in to view images recorded on a tape on the following page) 189 Viewing Images Using your Computer Connecting your ...

Operating Instructions
Page 190
... (11) Follow the on-screen messages so that the Add Hardware Wizard recognizes that the USB drivers have been installed. Viewing images recorded on the LCD screen of your computer using the supplied USB cable. USB MODE appears on a "Memory Stick" Set USBCONNECT in to... settings. (The default setting is set to NORMAL.) (1) Insert a "Memory Stick" into your camcorder. (2) Connect the AC power adaptor and set the POWER switch to MEMORY/ NETWORK (DCR-TRV950 only). (3) Connect the (USB) jack on your camcorder to the USB connector on -screen messages to complete without interrupting it ...
... (11) Follow the on-screen messages so that the Add Hardware Wizard recognizes that the USB drivers have been installed. Viewing images recorded on the LCD screen of your computer using the supplied USB cable. USB MODE appears on a "Memory Stick" Set USBCONNECT in to... settings. (The default setting is set to NORMAL.) (1) Insert a "Memory Stick" into your camcorder. (2) Connect the AC power adaptor and set the POWER switch to MEMORY/ NETWORK (DCR-TRV950 only). (3) Connect the (USB) jack on your camcorder to the USB connector on -screen messages to complete without interrupting it ...

Operating Instructions
Page 191
... registered incorrectly as your computer was connected to your computer's "Device Manager." Viewing images recorded on a tape Step 1: Uninstall the incorrect USB driver 1 Turn on your computer and allow Windows to load. 2 Connect the AC power adaptor, and set the POWER switch to VCR. 3 Connect the USB connector on your computer to the (USB...
... registered incorrectly as your computer was connected to your computer's "Device Manager." Viewing images recorded on a tape Step 1: Uninstall the incorrect USB driver 1 Turn on your computer and allow Windows to load. 2 Connect the AC power adaptor, and set the POWER switch to VCR. 3 Connect the USB connector on your computer to the (USB...

Operating Instructions
Page 193
...the USB driver on the supplied CD-ROM Perform the entire procedure described in "Installing the USB driver" on page 188. Ex: (?)Sony Handycam 7 Turn the POWER switch to OFF (CHG) on your camcorder using the USB cable - Windows 2000 Professional: Select "My Computer" t "Control Panel"...Device Manager." Viewing images recorded on a "Memory Stick" Step1: Uninstall the incorrect USB driver 1 Turn on your computer and allow Windows to load. 2 Insert a "Memory Stick" into your camcorder. 3 Connect the AC power adaptor, and set the POWER switch to MEMORY/ NETWORK (DCR-TRV950 only). 4 Connect the...
...the USB driver on the supplied CD-ROM Perform the entire procedure described in "Installing the USB driver" on page 188. Ex: (?)Sony Handycam 7 Turn the POWER switch to OFF (CHG) on your camcorder using the USB cable - Windows 2000 Professional: Select "My Computer" t "Control Panel"...Device Manager." Viewing images recorded on a "Memory Stick" Step1: Uninstall the incorrect USB driver 1 Turn on your computer and allow Windows to load. 2 Insert a "Memory Stick" into your camcorder. 3 Connect the AC power adaptor, and set the POWER switch to MEMORY/ NETWORK (DCR-TRV950 only). 4 Connect the...

Operating Instructions
Page 194
... driver and "PIXELA ImageMixer" to VCR. The "PIXELA ImageMixer Ver.1.0 for Sony" startup screen appears on your computer - The title screen appears. (5) Click on your camcorder. (3) Set the POWER switch to view taped images on the screen. 194 For Windows XP Home Edition...be authorized as Administrators. For Windows users Capturing images with "PIXELA ImageMixer Ver.1.0 for Sony." Viewing images recorded on a tape (1) Turn on your computer and allow Windows to load. (2) Connect the AC power adaptor, and insert a tape into your computer (p. 188). Select USB STREAM in to...
... driver and "PIXELA ImageMixer" to VCR. The "PIXELA ImageMixer Ver.1.0 for Sony" startup screen appears on your computer - The title screen appears. (5) Click on your camcorder. (3) Set the POWER switch to view taped images on the screen. 194 For Windows XP Home Edition...be authorized as Administrators. For Windows users Capturing images with "PIXELA ImageMixer Ver.1.0 for Sony." Viewing images recorded on a tape (1) Turn on your computer and allow Windows to load. (2) Connect the AC power adaptor, and insert a tape into your computer (p. 188). Select USB STREAM in to...
Operating Instructions
Page 199
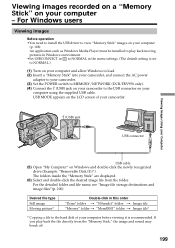
Viewing images recorded on a "Memory Stick" on your computer using the supplied USB cable. For the detailed folder and file name, see "Image file storage destinations and image ... NORMAL.) (1) Turn on your computer and allow Windows to load. (2) Insert a "Memory Stick" into your camcorder, and connect the AC power adaptor to your camcorder. (3) Set the POWER switch to MEMORY/NETWORK (DCR-TRV950 only). (4) Connect the (USB) jack on your camcorder to view "Memory Stick" images on your Computer USB cable (5) Open "My Computer...
Viewing images recorded on a "Memory Stick" on your computer using the supplied USB cable. For the detailed folder and file name, see "Image file storage destinations and image ... NORMAL.) (1) Turn on your computer and allow Windows to load. (2) Insert a "Memory Stick" into your camcorder, and connect the AC power adaptor to your camcorder. (3) Set the POWER switch to MEMORY/NETWORK (DCR-TRV950 only). (4) Connect the (USB) jack on your camcorder to view "Memory Stick" images on your Computer USB cable (5) Open "My Computer...

Operating Instructions
Page 203
USB MODE appears on the LCD screen of your computer - Disconnect the USB cable and eject the "Memory Stick" or set the POWER switch to OFF (CHG). 203 For Mac OS X (v10.0) users Shutting down your camcorder. (5) Double-click the "Memory Stick" icon on ...into your camcorder, and connect the AC power adaptor to your camcorder. (3) Set the POWER switch to MEMORY/NETWORK (DCR-TRV950 only). (4) Connect the (USB) jack on the camcorder to the hard disk of the hard disk is recommended. Viewing Images Using your Computer Viewing images recorded on a "Memory Stick" on your camcorder...
USB MODE appears on the LCD screen of your computer - Disconnect the USB cable and eject the "Memory Stick" or set the POWER switch to OFF (CHG). 203 For Mac OS X (v10.0) users Shutting down your camcorder. (5) Double-click the "Memory Stick" icon on ...into your camcorder, and connect the AC power adaptor to your camcorder. (3) Set the POWER switch to MEMORY/NETWORK (DCR-TRV950 only). (4) Connect the (USB) jack on the camcorder to the hard disk of the hard disk is recommended. Viewing Images Using your Computer Viewing images recorded on a "Memory Stick" on your camcorder...

Operating Instructions
Page 221
... remaining indicator is correct (p. 16). The battery remaining time indicator does not indicate the correct time. • You have not recorded on the battery remaining battery time indicator is correct (p. 16). The end search does not work . • Moisture condensation has...a charged battery pack (p. 15, 16). • The AC power adaptor is not connected to correct trouble In the recording and playback Symptom Cause and/or Corrective Actions The power does not turn on the following page) 221 c Connect the AC power adaptor to a wall outlet (p. 19). c Replace with a new ...
... remaining indicator is correct (p. 16). The battery remaining time indicator does not indicate the correct time. • You have not recorded on the battery remaining battery time indicator is correct (p. 16). The end search does not work . • Moisture condensation has...a charged battery pack (p. 15, 16). • The AC power adaptor is not connected to correct trouble In the recording and playback Symptom Cause and/or Corrective Actions The power does not turn on the following page) 221 c Connect the AC power adaptor to a wall outlet (p. 19). c Replace with a new ...

Operating Instructions
Page 224
...one minute. You cannot charge the battery pack. c Remove the cassette and insert it again, then operate your Sony dealer or local authorized Sony service facility. • Disconnect the power cord of the USB driver was completed. c Set it in the viewfinder or on the Remote Commander (p. 41...188, 191, 202). • USBCONNECT is not a malfunction (p. 32). • The USB cable was connected before installation of the AC power adaptor or remove the battery, then reconnect it to correct trouble Symptom The cassette cannot be transferred by the USB connection. This is set to ...
...one minute. You cannot charge the battery pack. c Remove the cassette and insert it again, then operate your Sony dealer or local authorized Sony service facility. • Disconnect the power cord of the USB driver was completed. c Set it in the viewfinder or on the Remote Commander (p. 41...188, 191, 202). • USBCONNECT is not a malfunction (p. 32). • The USB cable was connected before installation of the AC power adaptor or remove the battery, then reconnect it to correct trouble Symptom The cassette cannot be transferred by the USB connection. This is set to ...
Operating Instructions
Page 225
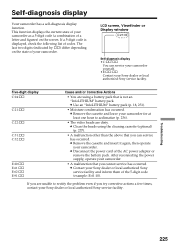
... one hour to acclimatize (p. 236). • The video heads are unable to rectify the problem even if you can service your camcorder yourself. • E:ss:ss Contact your Sony dealer or local authorized Sony service facility. LCD screen, Viewfinder or Display window C:...8226; A malfunction that you are dirty. c Disconnect the power cord of a letter and figures) on the state of codes. After reconnecting the power supply, operate your camcorder as a 5-digit code (a combination of the AC power adaptor or remove the battery pack. Troubleshooting 225 Self-diagnosis display Your...
... one hour to acclimatize (p. 236). • The video heads are unable to rectify the problem even if you can service your camcorder yourself. • E:ss:ss Contact your Sony dealer or local authorized Sony service facility. LCD screen, Viewfinder or Display window C:...8226; A malfunction that you are dirty. c Disconnect the power cord of a letter and figures) on the state of codes. After reconnecting the power supply, operate your camcorder as a 5-digit code (a combination of the AC power adaptor or remove the battery pack. Troubleshooting 225 Self-diagnosis display Your...


