
Operating Instructions
Page 2
...producing home video that may be of sufficient magnitude to constitute a risk of lithium ion Operation is subject to the presence of this equipment. 2 Address: 1 Sony Drive, ...ion battery. Declaration of Conformity Trade Name: SONY Model No.: DCR-TRV6, DCR-TRV11 Responsible Party:Sony Electronics Inc. Congratulations on your authority to use. WARNING To prevent fire or shock hazard... "dangerous voltage" within the product's enclosure that may be prohibited. Your Digital Handycam is loaded with Part 15 of the FCC Rules. Operation is intended...
...producing home video that may be of sufficient magnitude to constitute a risk of lithium ion Operation is subject to the presence of this equipment. 2 Address: 1 Sony Drive, ...ion battery. Declaration of Conformity Trade Name: SONY Model No.: DCR-TRV6, DCR-TRV11 Responsible Party:Sony Electronics Inc. Congratulations on your authority to use. WARNING To prevent fire or shock hazard... "dangerous voltage" within the product's enclosure that may be prohibited. Your Digital Handycam is loaded with Part 15 of the FCC Rules. Operation is intended...

Operating Instructions
Page 3
... to provide reasonable protection against harmful interference in a particular installation. Consult the dealer or an experienced radio/ TV technician for a Class B digital device, pursuant to radio communications. Connect the equipment into an outlet on , the user is encouraged to try to correct the interference by ... equipment does cause harmful interference to radio or television reception, which can radiate radio frequency energy and, if not installed and used in CANADA CAUTION TO PREVENT ELECTRIC SHOCK, MATCH WIDE BLADE OF PLUG TO WIDE SLOT, FULLY INSERT. This equipment generates...
... to provide reasonable protection against harmful interference in a particular installation. Consult the dealer or an experienced radio/ TV technician for a Class B digital device, pursuant to radio communications. Connect the equipment into an outlet on , the user is encouraged to try to correct the interference by ... equipment does cause harmful interference to radio or television reception, which can radiate radio frequency energy and, if not installed and used in CANADA CAUTION TO PREVENT ELECTRIC SHOCK, MATCH WIDE BLADE OF PLUG TO WIDE SLOT, FULLY INSERT. This equipment generates...
Operating Instructions
Page 4
...92 "Memory Stick" Operations (DCR-TRV11/TRV20 only) Using a "Memory Stick" - Signal convert function 66 Recording video or TV programs ....... 67 Inserting a scene from a mini DV tape - Picture effect .. 37 Using special effects - introduction 93 Recording still images on a moving picture...loop - Title search 49 Searching a recording by title - Memory photo playback 113 Copying the image recorded on "Memory Stick"s to a wall outlet 14 Step 2 Inserting a cassette 15 Using with digital effects ... 46 Enlarging images recorded on tapes - Image protection 120 Deleting ...
...92 "Memory Stick" Operations (DCR-TRV11/TRV20 only) Using a "Memory Stick" - Signal convert function 66 Recording video or TV programs ....... 67 Inserting a scene from a mini DV tape - Picture effect .. 37 Using special effects - introduction 93 Recording still images on a moving picture...loop - Title search 49 Searching a recording by title - Memory photo playback 113 Copying the image recorded on "Memory Stick"s to a wall outlet 14 Step 2 Inserting a cassette 15 Using with digital effects ... 46 Enlarging images recorded on tapes - Image protection 120 Deleting ...
Operating Instructions
Page 6
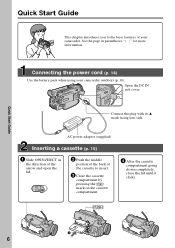
.... EJECT 2 Push the middle portion of the back of the cassette to the basic features of your camcorder outdoors (p. 10). Connecting the power cord (p. 14) Use the battery pack when using your camcorder. Quick Start Guide 6 Open the DC IN jack cover.
.... EJECT 2 Push the middle portion of the back of the cassette to the basic features of your camcorder outdoors (p. 10). Connecting the power cord (p. 14) Use the battery pack when using your camcorder. Quick Start Guide 6 Open the DC IN jack cover.
Operating Instructions
Page 7
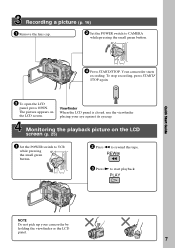
...25) 1 Set the POWER switch to rewind the tape. Recording a picture (p. 16) 1 Remove the lens cap. 2 Set the POWER switch to start playback. VCR POWER OFF(CHG) CAMERA MEMORY 4 Press START/STOP. REW 3 Press N to CAMERA while pressing the small green button. Viewfinder When the LCD panel... is closed, use the viewfinder placing your camcorder by holding the viewfinder or the LCD panel. 7 POWER MEMORY CAMERA VCR OFF(CHG) 2 Press m to VCR while pressing the small green button. To stop recording, press START/ STOP again. 3 To open ...
...25) 1 Set the POWER switch to rewind the tape. Recording a picture (p. 16) 1 Remove the lens cap. 2 Set the POWER switch to start playback. VCR POWER OFF(CHG) CAMERA MEMORY 4 Press START/STOP. REW 3 Press N to CAMERA while pressing the small green button. Viewfinder When the LCD panel... is closed, use the viewfinder placing your camcorder by holding the viewfinder or the LCD panel. 7 POWER MEMORY CAMERA VCR OFF(CHG) 2 Press m to VCR while pressing the small green button. To stop recording, press START/ STOP again. 3 To open ...
Operating Instructions
Page 8
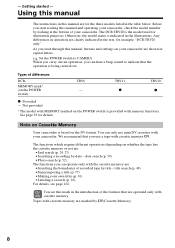
... is the model used for example, "DCR-TRV20 only". The functions you read through this manual and operating your camcorder, check the model number by looking at the bottom of recorded tape by title - Before you can hear a beep sound to CAMERA. Otherwise, the ...titles (p. 81) • Labeling a cassette (p. 83). - Using this manual The instructions in this mark in the introduction of differences DCRMEMORY mark* (on Cassette Memory Your camcorder is indicated in the table below. Note on the POWER switch) TRV6 - title search (p. 49) • Superimposing a title (p. ...
... is the model used for example, "DCR-TRV20 only". The functions you read through this manual and operating your camcorder, check the model number by looking at the bottom of recorded tape by title - Before you can hear a beep sound to CAMERA. Otherwise, the ...titles (p. 81) • Labeling a cassette (p. 83). - Using this manual The instructions in this mark in the introduction of differences DCRMEMORY mark* (on Cassette Memory Your camcorder is indicated in the table below. Note on the POWER switch) TRV6 - title search (p. 49) • Superimposing a title (p. ...
Operating Instructions
Page 9
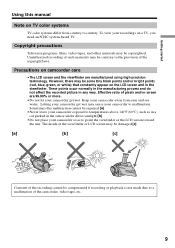
...such as in a car parked in any way. Unauthorized recording of such materials may be repaired [a]. •Never leave your camcorder get wet may be damaged [c]. [a] [b] [c] Contents of the camcorder, video tape, etc. 9 Getting started Using this malfunction cannot be contrary to point the viewfinder or the...your camcorder so as to the provision of pixels and/or screen are manufactured using high-precision technology. These points occur normally in the manufacturing process and do not affect the recorded picture in the sun or under direct sunlight [b]. •Do not place ...
...such as in a car parked in any way. Unauthorized recording of such materials may be repaired [a]. •Never leave your camcorder get wet may be damaged [c]. [a] [b] [c] Contents of the camcorder, video tape, etc. 9 Getting started Using this malfunction cannot be contrary to point the viewfinder or the...your camcorder so as to the provision of pixels and/or screen are manufactured using high-precision technology. These points occur normally in the manufacturing process and do not affect the recorded picture in the sun or under direct sunlight [b]. •Do not place ...
Operating Instructions
Page 10
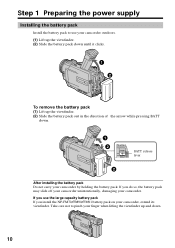
If you install the NP-FM70/FM90/FM91 battery pack on your camcorder, extend its viewfinder. Take care not to use the large capacity battery pack If you do so, the battery pack may slide off your camcorder unintentionally, damaging your camcorder. Step 1 Preparing the power... when lifting the viewfinder up the viewfinder. (2) Slide the battery pack out in the direction of the arrow while pressing BATT down . 10 If you use your camcorder outdoors. (1) Lift up the viewfinder. (2) Slide the battery pack down until it clicks. 1 2 To remove the battery pack (1) Lift up and down . 1 2 ...
If you install the NP-FM70/FM90/FM91 battery pack on your camcorder, extend its viewfinder. Take care not to use the large capacity battery pack If you do so, the battery pack may slide off your camcorder unintentionally, damaging your camcorder. Step 1 Preparing the power... when lifting the viewfinder up the viewfinder. (2) Slide the battery pack out in the direction of the arrow while pressing BATT down . 10 If you use your camcorder outdoors. (1) Lift up the viewfinder. (2) Slide the battery pack down until it clicks. 1 2 To remove the battery pack (1) Lift up and down . 1 2 ...
Operating Instructions
Page 11
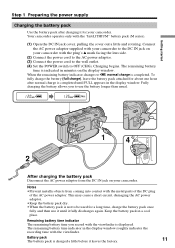
VCR OFF(CHG) 1 4 POWER 2 CAMERA MEMORY After charging the battery pack Disconnect the AC power adaptor from coming into contact with the viewfinder is completed. Remaining battery time indicator The remaining battery time you to use it until FULL appears in minutes on the display window. ...power adaptor. Battery pack The battery pack is indicated in the display window. Keep the battery pack in the display window roughly indicates the recording time with the "InfoLITHIUM" battery pack (M series). (1) Open the DC IN jack cover, pulling the cover out a little and rotating....
VCR OFF(CHG) 1 4 POWER 2 CAMERA MEMORY After charging the battery pack Disconnect the AC power adaptor from coming into contact with the viewfinder is completed. Remaining battery time indicator The remaining battery time you to use it until FULL appears in minutes on the display window. ...power adaptor. Battery pack The battery pack is indicated in the display window. Keep the battery pack in the display window roughly indicates the recording time with the "InfoLITHIUM" battery pack (M series). (1) Open the DC IN jack cover, pulling the cover out a little and rotating....
Operating Instructions
Page 12
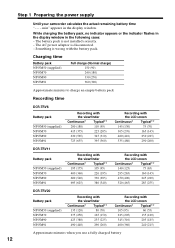
...Approximate minutes when you use a fully charged battery 12 Charging time Battery pack NP-FM50 (supplied) NP-FM70 NP-FM90 NP-FM91 Full charge (Normal charge) 150 (90) 240 (180) 330 (270) 360 (300) Approximate minutes to charge an empty battery pack Recording time DCR-TRV6 Battery pack NP-FM50 ...(supplied) NP-FM70 NP-FM90 NP-FM91 Recording with the viewfinder Continuous* Typical** 200 (180) 110 (95) 415 (375) 225 (205) 630 (565) 345...
...Approximate minutes when you use a fully charged battery 12 Charging time Battery pack NP-FM50 (supplied) NP-FM70 NP-FM90 NP-FM91 Full charge (Normal charge) 150 (90) 240 (180) 330 (270) 360 (300) Approximate minutes to charge an empty battery pack Recording time DCR-TRV6 Battery pack NP-FM50 ...(supplied) NP-FM70 NP-FM90 NP-FM91 Recording with the viewfinder Continuous* Typical** 200 (180) 110 (95) 415 (375) 225 (205) 630 (565) 345...
Operating Instructions
Page 13
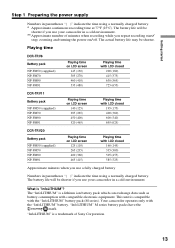
The actual battery life may be shorter if you use your camcorder in a cold environment. ** Approximate number of Sony Corporation. 13 Playing time DCR-TRV6 Battery pack NP-FM50 (supplied) NP-FM70 NP-FM90 NP-FM91 Playing time on LCD screen 145 (130) 305 (270) 460 (...-FM70 NP-FM90 NP-FM91 Playing time on /off. The battery life will be shorter if you use a fully charged battery Numbers in parentheses "( )" indicate the time using a normally charged battery. * Approximate continuous recording time at 77°F (25°C). "InfoLITHIUM" M series battery packs have the mark. Getting ...
The actual battery life may be shorter if you use your camcorder in a cold environment. ** Approximate number of Sony Corporation. 13 Playing time DCR-TRV6 Battery pack NP-FM50 (supplied) NP-FM70 NP-FM90 NP-FM91 Playing time on LCD screen 145 (130) 305 (270) 460 (...-FM70 NP-FM90 NP-FM91 Playing time on /off. The battery life will be shorter if you use a fully charged battery Numbers in parentheses "( )" indicate the time using a normally charged battery. * Approximate continuous recording time at 77°F (25°C). "InfoLITHIUM" M series battery packs have the mark. Getting ...

Operating Instructions
Page 14
This means that you use your camcorder for a long time, we recommend that the battery pack cannot supply any power if the power ...PRECAUTION The set itself has been turned off. Step 1 Preparing the power supply Connecting to a wall outlet When you power it from a wall outlet using the AC power adaptor. (1) Open the DC IN jack cover, pulling the cover out a little and rotating it is connected to the wall outlet... with your camcorder to the DC IN jack on your camcorder. •The DC IN jack has "source priority." Using a car battery Use Sony DC Adaptor/Charger (not supplied). 14
This means that you use your camcorder for a long time, we recommend that the battery pack cannot supply any power if the power ...PRECAUTION The set itself has been turned off. Step 1 Preparing the power supply Connecting to a wall outlet When you power it from a wall outlet using the AC power adaptor. (1) Open the DC IN jack cover, pulling the cover out a little and rotating it is connected to the wall outlet... with your camcorder to the DC IN jack on your camcorder. •The DC IN jack has "source priority." Using a car battery Use Sony DC Adaptor/Charger (not supplied). 14
Operating Instructions
Page 15
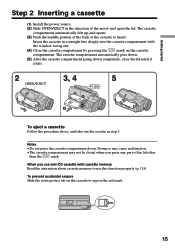
...cassette compartment going down . The cassette compartment automatically lifts up and opens. (3) Push the middle portion of the back of the cassette to use mini DV cassette with the window facing out. (4) Close the cassette compartment by pressing the mark on the cassette to expose the red ...mark. 15 Doing so may cause malfunction. •The cassette compartment may not be closed when you use this function properly (p. 124). Getting started Step 2 Inserting a cassette (1) Install the power source. (2) Slide OPEN/EJECT in the direction of...
...cassette compartment going down . The cassette compartment automatically lifts up and opens. (3) Push the middle portion of the back of the cassette to use mini DV cassette with the window facing out. (4) Close the cassette compartment by pressing the mark on the cassette to expose the red ...mark. 15 Doing so may cause malfunction. •The cassette compartment may not be closed when you use this function properly (p. 124). Getting started Step 2 Inserting a cassette (1) Install the power source. (2) Slide OPEN/EJECT in the direction of...
Operating Instructions
Page 17
... on the LCD screen and in the mirror mode, the viewfinder automatically turns off. 17 When you use the END SEARCH function (p. 24). Basics Recording a picture Note on one tape or you record some scenes in the standby mode for five minutes while the cassette is smooth as long as you ... the time code may not be set to CAMERA again. To enable smooth transition Transition between scenes. However, check the following: •Do not mix recordings in the SP mode and ones in the LP mode on the LOCK switch (DCR-TRV11/TRV20 only) When you use a tape with cassette memory, however, you...
... on the LCD screen and in the mirror mode, the viewfinder automatically turns off. 17 When you use the END SEARCH function (p. 24). Basics Recording a picture Note on one tape or you record some scenes in the standby mode for five minutes while the cassette is smooth as long as you ... the time code may not be set to CAMERA again. To enable smooth transition Transition between scenes. However, check the following: •Do not mix recordings in the SP mode and ones in the LP mode on the LOCK switch (DCR-TRV11/TRV20 only) When you use a tape with cassette memory, however, you...
Operating Instructions
Page 18
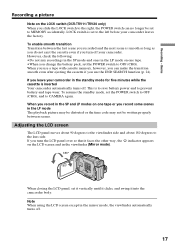
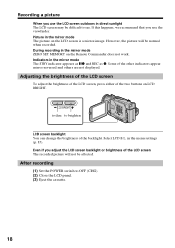
...the backlight. LCD BRIGHT to dim to brighten LCD screen backlight You can change the brightness of the LCD screen The recorded picture will be affected. Even if you use the LCD screen outdoors in direct sunlight The LCD screen may be difficult to OFF (CHG). (2) Close the LCD panel.... (3) Eject the cassette. 18 During recording in the menu settings (p. 85). However, the picture will not be normal when recorded. Adjusting the brightness of...
...the backlight. LCD BRIGHT to dim to brighten LCD screen backlight You can change the brightness of the LCD screen The recorded picture will be affected. Even if you use the LCD screen outdoors in direct sunlight The LCD screen may be difficult to OFF (CHG). (2) Close the LCD panel.... (3) Eject the cassette. 18 During recording in the menu settings (p. 85). However, the picture will not be normal when recorded. Adjusting the brightness of...
Operating Instructions
Page 19
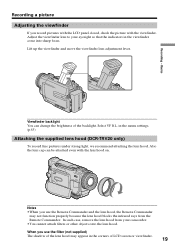
...8226;When you use the filter (not supplied) The shadow of the lens hood may not function properly because the lens hood blocks the infrared rays from your eyesight so that the indicators in the menu settings. (p.85) Attaching the supplied lens hood (DCR-TRV20 only) To record fine pictures under ...filters or other objects onto the lens hood. In such case, remove the lens hood from the Remote Commander. Basics Recording a picture Adjusting the viewfinder If you use the Remote Commander and the lens hood, the Remote Commander may appear in the corners of the backlight. Lift up the...
...8226;When you use the filter (not supplied) The shadow of the lens hood may not function properly because the lens hood blocks the infrared rays from your eyesight so that the indicators in the menu settings. (p.85) Attaching the supplied lens hood (DCR-TRV20 only) To record fine pictures under ...filters or other objects onto the lens hood. In such case, remove the lens hood from the Remote Commander. Basics Recording a picture Adjusting the viewfinder If you use the Remote Commander and the lens hood, the Remote Commander may appear in the corners of the backlight. Lift up the...

Operating Instructions
Page 20
... zoom lever to MEMORY (DCR- TRV11/TRV20 only). 20 "T" side: for telephoto (subject appears closer) "W" side: for wide-angle (subject appears farther away) W T WT W T To use the digital zoom when the POWER switch is at the factory. (p. 85) W T The right side of the bar shows the digital zooming zone. Recording a picture Using the zoom feature Move...
... zoom lever to MEMORY (DCR- TRV11/TRV20 only). 20 "T" side: for telephoto (subject appears closer) "W" side: for wide-angle (subject appears farther away) W T WT W T To use the digital zoom when the POWER switch is at the factory. (p. 85) W T The right side of the bar shows the digital zooming zone. Recording a picture Using the zoom feature Move...
Operating Instructions
Page 21
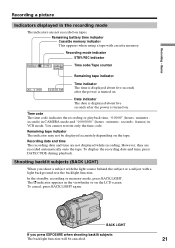
... on tapes. To cancel, press BACK LIGHT again. Remaining battery time indicator Cassette memory indicator This appears when using a tape with a light background, use the backlight function. The . BACK LIGHT If you shoot a subject with the light source behind the subject or... a subject with cassette memory. Basics Recording a picture Indicators displayed in the recording mode The indicators are not recorded on the tape. Time code The time code indicates the recording or playback time, "0:00:00" (hours : minutes : seconds) in CAMERA mode and "0:00:00:00" (hours :...
... on tapes. To cancel, press BACK LIGHT again. Remaining battery time indicator Cassette memory indicator This appears when using a tape with a light background, use the backlight function. The . BACK LIGHT If you shoot a subject with the light source behind the subject or... a subject with cassette memory. Basics Recording a picture Indicators displayed in the recording mode The indicators are not recorded on the tape. Time code The time code indicates the recording or playback time, "0:00:00" (hours : minutes : seconds) in CAMERA mode and "0:00:00:00" (hours :...
Operating Instructions
Page 22
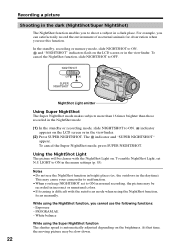
... in a dark place. This may cause your camcorder to malfunction. •When you to ON in normal recording, the picture may be clearer with the autofocus mode when using the Super NightShot function The shutter speed is difficult with the NightShot Light on the LCD screen or in the..., focus manually. To cancel the Super NightShot mode, press SUPER NIGHTSHOT. PROGRAM AE - Using the NightShot Light The picture will be slow down. 22 At that time, the moving picture may be recorded in incorrect or unnatural colors. •If focusing is automatically adjusted depending on the LCD...
... in a dark place. This may cause your camcorder to malfunction. •When you to ON in normal recording, the picture may be clearer with the autofocus mode when using the Super NightShot function The shutter speed is difficult with the NightShot Light on the LCD screen or in the..., focus manually. To cancel the Super NightShot mode, press SUPER NIGHTSHOT. PROGRAM AE - Using the NightShot Light The picture will be slow down. 22 At that time, the moving picture may be recorded in incorrect or unnatural colors. •If focusing is automatically adjusted depending on the LCD...
Operating Instructions
Page 23
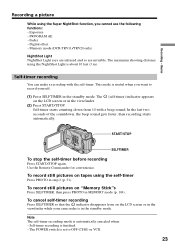
... - Digital effect - In the last two seconds of the countdown, the beep sound gets faster, then recording starts automatically. Note The self-timer recording mode is set to record yourself. (1) Press SELFTIMER in the standby mode. Basics Recording a picture While using the Super NightShot function, you want to OFF (CHG) or VCR. 23 Memory mode (DCR-TRV11...
... - Digital effect - In the last two seconds of the countdown, the beep sound gets faster, then recording starts automatically. Note The self-timer recording mode is set to record yourself. (1) Press SELFTIMER in the standby mode. Basics Recording a picture While using the Super NightShot function, you want to OFF (CHG) or VCR. 23 Memory mode (DCR-TRV11...


