Operating Instructions
Page 4
...Stick" on a tape - Photo save 87 Shooting in a continuous loop - Digital effect 37 Using the PROGRAM AE function 40 Adjusting the exposure manually 42 Additional Information Digital8 system, recording and playback 102 About i.LINK 104 Changing the lithium battery in this manual 8... other product names mentioned herein may be the trademarks or registered trademarks of their Recording video or TV programs 60 respective companies. Table of contents Checking supplied accessories 5 Quick Start Guide 6 Customizing Your Camcorder Changing the menu settings 64 Getting ...
...Stick" on a tape - Photo save 87 Shooting in a continuous loop - Digital effect 37 Using the PROGRAM AE function 40 Adjusting the exposure manually 42 Additional Information Digital8 system, recording and playback 102 About i.LINK 104 Changing the lithium battery in this manual 8... other product names mentioned herein may be the trademarks or registered trademarks of their Recording video or TV programs 60 respective companies. Table of contents Checking supplied accessories 5 Quick Start Guide 6 Customizing Your Camcorder Changing the menu settings 64 Getting ...
Operating Instructions
Page 5
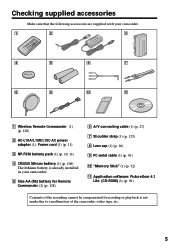
Getting started Checking supplied accessories Make sure that the following accessories are supplied with your camcorder. 1 2 3 4 5 6 7 8 9 0 qa 1 Wireless Remote Commander (1) (p. 128) 2 AC-L10A/L10B/L10C AC power adaptor (1), Power cord (1) (p. 11) 3 NP-F330 battery pack (1) ... 27) 7 Shoulder strap (1) (p. 125) 8 Lens cap (1) (p. 16) 9 PC serial cable (1) (p. 91) 0 "Memory Stick" (1) (p. 72) qa Application software: PictureGear 4.1 Lite (CD-ROM) (1) (p. 91) Contents of the recording cannot be compensated if recording or playback is not made due to a malfunction of the camcorder...
Getting started Checking supplied accessories Make sure that the following accessories are supplied with your camcorder. 1 2 3 4 5 6 7 8 9 0 qa 1 Wireless Remote Commander (1) (p. 128) 2 AC-L10A/L10B/L10C AC power adaptor (1), Power cord (1) (p. 11) 3 NP-F330 battery pack (1) ... 27) 7 Shoulder strap (1) (p. 125) 8 Lens cap (1) (p. 16) 9 PC serial cable (1) (p. 91) 0 "Memory Stick" (1) (p. 72) qa Application software: PictureGear 4.1 Lite (CD-ROM) (1) (p. 91) Contents of the recording cannot be compensated if recording or playback is not made due to a malfunction of the camcorder...

Operating Instructions
Page 80
Recording still images on using the video flash light (not supplied) The video flash light does not work in the multi screen mode if you install it to the accessory shoe. 80 Memory Photo recording Continuous shooting settings Setting Meaning (indicator on the screen) OFF Your camcorder shoots one image at a time. (no indicator) MULTI SCRN Your camcorder shoots 9 still images at about 0.3 sec intervals and displays the images on a single page divided into 9 boxes. ( ) Note on "Memory Stick" -
Recording still images on using the video flash light (not supplied) The video flash light does not work in the multi screen mode if you install it to the accessory shoe. 80 Memory Photo recording Continuous shooting settings Setting Meaning (indicator on the screen) OFF Your camcorder shoots one image at a time. (no indicator) MULTI SCRN Your camcorder shoots 9 still images at about 0.3 sec intervals and displays the images on a single page divided into 9 boxes. ( ) Note on "Memory Stick" -
Operating Instructions
Page 120
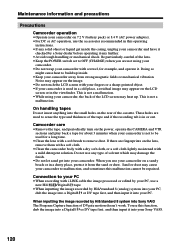
...a malfunction. Camcorder care • Remove the tape, and periodically turn on the power, operate the CAMERA and VTR sections and play back a tape for about 3 minutes when your camcorder is in or ...screen may heat up inside the casing, unplug your camcorder and have it checked by a Sony dealer before operating it any type of the cassette. Connection to malfunction, and sometimes this...your camcorder to your PC • When recording with a mild detergent solution. Doing so might cause heat to OFF (CHARGE) when you use the accessories recommended in this function, dub the image ...
...a malfunction. Camcorder care • Remove the tape, and periodically turn on the power, operate the CAMERA and VTR sections and play back a tape for about 3 minutes when your camcorder is in or ...screen may heat up inside the casing, unplug your camcorder and have it checked by a Sony dealer before operating it any type of the cassette. Connection to malfunction, and sometimes this...your camcorder to your PC • When recording with a mild detergent solution. Doing so might cause heat to OFF (CHARGE) when you use the accessories recommended in this function, dub the image ...
Operating Instructions
Page 122
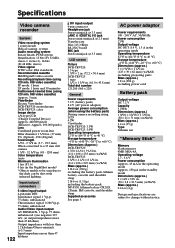
...video cassette) Approx. 5 min. Hi8 cassette, and shoulder strap Supplied accessories See page 5. Viewfinder Electric Viewfinder DCR-TRV520: monochrome DCR-TRV525: color Image device 1/4 type CCD (Charge Coupled Device) Approx. 460,000 pixels (Effective: Approx. 290,000 pixels) Lens Combined power zoom lens Filter diameter 1 7/16 in. (37 mm) 25× (Optical), 450× (Digital...F330, lithium battery CR2025, 120min. Specifications Video camera recorder System Video recording system 2 rotary heads Helical scaning system Audio recording system Rotary heads, PCM system Quantization: 12...
...video cassette) Approx. 5 min. Hi8 cassette, and shoulder strap Supplied accessories See page 5. Viewfinder Electric Viewfinder DCR-TRV520: monochrome DCR-TRV525: color Image device 1/4 type CCD (Charge Coupled Device) Approx. 460,000 pixels (Effective: Approx. 290,000 pixels) Lens Combined power zoom lens Filter diameter 1 7/16 in. (37 mm) 25× (Optical), 450× (Digital...F330, lithium battery CR2025, 120min. Specifications Video camera recorder System Video recording system 2 rotary heads Helical scaning system Audio recording system Rotary heads, PCM system Quantization: 12...
Operating Instructions
Page 123
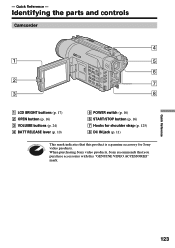
Quick Reference 123 Identifying the parts and controls Camcorder 4 1 5 6 2 7 3 8 1 LCD BRIGHT buttons (p. 17) 2 OPEN button (p. 16) 3 VOLUME buttons (p. 24) 4 BATT RELEASE lever (p. 10) 5 POWER switch (p. 16) 6 START/STOP button (p. 16) 7 Hooks for shoulder strap (p. 125) 8 DC IN jack (p. 11) This mark indicates that you purchase accessories with this product is a genuine accessory for Sony video products. When purchasing Sony video products, Sony recommends that this "GENUINE VIDEO ACCESSORIES" mark. - Quick Reference -
Quick Reference 123 Identifying the parts and controls Camcorder 4 1 5 6 2 7 3 8 1 LCD BRIGHT buttons (p. 17) 2 OPEN button (p. 16) 3 VOLUME buttons (p. 24) 4 BATT RELEASE lever (p. 10) 5 POWER switch (p. 16) 6 START/STOP button (p. 16) 7 Hooks for shoulder strap (p. 125) 8 DC IN jack (p. 11) This mark indicates that you purchase accessories with this product is a genuine accessory for Sony video products. When purchasing Sony video products, Sony recommends that this "GENUINE VIDEO ACCESSORIES" mark. - Quick Reference -
Operating Instructions
Page 126
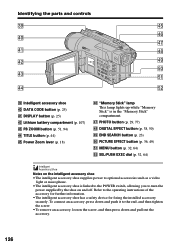
...DIGITAL EFFECT button (p. 38, 50) rl END SEARCH button (p. 23) t; rj ra rk rs rl t; To connect an accessory, press down and push it to the operating instructions of the accessory for further information. •The intelligent accessory shoe has a safety device for fixing the installed accessory...) ts SEL/PUSH EXEC dial (p. 32, 64) Notes on the intelligent accessory shoe •The intelligent accessory shoe supplies power to optional accessories such as a video light or microphone. •The intelligent accessory shoe is in the "Memory Stick" compartment. rd ta rf ts el ...
...DIGITAL EFFECT button (p. 38, 50) rl END SEARCH button (p. 23) t; rj ra rk rs rl t; To connect an accessory, press down and push it to the operating instructions of the accessory for further information. •The intelligent accessory shoe has a safety device for fixing the installed accessory...) ts SEL/PUSH EXEC dial (p. 32, 64) Notes on the intelligent accessory shoe •The intelligent accessory shoe supplies power to optional accessories such as a video light or microphone. •The intelligent accessory shoe is in the "Memory Stick" compartment. rd ta rf ts el ...
PictureGear v4.1 Lite User Guide
Page 5
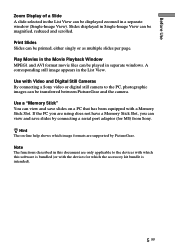
...only applicable to the devices with which this software is bundled (or with Video and Digital Still Cameras By connecting a Sony video or digital still camera to the PC, photographic images can view and save slides on -line help shows which the accessory kit bundle is intended). 5 GB Before Use Zoom Display of a ...-Image View can be played in the Movie Playback Window MPEG1 and AVI format movie files can be transferred between PictureGear and the camera. If the PC you are supported by connecting a serial port adaptor (for which image formats are using does not have a Memory...
...only applicable to the devices with which this software is bundled (or with Video and Digital Still Cameras By connecting a Sony video or digital still camera to the PC, photographic images can view and save slides on -line help shows which the accessory kit bundle is intended). 5 GB Before Use Zoom Display of a ...-Image View can be played in the Movie Playback Window MPEG1 and AVI format movie files can be transferred between PictureGear and the camera. If the PC you are supported by connecting a serial port adaptor (for which image formats are using does not have a Memory...

PictureGear v4.1 Lite User Guide
Page 16
... between the PC and the camera. See the PictureGear on the video camera, and set it to communicate with the PC (set the power switch to the device with which the accessory kit bundle is intended). Using a Video Camera With a Sony video camera connected to Various Settings - ...Connections and Settings 1 Turn off the video camera and PC power. 2 Connect one end of the connection cable to a PC serial port, and the other end to the DIGITAL I/O jack on the video camera....
... between the PC and the camera. See the PictureGear on the video camera, and set it to communicate with the PC (set the power switch to the device with which the accessory kit bundle is intended). Using a Video Camera With a Sony video camera connected to Various Settings - ...Connections and Settings 1 Turn off the video camera and PC power. 2 Connect one end of the connection cable to a PC serial port, and the other end to the DIGITAL I/O jack on the video camera....

