Operating Instructions
Page 4
... •Viewing images recorded on "Memory Stick"s using the USB cable (except DCR-TRV240) (p. 155) •Viewing images recorded on a tape using the USB cable (p. 94) •Viewing images live on your computer from your camcorder using the USB cable (p. 103) •Capturing images from an analog video... for giving images more impact •Digital zoom [MENU] (p. 24) The default setting is OFF. (To zoom greater than 25×, (DCR-TRV240/TRV340)/15× (DCR-TRV740/TRV840), select the digital zoom power in D ZOOM in the menu settings.) •Fader (p. 44) •Picture effects (p. 47) ...
... •Viewing images recorded on "Memory Stick"s using the USB cable (except DCR-TRV240) (p. 155) •Viewing images recorded on a tape using the USB cable (p. 94) •Viewing images live on your computer from your camcorder using the USB cable (p. 103) •Capturing images from an analog video... for giving images more impact •Digital zoom [MENU] (p. 24) The default setting is OFF. (To zoom greater than 25×, (DCR-TRV240/TRV340)/15× (DCR-TRV740/TRV840), select the digital zoom power in D ZOOM in the menu settings.) •Fader (p. 44) •Picture effects (p. 47) ...
Operating Instructions
Page 5
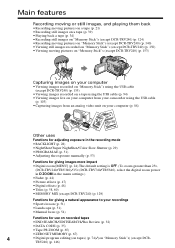
...supplied with your camcorder. 1 2 3 4 5 6 7 8 9 0 1 Wireless Remote Commander (1) (p. 207) 2 AC-L10A/L10B/L10C AC power adaptor (1), Power cord (1) (p. 13) 3 NP-FM30 battery pack (1) (p. 12, 13) DCR-TRV240/TRV340 NP-FM50 battery pack (1) (p. 12, 13) DCR-TRV740/TRV840 4... Size AA (R6) battery for Remote Commander (2) (p. 207) 5 A/V connecting cable (1) (p. 38) 6 Shoulder strap (1) (p. 201) 7 Lens cap (1) (p. 21) 8 USB cable (1) (p. 96, 156) 9 "Memory Stick" (1) (except DCR-TRV240) (p. 116) 0 CD-ROM (SPVD-008 USB...
...supplied with your camcorder. 1 2 3 4 5 6 7 8 9 0 1 Wireless Remote Commander (1) (p. 207) 2 AC-L10A/L10B/L10C AC power adaptor (1), Power cord (1) (p. 13) 3 NP-FM30 battery pack (1) (p. 12, 13) DCR-TRV240/TRV340 NP-FM50 battery pack (1) (p. 12, 13) DCR-TRV740/TRV840 4... Size AA (R6) battery for Remote Commander (2) (p. 207) 5 A/V connecting cable (1) (p. 38) 6 Shoulder strap (1) (p. 201) 7 Lens cap (1) (p. 21) 8 USB cable (1) (p. 96, 156) 9 "Memory Stick" (1) (except DCR-TRV240) (p. 116) 0 CD-ROM (SPVD-008 USB...
Operating Instructions
Page 6
... time ........ 18 Step 3 Inserting a cassette 20 Recording - NightShot/Super NightShot/ Color Slow Shutter 29 Self-timer recording (except DCR-TRV240 31 Checking recordings - Digital effect 48 Using the PROGRAM AE function .... 51 Adjusting the exposure manually ...... 53 Focusing manually... ZOOM 65 Quickly locating a scene - Frame recording 57 Superimposing a title 58 Making your computer (Windows users only 94 Customizing Your Camcorder Changing the menu settings 105 6 ZERO SET MEMORY 67 Searching a recording by frame recording - Digital program editing (on your own ...
... time ........ 18 Step 3 Inserting a cassette 20 Recording - NightShot/Super NightShot/ Color Slow Shutter 29 Self-timer recording (except DCR-TRV240 31 Checking recordings - Digital effect 48 Using the PROGRAM AE function .... 51 Adjusting the exposure manually ...... 53 Focusing manually... ZOOM 65 Quickly locating a scene - Frame recording 57 Superimposing a title 58 Making your computer (Windows users only 94 Customizing Your Camcorder Changing the menu settings 105 6 ZERO SET MEMORY 67 Searching a recording by frame recording - Digital program editing (on your own ...
Operating Instructions
Page 7
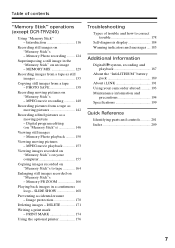
... 185 Additional Information Digital8 system, recording and playback 187 About the "InfoLITHIUM" battery pack 189 About i.LINK 191 Using your camcorder abroad .......... 193 ...Maintenance information and precautions 194 Specifications 199 Quick Reference Identifying parts and controls 201 Index 209 7 Image protection 170 Deleting images - DELETE 171 Writing a print mark - SLIDE SHOW 168 Preventing accidental erasure - PRINT MARK 174 Using the optional printer 176 Troubleshooting Types of contents "Memory Stick" operations (except DCR...
... 185 Additional Information Digital8 system, recording and playback 187 About the "InfoLITHIUM" battery pack 189 About i.LINK 191 Using your camcorder abroad .......... 193 ...Maintenance information and precautions 194 Specifications 199 Quick Reference Identifying parts and controls 201 Index 209 7 Image protection 170 Deleting images - DELETE 171 Writing a print mark - SLIDE SHOW 168 Preventing accidental erasure - PRINT MARK 174 Using the optional printer 176 Troubleshooting Types of contents "Memory Stick" operations (except DCR...
Operating Instructions
Page 8
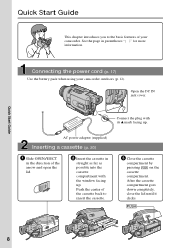
...as far as possible into the cassette compartment with its v mark facing up . Connecting the power cord (p. 17) Use the battery pack when using your camcorder. Open the DC IN jack cover. AC power adaptor (supplied) Inserting a cassette (p. 20) 1 Slide OPEN/EJECT in the direction of your... camcorder outdoors (p. 12). Quick Start Guide 8 Connect the plug with the window facing up . After the cassette compartment goes down completely, close the lid until ...
...as far as possible into the cassette compartment with its v mark facing up . Connecting the power cord (p. 17) Use the battery pack when using your camcorder. Open the DC IN jack cover. AC power adaptor (supplied) Inserting a cassette (p. 20) 1 Slide OPEN/EJECT in the direction of your... camcorder outdoors (p. 12). Quick Start Guide 8 Connect the plug with the window facing up . After the cassette compartment goes down completely, close the lid until ...
Operating Instructions
Page 9
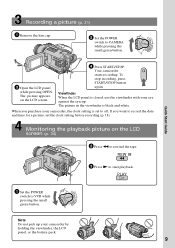
...POWER CAM M Note Do not pick up your camcorder, the clock setting is set the clock setting before recording (p. 18). The picture appears on the LCD screen (p. 34) 2 Press m to off. Your camcorder starts recording. V POWER OFCFR(CHG) CAM M 3 Open the LCD panel while pressing OPEN. To stop recording, press... START/STOP button again. If you purchase your camcorder by holding the viewfinder, the LCD panel, or the battery pack. 9 E ERMAORY E ERMAORY Recording a picture (p. 21) 1 Remove the lens cap. 2 Set the POWER switch to record the...
...POWER CAM M Note Do not pick up your camcorder, the clock setting is set the clock setting before recording (p. 18). The picture appears on the LCD screen (p. 34) 2 Press m to off. Your camcorder starts recording. V POWER OFCFR(CHG) CAM M 3 Open the LCD panel while pressing OPEN. To stop recording, press... START/STOP button again. If you purchase your camcorder by holding the viewfinder, the LCD panel, or the battery pack. 9 E ERMAORY E ERMAORY Recording a picture (p. 21) 1 Remove the lens cap. 2 Set the POWER switch to record the...
Operating Instructions
Page 10
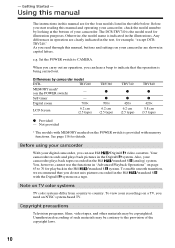
...Hi8 /standard 8 (analog) system. - Otherwise, the model name is the model used for details. Digital zoom 700× LCD Screen 6.2 cm (2.5 type) TRV340 z z 700× 6.2 cm (2.5 type) TRV740 z z 420× 6.2 cm (2.5 type) TRV840 z z 420&#...DCR-TRV740 is indicated in the Hi8 /standard 8 with memory functions. When you carry out an operation, you can use the functions in "Advanced Playback Operations" on a TV, you do not mix pictures recorded in the illustrations. See page 116 for illustration purposes. Also, your camcorder plays back tapes recorded in the Digital8...
...Hi8 /standard 8 (analog) system. - Otherwise, the model name is the model used for details. Digital zoom 700× LCD Screen 6.2 cm (2.5 type) TRV340 z z 700× 6.2 cm (2.5 type) TRV740 z z 420× 6.2 cm (2.5 type) TRV840 z z 420&#...DCR-TRV740 is indicated in the Hi8 /standard 8 with memory functions. When you carry out an operation, you can use the functions in "Advanced Playback Operations" on a TV, you do not mix pictures recorded in the illustrations. See page 116 for illustration purposes. Also, your camcorder plays back tapes recorded in the Digital8...
Operating Instructions
Page 11
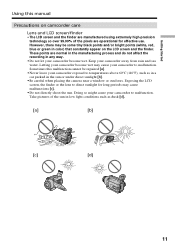
...tiny black points and/or bright points (white, red, blue or green in color) that constantly appear on camcorder care Lens and LCD screen/finder • The LCD screen and the finder are manufactured using extremely high-precision technology so over 99.99% of the sun in ... long periods may cause malfunctions [c]. •Do not directly shoot the sun. Keep your camcorder to malfunction. Doing so might cause your camcorder become wet. Letting your camcorder to malfunction. Exposing the LCD screen, the finder or the lens to direct sunlight for effective use. However, there may...
...tiny black points and/or bright points (white, red, blue or green in color) that constantly appear on camcorder care Lens and LCD screen/finder • The LCD screen and the finder are manufactured using extremely high-precision technology so over 99.99% of the sun in ... long periods may cause malfunctions [c]. •Do not directly shoot the sun. Keep your camcorder to malfunction. Doing so might cause your camcorder become wet. Letting your camcorder to malfunction. Exposing the LCD screen, the finder or the lens to direct sunlight for effective use. However, there may...
Operating Instructions
Page 12
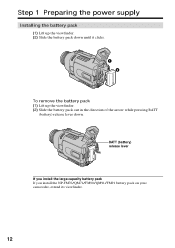
Step 1 Preparing the power supply Installing the battery pack (1) Lift up the viewfinder. (2) Slide the battery pack down until it clicks. 1 2 To remove the battery pack (1) Lift up the viewfinder. (2) Slide the battery pack out in the direction of the arrow while pressing BATT (battery) release lever down. BATT (battery) release lever If you install the large-capacity battery pack If you install the NP-FM70/QM71/FM90/QM91/FM91 battery pack on your camcorder, extend its viewfinder. 12
Step 1 Preparing the power supply Installing the battery pack (1) Lift up the viewfinder. (2) Slide the battery pack down until it clicks. 1 2 To remove the battery pack (1) Lift up the viewfinder. (2) Slide the battery pack out in the direction of the arrow while pressing BATT (battery) release lever down. BATT (battery) release lever If you install the large-capacity battery pack If you install the NP-FM70/QM71/FM90/QM91/FM91 battery pack on your camcorder, extend its viewfinder. 12
Operating Instructions
Page 13
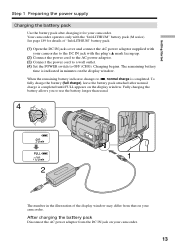
... (full charge), leave the battery pack attached after charging it for details of the display window may differ from the DC IN jack on your camcorder. Fully charging the battery allows you to use the battery longer than usual. 4 V POWER 1 2 The number in minutes on your... camcorder to the DC IN jack with the plug's v mark facing up. (2) Connect the power cord to the AC power adaptor. (3) Connect the power cord to a ...
... (full charge), leave the battery pack attached after charging it for details of the display window may differ from the DC IN jack on your camcorder. Fully charging the battery allows you to use the battery longer than usual. 4 V POWER 1 2 The number in minutes on your... camcorder to the DC IN jack with the plug's v mark facing up. (2) Connect the power cord to the AC power adaptor. (3) Connect the power cord to a ...
Operating Instructions
Page 14
... adaptor Place the AC power adaptor near a wall outlet. The "InfoLITHIUM" is "InfoLITHIUM"? Your camcorder operates only with this unit, disconnect the plug from coming into contact with the "InfoLITHIUM" battery pack (M series). Until ...your camcorder calculates the actual remaining battery time "- - - - The battery pack is correct. This may go off .... as possible to 86°F). When the battery pack is charged fully The LCD backlight of Sony Corporation. 14
... adaptor Place the AC power adaptor near a wall outlet. The "InfoLITHIUM" is "InfoLITHIUM"? Your camcorder operates only with this unit, disconnect the plug from coming into contact with the "InfoLITHIUM" battery pack (M series). Until ...your camcorder calculates the actual remaining battery time "- - - - The battery pack is correct. This may go off .... as possible to 86°F). When the battery pack is charged fully The LCD backlight of Sony Corporation. 14
Operating Instructions
Page 16
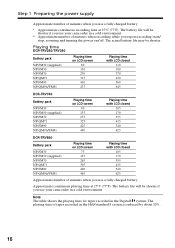
... battery life will be shorter Playing time DCR-TRV240/TRV340 Battery pack NP-FM30 (supplied) NP-FM50 NP-FM70 NP-QM71 NP-FM90 NP-QM91/FM91 Playing time on LCD screen 80 130 270 315 410 475 Playing time with LCD closed 110 180 370 430 560 645 DCR-TRV740 Battery pack NP-FM30 NP... 540 625 DCR-TRV840 Battery pack NP-FM30 NP-FM50 (supplied) NP-FM70 NP-QM71 NP-FM90 NP-QM91/FM91 Playing time on /off. Note The table shows the playing time for tapes recorded in a cold environment. The battery life will be shorter if you use your camcorder in the Digital8 system. The...
... battery life will be shorter Playing time DCR-TRV240/TRV340 Battery pack NP-FM30 (supplied) NP-FM50 NP-FM70 NP-QM71 NP-FM90 NP-QM91/FM91 Playing time on LCD screen 80 130 270 315 410 475 Playing time with LCD closed 110 180 370 430 560 645 DCR-TRV740 Battery pack NP-FM30 NP... 540 625 DCR-TRV840 Battery pack NP-FM30 NP-FM50 (supplied) NP-FM70 NP-QM71 NP-FM90 NP-QM91/FM91 Playing time on /off. Note The table shows the playing time for tapes recorded in a cold environment. The battery life will be shorter if you use your camcorder in the Digital8 system. The...
Operating Instructions
Page 17
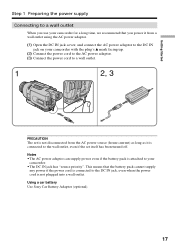
...power even if the battery pack is not plugged into a wall outlet. Using a car battery Use Sony Car Battery Adaptor (optional). 17 This means that you power it from a wall outlet using the AC... (1) Open the DC IN jack cover, and connect the AC power adaptor to the DC IN jack on your camcorder with the plug's v mark facing up. (2) Connect the power cord to the AC power adaptor. (3) Connect ...is not disconnected from the AC power source (house current) as long as it is connected to your camcorder for a long time, we recommend that the battery pack cannot supply any power if the power cord is...
...power even if the battery pack is not plugged into a wall outlet. Using a car battery Use Sony Car Battery Adaptor (optional). 17 This means that you power it from a wall outlet using the AC... (1) Open the DC IN jack cover, and connect the AC power adaptor to the DC IN jack on your camcorder with the plug's v mark facing up. (2) Connect the power cord to the AC power adaptor. (3) Connect ...is not disconnected from the AC power source (house current) as long as it is connected to your camcorder for a long time, we recommend that the battery pack cannot supply any power if the power cord is...
Operating Instructions
Page 18
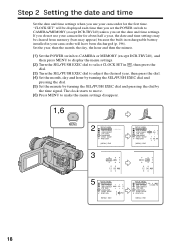
... hour and then the minute. (1) Set the POWER switch to CAMERA or MEMORY (except DCR-TRV240), and then press MENU to display the menu settings. (2) Turn the SEL/PUSH EXEC dial to select CLOCK SET in your camcorder will be cleared from memory (bars may appear) because the built-in rechargeable battery... 1 12 00 AM SETUP MENU CLOCK SET JUL 4 2002 USB STREAM 5:30:00 PM USBCONNECT LTR SIZE LANGUAGE DEMO MODE RETURN [MENU] : END 18 Step 2 Setting the date and time Set the date and time settings when you do not use your camcorder for about half a year, the date and time settings may...
... hour and then the minute. (1) Set the POWER switch to CAMERA or MEMORY (except DCR-TRV240), and then press MENU to display the menu settings. (2) Turn the SEL/PUSH EXEC dial to select CLOCK SET in your camcorder will be cleared from memory (bars may appear) because the built-in rechargeable battery... 1 12 00 AM SETUP MENU CLOCK SET JUL 4 2002 USB STREAM 5:30:00 PM USBCONNECT LTR SIZE LANGUAGE DEMO MODE RETURN [MENU] : END 18 Step 2 Setting the date and time Set the date and time settings when you do not use your camcorder for about half a year, the date and time settings may...
Operating Instructions
Page 19
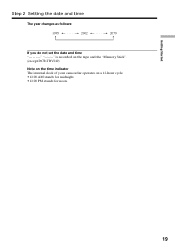
Getting Started Step 2 Setting the date and time The year changes as follows: 1995 T t 2002 T t 2079 If you do not set the date and time is recorded on the tape and the "Memory Stick". (except DCR-TRV240) Note on the time indicator The internal clock of your camcorder operates on a 12-hour cycle. •12:00 AM stands for midnight. •12:00 PM stands for noon. 19
Getting Started Step 2 Setting the date and time The year changes as follows: 1995 T t 2002 T t 2079 If you do not set the date and time is recorded on the tape and the "Memory Stick". (except DCR-TRV240) Note on the time indicator The internal clock of your camcorder operates on a 12-hour cycle. •12:00 AM stands for midnight. •12:00 PM stands for noon. 19

Operating Instructions
Page 20
... The cassette compartment automatically goes down. (5) After the cassette compartment going down . Doing so may cause a malfunction. •Your camcorder records pictures in the Digital8 system. • The recording time when you use standard 8 tape, be closed when you use your...the arrow and open the lid. Step 3 Inserting a cassette We recommend using Hi8 /Digital8 video cassettes. (1) Prepare the power source (p. 12). (2) Slide OPEN/EJECT in the direction of the lid other DCR-TRV240/TRV340/TRV740/TRV840). •The cassette compartment may not be sure to insert. (4) Close ...
... The cassette compartment automatically goes down. (5) After the cassette compartment going down . Doing so may cause a malfunction. •Your camcorder records pictures in the Digital8 system. • The recording time when you use standard 8 tape, be closed when you use your...the arrow and open the lid. Step 3 Inserting a cassette We recommend using Hi8 /Digital8 video cassettes. (1) Prepare the power source (p. 12). (2) Slide OPEN/EJECT in the direction of the lid other DCR-TRV240/TRV340/TRV740/TRV840). •The cassette compartment may not be sure to insert. (4) Close ...
Operating Instructions
Page 21
...information (p. 12 to 20). (3) Set the POWER switch to the standby mode. (4) Open the LCD panel while pressing OPEN. The viewfinder automatically turns off. (5) Press START/STOP. Your camcorder starts recording. The camera recording lamp located on the screen. To stop recording, press START/STOP ...again. Basics - Basics - The REC indicator appears on the front of your camcorder to CAMERA while pressing the small green button. The recording lamp lights up . See "Step 1" to "Step 3" for you record with the...
...information (p. 12 to 20). (3) Set the POWER switch to the standby mode. (4) Open the LCD panel while pressing OPEN. The viewfinder automatically turns off. (5) Press START/STOP. Your camcorder starts recording. The camera recording lamp located on the screen. To stop recording, press START/STOP ...again. Basics - Basics - The REC indicator appears on the front of your camcorder to CAMERA while pressing the small green button. The recording lamp lights up . See "Step 1" to "Step 3" for you record with the...
Operating Instructions
Page 22
... OFF (CHG). Note on the LOCK switch (except DCR-TRV240) When you leave your camcorder. This is to save battery power and to OFF (CHG). (2) Close the LCD panel. (3) Eject the cassette. (4) Remove the battery pack. 22 However, your camcorder does not turn it to the right, the POWER... switch can record 1.5 times as long as the default setting. To display the recording data, press DATA CODE on your camcorder. After recording (1) Set...
... OFF (CHG). Note on the LOCK switch (except DCR-TRV240) When you leave your camcorder. This is to save battery power and to OFF (CHG). (2) Close the LCD panel. (3) Eject the cassette. (4) Remove the battery pack. 22 However, your camcorder does not turn it to the right, the POWER... switch can record 1.5 times as long as the default setting. To display the recording data, press DATA CODE on your camcorder. After recording (1) Set...
Operating Instructions
Page 23
...lens side. 180° 90° When closing the LCD panel, set it vertically until it clicks, and swing it into the camcorder body. Basics Recording a picture Adjusting the LCD screen The LCD panel can adjust the brightness of the LCD screen You can be affected. 23 If this happens, ...we recommend that you adjust the LCD B.L. or LCD BRIGHT, the recorded picture will not be ...
...lens side. 180° 90° When closing the LCD panel, set it vertically until it clicks, and swing it into the camcorder body. Basics Recording a picture Adjusting the LCD screen The LCD panel can adjust the brightness of the LCD screen You can be affected. 23 If this happens, ...we recommend that you adjust the LCD B.L. or LCD BRIGHT, the recorded picture will not be ...

Operating Instructions
Page 30
...Do not use the following functions: - When the POWER switch is automatically adjusted depending on the brightness. Exposure - Memory Photo recording (except DCR-TRV240) While using the Super NightShot or Color Slow Shutter function, you can not use the Color Slow Shutter function in bright places (e.g. Super..., focus manually. •You cannot use the following functions: - PROGRAM AE - At this time, moving pictures may cause your camcorder to malfunction. •When you keep NIGHTSHOT set to ON in normal recording, the picture may be recorded in the daytime).
...Do not use the following functions: - When the POWER switch is automatically adjusted depending on the brightness. Exposure - Memory Photo recording (except DCR-TRV240) While using the Super NightShot or Color Slow Shutter function, you can not use the Color Slow Shutter function in bright places (e.g. Super..., focus manually. •You cannot use the following functions: - PROGRAM AE - At this time, moving pictures may cause your camcorder to malfunction. •When you keep NIGHTSHOT set to ON in normal recording, the picture may be recorded in the daytime).


