
Operating Instructions
Page 1
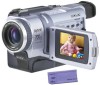
Refer to these numbers whenever you call upon your Sony dealer regarding this manual thoroughly, and retain it for future reference. 3-072-650-12 (1) Digital Video Camera Recorder Operating Instructions Before operating the unit, please read this product. Model No. Owner's Record The model and serial numbers are located on the bottom. DCR-TRV Model No. DCR-TRV740 TM SERIES DCR-TRV240/TRV340/TRV740/ TRV840 ©2002 Sony Corporation Serial No. Serial No. Record the serial number in the space provided below. AC-
Refer to these numbers whenever you call upon your Sony dealer regarding this manual thoroughly, and retain it for future reference. 3-072-650-12 (1) Digital Video Camera Recorder Operating Instructions Before operating the unit, please read this product. Model No. Owner's Record The model and serial numbers are located on the bottom. DCR-TRV Model No. DCR-TRV740 TM SERIES DCR-TRV240/TRV340/TRV740/ TRV840 ©2002 Sony Corporation Serial No. Serial No. Record the serial number in the space provided below. AC-

Operating Instructions
Page 2
...-Ion batteries. For customers in the sun or under direct sunlight. THIS CLASS B DIGITAL APPARATUS COMPLIES WITH CANADIAN ICES-003. 2 With your purchase of this Sony Handycam. RECYCLING LITHIUM-ION BATTERIES Lithium-Ion batteries are recyclable. For more information regarding recycling of uninsulated "dangerous voltage" within the product's enclosure that may...
...-Ion batteries. For customers in the sun or under direct sunlight. THIS CLASS B DIGITAL APPARATUS COMPLIES WITH CANADIAN ICES-003. 2 With your purchase of this Sony Handycam. RECYCLING LITHIUM-ION BATTERIES Lithium-Ion batteries are recyclable. For more information regarding recycling of uninsulated "dangerous voltage" within the product's enclosure that may...
Operating Instructions
Page 3
TRV340 Responsible Party: Sony Electronics Inc. If this device must accept any interference received, including interference that may cause undesired operation. Increase the separation between the equipment and receiver. - ... may cause harmful interference to which can radiate radio frequency energy and, if not installed and used with Part 15 of Conformity Trade Name: SONY Model No.: DCR-TRV240, DCR- Telephone No.: 201-930-6972 This device complies with the equipment in this product, you may not cause harmful interference, and (2)this equipment...
TRV340 Responsible Party: Sony Electronics Inc. If this device must accept any interference received, including interference that may cause undesired operation. Increase the separation between the equipment and receiver. - ... may cause harmful interference to which can radiate radio frequency energy and, if not installed and used with Part 15 of Conformity Trade Name: SONY Model No.: DCR-TRV240, DCR- Telephone No.: 201-930-6972 This device complies with the equipment in this product, you may not cause harmful interference, and (2)this equipment...
Operating Instructions
Page 4
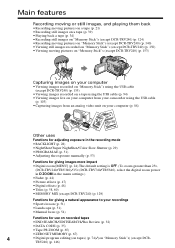
... •Viewing images recorded on "Memory Stick"s using the USB cable (except DCR-TRV240) (p. 155) •Viewing images recorded on a tape using the USB cable (p. 94) •Viewing images live on your computer from your camcorder using the USB cable (p. 103) •Capturing images from an analog video... for giving images more impact •Digital zoom [MENU] (p. 24) The default setting is OFF. (To zoom greater than 25×, (DCR-TRV240/TRV340)/15× (DCR-TRV740/TRV840), select the digital zoom power in D ZOOM in the menu settings.) •Fader (p. 44) •Picture effects (p. 47) ...
... •Viewing images recorded on "Memory Stick"s using the USB cable (except DCR-TRV240) (p. 155) •Viewing images recorded on a tape using the USB cable (p. 94) •Viewing images live on your computer from your camcorder using the USB cable (p. 103) •Capturing images from an analog video... for giving images more impact •Digital zoom [MENU] (p. 24) The default setting is OFF. (To zoom greater than 25×, (DCR-TRV240/TRV340)/15× (DCR-TRV740/TRV840), select the digital zoom power in D ZOOM in the menu settings.) •Fader (p. 44) •Picture effects (p. 47) ...
Operating Instructions
Page 5
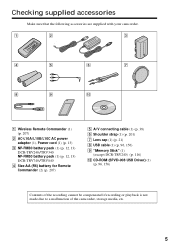
...supplied with your camcorder. 1 2 3 4 5 6 7 8 9 0 1 Wireless Remote Commander (1) (p. 207) 2 AC-L10A/L10B/L10C AC power adaptor (1), Power cord (1) (p. 13) 3 NP-FM30 battery pack (1) (p. 12, 13) DCR-TRV240/TRV340 NP-FM50 battery pack (1) (p. 12, 13) DCR-TRV740/TRV840 4... Size AA (R6) battery for Remote Commander (2) (p. 207) 5 A/V connecting cable (1) (p. 38) 6 Shoulder strap (1) (p. 201) 7 Lens cap (1) (p. 21) 8 USB cable (1) (p. 96, 156) 9 "Memory Stick" (1) (except DCR-TRV240) (p. 116) 0 CD-ROM (SPVD-008 USB...
...supplied with your camcorder. 1 2 3 4 5 6 7 8 9 0 1 Wireless Remote Commander (1) (p. 207) 2 AC-L10A/L10B/L10C AC power adaptor (1), Power cord (1) (p. 13) 3 NP-FM30 battery pack (1) (p. 12, 13) DCR-TRV240/TRV340 NP-FM50 battery pack (1) (p. 12, 13) DCR-TRV740/TRV840 4... Size AA (R6) battery for Remote Commander (2) (p. 207) 5 A/V connecting cable (1) (p. 38) 6 Shoulder strap (1) (p. 201) 7 Lens cap (1) (p. 21) 8 USB cable (1) (p. 96, 156) 9 "Memory Stick" (1) (except DCR-TRV240) (p. 116) 0 CD-ROM (SPVD-008 USB...
Operating Instructions
Page 6
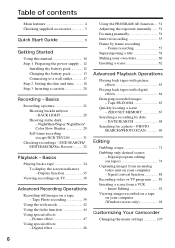
... function 44 Using special effects - Frame recording 57 Superimposing a title 58 Making your computer (Windows users only 94 Customizing Your Camcorder Changing the menu settings 105 6 DATE SEARCH 68 Searching for a photo - BACK LIGHT 28 Shooting in the dark - Picture... 53 Focusing manually 54 Interval recording 55 Frame by date - NightShot/Super NightShot/ Color Slow Shutter 29 Self-timer recording (except DCR-TRV240 31 Checking recordings - END SEARCH/ EDITSEARCH/Rec Review .......... 32 Playback - Digital program editing (on your computer - Insert Editing...
... function 44 Using special effects - Frame recording 57 Superimposing a title 58 Making your computer (Windows users only 94 Customizing Your Camcorder Changing the menu settings 105 6 DATE SEARCH 68 Searching for a photo - BACK LIGHT 28 Shooting in the dark - Picture... 53 Focusing manually 54 Interval recording 55 Frame by date - NightShot/Super NightShot/ Color Slow Shutter 29 Self-timer recording (except DCR-TRV240 31 Checking recordings - END SEARCH/ EDITSEARCH/Rec Review .......... 32 Playback - Digital program editing (on your computer - Insert Editing...
Operating Instructions
Page 7
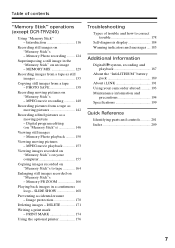
... display 184 Warning indicators and messages .... 185 Additional Information Digital8 system, recording and playback 187 About the "InfoLITHIUM" battery pack 189 About i.LINK 191 Using your camcorder abroad .......... 193 Maintenance information and precautions 194 Specifications 199 ... 138 Recording moving pictures - PRINT MARK 174 Using the optional printer 176 Troubleshooting Types of contents "Memory Stick" operations (except DCR-TRV240) Using "Memory Stick" - Memory Photo recording ......... 124 Superimposing a still image in a continuous loop - Introduction 116...
... display 184 Warning indicators and messages .... 185 Additional Information Digital8 system, recording and playback 187 About the "InfoLITHIUM" battery pack 189 About i.LINK 191 Using your camcorder abroad .......... 193 Maintenance information and precautions 194 Specifications 199 ... 138 Recording moving pictures - PRINT MARK 174 Using the optional printer 176 Troubleshooting Types of contents "Memory Stick" operations (except DCR-TRV240) Using "Memory Stick" - Memory Photo recording ......... 124 Superimposing a still image in a continuous loop - Introduction 116...
Operating Instructions
Page 8
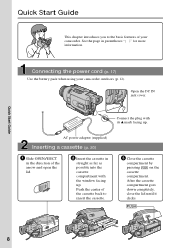
... facing up . After the cassette compartment goes down completely, close the lid until it clicks. See the page in the direction of your camcorder outdoors (p. 12). Quick Start Guide 8 Quick Start Guide This chapter introduces you to insert the cassette. 3 Close the cassette compartment by ...pressing on the cassette compartment. Connecting the power cord (p. 17) Use the battery pack when using your camcorder. Push the center of the cassette back to the basic features of the arrow and open the lid. 2 Insert the cassette in straight ...
... facing up . After the cassette compartment goes down completely, close the lid until it clicks. See the page in the direction of your camcorder outdoors (p. 12). Quick Start Guide 8 Quick Start Guide This chapter introduces you to insert the cassette. 3 Close the cassette compartment by ...pressing on the cassette compartment. Connecting the power cord (p. 17) Use the battery pack when using your camcorder. Push the center of the cassette back to the basic features of the arrow and open the lid. 2 Insert the cassette in straight ...
Operating Instructions
Page 9
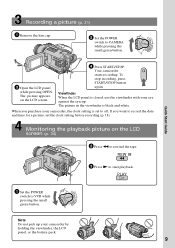
V POWER CAM M Note Do not pick up your eye against the eyecup. Your camcorder starts recording. Viewfinder When the LCD panel is closed, use the viewfinder with your camcorder by holding the viewfinder, the LCD panel, or the battery pack. 9 PLAY Quick Start Guide OFCFR(CHG) 1 Set the POWER ... a picture (p. 21) 1 Remove the lens cap. 2 Set the POWER switch to off. If you purchase your camcorder, the clock setting is black and white. The picture appears on the LCD screen (p. 34) 2 Press m to rewind the tape. The picture in the viewfinder is set the clock setting before...
V POWER CAM M Note Do not pick up your eye against the eyecup. Your camcorder starts recording. Viewfinder When the LCD panel is closed, use the viewfinder with your camcorder by holding the viewfinder, the LCD panel, or the battery pack. 9 PLAY Quick Start Guide OFCFR(CHG) 1 Set the POWER ... a picture (p. 21) 1 Remove the lens cap. 2 Set the POWER switch to off. If you purchase your camcorder, the clock setting is black and white. The picture appears on the LCD screen (p. 34) 2 Press m to rewind the tape. The picture in the viewfinder is set the clock setting before...
Operating Instructions
Page 10
... tapes, and other materials may be copyrighted. Any differences in operation are shown in the table below. Digital zoom 700× LCD Screen 6.2 cm (2.5 type) TRV340 z z 700× 6.2 cm (2.5 type) TRV740 z z 420× 6.2 cm (2.5 type) TRV840 z z 420×...Digital8 system. Differences by looking at the bottom of the copyright laws. 10 TRV240 MEMORY mark* (on page 63 to CAMERA. Self-timer - See page 116 for illustration purposes. Before using your camcorder With your camcorder, check the model number by camcorder model DCR- You, however, cannot use Hi8 /Digital8...
... tapes, and other materials may be copyrighted. Any differences in operation are shown in the table below. Digital zoom 700× LCD Screen 6.2 cm (2.5 type) TRV340 z z 700× 6.2 cm (2.5 type) TRV740 z z 420× 6.2 cm (2.5 type) TRV840 z z 420×...Digital8 system. Differences by looking at the bottom of the copyright laws. 10 TRV240 MEMORY mark* (on page 63 to CAMERA. Self-timer - See page 116 for illustration purposes. Before using your camcorder With your camcorder, check the model number by camcorder model DCR- You, however, cannot use Hi8 /Digital8...
Operating Instructions
Page 11
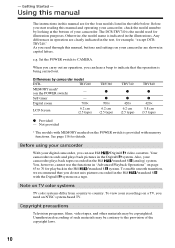
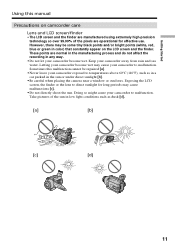
...the finder. Exposing the LCD screen, the finder or the lens to direct sunlight for effective use. Getting Started Using this malfunction cannot be some tiny black points and/or bright points (white, red, blue or green in color) that constantly appear on camcorder care Lens and LCD screen/finder •... The LCD screen and the finder are manufactured using extremely high-precision technology so over 99.99% of the sun in low light...
...the finder. Exposing the LCD screen, the finder or the lens to direct sunlight for effective use. Getting Started Using this malfunction cannot be some tiny black points and/or bright points (white, red, blue or green in color) that constantly appear on camcorder care Lens and LCD screen/finder •... The LCD screen and the finder are manufactured using extremely high-precision technology so over 99.99% of the sun in low light...
Operating Instructions
Page 12
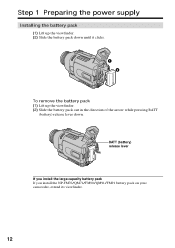
BATT (battery) release lever If you install the large-capacity battery pack If you install the NP-FM70/QM71/FM90/QM91/FM91 battery pack on your camcorder, extend its viewfinder. 12 Step 1 Preparing the power supply Installing the battery pack (1) Lift up the viewfinder. (2) Slide the battery pack down until it clicks. 1 2 To remove the battery pack (1) Lift up the viewfinder. (2) Slide the battery pack out in the direction of the arrow while pressing BATT (battery) release lever down.
BATT (battery) release lever If you install the large-capacity battery pack If you install the NP-FM70/QM71/FM90/QM91/FM91 battery pack on your camcorder, extend its viewfinder. 12 Step 1 Preparing the power supply Installing the battery pack (1) Lift up the viewfinder. (2) Slide the battery pack down until it clicks. 1 2 To remove the battery pack (1) Lift up the viewfinder. (2) Slide the battery pack out in the direction of the arrow while pressing BATT (battery) release lever down.
Operating Instructions
Page 13
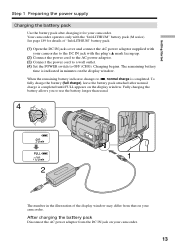
...indicated in the illustration of "InfoLITHIUM" battery pack. (1) Open the DC IN jack cover and connect the AC power adaptor supplied with your camcorder. 13 To fully charge the battery (full charge), leave the battery pack attached after charging it for details of the display window may ... charging the battery pack Disconnect the AC power adaptor from that on the display window. When the remaining battery indicator changes to OFF (CHG). Your camcorder operates only with the plug's v mark facing up. (2) Connect the power cord to the AC power adaptor. (3) Connect the power cord to a ...
...indicated in the illustration of "InfoLITHIUM" battery pack. (1) Open the DC IN jack cover and connect the AC power adaptor supplied with your camcorder. 13 To fully charge the battery (full charge), leave the battery pack attached after charging it for details of the display window may ... charging the battery pack Disconnect the AC power adaptor from that on the display window. When the remaining battery indicator changes to OFF (CHG). Your camcorder operates only with the plug's v mark facing up. (2) Connect the power cord to the AC power adaptor. (3) Connect the power cord to a ...
Operating Instructions
Page 14
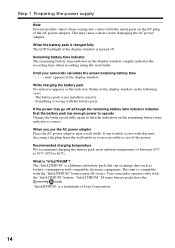
... cases: - If the power may cause a short-circuit, damaging the AC power adaptor. Your camcorder operates only with compatible electronic equipment. When the battery pack is charged fully The LCD backlight of the AC power adaptor. The battery pack is "InfoLITHIUM"? When you use the AC..." is a trademark of between 10°C to 30°C (50°F to cut off . min" appears in an ambient temperature of Sony Corporation. 14 Step 1 Preparing the power supply Note Prevent metallic objects from the wall outlet as soon as battery consumption with the "InfoLITHIUM" battery...
... cases: - If the power may cause a short-circuit, damaging the AC power adaptor. Your camcorder operates only with compatible electronic equipment. When the battery pack is charged fully The LCD backlight of the AC power adaptor. The battery pack is "InfoLITHIUM"? When you use the AC..." is a trademark of between 10°C to 30°C (50°F to cut off . min" appears in an ambient temperature of Sony Corporation. 14 Step 1 Preparing the power supply Note Prevent metallic objects from the wall outlet as soon as battery consumption with the "InfoLITHIUM" battery...

Operating Instructions
Page 15
...or low because of minutes to charge an empty battery pack at 25°C (77°F) 1) Supplied with DCR-TRV240/TRV340 2) Supplied with DCR-TRV740/TRV840 Recording time DCR-TRV240/TRV340 Battery pack NP-FM30 (supplied) NP-FM50 NP-FM70 NP-QM71 NP-FM90 NP-QM91/FM91 Recording with the ...viewfinder Continuous* Typical** 100 55 165 95 345 200 400 230 520 300 605 350 Recording with the LCD screen Continuous*...
...or low because of minutes to charge an empty battery pack at 25°C (77°F) 1) Supplied with DCR-TRV240/TRV340 2) Supplied with DCR-TRV740/TRV840 Recording time DCR-TRV240/TRV340 Battery pack NP-FM30 (supplied) NP-FM50 NP-FM70 NP-QM71 NP-FM90 NP-QM91/FM91 Recording with the ...viewfinder Continuous* Typical** 100 55 165 95 345 200 400 230 520 300 605 350 Recording with the LCD screen Continuous*...
Operating Instructions
Page 16
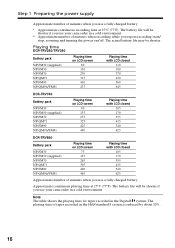
...DCR-TRV240/TRV340 Battery pack NP-FM30 (supplied) NP-FM50 NP-FM70 NP-QM71 NP-FM90 NP-QM91/FM91 Playing time on LCD screen 80 130 270 315 410 475 Playing time with LCD closed 110 180 370 430 560 645 DCR...time of tapes recorded in the Digital8 system. The battery life will be shorter if you use your camcorder in a cold environment. ** ...Approximate number of minutes when recording while you repeat recording start/ stop, zooming and turning the power on LCD screen 75 125 265 305 400 465 Playing time with LCD closed 105 170 355 415 540 625 DCR...
...DCR-TRV240/TRV340 Battery pack NP-FM30 (supplied) NP-FM50 NP-FM70 NP-QM71 NP-FM90 NP-QM91/FM91 Playing time on LCD screen 80 130 270 315 410 475 Playing time with LCD closed 110 180 370 430 560 645 DCR...time of tapes recorded in the Digital8 system. The battery life will be shorter if you use your camcorder in a cold environment. ** ...Approximate number of minutes when recording while you repeat recording start/ stop, zooming and turning the power on LCD screen 75 125 265 305 400 465 Playing time with LCD closed 105 170 355 415 540 625 DCR...
Operating Instructions
Page 17
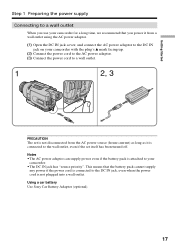
Using a car battery Use Sony Car Battery Adaptor (optional). 17 This means that you use your camcorder for a long time, we recommend that the battery pack cannot supply any power if the power cord ...using the AC power adaptor. (1) Open the DC IN jack cover, and connect the AC power adaptor to the DC IN jack on your camcorder with the plug's v mark facing up. (2) Connect the power cord to the AC power adaptor. (3) Connect the power cord to a wall...•The AC power adaptor can supply power even if the battery pack is attached to your camcorder. •The DC IN jack has "source priority".
Using a car battery Use Sony Car Battery Adaptor (optional). 17 This means that you use your camcorder for a long time, we recommend that the battery pack cannot supply any power if the power cord ...using the AC power adaptor. (1) Open the DC IN jack cover, and connect the AC power adaptor to the DC IN jack on your camcorder with the plug's v mark facing up. (2) Connect the power cord to the AC power adaptor. (3) Connect the power cord to a wall...•The AC power adaptor can supply power even if the battery pack is attached to your camcorder. •The DC IN jack has "source priority".
Operating Instructions
Page 18
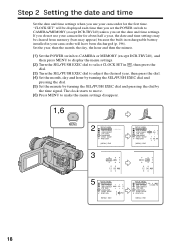
... hour and then the minute. (1) Set the POWER switch to CAMERA or MEMORY (except DCR-TRV240), and then press MENU to display the menu settings. (2) Turn the SEL/PUSH EXEC dial to select CLOCK SET in your camcorder will be cleared from memory (bars may appear) because the built-in rechargeable battery... SETUP MENU CLOCK SET JUL 4 2002 USB STREAM 5:30:00 PM USBCONNECT LTR SIZE LANGUAGE DEMO MODE RETURN [MENU] : END 18 Step 2 Setting the date and time Set the date and time settings when you set the date and time settings. If you do not use your camcorder for about half a year, the...
... hour and then the minute. (1) Set the POWER switch to CAMERA or MEMORY (except DCR-TRV240), and then press MENU to display the menu settings. (2) Turn the SEL/PUSH EXEC dial to select CLOCK SET in your camcorder will be cleared from memory (bars may appear) because the built-in rechargeable battery... SETUP MENU CLOCK SET JUL 4 2002 USB STREAM 5:30:00 PM USBCONNECT LTR SIZE LANGUAGE DEMO MODE RETURN [MENU] : END 18 Step 2 Setting the date and time Set the date and time settings when you set the date and time settings. If you do not use your camcorder for about half a year, the...
Operating Instructions
Page 19
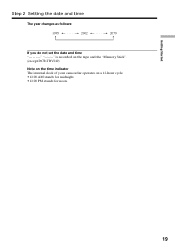
Getting Started Step 2 Setting the date and time The year changes as follows: 1995 T t 2002 T t 2079 If you do not set the date and time is recorded on the tape and the "Memory Stick". (except DCR-TRV240) Note on the time indicator The internal clock of your camcorder operates on a 12-hour cycle. •12:00 AM stands for midnight. •12:00 PM stands for noon. 19
Getting Started Step 2 Setting the date and time The year changes as follows: 1995 T t 2002 T t 2079 If you do not set the date and time is recorded on the tape and the "Memory Stick". (except DCR-TRV240) Note on the time indicator The internal clock of your camcorder operates on a 12-hour cycle. •12:00 AM stands for midnight. •12:00 PM stands for noon. 19

Operating Instructions
Page 20
... close the lid until it clicks. 2 3 4,5 4 5 To eject a cassette Follow the procedure above, and take out the cassette in the Digital8 system. • The recording time when you use standard 8 tape, be closed when you select the LP mode in the menu settings, 3/4 of...back standard 8 tape on the cassette compartment. If you press any part of the lid other DCR-TRV240/TRV340/TRV740/TRV840). •The cassette compartment may cause a malfunction. •Your camcorder records pictures in step 3. To prevent accidental erasure Slide the write-protect tab on the cassette ...
... close the lid until it clicks. 2 3 4,5 4 5 To eject a cassette Follow the procedure above, and take out the cassette in the Digital8 system. • The recording time when you use standard 8 tape, be closed when you select the LP mode in the menu settings, 3/4 of...back standard 8 tape on the cassette compartment. If you press any part of the lid other DCR-TRV240/TRV340/TRV740/TRV840). •The cassette compartment may cause a malfunction. •Your camcorder records pictures in step 3. To prevent accidental erasure Slide the write-protect tab on the cassette ...
