
Camera Operations Guide
Page 3
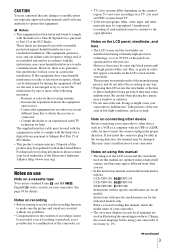
...for effective use standard 8 mm and Hi8 , Digital8 video cassettes on the country/ region. For disposal or recycling information, please contact your camcorder. Notes on recording • Before starting to record...use Note on the LCD screen and the viewfinder. CCD-TRV138: TRV138 CCD-TRV338: TRV338 DCR-TRV280: TRV280 Instructions with the limits for the contents of the LCD screen and the viewfinder used with... Be careful when placing the camera near a window or outdoors. • Do not aim at dusk. Instructions with the instructions, may be copyrighted.
...for effective use standard 8 mm and Hi8 , Digital8 video cassettes on the country/ region. For disposal or recycling information, please contact your camcorder. Notes on recording • Before starting to record...use Note on the LCD screen and the viewfinder. CCD-TRV138: TRV138 CCD-TRV338: TRV338 DCR-TRV280: TRV280 Instructions with the limits for the contents of the LCD screen and the viewfinder used with... Be careful when placing the camera near a window or outdoors. • Do not aim at dusk. Instructions with the instructions, may be copyrighted.
Camera Operations Guide
Page 4
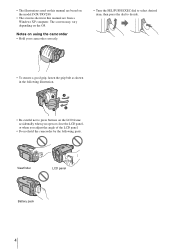
... manual are based on the model DCR-TRV280. • The screens shown in the following illustration. • Be careful not to decide. • To ensure a good grip, fasten the grip belt as shown in this manual are from a Windows XP computer. Notes on using the camcorder • Hold your camcorder correctly. • Turn the SEL...
... manual are based on the model DCR-TRV280. • The screens shown in the following illustration. • Be careful not to decide. • To ensure a good grip, fasten the grip belt as shown in this manual are from a Windows XP computer. Notes on using the camcorder • Hold your camcorder correctly. • Turn the SEL...
Camera Operations Guide
Page 8
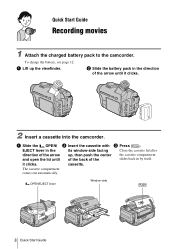
... the battery pack in the direction of the slides back in the its window-side facing Close the cassette lid after direction of the arrow up the viewfinder. cassette. it clicks. 2 Insert a cassette into the camcorder. a Slide the OPEN/ b Insert the cassette with c Press .... EJECT lever in by itself. The cassette compartment comes out automatically. OPEN/EJECT lever Window-side 8 Quick Start Guide To charge the battery, see page ...
... the battery pack in the direction of the slides back in the its window-side facing Close the cassette lid after direction of the arrow up the viewfinder. cassette. it clicks. 2 Insert a cassette into the camcorder. a Slide the OPEN/ b Insert the cassette with c Press .... EJECT lever in by itself. The cassette compartment comes out automatically. OPEN/EJECT lever Window-side 8 Quick Start Guide To charge the battery, see page ...
Camera Operations Guide
Page 19
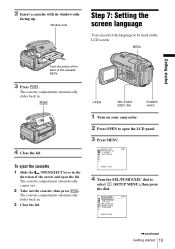
2 Insert a cassette with its window-side facing up. Window-side Step 7: Setting the screen language You can select the language to be used on your camcorder. 2 Press OPEN to select (SETUP MENU), then press the dial. MENU Getting started 19 The cassette compartment automatically slides back in . 4 Close the lid. To ...
2 Insert a cassette with its window-side facing up. Window-side Step 7: Setting the screen language You can select the language to be used on your camcorder. 2 Press OPEN to select (SETUP MENU), then press the dial. MENU Getting started 19 The cassette compartment automatically slides back in . 4 Close the lid. To ...

Camera Operations Guide
Page 28
... EXEC dial 1 Press EXPOSURE in dark places - When recording indoors on a clear day, for instance, you can avoid backlight shadows on people next to the window by manually fixing the exposure to automatic exposure Press EXPOSURE. b Notes • Do not use the NightShot plus function in bright places. Manual exposure •...
... EXEC dial 1 Press EXPOSURE in dark places - When recording indoors on a clear day, for instance, you can avoid backlight shadows on people next to the window by manually fixing the exposure to automatic exposure Press EXPOSURE. b Notes • Do not use the NightShot plus function in bright places. Manual exposure •...

Camera Operations Guide
Page 29
... can adjust the focus manually according to the recording conditions. Adjusting the focus manually The focus is about 3 meters (10 feet). To record a subject behind a window covered with little contrast between the subject and its background. - To record a subject with raindrops. - When you record subjects in dark places (such as night...
... can adjust the focus manually according to the recording conditions. Adjusting the focus manually The focus is about 3 meters (10 feet). To record a subject behind a window covered with little contrast between the subject and its background. - To record a subject with raindrops. - When you record subjects in dark places (such as night...

Camera Operations Guide
Page 42
...menu settings" (p. 41). Unavailable items will be grayed out. Select to prevent people's faces from focusing on glass or metal mesh in windows that requires various techniques by strong light, such as in a theater or at a beach in strong light or reflected light, such as...&SKI* (beach & ski) ( Select to prevent people's faces from appearing excessively white when subjects are marked with G. This setting also prevents your camcorder. PROGRAM AE/P EFFECT, etc. lesson) ( ) moving subjects such as sunsets, general night views, fireworks, and neon signs. LANDSCAPE** Select when ...
...menu settings" (p. 41). Unavailable items will be grayed out. Select to prevent people's faces from focusing on glass or metal mesh in windows that requires various techniques by strong light, such as in a theater or at a beach in strong light or reflected light, such as...&SKI* (beach & ski) ( Select to prevent people's faces from appearing excessively white when subjects are marked with G. This setting also prevents your camcorder. PROGRAM AE/P EFFECT, etc. lesson) ( ) moving subjects such as sunsets, general night views, fireworks, and neon signs. LANDSCAPE** Select when ...
Camera Operations Guide
Page 72
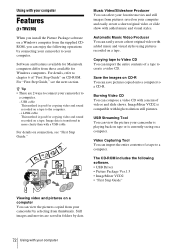
...- z Tip • There are saved in more clarity than with your computer Features ( TRV280) When you install the Picture Package software on CD-ROM. USB cable This method is good for Windows computers. Image data is compatible with added music and visual styles using pictures recorded on a...VCD2 is transferred in folders by date. 72 Using with your camcorder by connecting your camcorder to your computer and easily create a short original video or slide show with a menu of "First Step Guide" on a Windows computer from those available for copying video and sound recorded on a...
...- z Tip • There are saved in more clarity than with your computer Features ( TRV280) When you install the Picture Package software on CD-ROM. USB cable This method is good for Windows computers. Image data is compatible with added music and visual styles using pictures recorded on a...VCD2 is transferred in folders by date. 72 Using with your camcorder by connecting your camcorder to your computer and easily create a short original video or slide show with a menu of "First Step Guide" on a Windows computer from those available for copying video and sound recorded on a...
Camera Operations Guide
Page 73
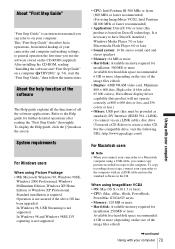
... computer It is not assured if the above OS has been upgraded. In Windows 98 and Windows 98SE, DV capturing is based on the size of the image files edited) ,continued Using with your camcorder and computer and making settings, to create a video CD. To copy recordings...compatible drive, visit the following URL: http://www.ppackage.com/) For Macintosh users b Note • When you cannot copy pictures recorded on a computer ( TRV280)" (p. 74), start the "First Step Guide," then follow the instructions. After installing the CD-ROM, reading "Installing the software and "First Step Guide...
... computer It is not assured if the above OS has been upgraded. In Windows 98 and Windows 98SE, DV capturing is based on the size of the image files edited) ,continued Using with your camcorder and computer and making settings, to create a video CD. To copy recordings...compatible drive, visit the following URL: http://www.ppackage.com/) For Macintosh users b Note • When you cannot copy pictures recorded on a computer ( TRV280)" (p. 74), start the "First Step Guide," then follow the instructions. After installing the CD-ROM, reading "Installing the software and "First Step Guide...
Camera Operations Guide
Page 74
... setting of the browser. You can refer to "First Step Guide." Windows computer: Picture Package (including ImageMixer VCD2) Macintosh computer: ImageMixer VCD2 For the details on your computer before connecting your camcorder and your computer In this product will not operate correctly at less than... 1 024 × 768 dots or 256 colors.) • Application: QuickTime 4 or later (QuickTime 5 recommended) • Other: Disc drive Installing the software and "First Step Guide" on a computer ( TRV280)...
... setting of the browser. You can refer to "First Step Guide." Windows computer: Picture Package (including ImageMixer VCD2) Macintosh computer: ImageMixer VCD2 For the details on your computer before connecting your camcorder and your computer In this product will not operate correctly at less than... 1 024 × 768 dots or 256 colors.) • Application: QuickTime 4 or later (QuickTime 5 recommended) • Other: Disc drive Installing the software and "First Step Guide" on a computer ( TRV280)...
Camera Operations Guide
Page 75
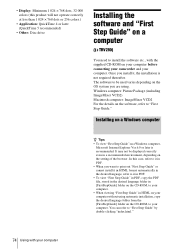
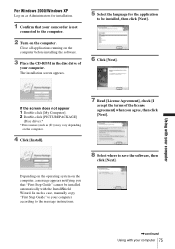
...In such a case, manually copy "First Step Guide" to your computer according to the computer. 2 Turn on the computer. For Windows 2000/Windows XP Log on as (E:)) may vary depending on the computer. 4 Click [Install]. 7 Read [License Agreement], check [I accept ...the terms of your computer. Depending on the operating system on the computer before installing the software. 3 Place the CD-ROM in the disc drive of the license agreement] when you that your camcorder...
...In such a case, manually copy "First Step Guide" to your computer according to the computer. 2 Turn on the computer. For Windows 2000/Windows XP Log on as (E:)) may vary depending on the computer. 4 Click [Install]. 7 Read [License Agreement], check [I accept ...the terms of your computer. Depending on the operating system on the computer before installing the software. 3 Place the CD-ROM in the disc drive of the license agreement] when you that your camcorder...
Camera Operations Guide
Page 78
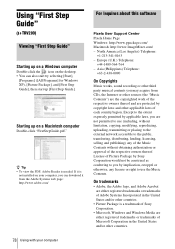
Using "First Step Guide" ( TRV280) Viewing "First Step Guide" Starting up [First Step Guide]. Asia (...Systems web page: http://www.adobe.com/ For inquires about this software Pixela User Support Center Pixela Home Page Windows: http://www.ppackage.com/ Macintosh: http://www.ImageMixer.com/ - On trademarks • Adobe, the Adobe...in the United States and/or other countries. • Picture Package is a trademark of Sony Corporation. • Microsoft, Windows and Windows Media are either registered trademarks or trademarks of each country/region. Except to the extent expressly ...
Using "First Step Guide" ( TRV280) Viewing "First Step Guide" Starting up [First Step Guide]. Asia (...Systems web page: http://www.adobe.com/ For inquires about this software Pixela User Support Center Pixela Home Page Windows: http://www.ppackage.com/ Macintosh: http://www.ImageMixer.com/ - On trademarks • Adobe, the Adobe...in the United States and/or other countries. • Picture Package is a trademark of Sony Corporation. • Microsoft, Windows and Windows Media are either registered trademarks or trademarks of each country/region. Except to the extent expressly ...
Camera Operations Guide
Page 80
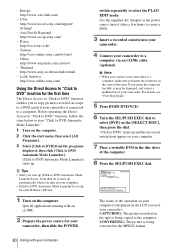
...displayed, then click [Click to DVD Automatic Mode Launcher]. [Click to select [DVD] on a tape to a DVD easily if your camcorder to the computer. Thailand http://www.sony.co.th/vaio/index.html - Quit all applications running with your computer. • [Click to a computer, make sure you connect your... recorded on the tape is being converted to the MPEG2 format. 80 Using with an i.LINK. 2 Prepare the power source for your camcorder. - Latin America http://vaio-online.sony.com/ Using the Direct Access to "Click to DVD" function for each Windows XP user. 1 Turn on your computer
...displayed, then click [Click to DVD Automatic Mode Launcher]. [Click to select [DVD] on a tape to a DVD easily if your camcorder to the computer. Thailand http://www.sony.co.th/vaio/index.html - Quit all applications running with your computer. • [Click to a computer, make sure you connect your... recorded on the tape is being converted to the MPEG2 format. 80 Using with an i.LINK. 2 Prepare the power source for your camcorder. - Latin America http://vaio-online.sony.com/ Using the Direct Access to "Click to DVD" function for each Windows XP user. 1 Turn on your computer
Camera Operations Guide
Page 87
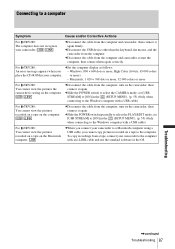
... the cable from the computer and camcorder, then connect it again. Troubleshooting ,continued Troubleshooting 87 For TRV280: cSet the computer display as follows: An error message appears when you cannot copy pictures recorded on the Macintosh computer. Windows: 800 × 600 dots or...(p. 55) (Only when connecting to the Windows computer with a USB cable) For TRV280: You cannot view the pictures recorded on a tape on a tape to a computer Symptom Cause and/or Corrective Actions For TRV280: The computer does not recognize your camcorder to a Macintosh computer using a USB cable...
... the cable from the computer and camcorder, then connect it again. Troubleshooting ,continued Troubleshooting 87 For TRV280: cSet the computer display as follows: An error message appears when you cannot copy pictures recorded on the Macintosh computer. Windows: 800 × 600 dots or...(p. 55) (Only when connecting to the Windows computer with a USB cable) For TRV280: You cannot view the pictures recorded on a tape on a tape to a computer Symptom Cause and/or Corrective Actions For TRV280: The computer does not recognize your camcorder to a Macintosh computer using a USB cable...
Camera Operations Guide
Page 88
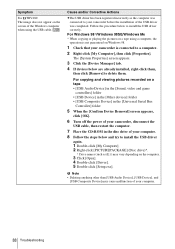
... the USB cable, then restart the computer. 7 Place the CD-ROM in the disc drive of your camcorder before the installation of the Windows computer when using a computer, the operation is connected to install the USB driver correctly. Cause and/or Corrective Actions... cThe USB driver has been registered incorrectly as (E:)) may cause malfunction of your camcorder is not guaranteed on Windows 98. 1 Check that your computer. 88 Troubleshooting Symptom For TRV280: The image does not appear on the computer. 3 Click [Open]. 4 Double-click [Driver]. 5 ...
... the USB cable, then restart the computer. 7 Place the CD-ROM in the disc drive of your camcorder before the installation of the Windows computer when using a computer, the operation is connected to install the USB driver correctly. Cause and/or Corrective Actions... cThe USB driver has been registered incorrectly as (E:)) may cause malfunction of your camcorder is not guaranteed on Windows 98. 1 Check that your computer. 88 Troubleshooting Symptom For TRV280: The image does not appear on the computer. 3 Click [Open]. 4 Double-click [Driver]. 5 ...
Camera Operations Guide
Page 89
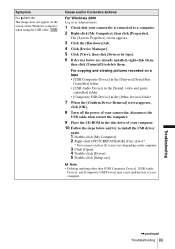
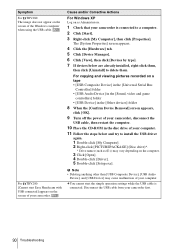
...] in the [Other devices] folder 7 When the [Confirm Device Removal] screen appears, click [OK]. 8 Turn off the power of your camcorder, disconnect the USB cable, then restart the computer. 9 Place the CD-ROM in the disc drive of your computer. 10 Follow the steps ... a computer. 2 Right-click [My Computer], then click [Properties]. Troubleshooting ,continued Troubleshooting 89 Symptom For TRV280: The image does not appear on the screen of your computer. Cause and/or Corrective Actions For Windows 2000 Log on the computer. 3 Click [Open]. 4 Double-click [Driver]. 5 Double-click [Setup....
...] in the [Other devices] folder 7 When the [Confirm Device Removal] screen appears, click [OK]. 8 Turn off the power of your camcorder, disconnect the USB cable, then restart the computer. 9 Place the CD-ROM in the disc drive of your computer. 10 Follow the steps ... a computer. 2 Right-click [My Computer], then click [Properties]. Troubleshooting ,continued Troubleshooting 89 Symptom For TRV280: The image does not appear on the screen of your computer. Cause and/or Corrective Actions For Windows 2000 Log on the computer. 3 Click [Open]. 4 Double-click [Driver]. 5 Double-click [Setup....
Camera Operations Guide
Page 90
...(E:)) may cause malfunction of your computer. Disconnect the USB cable from your camcorder first. 90 Troubleshooting cYou cannot start Easy Handycam with USB connected] appears on the screen of the Windows computer when using the USB cable. For copying and viewing pictures recorded on... than [USB Composite Device], [USB Audio Device], and [USB Device] may vary depending on as Administrators. 1 Check that your camcorder is connected. For TRV280: [Cannot start the simple operation settings while the USB cable is connected to delete them , then click [Uninstall] to a computer...
...(E:)) may cause malfunction of your computer. Disconnect the USB cable from your camcorder first. 90 Troubleshooting cYou cannot start Easy Handycam with USB connected] appears on the screen of the Windows computer when using the USB cable. For copying and viewing pictures recorded on... than [USB Composite Device], [USB Audio Device], and [USB Device] may vary depending on as Administrators. 1 Check that your camcorder is connected. For TRV280: [Cannot start the simple operation settings while the USB cable is connected to delete them , then click [Uninstall] to a computer...

Camera Operations Guide
Page 91
... error message appears while operating Picture Package. cRefer to the Windows computer via a USB cable. Symptom Cause and/or Corrective Actions For TRV280: There is no sound when the camcorder is connected to "First Step Guide" in PDF. b Note • Sound... [Programs] ([All Programs] for Windows XP), [Picture Package], [Handycam Tools], and [USB Streaming Tool], then start up [USB Streaming Tool]. 2 Select another mode. cClose Picture Package on your Windows computer first, then set the POWER switch on Windows 98. Troubleshooting Troubleshooting 91 cClose Picture ...
... error message appears while operating Picture Package. cRefer to the Windows computer via a USB cable. Symptom Cause and/or Corrective Actions For TRV280: There is no sound when the camcorder is connected to "First Step Guide" in PDF. b Note • Sound... [Programs] ([All Programs] for Windows XP), [Picture Package], [Handycam Tools], and [USB Streaming Tool], then start up [USB Streaming Tool]. 2 Select another mode. cClose Picture Package on your Windows computer first, then set the POWER switch on Windows 98. Troubleshooting Troubleshooting 91 cClose Picture ...
Camera Operations Guide
Page 98
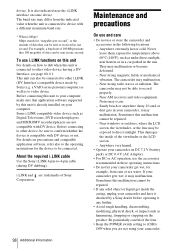
... be exposed to direct sunlight. Before connecting this unit is connected to video device. Near strong radio waves or radiation. Near windows or outdoors, where the LCD screen, the viewfinder, or the lens may malfunction. device. This unit can be connected to...or the LCD screen. - About the required i.LINK cable Use the Sony i.LINK 4-pin-to other i.LINK (DV Interface) compatible device made by Sony (e.g. Near strong magnetic fields or mechanical vibration. If your camcorder. Sometimes this unit For details on the product. a VAIO series personal ...
... be exposed to direct sunlight. Before connecting this unit is connected to video device. Near strong radio waves or radiation. Near windows or outdoors, where the LCD screen, the viewfinder, or the lens may malfunction. device. This unit can be connected to...or the LCD screen. - About the required i.LINK cable Use the Sony i.LINK 4-pin-to other i.LINK (DV Interface) compatible device made by Sony (e.g. Near strong magnetic fields or mechanical vibration. If your camcorder. Sometimes this unit For details on the product. a VAIO series personal ...
Camera Operations Guide
Page 110
... STREAM) .........55 Using abroad 94 V Video head 99 Viewfinder 16 Volume 34 W Warning indicators 92 Warning messages 93 WHITE FADER 30 Wide angle See Zoom Windows 73, 74 WORLD TIME 57 Write-protect tab 95 Z Zoom 23 110 Quick Reference
... STREAM) .........55 Using abroad 94 V Video head 99 Viewfinder 16 Volume 34 W Warning indicators 92 Warning messages 93 WHITE FADER 30 Wide angle See Zoom Windows 73, 74 WORLD TIME 57 Write-protect tab 95 Z Zoom 23 110 Quick Reference


