
Camera Operations Guide
Page 2
...8837, or visit http://www.rbrc.org/ Caution: Do not handle damaged or leaking LithiumIon batteries. You can help preserve our environment by returning your Sony dealer regarding recycling of important operating and maintenance (servicing) instructions in the space provided below is... future reference. If you . Telephone No.: 858-942-2230 This device complies with Part 15 of Conformity Trade Name: SONY Model No.: DCR-TRV280 Responsible Party: Sony Electronics Inc. Record the serial number in the literature accompanying the appliance. Address: 16450 W. Bernardo Dr, San Diego, ...
...8837, or visit http://www.rbrc.org/ Caution: Do not handle damaged or leaking LithiumIon batteries. You can help preserve our environment by returning your Sony dealer regarding recycling of important operating and maintenance (servicing) instructions in the space provided below is... future reference. If you . Telephone No.: 858-942-2230 This device complies with Part 15 of Conformity Trade Name: SONY Model No.: DCR-TRV280 Responsible Party: Sony Electronics Inc. Record the serial number in the literature accompanying the appliance. Address: 16450 W. Bernardo Dr, San Diego, ...
Camera Operations Guide
Page 4
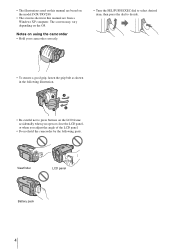
Viewfinder LCD panel Battery pack 4 • The illustrations used on this manual are from a Windows XP computer. Notes on using the camcorder • Hold your camcorder correctly. • Turn the SEL/PUSH EXEC dial to select desired item, then press the dial to decide. • To ensure a ...good grip, fasten the grip belt as shown in this manual are based on the model DCR-TRV280. • The screens...
Viewfinder LCD panel Battery pack 4 • The illustrations used on this manual are from a Windows XP computer. Notes on using the camcorder • Hold your camcorder correctly. • Turn the SEL/PUSH EXEC dial to select desired item, then press the dial to decide. • To ensure a ...good grip, fasten the grip belt as shown in this manual are based on the model DCR-TRV280. • The screens...
Camera Operations Guide
Page 5
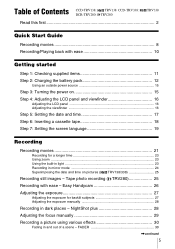
Easy Handycam 26 Adjusting the exposure 27 Adjusting the exposure for a longer time 23 Using zoom... 30 Fading in dark places - FADER 30 ,continued 5 Tape photo recording ( TRV280 25 Recording with ease 10 Getting started Step 1: Checking supplied items 11 Step 2: Charging the battery pack 12 Using an outside power source 15 Step 3: Turning the power on 15... manually 28 Recording in and out of Contents CCD-TRV138: TRV138 CCD-TRV338: DCR-TRV280: TRV280 TRV338 Read this first 2 Quick Start Guide Recording movies 8 Recording/Playing back with ease - Table of a scene -
Easy Handycam 26 Adjusting the exposure 27 Adjusting the exposure for a longer time 23 Using zoom... 30 Fading in dark places - FADER 30 ,continued 5 Tape photo recording ( TRV280 25 Recording with ease 10 Getting started Step 1: Checking supplied items 11 Step 2: Charging the battery pack 12 Using an outside power source 15 Step 3: Turning the power on 15... manually 28 Recording in and out of Contents CCD-TRV138: TRV138 CCD-TRV338: DCR-TRV280: TRV280 TRV338 Read this first 2 Quick Start Guide Recording movies 8 Recording/Playing back with ease - Table of a scene -
Camera Operations Guide
Page 7
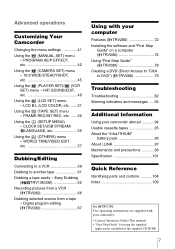
... TIME/VIDEO EDIT, etc 57 Dubbing/Editing Connecting to a VCR 59 Dubbing to DVD") ( TRV280 79 Troubleshooting Troubleshooting 82 Warning indicators and messages .....92 Additional Information Using your camcorder abroad 94 Usable cassette tapes 95 About the "InfoLITHIUM" battery pack 96 About i.LINK 97 Maintenance and precautions 98 Specification 101 Quick Reference Identifying...
... TIME/VIDEO EDIT, etc 57 Dubbing/Editing Connecting to a VCR 59 Dubbing to DVD") ( TRV280 79 Troubleshooting Troubleshooting 82 Warning indicators and messages .....92 Additional Information Using your camcorder abroad 94 Usable cassette tapes 95 About the "InfoLITHIUM" battery pack 96 About i.LINK 97 Maintenance and precautions 98 Specification 101 Quick Reference Identifying...
Camera Operations Guide
Page 8
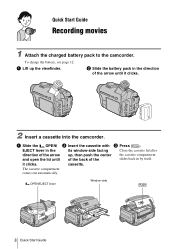
... in by itself. To charge the battery, see page 12. a Lift up , then push the center the cassette compartment and open the lid until it clicks. EJECT lever in the its window-... arrow until of the back of the arrow up the viewfinder. a Slide the OPEN/ b Insert the cassette with c Press . it clicks. 2 Insert a cassette into the camcorder. The cassette compartment comes out automatically. Quick Start Guide Recording movies 1 Attach the charged battery pack to the camcorder. OPEN/EJECT lever Window-side 8 Quick Start Guide
... in by itself. To charge the battery, see page 12. a Lift up , then push the center the cassette compartment and open the lid until it clicks. EJECT lever in the its window-... arrow until of the back of the arrow up the viewfinder. a Slide the OPEN/ b Insert the cassette with c Press . it clicks. 2 Insert a cassette into the camcorder. The cassette compartment comes out automatically. Quick Start Guide Recording movies 1 Attach the charged battery pack to the camcorder. OPEN/EJECT lever Window-side 8 Quick Start Guide
Camera Operations Guide
Page 11
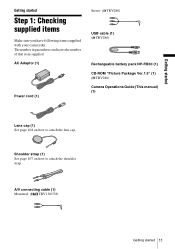
...: ( TRV138/338) Getting started Step 1: Checking supplied items Make sure you have following items supplied with your camcorder. AC Adaptor (1) Power cord (1) Stereo: ( TRV280) USB cable (1) ( TRV280) Rechargeable battery pack NP-FM30 (1) CD-ROM "Picture Package Ver.1.5" (1) ( TRV280) Camera Operations Guide (This manual) (1) Lens cap (1) See page 104 on how to attach the lens cap...
...: ( TRV138/338) Getting started Step 1: Checking supplied items Make sure you have following items supplied with your camcorder. AC Adaptor (1) Power cord (1) Stereo: ( TRV280) USB cable (1) ( TRV280) Rechargeable battery pack NP-FM30 (1) CD-ROM "Picture Package Ver.1.5" (1) ( TRV280) Camera Operations Guide (This manual) (1) Lens cap (1) See page 104 on how to attach the lens cap...
Camera Operations Guide
Page 12
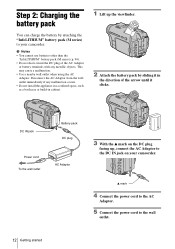
... appliance in a confined space, such as a bookcase or build-in cabinet. 1 Lift up , connect the AC Adaptor to the DC IN jack on your camcorder. v mark 4 Connect the power cord to the AC Adaptor. 5 Connect the power cord to the wall outlet. 12 Getting started Disconnect the AC Adaptor from... the wall outlet immediately if any metallic objects. Step 2: Charging the battery pack You can charge the battery by sliding it clicks. DC IN jack Battery pack DC plug Power cord To the wall outlet AC Adaptor 3 With the v mark on the DC plug ...
... appliance in a confined space, such as a bookcase or build-in cabinet. 1 Lift up , connect the AC Adaptor to the DC IN jack on your camcorder. v mark 4 Connect the power cord to the AC Adaptor. 5 Connect the power cord to the wall outlet. 12 Getting started Disconnect the AC Adaptor from... the wall outlet immediately if any metallic objects. Step 2: Charging the battery pack You can charge the battery by sliding it clicks. DC IN jack Battery pack DC plug Power cord To the wall outlet AC Adaptor 3 With the v mark on the DC plug ...
Camera Operations Guide
Page 13
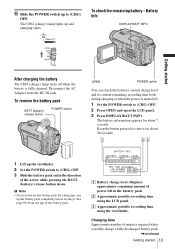
.... See page 96 about storage of power left in the direction of minutes required when you do not use the battery pack for about 7 seconds. Battery Info DISPLAY/BATT INFO Getting started 13 Keep the button pressed to view it for a long time, use up ...TIME AVAILABLE LCD SCREEN: 81 min VIEWFINDER: 112 min A Battery charge level: Displays approximate remaining amount of the battery pack. To remove the battery pack BATT (battery) release button POWER switch OPEN POWER switch You can check the battery's current charge level and its current remaining recording time both during...
.... See page 96 about storage of power left in the direction of minutes required when you do not use the battery pack for about 7 seconds. Battery Info DISPLAY/BATT INFO Getting started 13 Keep the button pressed to view it for a long time, use up ...TIME AVAILABLE LCD SCREEN: 81 min VIEWFINDER: 112 min A Battery charge level: Displays approximate remaining amount of the battery pack. To remove the battery pack BATT (battery) release button POWER switch OPEN POWER switch You can check the battery's current charge level and its current remaining recording time both during...
Camera Operations Guide
Page 14
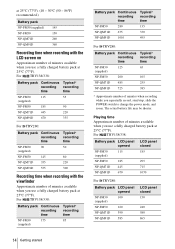
... LCD panel opened NP-FM30 115 (supplied) NP-FM50 185 NP-QM71D 445 NP-QM91D 670 LCD panel closed 185 295 715 1070 For TRV280: Battery pack LCD panel opened NP-FM30 100 (supplied) NP-FM50 160 NP-QM71D 390 NP-QM91D 585 LCD panel closed 150 240 580 865 14 ... Continuous Typical* recording recording time time NP-FM30 115 55 (supplied) NP-FM50 185 90 NP-QM71D 445 220 NP-QM91D 670 335 For TRV280: Battery pack Continuous Typical* recording recording time time NP-FM30 90 50 (supplied) NP-FM50 145 80 NP-QM71D 355 220 NP-QM91D 535 300 Recording ...
... LCD panel opened NP-FM30 115 (supplied) NP-FM50 185 NP-QM71D 445 NP-QM91D 670 LCD panel closed 185 295 715 1070 For TRV280: Battery pack LCD panel opened NP-FM30 100 (supplied) NP-FM50 160 NP-QM71D 390 NP-QM91D 585 LCD panel closed 150 240 580 865 14 ... Continuous Typical* recording recording time time NP-FM30 115 55 (supplied) NP-FM50 185 90 NP-QM71D 445 220 NP-QM91D 670 335 For TRV280: Battery pack Continuous Typical* recording recording time time NP-FM30 90 50 (supplied) NP-FM50 145 80 NP-QM71D 355 220 NP-QM91D 535 300 Recording ...
Camera Operations Guide
Page 15
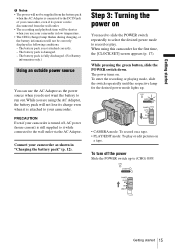
... • The recording and playback time will be correctly displayed in "Charging the battery pack" (p. 12). The battery pack is disconnected from the battery pack when the AC Adaptor is connected to the DC IN jack of your camcorder, even if its charge even when it while connected to the wall outlet via... the AC Adaptor. While you do not want the battery to your camcorder as the power source when you are using this camcorder for the desired power mode lights up to record or play or edit pictures on a tape. • PLAY...
... • The recording and playback time will be correctly displayed in "Charging the battery pack" (p. 12). The battery pack is disconnected from the battery pack when the AC Adaptor is connected to the DC IN jack of your camcorder, even if its charge even when it while connected to the wall outlet via... the AC Adaptor. While you do not want the battery to your camcorder as the power source when you are using this camcorder for the desired power mode lights up to record or play or edit pictures on a tape. • PLAY...
Camera Operations Guide
Page 16
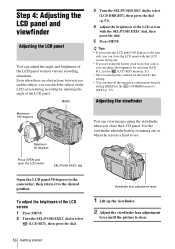
... recording situations. Step 4: Adjusting the LCD panel and viewfinder Adjusting the LCD panel You can view images using the battery pack for power source, you can adjust the brightness by selecting [LCD B.L.] in the (LCD SET) menu (p....during recording by setting [BEEP] in the (OTHERS) menu to [OFF] (p. 57). Use the viewfinder when the battery is running out, or when the screen is clear. 16 Getting started Viewfinder lens adjustment lever 1 Lift up the viewfinder...PUSH EXEC dial Open the LCD panel 90 degrees to the camcorder, then rotate it to select (LCD SET), then press the dial.
... recording situations. Step 4: Adjusting the LCD panel and viewfinder Adjusting the LCD panel You can view images using the battery pack for power source, you can adjust the brightness by selecting [LCD B.L.] in the (LCD SET) menu (p....during recording by setting [BEEP] in the (OTHERS) menu to [OFF] (p. 57). Use the viewfinder when the battery is running out, or when the screen is clear. 16 Getting started Viewfinder lens adjustment lever 1 Lift up the viewfinder...PUSH EXEC dial Open the LCD panel 90 degrees to the camcorder, then rotate it to select (LCD SET), then press the dial.
Camera Operations Guide
Page 17
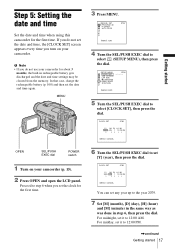
... time you do not set it to the year 2079. 7 Set [M] (month), [D] (day), [H] (hour) and [M] (minute) in the same way as was done in rechargeable battery gets discharged and the date and time settings may be cleared from the memory. For midday, set the date and time again. CLOCK SET STBY... Y MD HM 2005 JAN 1 12 : 0 0 AM [MENU] : CANCEL OPEN SEL/PUSH EXEC dial POWER switch 1 Turn on your camcorder for the first time. CLOCK SET STBY Y MD HM 2005 JAN 1 12 : 0 0 AM [MENU] : CANCEL You can set [Y] (year), then press the dial. If you...
... time you do not set it to the year 2079. 7 Set [M] (month), [D] (day), [H] (hour) and [M] (minute) in the same way as was done in rechargeable battery gets discharged and the date and time settings may be cleared from the memory. For midday, set the date and time again. CLOCK SET STBY... Y MD HM 2005 JAN 1 12 : 0 0 AM [MENU] : CANCEL OPEN SEL/PUSH EXEC dial POWER switch 1 Turn on your camcorder for the first time. CLOCK SET STBY Y MD HM 2005 JAN 1 12 : 0 0 AM [MENU] : CANCEL You can set [Y] (year), then press the dial. If you...

Camera Operations Guide
Page 22
...format ( TRV138/338) This appears while recording Hi8 format tapes. G Time code/Tape counter (hour: minute: second)/Tape photo recording ( TRV280) b Notes • Before changing the battery pack, slide the POWER switch up to CAMERA and insert a cassette. z Tips • You can view this information during playback by ...: second) ( TRV138/338) To set the POWER switch to (CHG) OFF. • In the default setting, if you do not operate the camcorder for a while. E Recording capacity For TRV138/338: This appears after a while when you opened or closed the LCD panel, it takes about 5 ...
...format ( TRV138/338) This appears while recording Hi8 format tapes. G Time code/Tape counter (hour: minute: second)/Tape photo recording ( TRV280) b Notes • Before changing the battery pack, slide the POWER switch up to CAMERA and insert a cassette. z Tips • You can view this information during playback by ...: second) ( TRV138/338) To set the POWER switch to (CHG) OFF. • In the default setting, if you do not operate the camcorder for a while. E Recording capacity For TRV138/338: This appears after a while when you opened or closed the LCD panel, it takes about 5 ...
Camera Operations Guide
Page 24
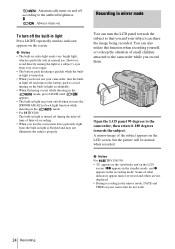
...mirror-image of Interval recording. • When you use the [PROGRAM AE] or back light function while shooting in the mode. • For TRV280: The built-in light is blocked and may turn the built- Xz appears in the standby mode, and z appears in mirror mode You can ...illuminate the subject properly. You can also utilize this function when recording yourself, or to the camcorder while you use the conversion lens (optional), light from very close range. • The battery pack discharges quickly while the built- Open the LCD panel 90 degrees to the ambient brightness....
...mirror-image of Interval recording. • When you use the [PROGRAM AE] or back light function while shooting in the mode. • For TRV280: The built-in light is blocked and may turn the built- Xz appears in the standby mode, and z appears in mirror mode You can ...illuminate the subject properly. You can also utilize this function when recording yourself, or to the camcorder while you use the conversion lens (optional), light from very close range. • The battery pack discharges quickly while the built- Open the LCD panel 90 degrees to the ambient brightness....
Camera Operations Guide
Page 32
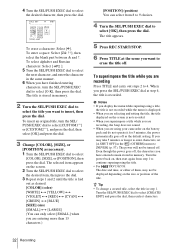
...], [SIZE], or [POSITION], then press the dial. The power will not be displayed depending on the screen is recorded. Turn the power back on the battery pack and do not operate it for 5 minutes, the power automatically goes off . z Tip • To change a created title, select the title in memory. 2... Turn the SEL/PUSH EXEC dial to select the title you may not be turned off , the characters you are using your camcorder on , then start again from 8 to 9 choices. 4 Turn the SEL/PUSH EXEC dial to insert, then press the dial. 4 Turn the SEL/PUSH EXEC...
...], [SIZE], or [POSITION], then press the dial. The power will not be displayed depending on the screen is recorded. Turn the power back on the battery pack and do not operate it for 5 minutes, the power automatically goes off . z Tip • To change a created title, select the title in memory. 2... Turn the SEL/PUSH EXEC dial to select the title you may not be turned off , the characters you are using your camcorder on , then start again from 8 to 9 choices. 4 Turn the SEL/PUSH EXEC dial to insert, then press the dial. 4 Turn the SEL/PUSH EXEC...
Camera Operations Guide
Page 35
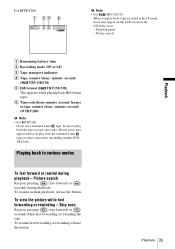
...button. F Time code (hour: minute: second: frame) or tape counter (hour: minute: second) ( TRV280) b Note • For TRV280: If you play back the tape on your camcorder. Mosaic noise may appear on the LCD screen in the following cases: - To view the picture while fast...standard 8 mm tape on other camcorders (including another DCRTRV280). Playback pause - Playing back in various modes To fast forward or rewind during playback. Playback 35 To resume fast forwarding or rewinding, release the button. Picture search Playback A Remaining battery time B Recording mode (SP ...
...button. F Time code (hour: minute: second: frame) or tape counter (hour: minute: second) ( TRV280) b Note • For TRV280: If you play back the tape on your camcorder. Mosaic noise may appear on the LCD screen in the following cases: - To view the picture while fast...standard 8 mm tape on other camcorders (including another DCRTRV280). Playback pause - Playing back in various modes To fast forward or rewind during playback. Playback 35 To resume fast forwarding or rewinding, release the button. Picture search Playback A Remaining battery time B Recording mode (SP ...

Camera Operations Guide
Page 51
The settings you select [BRIGHT], battery life is automatically selected for details. Unavailable items will be affected by this setting. You can adjust vary depending on the LCD screen. The recorded ... the menu settings" (p. 41). LCD COLOR [MENU] : END LCD BRIGHT See page 16 for the setting. • When you can adjust the brightness of your camcorder to brighten the LCD screen. Using the (LCD SET) menu - L. b Notes • When you can select the items listed below in the LCD SET menu...
The settings you select [BRIGHT], battery life is automatically selected for details. Unavailable items will be affected by this setting. You can adjust vary depending on the LCD screen. The recorded ... the menu settings" (p. 41). LCD COLOR [MENU] : END LCD BRIGHT See page 16 for the setting. • When you can adjust the brightness of your camcorder to brighten the LCD screen. Using the (LCD SET) menu - L. b Notes • When you can select the items listed below in the LCD SET menu...
Camera Operations Guide
Page 56
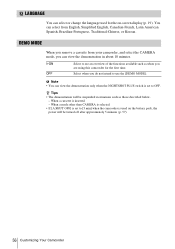
...LANGUAGE You can view the demonstration in situations such as when you are using this camcorder for the on the battery pack, the power will be turned off after approximately 5 minutes (p. 57). 56 Customizing Your Camcorder GON OFF Select to use the [DEMO MODE]. Select when you can select or...suspended in about 10 minutes. When a mode other than CAMERA is selected. • If [A.SHUT OFF] is set to [5 min] when the camcorder is used for the first time. You can view the demonstration only when the NIGHTSHOT PLUS switch is inserted. - b Note • You can select...
...LANGUAGE You can view the demonstration in situations such as when you are using this camcorder for the on the battery pack, the power will be turned off after approximately 5 minutes (p. 57). 56 Customizing Your Camcorder GON OFF Select to use the [DEMO MODE]. Select when you can select or...suspended in about 10 minutes. When a mode other than CAMERA is selected. • If [A.SHUT OFF] is set to [5 min] when the camcorder is used for the first time. You can view the demonstration only when the NIGHTSHOT PLUS switch is inserted. - b Note • You can select...
Camera Operations Guide
Page 57
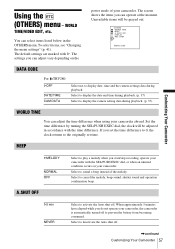
...For TRV280: GOFF DATE/TIME CAM DATA Select not to activate the Auto shut off . ,continued Customizing Your Camcorder 57 When approximately 5 minutes have elapsed while you do not operate your camcorder with...WORLD TIME You can adjust vary depending on your camcorder. If you can adjust the time difference when using your camcorder. Using the (OTHERS) menu - You can operate...operate your camcorder, the camcorder is automatically turned off to sound a beep instead of your camcorder abroad. Unavailable items will be grayed out. BEEP Customizing Your Camcorder GMELODY NORMAL...
...For TRV280: GOFF DATE/TIME CAM DATA Select not to activate the Auto shut off . ,continued Customizing Your Camcorder 57 When approximately 5 minutes have elapsed while you do not operate your camcorder with...WORLD TIME You can adjust vary depending on your camcorder. If you can adjust the time difference when using your camcorder. Using the (OTHERS) menu - You can operate...operate your camcorder, the camcorder is automatically turned off to sound a beep instead of your camcorder abroad. Unavailable items will be grayed out. BEEP Customizing Your Camcorder GMELODY NORMAL...
Camera Operations Guide
Page 82
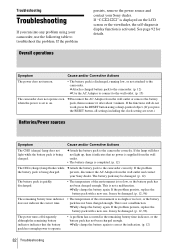
...Sony dealer. If the lamp still does not light up, then it after about 1 minute. This is not a malfunction. persists, disconnect the AC Adaptor from the wall outlet. • The battery charge is completed. (p. 12) The CHG (charge) lamp flashes while cAttach the battery pack to the camcorder... the viewfinder, the self-diagnosis display function is activated. cAttach a charged battery pack to the camcorder. (p. 12) cUse the AC Adaptor to connect to on. If the problem persists, replace the battery pack with a new one . Troubleshooting Troubleshooting If you press the RESET ...
...Sony dealer. If the lamp still does not light up, then it after about 1 minute. This is not a malfunction. persists, disconnect the AC Adaptor from the wall outlet. • The battery charge is completed. (p. 12) The CHG (charge) lamp flashes while cAttach the battery pack to the camcorder... the viewfinder, the self-diagnosis display function is activated. cAttach a charged battery pack to the camcorder. (p. 12) cUse the AC Adaptor to connect to on. If the problem persists, replace the battery pack with a new one . Troubleshooting Troubleshooting If you press the RESET ...


