Operating Instructions
Page 3
...that may cause undesired operation. Consult the dealer or an experienced radio/TV technician for a digital device pursuant to Subpart B of Part 15 of the FCC Rules. "Memory Stick" This Class B digital apparatus complies with the instructions, may not cause harmful interference, and (2) this device must...and receiver. - "Memory Stick" This device complies with the limits for a Class B digital device, pursuant to Part 15 of FCC Rules. Connect the equipment into an outlet on , the user is connected. - The shielded interface cable supplied with this equipment in order to comply with the ...
...that may cause undesired operation. Consult the dealer or an experienced radio/TV technician for a digital device pursuant to Subpart B of Part 15 of the FCC Rules. "Memory Stick" This Class B digital apparatus complies with the instructions, may not cause harmful interference, and (2) this device must...and receiver. - "Memory Stick" This device complies with the limits for a Class B digital device, pursuant to Part 15 of FCC Rules. Connect the equipment into an outlet on , the user is connected. - The shielded interface cable supplied with this equipment in order to comply with the ...
Operating Instructions
Page 5
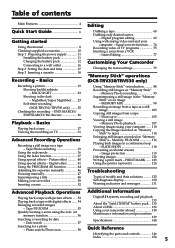
...supply 11 Installing the battery pack 11 Charging the battery pack 12 Connecting to tapes 114 Enlarging still images recorded on "Memory Stick" - Digital effect 41 Using the PROGRAM AE function 44 Adjusting the exposure ...video unit and your camcorder abroad 138 Maintenance information and precautions 139 Specifications 144 Quick Reference Identifying the parts and controls 146 Index 154 5 Insert Editing 77 Customizing Your Camcorder Changing the menu settings 79 "Memory Stick" operations (DCR-TRV330/TRV530 only) Using "Memory Stick"-introduction .......... 88 Recording...
...supply 11 Installing the battery pack 11 Charging the battery pack 12 Connecting to tapes 114 Enlarging still images recorded on "Memory Stick" - Digital effect 41 Using the PROGRAM AE function 44 Adjusting the exposure ...video unit and your camcorder abroad 138 Maintenance information and precautions 139 Specifications 144 Quick Reference Identifying the parts and controls 146 Index 154 5 Insert Editing 77 Customizing Your Camcorder Changing the menu settings 79 "Memory Stick" operations (DCR-TRV330/TRV530 only) Using "Memory Stick"-introduction .......... 88 Recording...
Operating Instructions
Page 6
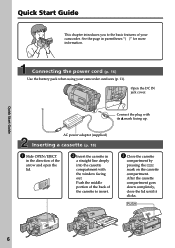
Connect the plug with the window facing out. Open the DC IN jack cover. AC power adaptor (supplied) Inserting a cassette (p. 18) 1 Slide OPEN/EJECT in the ... of the cassette to the basic features of your camcorder outdoors (p. 11). After the cassette compartment goes down completely, close the lid until it clicks. Connecting the power cord (p. 16) Use the battery pack when using your camcorder. Quick Start Guide This chapter introduces you to insert. 3 Close the cassette compartment...
Connect the plug with the window facing out. Open the DC IN jack cover. AC power adaptor (supplied) Inserting a cassette (p. 18) 1 Slide OPEN/EJECT in the ... of the cassette to the basic features of your camcorder outdoors (p. 11). After the cassette compartment goes down completely, close the lid until it clicks. Connecting the power cord (p. 16) Use the battery pack when using your camcorder. Quick Start Guide This chapter introduces you to insert. 3 Close the cassette compartment...
Operating Instructions
Page 10
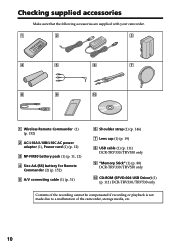
... (R6) battery for Remote Commander (2) (p. 152) 5 A/V connecting cable (1) (p. 31) 6 Shoulder strap (1) (p. 146) 7 Lens cap (1) (p. 19) 8 USB cable (1) (p. 111) DCR-TRV330/TRV530 only 9 "Memory Stick" (1) (p. 88) DCR-TRV330/TRV530 only 0 CD-ROM (SPVD-004 USB Driver) (1) (p. 111) DCR-TRV330/TRV530 only Contents of the recording cannot be compensated if recording or playback is not made due to...
... (R6) battery for Remote Commander (2) (p. 152) 5 A/V connecting cable (1) (p. 31) 6 Shoulder strap (1) (p. 146) 7 Lens cap (1) (p. 19) 8 USB cable (1) (p. 111) DCR-TRV330/TRV530 only 9 "Memory Stick" (1) (p. 88) DCR-TRV330/TRV530 only 0 CD-ROM (SPVD-004 USB Driver) (1) (p. 111) DCR-TRV330/TRV530 only Contents of the recording cannot be compensated if recording or playback is not made due to...
Operating Instructions
Page 12
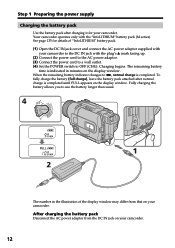
The remaining battery time is indicated in the illustration of "InfoLITHIUM" battery pack. (1) Open the DC IN jack cover and connect the AC power adaptor supplied with the "InfoLITHIUM" battery pack (M series). To fully charge the battery (full charge), leave the battery pack attached after ... may differ from the DC IN jack on your camcorder to the DC IN jack with the plug's v mark facing up. (2) Connect the power cord to the AC power adaptor. (3) Connect the power cord to a wall outlet. (4) Set the POWER switch to u, normal charge is completed. OFCFR(CHG) E ERMAORY CAM M Step 1 ...
The remaining battery time is indicated in the illustration of "InfoLITHIUM" battery pack. (1) Open the DC IN jack cover and connect the AC power adaptor supplied with the "InfoLITHIUM" battery pack (M series). To fully charge the battery (full charge), leave the battery pack attached after ... may differ from the DC IN jack on your camcorder to the DC IN jack with the plug's v mark facing up. (2) Connect the power cord to the AC power adaptor. (3) Connect the power cord to a wall outlet. (4) Set the POWER switch to u, normal charge is completed. OFCFR(CHG) E ERMAORY CAM M Step 1 ...

Operating Instructions
Page 16
This means that you use your camcorder for a long time, we recommend that the battery pack cannot supply any power if the power cord is connected to the DC IN jack, even when the power cord is not plugged into a wall outlet. Notes • The AC power adaptor can supply power ... the battery pack is attached to your camcorder. • The DC IN jack has "source priority". Using a car battery Use Sony DC Adaptor/Charger (optional). 16 Step 1 Preparing the power supply Connecting to a wall outlet When you power it from a wall outlet using the AC power adaptor. (1) Open the DC IN jack...
This means that you use your camcorder for a long time, we recommend that the battery pack cannot supply any power if the power cord is connected to the DC IN jack, even when the power cord is not plugged into a wall outlet. Notes • The AC power adaptor can supply power ... the battery pack is attached to your camcorder. • The DC IN jack has "source priority". Using a car battery Use Sony DC Adaptor/Charger (optional). 16 Step 1 Preparing the power supply Connecting to a wall outlet When you power it from a wall outlet using the AC power adaptor. (1) Open the DC IN jack...
Operating Instructions
Page 29
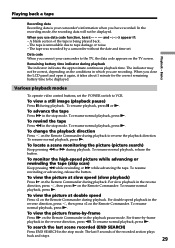
...the TV, the data code appears on the Remote Commander. A blank section of the recorded section plays back and stops. 29 To change the playback direction Press on the Remote Commander in which you connect your camcorder's information when you use data code function, bars and --:--:--) appear if: -... tape is being played back. - To resume normal playback, press N. Remaining battery time indicator during playback. Various playback modes To operate video control buttons, set . The tape is your camcorder to tape damage or noise. - To resume normal playback, press N.
...the TV, the data code appears on the Remote Commander. A blank section of the recorded section plays back and stops. 29 To change the playback direction Press on the Remote Commander in which you connect your camcorder's information when you use data code function, bars and --:--:--) appear if: -... tape is being played back. - To resume normal playback, press N. Remaining battery time indicator during playback. Various playback modes To operate video control buttons, set . The tape is your camcorder to tape damage or noise. - To resume normal playback, press N.
Operating Instructions
Page 31
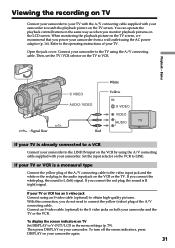
... the TV screen, we recommend that you do not need to connect the yellow (video) plug of your camcorder again. 31 With this connection, you power your camcorder. Connect an S video cable (optional) to the S video jacks on both your camcorder. To display the screen indicators on the...off the screen indicators, press DISPLAY on your TV. Refer to the operating instructions of the A/V connecting cable. Viewing the recording on TV Connect your camcorder to your TV with the A/V connecting cable supplied with your camcorder from a wall outlet using the AC power adaptor (p. 16). You ...
... the TV screen, we recommend that you do not need to connect the yellow (video) plug of your camcorder again. 31 With this connection, you power your camcorder. Connect an S video cable (optional) to the S video jacks on both your camcorder. To display the screen indicators on the...off the screen indicators, press DISPLAY on your TV. Refer to the operating instructions of the A/V connecting cable. Viewing the recording on TV Connect your camcorder to your TV with the A/V connecting cable supplied with your camcorder from a wall outlet using the AC power adaptor (p. 16). You ...
Operating Instructions
Page 32
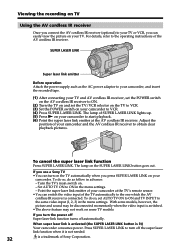
...• You can switch the video input of your camcorder and the AV cordless IR receiver to the one which the AV cordless IR receiver is connected. The lamp of Sony Corporation. To cancel the super laser link function Press SUPER LASER LINK. Viewing the recording on TV Using the AV cordless ...IR receiver Once you connect the AV cordless IR receiver (optional) to your TV or...
...• You can switch the video input of your camcorder and the AV cordless IR receiver to the one which the AV cordless IR receiver is connected. The lamp of Sony Corporation. To cancel the super laser link function Press SUPER LASER LINK. Viewing the recording on TV Using the AV cordless ...IR receiver Once you connect the AV cordless IR receiver (optional) to your TV or...

Operating Instructions
Page 35
... the A/V connecting cable supplied with S video input Use the S video connecting cable (optional). S VIDEO AUDIO / VIDEO Video printer LINE IN VIDEO S VIDEO : Signal flow If the video printer is equipped with your camcorder. Connect it to the S VIDEO jack and the S video input of the video printer as well. Refer to the video input of the video printer. Advanced Recording Operations Recording a still image on a tape - Connect the A/V connecting cable...
... the A/V connecting cable supplied with S video input Use the S video connecting cable (optional). S VIDEO AUDIO / VIDEO Video printer LINE IN VIDEO S VIDEO : Signal flow If the video printer is equipped with your camcorder. Connect it to the S VIDEO jack and the S video input of the video printer as well. Refer to the video input of the video printer. Advanced Recording Operations Recording a still image on a tape - Connect the A/V connecting cable...
Operating Instructions
Page 36
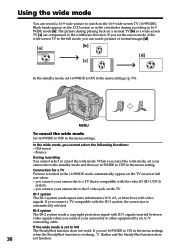
Connection for a TV Pictures recorded in the menu settings. ID-2 system The ID-2 system sends a copyright protection signal with ID-1 signals inserted between video signals when you connect your camcorder to other equipment by an A/V connecting cable. If the wide mode is automatically selected. If you set the screen ...during recording in the menu setting. MENU To cancel the wide mode Set 16:9WIDE to OFF in 16:9 WIDE mode [a]. ID-1 system The ID-1 system sends aspect ratio information (16:9, 4:3, or letter box) with the video ID (ID-1/ID-2) system. - If you connect a...
Connection for a TV Pictures recorded in the menu settings. ID-2 system The ID-2 system sends a copyright protection signal with ID-1 signals inserted between video signals when you connect your camcorder to other equipment by an A/V connecting cable. If the wide mode is automatically selected. If you set the screen ...during recording in the menu setting. MENU To cancel the wide mode Set 16:9WIDE to OFF in 16:9 WIDE mode [a]. ID-1 system The ID-1 system sends aspect ratio information (16:9, 4:3, or letter box) with the video ID (ID-1/ID-2) system. - If you connect a...

Operating Instructions
Page 49
...If you want to use the i. To select the language of the A/V connecting cable, you are recording, and carry out steps 2 to the VCR with the A/V connecting cable. When you superimpose a title while you cannot record the title. 49 When you display the menu while superimposing a title The title... is not recorded while the menu is recorded. When you select the title size LARGE, you dub a tape connecting your camcorder to 5. When you are selecting and setting the title You cannot record the title displayed on tape. While you are ...
...If you want to use the i. To select the language of the A/V connecting cable, you are recording, and carry out steps 2 to the VCR with the A/V connecting cable. When you superimpose a title while you cannot record the title. 49 When you display the menu while superimposing a title The title... is not recorded while the menu is recorded. When you select the title size LARGE, you dub a tape connecting your camcorder to 5. When you are selecting and setting the title You cannot record the title displayed on tape. While you are ...
Operating Instructions
Page 60
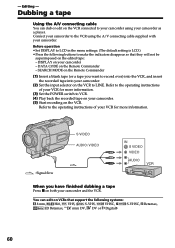
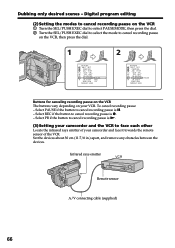
... your VCR for more information. S VIDEO AUDIO / VIDEO IN S VIDEO VIDEO AUDIO : Signal flow When you want to make the indicators disappear so that they will not be superimposed on the edited tape: - Dubbing a tape Using the A/V connecting cable You can edit on VCRs that support the following buttons to record over) into the VCR, and...
... your VCR for more information. S VIDEO AUDIO / VIDEO IN S VIDEO VIDEO AUDIO : Signal flow When you want to make the indicators disappear so that they will not be superimposed on the edited tape: - Dubbing a tape Using the A/V connecting cable You can edit on VCRs that support the following buttons to record over) into the VCR, and...
Operating Instructions
Page 61
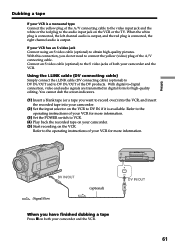
...DV products. With digital-to DV IN if it is available. With this connection, you want to record over) into the VCR, and insert the recorded tape into your camcorder. (2) Set the input selector on the VCR to -digital connection, video and audio signals are transmitted in digital form for more ...information. (3) Set the POWER switch to VCR. (4) Play back the recorded tape on the VCR or the TV. You cannot dub the screen indicators. (1) ...
...DV products. With digital-to DV IN if it is available. With this connection, you want to record over) into the VCR, and insert the recorded tape into your camcorder. (2) Set the input selector on the VCR to -digital connection, video and audio signals are transmitted in digital form for more ...information. (3) Set the POWER switch to VCR. (4) Play back the recorded tape on the VCR or the TV. You cannot dub the screen indicators. (1) ...
Operating Instructions
Page 62
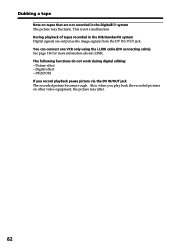
Dubbing a tape Note on other video equipment, the picture may fluctuate. You can connect one VCR only using the i.LINK cable (DV connecting cable). See page 136 for more infomation about i.LINK. During playback of tapes recorded in the Hi8/standard 8 system Digital signals are not recorded in the Digital8 system The picture may jitter. 62 PB...
Dubbing a tape Note on other video equipment, the picture may fluctuate. You can connect one VCR only using the i.LINK cable (DV connecting cable). See page 136 for more infomation about i.LINK. During playback of tapes recorded in the Hi8/standard 8 system Digital signals are not recorded in the Digital8 system The picture may jitter. 62 PB...
Operating Instructions
Page 63
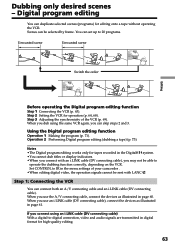
... synchronicity of your camcorder . •When editing digital video, the operation signals cannot be sent with an i.LINK cable (DV connecting cable), you use the A/V connecting cable, connect the devices as illustrated in page 60. Digital program editing You can be able to IR in digital format for tapes recorded in the Digital8 system. •You cannot dub...
... synchronicity of your camcorder . •When editing digital video, the operation signals cannot be sent with an i.LINK cable (DV connecting cable), you use the A/V connecting cable, connect the devices as illustrated in page 60. Digital program editing You can be able to IR in digital format for tapes recorded in the Digital8 system. •You cannot dub...
Operating Instructions
Page 64
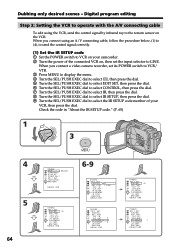
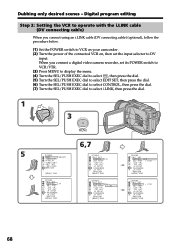
...connect a video camera recorder, set the input selector to LINE. I N " " CUT-OUT " I R SETUP P AUS EMODE I R TEST RETURN [ MENU ] : END 6-9 OTHERS ED I T SET CONTROL ADJ TEST " CUT- L I NK OTHERS ED I T SET CONTROL ADJ TEST " CUT- I N " " CUT-OUT " I R SETUP P AUS EMODE I R TEST RETURN [ MENU ] : END OTHERS ED I R ADJ TEST " CUT- When you connect... T SET CONTROL I R TEST RETURN [ MENU ] : END Digital program editing Step 2: Setting the VCR to operate with the A/V connecting cable To edit using an A/V connecting cable, follow the procedure below, (1) to (4), to send the ...
...connect a video camera recorder, set the input selector to LINE. I N " " CUT-OUT " I R SETUP P AUS EMODE I R TEST RETURN [ MENU ] : END 6-9 OTHERS ED I T SET CONTROL ADJ TEST " CUT- L I NK OTHERS ED I T SET CONTROL ADJ TEST " CUT- I N " " CUT-OUT " I R SETUP P AUS EMODE I R TEST RETURN [ MENU ] : END OTHERS ED I R ADJ TEST " CUT- When you connect... T SET CONTROL I R TEST RETURN [ MENU ] : END Digital program editing Step 2: Setting the VCR to operate with the A/V connecting cable To edit using an A/V connecting cable, follow the procedure below, (1) to (4), to send the ...
Operating Instructions
Page 66
...ADJ TEST " CUT- Set the devices about 30 cm (11 7/8 in.) apart, and remove any obstacles between the devices. Digital program editing (2)Setting the modes to cancel recording pause on the VCR 1 Turn the SEL/PUSH EXEC dial to select PAUSEMODE, then press the dial. 2 Turn the SEL/...of your VCR. Infrared rays emitter Remote sensor A/V connecting cable (supplied) 66 To cancel recording pause: - Dubbing only desired scenes - Select PB if the button to cancel recording pause is N. (3) Setting your camcorder and the VCR to cancel recording pause on your camcorder and face it towards the...
...ADJ TEST " CUT- Set the devices about 30 cm (11 7/8 in.) apart, and remove any obstacles between the devices. Digital program editing (2)Setting the modes to cancel recording pause on the VCR 1 Turn the SEL/PUSH EXEC dial to select PAUSEMODE, then press the dial. 2 Turn the SEL/...of your VCR. Infrared rays emitter Remote sensor A/V connecting cable (supplied) 66 To cancel recording pause: - Dubbing only desired scenes - Select PB if the button to cancel recording pause is N. (3) Setting your camcorder and the VCR to cancel recording pause on your camcorder and face it towards the...
Operating Instructions
Page 68
... editing Step 2: Setting the VCR to operate with the i.LINK cable (DV connecting cable) When you connect a digital video camera recorder, set the input selector to select i.LINK, then press the dial. 1 5 OFCFR(CHG) V POWER CAM M 3 E ERMAORY MENU OTHERS BEEP ME LODY COMMA ND E R D I SPLAY V I DEO ...
... editing Step 2: Setting the VCR to operate with the i.LINK cable (DV connecting cable) When you connect a digital video camera recorder, set the input selector to select i.LINK, then press the dial. 1 5 OFCFR(CHG) V POWER CAM M 3 E ERMAORY MENU OTHERS BEEP ME LODY COMMA ND E R D I SPLAY V I DEO ...
Operating Instructions
Page 70
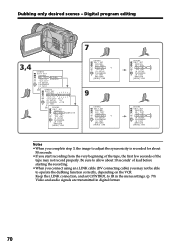
Digital program editing 7 3,4 OTHERS ED I T SET CONTROL ADJ TEST " CUT- I N " 0 ... Keep the i.LINK connection, and set CONTROL to adjust the syncronicity is recorded for about 10 seconds' of lead before starting the recording. • When you connect using an i.LINK cable (DV connecting cable) you start recording from the very beginning ...EMODE I R TEST RETURN [ MENU ] : END OTHERS ED I NG " CUT- Be sure to allow about 50 seconds. • If you may not record properly. I N " " CUT-OUT " 0 I R SETUP P AUS EMODE I R TEST RETURN [ MENU ] : END OTHERS ED I R TEST...
Digital program editing 7 3,4 OTHERS ED I T SET CONTROL ADJ TEST " CUT- I N " 0 ... Keep the i.LINK connection, and set CONTROL to adjust the syncronicity is recorded for about 10 seconds' of lead before starting the recording. • When you connect using an i.LINK cable (DV connecting cable) you start recording from the very beginning ...EMODE I R TEST RETURN [ MENU ] : END OTHERS ED I NG " CUT- Be sure to allow about 50 seconds. • If you may not record properly. I N " " CUT-OUT " 0 I R SETUP P AUS EMODE I R TEST RETURN [ MENU ] : END OTHERS ED I R TEST...


