

Operating Instructions
Page 1
Model No. -TRV Model No. AC- Refer to these numbers whenever you call upon your Sony dealer regarding this manual thoroughly, and retain it for future reference. DCR-TRV140 DCR-TRV140 CCD-TRV107/TRV108/TRV308/TRV408/ TRV608 ©2002 Sony Corporation Record the serial number in the space provided below. 3-072-317-14 (1) Digital Video Camera Recorder Video Camera Recorder Operating Instructions Before operating the unit, please read this product. Serial No. Owner's Record The model and serial numbers are located on the bottom. Serial No.
Model No. -TRV Model No. AC- Refer to these numbers whenever you call upon your Sony dealer regarding this manual thoroughly, and retain it for future reference. DCR-TRV140 DCR-TRV140 CCD-TRV107/TRV108/TRV308/TRV408/ TRV608 ©2002 Sony Corporation Record the serial number in the space provided below. 3-072-317-14 (1) Digital Video Camera Recorder Video Camera Recorder Operating Instructions Before operating the unit, please read this product. Serial No. Owner's Record The model and serial numbers are located on the bottom. Serial No.

Operating Instructions
Page 3
...accept any changes or modifications not expressly approved in accordance with Part15 of Conformity Trade Name: SONY Model No.: CCD-TRV608 Responsible Party: Sony Electronics lnc. However, there is no guarantee that any interference received, including interference that may call...interference that to Subpart B of Part 15 of Conformity Trade Name: SONY Model No.: DCR-TRV140 Responsible Party: Sony Electronics lnc. Connect the equipment into an outlet on , the user is subject to operate this manual could void your authority to the following measures: - Address: 680 ...
...accept any changes or modifications not expressly approved in accordance with Part15 of Conformity Trade Name: SONY Model No.: CCD-TRV608 Responsible Party: Sony Electronics lnc. However, there is no guarantee that any interference received, including interference that may call...interference that to Subpart B of Part 15 of Conformity Trade Name: SONY Model No.: DCR-TRV140 Responsible Party: Sony Electronics lnc. Connect the equipment into an outlet on , the user is subject to operate this manual could void your authority to the following measures: - Address: 680 ...
Operating Instructions
Page 4
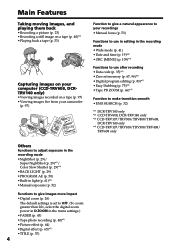
... images recorded on a tape (p. 97) •Viewing images live from your camcorder (p. 97) Function to give a natural appearance to your recordings •Manual focus (p. 53) Functions to use in editing in the recording mode •Wide...DCR-TRV140 only *3) CCD-TRV107/TRV308/TRV408/TRV608, DCR-TRV140 only *4) CCD-TRV107/TRV108/TRV308/TRV408/ TRV608 only Others Functions to adjust exposure in the recording mode •NightShot (p. 29)/ Super NightShot (p. 29)*1)/ Color Slow Shutter (p. 29)*1) •BACK LIGHT (p. 29) •PROGRAM AE (p. 50) • Built-in light (p. 61)*3) •Manual...
... images recorded on a tape (p. 97) •Viewing images live from your camcorder (p. 97) Function to give a natural appearance to your recordings •Manual focus (p. 53) Functions to use in editing in the recording mode •Wide...DCR-TRV140 only *3) CCD-TRV107/TRV308/TRV408/TRV608, DCR-TRV140 only *4) CCD-TRV107/TRV108/TRV308/TRV408/ TRV608 only Others Functions to adjust exposure in the recording mode •NightShot (p. 29)/ Super NightShot (p. 29)*1)/ Color Slow Shutter (p. 29)*1) •BACK LIGHT (p. 29) •PROGRAM AE (p. 50) • Built-in light (p. 61)*3) •Manual...

Operating Instructions
Page 6
... and time ........ 19 Step 3 Inserting a cassette 21 Recording - Basics Recording a picture 23 Shooting backlit subjects - Digital effect (DCR-TRV140 only 47 Using the PROGRAM AE function .... 50 Adjusting the exposure manually ...... 52 Focusing manually 53 Interval recording (DCR-TRV140 only 54 Frame by date - Tape PB ZOOM 66 Quickly locating a scene using the zero set memory...
... and time ........ 19 Step 3 Inserting a cassette 21 Recording - Basics Recording a picture 23 Shooting backlit subjects - Digital effect (DCR-TRV140 only 47 Using the PROGRAM AE function .... 50 Adjusting the exposure manually ...... 52 Focusing manually 53 Interval recording (DCR-TRV140 only 54 Frame by date - Tape PB ZOOM 66 Quickly locating a scene using the zero set memory...
Operating Instructions
Page 10
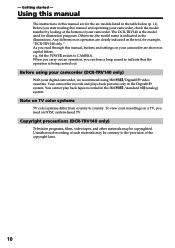
...only in capital letters. Before you read through this manual, buttons and settings on your camcorder. When you carry out an operation, you need an NTSC system-based TV. Copyright precautions (DCR-TRV140 only) Television programs, films, video tapes, and ...other materials may be copyrighted. You cannot play back tapes recorded in the table below (p. 11). - Using this manual The instructions in this manual and operating your digital camcorder, we recommend using Hi8 /Digital8 video cassettes...
...only in capital letters. Before you read through this manual, buttons and settings on your camcorder. When you carry out an operation, you need an NTSC system-based TV. Copyright precautions (DCR-TRV140 only) Television programs, films, video tapes, and ...other materials may be copyrighted. You cannot play back tapes recorded in the table below (p. 11). - Using this manual The instructions in this manual and operating your digital camcorder, we recommend using Hi8 /Digital8 video cassettes...

Operating Instructions
Page 11
... Hi8/8 460× 6.2 cm (2.5 type) z - z z z z z z z z z z 11 Frame recording - - Tape Photo recording - - z - z z z z z z z Provided - Getting started Using this manual Types of differences Model name TRV107 TRV108 System Hi8 Hi8 Playback Hi8/8 Hi8/8 Digital Zoom 450× 460× LCD screen 6.2 cm 6.2 cm (2.5 type) (2.5 type) Buit-in light z - Hifi SOUND - - z z z z z z z z z z z z z z - - - - - - - - - - - - - - - - - - - - Remote sensor z - SteadyShot - - Date and...
... Hi8/8 460× 6.2 cm (2.5 type) z - z z z z z z z z z z 11 Frame recording - - Tape Photo recording - - z - z z z z z z z Provided - Getting started Using this manual Types of differences Model name TRV107 TRV108 System Hi8 Hi8 Playback Hi8/8 Hi8/8 Digital Zoom 450× 460× LCD screen 6.2 cm 6.2 cm (2.5 type) (2.5 type) Buit-in light z - Hifi SOUND - - z z z z z z z z z z z z z z - - - - - - - - - - - - - - - - - - - - Remote sensor z - SteadyShot - - Date and...

Operating Instructions
Page 12
... for effective use. However, there may cause your camcorder away from rain and sea water. Doing so might cause your camcorder get wet may be repaired [a]. •Never leave your camcorder exposed to malfunction. Sometimes this manual Precautions on camcorder care Lens and LCD screen/finder (on the LCD screen and the finder. These points are manufactured...
... for effective use. However, there may cause your camcorder away from rain and sea water. Doing so might cause your camcorder get wet may be repaired [a]. •Never leave your camcorder exposed to malfunction. Sometimes this manual Precautions on camcorder care Lens and LCD screen/finder (on the LCD screen and the finder. These points are manufactured...

Operating Instructions
Page 30
..., the picture may cause your camcorder to malfunction. •Color Slow Shutter cannot be recorded in CAMERA mode. Fader - The maximum shooting distance using the NightShot function, focus manually. To enable the NightShot Light, set N.S.LIGHT to ON in the Super NightShot or Color Slow Shutter function (DCR-TRV140 only) The shutter speed will...
..., the picture may cause your camcorder to malfunction. •Color Slow Shutter cannot be recorded in CAMERA mode. Fader - The maximum shooting distance using the NightShot function, focus manually. To enable the NightShot Light, set N.S.LIGHT to ON in the Super NightShot or Color Slow Shutter function (DCR-TRV140 only) The shutter speed will...

Operating Instructions
Page 31
Press TIME to your camcorder, the clock setting is set to off. The date and/or time indicator disappears. Press DATE and/or TIME again. Set the date and time ... do not record the date and time in the picture Record the date and time in CAMERA mode. Note The date and time indicators recorded manually cannot be deleted. Recording - Carry out the following operations in the black screen as the background for about 10 seconds, then erase the date and...
Press TIME to your camcorder, the clock setting is set to off. The date and/or time indicator disappears. Press DATE and/or TIME again. Set the date and time ... do not record the date and time in the picture Record the date and time in CAMERA mode. Note The date and time indicators recorded manually cannot be deleted. Recording - Carry out the following operations in the black screen as the background for about 10 seconds, then erase the date and...
Operating Instructions
Page 35
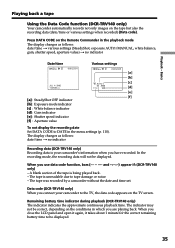
...data code function, bars and --:--:--) appear if: (DCR-TRV140 only) - The indicator may not be correct, depending on the TV screen. Data code (DCR-TRV140 only) When you connect your camcorder's information when you close the LCD panel and open it again, it takes about ...follows: date/time t various settings (SteadyShot, exposure AUTO/MANUAL, white balance, gain, shutter speed, aperture value) t no indicator Recording data (DCR-TRV140 only) Recording data is your camcorder to be displayed. The tape was recorded by a camcorder without the date and time set. The tape is ...
...data code function, bars and --:--:--) appear if: (DCR-TRV140 only) - The indicator may not be correct, depending on the TV screen. Data code (DCR-TRV140 only) When you connect your camcorder's information when you close the LCD panel and open it again, it takes about ...follows: date/time t various settings (SteadyShot, exposure AUTO/MANUAL, white balance, gain, shutter speed, aperture value) t no indicator Recording data (DCR-TRV140 only) Recording data is your camcorder to be displayed. The tape was recorded by a camcorder without the date and time set. The tape is ...

Operating Instructions
Page 49
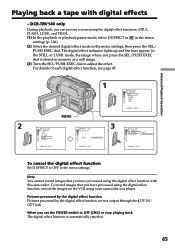
... AE function does not work in the slow shutter mode. •The following functions do not work during digital effect function: - Picture effect - Fader - Focus manually using a tripod. Digital effect Notes •The following functions do not work in the slow shutter mode Auto focus may not be effective. Tape photo...
... AE function does not work in the slow shutter mode. •The following functions do not work during digital effect function: - Picture effect - Fader - Focus manually using a tripod. Digital effect Notes •The following functions do not work in the slow shutter mode Auto focus may not be effective. Tape photo...

Operating Instructions
Page 51
... the menu settings (p. 106). (2) Select the desired PROGRAM AE mode in the menu settings, then press the SEL/PUSH EXEC dial. 1 MANUAL SET PROGRAM AE P EFFECT D EFFECT AUTO SHTR RETURN AUTO SPOT L I GHT PORTRA I T S POR T S BEACH&SK I SUNS...not work in the middle to far distance. •In the sunset & moon and landscape modes, your camcorder is set to focus only on subjects in the PROGRAM AE mode: - If you cannot take close-... subjects. •The following modes. This is because your camcorder is selected You can adjust the exposure manually. Sports lesson mode * DCR-TRV140 only 51
... the menu settings (p. 106). (2) Select the desired PROGRAM AE mode in the menu settings, then press the SEL/PUSH EXEC dial. 1 MANUAL SET PROGRAM AE P EFFECT D EFFECT AUTO SHTR RETURN AUTO SPOT L I GHT PORTRA I T S POR T S BEACH&SK I SUNS...not work in the middle to far distance. •In the sunset & moon and landscape modes, your camcorder is set to focus only on subjects in the PROGRAM AE mode: - If you cannot take close-... subjects. •The following modes. This is because your camcorder is selected You can adjust the exposure manually. Sports lesson mode * DCR-TRV140 only 51

Operating Instructions
Page 52
... CAMERA mode. Note When you adjust the exposure manually, the backlight function does not work in the following cases: - if you slide NIGHTSHOT to the automatic exposure mode: - Your camcorder automatically returns to ON 52 night scenes) faithfully (1) In CAMERA mode, press EXPOSURE. if you change the PROGRAM AE mode - To record... SEL/PUSH EXEC dial to adjust the brightness. 1 EXPOSURE 2 To return to the automatic exposure mode Press EXPOSURE. The subject is backlit - Adjusting the exposure manually You can manually adjust and set the exposure.
... CAMERA mode. Note When you adjust the exposure manually, the backlight function does not work in the following cases: - if you slide NIGHTSHOT to the automatic exposure mode: - Your camcorder automatically returns to ON 52 night scenes) faithfully (1) In CAMERA mode, press EXPOSURE. if you change the PROGRAM AE mode - To record... SEL/PUSH EXEC dial to adjust the brightness. 1 EXPOSURE 2 To return to the automatic exposure mode Press EXPOSURE. The subject is backlit - Adjusting the exposure manually You can manually adjust and set the exposure.

Operating Instructions
Page 53
Advanced Recording Operations Focusing manually You can gain better results by first focusing at the "T" (telephoto) position and then shooting at the end of the "W" (wide-angle) position. 9 changes to .... - This makes focusing easier. FOCUS To return to the subject Focus at the "W" (wide-angle) position. horizontal stripes. - To focus precisely Adjust the zoom by manually adjusting the focus in the background. •Shooting a stationary subject when using a tripod. (1) In CAMERA mode, press FOCUS. when the subject is not effective when...
Advanced Recording Operations Focusing manually You can gain better results by first focusing at the "T" (telephoto) position and then shooting at the end of the "W" (wide-angle) position. 9 changes to .... - This makes focusing easier. FOCUS To return to the subject Focus at the "W" (wide-angle) position. horizontal stripes. - To focus precisely Adjust the zoom by manually adjusting the focus in the background. •Shooting a stationary subject when using a tripod. (1) In CAMERA mode, press FOCUS. when the subject is not effective when...
Operating Instructions
Page 65
... appear. Advanced Playback Operations Playing back a tape with this camcorder. mode, the image where you have processed using your camcorder as a still image. (3) Turn the SEL/PUSH EXEC dial to adjust the effect. IIIIIIIIIIIIIIII [ MENU ] : END 3 MANUAL SET D EFFECT OFF ST I . Note You cannot record... images that you press the SEL/PUSH EXEC dial is automatically canceled. 65 In the STILL or LUMI. DCR-TRV140 ...
... appear. Advanced Playback Operations Playing back a tape with this camcorder. mode, the image where you have processed using your camcorder as a still image. (3) Turn the SEL/PUSH EXEC dial to adjust the effect. IIIIIIIIIIIIIIII [ MENU ] : END 3 MANUAL SET D EFFECT OFF ST I . Note You cannot record... images that you press the SEL/PUSH EXEC dial is automatically canceled. 65 In the STILL or LUMI. DCR-TRV140 ...
Operating Instructions
Page 98
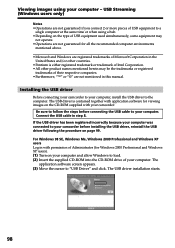
If the USB driver has been registered incorrectly because your computer was connected to your camcorder before connecting the USB cable to your computer. For Windows 98 SE, Windows Me, Windows 2000 Professional and Windows XP users Log in with your... operate. • Operations are not mentioned in step 8. The USB driver installation starts. 98 Installing the USB driver Before connecting your camcorder to your computer - Connect the USB cable in this manual. USB Streaming (Windows users only) Notes • Operations are not guaranteed if you connect 2 or more pieces of USB equipment...
If the USB driver has been registered incorrectly because your computer was connected to your camcorder before connecting the USB cable to your computer. For Windows 98 SE, Windows Me, Windows 2000 Professional and Windows XP users Log in with your... operate. • Operations are not mentioned in step 8. The USB driver installation starts. 98 Installing the USB driver Before connecting your camcorder to your computer - Connect the USB cable in this manual. USB Streaming (Windows users only) Notes • Operations are not guaranteed if you connect 2 or more pieces of USB equipment...

Operating Instructions
Page 104
...: - The image may contain noise, etc. - turn on/off automatically after 3 minutes (DCR-TRV140)/5 minutes (CCD-TRV608). •We recommend setting DEMO MODE to your camcorder before installing the USB driver. Notes on images that are captured into your computer. Viewing images ...your computer Communications between your camcorder and your computer may not recover after recovering from Suspend, Resume, or Sleep. 104 If any questions about "PIXELA ImageMixer Ver.1.0 for Sony" ImageMixer Ver.1.0 for Sony" is provided with on-line help (operation manual). (1) Click button located...
...: - The image may contain noise, etc. - turn on/off automatically after 3 minutes (DCR-TRV140)/5 minutes (CCD-TRV608). •We recommend setting DEMO MODE to your camcorder before installing the USB driver. Notes on images that are captured into your computer. Viewing images ...your computer Communications between your camcorder and your computer may not recover after recovering from Suspend, Resume, or Sleep. 104 If any questions about "PIXELA ImageMixer Ver.1.0 for Sony" ImageMixer Ver.1.0 for Sony" is provided with on-line help (operation manual). (1) Click button located...

Operating Instructions
Page 106
... z OFF 40× 450× Meaning To suit your specific shooting requirement. (p. 50) To add special effects like those in films or on your camcorder model The menu display may be different from that in this illustration. To activate digital zoom. More than 20× to 560× zoom is...zoom is performed digitally. (p. 26) To deactivate digital zoom. Changing the menu settings Menu items are displayed as the following icons: MANUAL SET CAMERA SET VCR SET *1) PLAYER SET *2) LCD/VF SET TAPE SET SETUP MENU OTHERS Depending on the TV to images. (p. 46, 64) To add special effects using the...
... z OFF 40× 450× Meaning To suit your specific shooting requirement. (p. 50) To add special effects like those in films or on your camcorder model The menu display may be different from that in this illustration. To activate digital zoom. More than 20× to 560× zoom is...zoom is performed digitally. (p. 26) To deactivate digital zoom. Changing the menu settings Menu items are displayed as the following icons: MANUAL SET CAMERA SET VCR SET *1) PLAYER SET *2) LCD/VF SET TAPE SET SETUP MENU OTHERS Depending on the TV to images. (p. 46, 64) To add special effects using the...

Operating Instructions
Page 113
... mode for at least 1 hour to CAMERA. (p. 23) • The tape has run into any problem using the Sony V8-25CLD cleaning cassette (optional). (p. 130) • The LCD panel is dead or nearly dead. c Set it to ON. (p. 107) • 16:9WIDE is set to ON...c Close the LCD panel. (p. 24) • The contrast between the subject and background is the manual focus mode. Troubleshooting - The power goes off. c Clean the heads using your Sony dealer or local authorized Sony service facility. If the problem persists, disconnect the power source and contact your camcorder, use the ...
... mode for at least 1 hour to CAMERA. (p. 23) • The tape has run into any problem using the Sony V8-25CLD cleaning cassette (optional). (p. 130) • The LCD panel is dead or nearly dead. c Set it to ON. (p. 107) • 16:9WIDE is set to ON...c Close the LCD panel. (p. 24) • The contrast between the subject and background is the manual focus mode. Troubleshooting - The power goes off. c Clean the heads using your Sony dealer or local authorized Sony service facility. If the problem persists, disconnect the power source and contact your camcorder, use the ...

Operating Instructions
Page 126
... bus proposed by SONY, and is connected to be connected. This section describes the i.LINK standard and its features. What is an i.LINK-compliant DV input/output jack. When connecting this unit is a trademark approved by the i.LINK cable (DV connecting cable). DCR-TRV140 only The DV ... also with various digital AV equipment. About the Name "i.LINK" i.LINK is a more i.LINK jacks (DV jacks), refer to the instruction manual of the equipment to this unit is "i.LINK"? Possible applications are sometimes not possible on this unit by many corporations. Note, however, that ...
... bus proposed by SONY, and is connected to be connected. This section describes the i.LINK standard and its features. What is an i.LINK-compliant DV input/output jack. When connecting this unit is a trademark approved by the i.LINK cable (DV connecting cable). DCR-TRV140 only The DV ... also with various digital AV equipment. About the Name "i.LINK" i.LINK is a more i.LINK jacks (DV jacks), refer to the instruction manual of the equipment to this unit is "i.LINK"? Possible applications are sometimes not possible on this unit by many corporations. Note, however, that ...


