

Operating Instructions
Page 2
WARNING To prevent fire or shock hazard, do not expose the unit to use. Welcome! Your Digital Handycam/Handycam VisionTM is loaded with advanced features, but at the same time it is intended to alert the user to the presence...such as in a car parked in the literature accompanying the appliance. Never expose the battery pack to constitute a risk of this Sony Digital Handycam camcorder/Handycam VisionTM . With your Digital Handycam/Handycam VisionTM, you can help preserve our environment by returning your purchase of electric shock to the presence of rechargeable batteries, ...
WARNING To prevent fire or shock hazard, do not expose the unit to use. Welcome! Your Digital Handycam/Handycam VisionTM is loaded with advanced features, but at the same time it is intended to alert the user to the presence...such as in a car parked in the literature accompanying the appliance. Never expose the battery pack to constitute a risk of this Sony Digital Handycam camcorder/Handycam VisionTM . With your Digital Handycam/Handycam VisionTM, you can help preserve our environment by returning your purchase of electric shock to the presence of rechargeable batteries, ...
Operating Instructions
Page 4
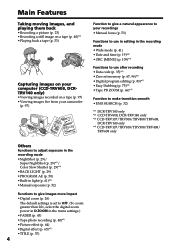
... your computer (CCD-TRV608, DCRTRV140 only) •Viewing images recorded on a tape (p. 97) •Viewing images live from your camcorder (p. 97) Function to give a natural appearance to your recordings •Manual focus (p. 53) Functions to use in editing in the...memory (p. 67, 96)*1) • Digital program editing (p. 83)*1) • Easy Dubbing (p. 75)*4) • Tape PB ZOOM (p. 66)*1) Function to make transition smooth •END SEARCH (p. 32) *1) DCR-TRV140 only *2) CCD-TRV608, DCR-TRV140 only *3) CCD-TRV107/TRV308/TRV408/TRV608, DCR-TRV140 only *4) CCD-TRV107/TRV108/TRV308/TRV408/...
... your computer (CCD-TRV608, DCRTRV140 only) •Viewing images recorded on a tape (p. 97) •Viewing images live from your camcorder (p. 97) Function to give a natural appearance to your recordings •Manual focus (p. 53) Functions to use in editing in the...memory (p. 67, 96)*1) • Digital program editing (p. 83)*1) • Easy Dubbing (p. 75)*4) • Tape PB ZOOM (p. 66)*1) Function to make transition smooth •END SEARCH (p. 32) *1) DCR-TRV140 only *2) CCD-TRV608, DCR-TRV140 only *3) CCD-TRV107/TRV308/TRV408/TRV608, DCR-TRV140 only *4) CCD-TRV107/TRV108/TRV308/TRV408/...
Operating Instructions
Page 7
... parts and controls .... 136 Index 144 7 USB Streaming (Windows users only 97 Customizing Your Camcorder Changing the menu settings 105 Troubleshooting Types of contents Editing Dubbing a tape 72 Dubbing a tape easily - Digital program editing (DCR-TRV140 only 83 Recording from video (DCR-TRV140 only 93 Inserting a scene from a VCR - Table of trouble and their solutions 113...
... parts and controls .... 136 Index 144 7 USB Streaming (Windows users only 97 Customizing Your Camcorder Changing the menu settings 105 Troubleshooting Types of contents Editing Dubbing a tape 72 Dubbing a tape easily - Digital program editing (DCR-TRV140 only 83 Recording from video (DCR-TRV140 only 93 Inserting a scene from a VCR - Table of trouble and their solutions 113...
Operating Instructions
Page 10
... in the Hi8 /standard 8 (analog) system. Copyright precautions (DCR-TRV140 only) Television programs, films, video tapes, and other materials may be copyrighted. To view your recordings on your digital camcorder, we recommend using Hi8 /Digital8 video cassettes. Otherwise, the model name is the model used for example, "DCR-TRV140 only." Getting started - Before you need an NTSC...
... in the Hi8 /standard 8 (analog) system. Copyright precautions (DCR-TRV140 only) Television programs, films, video tapes, and other materials may be copyrighted. To view your recordings on your digital camcorder, we recommend using Hi8 /Digital8 video cassettes. Otherwise, the model name is the model used for example, "DCR-TRV140 only." Getting started - Before you need an NTSC...

Operating Instructions
Page 26
...the digital W T zooming zone. To activate digital zoom, select the digital zoom power in D ZOOM in better-looking recordings. The digital zooming zone appears when you select the digital zoom power in D ZOOM in light accidentally. After using your camcorder (CCD-TRV107/TRV308/TRV408/TRV608, DCR-TRV140 only)...106). Move it further for a slower zoom. The digital zoom function is set to avoid turning on the built-in the menu settings. 26 Recording a picture After recording (1) Set the POWER switch to OFF (CHG). (2) Close the LCD panel. (3) Eject the cassette. (4) Attach the ...
...the digital W T zooming zone. To activate digital zoom, select the digital zoom power in D ZOOM in better-looking recordings. The digital zooming zone appears when you select the digital zoom power in D ZOOM in light accidentally. After using your camcorder (CCD-TRV107/TRV308/TRV408/TRV608, DCR-TRV140 only)...106). Move it further for a slower zoom. The digital zoom function is set to avoid turning on the built-in the menu settings. 26 Recording a picture After recording (1) Set the POWER switch to OFF (CHG). (2) Close the LCD panel. (3) Eject the cassette. (4) Attach the ...

Operating Instructions
Page 30
and "SUPER NIGHTSHOT" indicators flash on . While using the NightShot function, focus manually. Fader - Digital effect - The maximum shooting distance using the Super NightShot function or the Color Slow Shutter function, you cannot use the NightShot function ... feet). 30 Recording a picture Using the Super NightShot (DCR-TRV140 only) The Super NightShot mode makes subjects up to 16 times brighter than those recorded in the NightShot mode. (1) Slide NIGHTSHOT to ON in normal recording, the picture may cause your camcorder to malfunction. •Color Slow Shutter cannot be used in...
and "SUPER NIGHTSHOT" indicators flash on . While using the NightShot function, focus manually. Fader - Digital effect - The maximum shooting distance using the Super NightShot function or the Color Slow Shutter function, you cannot use the NightShot function ... feet). 30 Recording a picture Using the Super NightShot (DCR-TRV140 only) The Super NightShot mode makes subjects up to 16 times brighter than those recorded in the NightShot mode. (1) Slide NIGHTSHOT to ON in normal recording, the picture may cause your camcorder to malfunction. •Color Slow Shutter cannot be used in...

Operating Instructions
Page 40
...photo recording function during those seven seconds is recorded for about 765 images in the SP mode and about 7 seconds, and your camcorder. Press PHOTO deeper. DCR-TRV140 only You can record for 60 minutes in the SP mode. (1) In the standby mode, keep pressing PHOTO lightly until recording ... seconds. You can record about 510 images in the LP mode on the Remote Commander. while the digital effect function is in use . •When recording a still image, do not shake your camcorder returns to the standby mode. During the 7 seconds to record an image such as a photograph. ...
...photo recording function during those seven seconds is recorded for about 765 images in the SP mode and about 7 seconds, and your camcorder. Press PHOTO deeper. DCR-TRV140 only You can record for 60 minutes in the SP mode. (1) In the standby mode, keep pressing PHOTO lightly until recording ... seconds. You can record about 510 images in the LP mode on the Remote Commander. while the digital effect function is in use . •When recording a still image, do not shake your camcorder returns to the standby mode. During the 7 seconds to record an image such as a photograph. ...
Operating Instructions
Page 45
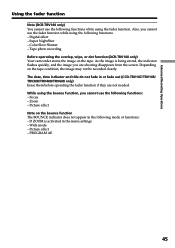
... use the fader function while using the bounce function, you are not needed. Tape photo recording Before operating the overlap, wipe, or dot function (DCR-TRV140 only) Your camcorder stores the image on the tape condition, the image may not be recorded clearly. While using the following functions: - Focus - D ZOOM is...Wide mode - Depending on the tape. Zoom - As the image is activated in the menu settings - Advanced Recording Operations Using the fader function Note (DCR-TRV140 only) You cannot use the following functions: - Digital effect - Picture effect - PROGRAM AE 45
... use the fader function while using the bounce function, you are not needed. Tape photo recording Before operating the overlap, wipe, or dot function (DCR-TRV140 only) Your camcorder stores the image on the tape condition, the image may not be recorded clearly. While using the following functions: - Focus - D ZOOM is...Wide mode - Depending on the tape. Zoom - As the image is activated in the menu settings - Advanced Recording Operations Using the fader function Note (DCR-TRV140 only) You cannot use the following functions: - Digital effect - Picture effect - PROGRAM AE 45
Operating Instructions
Page 46
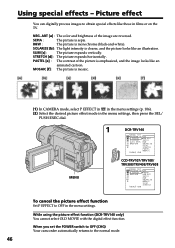
... contrast of the image are reversed. MENU 1 DCR-TRV140 MANUA L SET PROGRAM AE OFF P EFFECT NEG. STRETCH [d] : The picture expands horizontally. While using the picture effect function (DCR-TRV140 only) You cannot select OLD MOVIE with the digital effect function. ART [a] : The color and brightness...picture is clearer, and the picture looks like those in films or on the TV. When you set the POWER switch to OFF (CHG) Your camcorder automatically returns to obtain special effects like an illustration. Using special effects - AR T D EFFECT SEP I A AUTO SHTR B&W RETURN SOL AR...
... contrast of the image are reversed. MENU 1 DCR-TRV140 MANUA L SET PROGRAM AE OFF P EFFECT NEG. STRETCH [d] : The picture expands horizontally. While using the picture effect function (DCR-TRV140 only) You cannot select OLD MOVIE with the digital effect function. ART [a] : The color and brightness...picture is clearer, and the picture looks like those in films or on the TV. When you set the POWER switch to OFF (CHG) Your camcorder automatically returns to obtain special effects like an illustration. Using special effects - AR T D EFFECT SEP I A AUTO SHTR B&W RETURN SOL AR...
Operating Instructions
Page 47
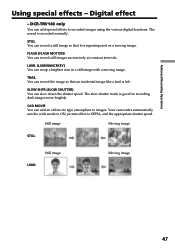
...speed. Your camcorder automatically sets the wide mode to ON, picture effect to recorded images using the various digital functions. SLOW SHTR (SLOW SHUTTER) You can record still images successively at constant intervals. Still image Moving image STILL Still image LUMI. DCR-TRV140 only You ...can add an old movie type atmosphere to images. OLD MOVIE You can add special effects to SEPIA, and the appropriate shutter speed. Advanced Recording Operations Using special effects - Moving image 47 Digital effect - The slow shutter...
...speed. Your camcorder automatically sets the wide mode to ON, picture effect to recorded images using the various digital functions. SLOW SHTR (SLOW SHUTTER) You can record still images successively at constant intervals. Still image Moving image STILL Still image LUMI. DCR-TRV140 only You ...can add an old movie type atmosphere to images. OLD MOVIE You can add special effects to SEPIA, and the appropriate shutter speed. Advanced Recording Operations Using special effects - Moving image 47 Digital effect - The slow shutter...
Operating Instructions
Page 65
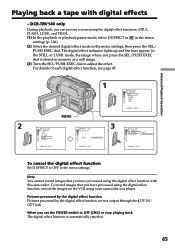
...press the SEL/PUSH EXEC dial is automatically canceled. 65 To record images that you have processed using the digital effect function, record the images on the VCR using your camcorder as a still image. (3) Turn the SEL/PUSH EXEC dial to OFF in the menu settings, then... indicator lights up and the bars appear. For details of each digital effect function, see page 47. 2 1 MANUAL SET D EFFECT OFF ST I . In the STILL or LUMI. DCR-TRV140 only During playback, you have processed using the digital effect functions: STILL, FLASH, LUMI., and TRAIL. (1) In the playback or ...
...press the SEL/PUSH EXEC dial is automatically canceled. 65 To record images that you have processed using the digital effect function, record the images on the VCR using your camcorder as a still image. (3) Turn the SEL/PUSH EXEC dial to OFF in the menu settings, then... indicator lights up and the bars appear. For details of each digital effect function, see page 47. 2 1 MANUAL SET D EFFECT OFF ST I . In the STILL or LUMI. DCR-TRV140 only During playback, you have processed using the digital effect functions: STILL, FLASH, LUMI., and TRAIL. (1) In the playback or ...

Operating Instructions
Page 74
...want to record over) into the VCR, and insert the recorded tape into your camcorder and the VCR. Refer to the operating instructions of the DV products. The following functions do not work during digital editing : - Digital effect - You cannot dub the screen indicators. (1) Insert a blank tape (... cable) (DCR-TRV140 only) Simply connect the i.LINK cable (DV connecting cable) (optional) to DV IN/OUT and to DV IN of your VCR for more information. (3) Set the POWER switch to VCR. (4) Play back the recorded tape on your camcorder. (5) Start recording on both your camcorder. (2) Set...
...want to record over) into the VCR, and insert the recorded tape into your camcorder and the VCR. Refer to the operating instructions of the DV products. The following functions do not work during digital editing : - Digital effect - You cannot dub the screen indicators. (1) Insert a blank tape (... cable) (DCR-TRV140 only) Simply connect the i.LINK cable (DV connecting cable) (optional) to DV IN/OUT and to DV IN of your VCR for more information. (3) Set the POWER switch to VCR. (4) Play back the recorded tape on your camcorder. (5) Start recording on both your camcorder. (2) Set...
Operating Instructions
Page 84
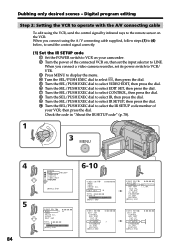
...[ MENU ] : END V I DEO ED I T ED I R TEST RETURN [ MENU ] : END 0:00:00:00 3 I N" "CUT-OUT" I R SETUP PAUSEMODE I T SET CONTROL ADJ TEST "CUT- Digital program editing Step 2: Setting the VCR to operate with the A/V connecting cable To edit using the A/V connecting cable supplied, follow steps (1) to (4) below, to send... the control signal correctly. (1) Set the IR SETUP code 1 Set the POWER switch to select the IR SETUP code number of your camcorder. 2 Turn the power of the connected VCR on the VCR. When you connect using the VCR, send the control signal by infrared rays ...
...[ MENU ] : END V I DEO ED I T ED I R TEST RETURN [ MENU ] : END 0:00:00:00 3 I N" "CUT-OUT" I R SETUP PAUSEMODE I T SET CONTROL ADJ TEST "CUT- Digital program editing Step 2: Setting the VCR to operate with the A/V connecting cable To edit using the A/V connecting cable supplied, follow steps (1) to (4) below, to send... the control signal correctly. (1) Set the IR SETUP code 1 Set the POWER switch to select the IR SETUP code number of your camcorder. 2 Turn the power of the connected VCR on the VCR. When you connect using the VCR, send the control signal by infrared rays ...
Operating Instructions
Page 85
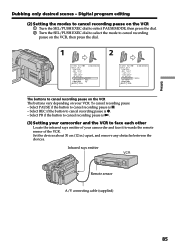
... pause on the VCR The buttons vary depending on your VCR. Select PAUSE if the button to cancel recording pause is N. (3) Setting your camcorder and face it towards the remote sensor of the VCR. Set the devices about 30 cm (12 in.) apart, and remove any obstacles between...VCR to cancel recording pause is X. - I N " " CUT-OUT " I R SETUP P AUS EMODE I T SET CONTROL ADJ TEST " CUT- Editing Dubbing only desired scenes - Digital program editing (2) Setting the modes to cancel recording pause on the VCR, then press the dial. 1 2 V I DEO ED I T ED I T SET CONTROL ADJ TEST " CUT-...
... pause on the VCR The buttons vary depending on your VCR. Select PAUSE if the button to cancel recording pause is N. (3) Setting your camcorder and face it towards the remote sensor of the VCR. Set the devices about 30 cm (12 in.) apart, and remove any obstacles between...VCR to cancel recording pause is X. - I N " " CUT-OUT " I R SETUP P AUS EMODE I T SET CONTROL ADJ TEST " CUT- Editing Dubbing only desired scenes - Digital program editing (2) Setting the modes to cancel recording pause on the VCR, then press the dial. 1 2 V I DEO ED I T ED I T SET CONTROL ADJ TEST " CUT-...
Operating Instructions
Page 86
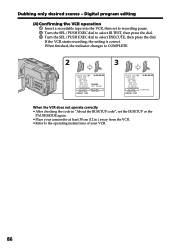
Digital program editing (4) Confirming the VCR operation 1 Insert a recordable tape into the VCR, then set the IR SETUP or the PAUSEMODE again. •Place your camcorder at least 30 cm (12 in.) away from the VCR. •Refer to the operating instructions of your VCR. 86 I N" "CUT-OUT" I R SETUP PAUSEMODE I R TEST ...
Digital program editing (4) Confirming the VCR operation 1 Insert a recordable tape into the VCR, then set the IR SETUP or the PAUSEMODE again. •Place your camcorder at least 30 cm (12 in.) away from the VCR. •Refer to the operating instructions of your VCR. 86 I N" "CUT-OUT" I R SETUP PAUSEMODE I R TEST ...
Operating Instructions
Page 87
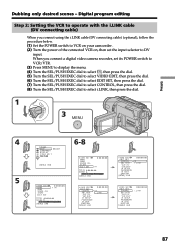
...When you connect using the i.LINK cable (DV connecting cable) (optional), follow the procedure below. (1) Set the POWER switch to VCR on your camcorder . (2) Turn the power of the connected VCR on, then set its POWER switch to VCR/VTR. (3) Press MENU to display the menu. ...I T SET CONTROL ADJ TEST "CUT- L I NK V I DEO ED I T ED I T SET CONTROL ADJ TEST "CUT- Digital program editing Step 2: Setting the VCR to operate with the i.LINK cable (DV connecting cable) When you connect a digital video camera recorder, set the input selector to select i.LINK, then press the dial. 1 POWER RA...
...When you connect using the i.LINK cable (DV connecting cable) (optional), follow the procedure below. (1) Set the POWER switch to VCR on your camcorder . (2) Turn the power of the connected VCR on, then set its POWER switch to VCR/VTR. (3) Press MENU to display the menu. ...I T SET CONTROL ADJ TEST "CUT- L I NK V I DEO ED I T ED I T SET CONTROL ADJ TEST "CUT- Digital program editing Step 2: Setting the VCR to operate with the i.LINK cable (DV connecting cable) When you connect a digital video camera recorder, set the input selector to select i.LINK, then press the dial. 1 POWER RA...

Operating Instructions
Page 88
.../PUSH EXEC dial to select the average numerical value of all the closing numerical values for each to select the average numerical value of your camcorder. (1) Set the POWER switch to recording pause. When finished, the indicator changes to COMPLETE. (9) Rewind the tape in CONTROL, you want to record...dial to select "CUT-OUT", then press the dial. (14) Turn the SEL/PUSH EXEC dial to select EXECUTE, then press the dial. Digital program editing Step 3: Adjusting the synchronization of the VCR You can adjust the synchronization of IN, then press the dial. The calculated stop position ...
.../PUSH EXEC dial to select the average numerical value of all the closing numerical values for each to select the average numerical value of your camcorder. (1) Set the POWER switch to recording pause. When finished, the indicator changes to COMPLETE. (9) Rewind the tape in CONTROL, you want to record...dial to select "CUT-OUT", then press the dial. (14) Turn the SEL/PUSH EXEC dial to select EXECUTE, then press the dial. Digital program editing Step 3: Adjusting the synchronization of the VCR You can adjust the synchronization of IN, then press the dial. The calculated stop position ...

Operating Instructions
Page 89
...- I N " " CUT-OUT " I R SETUP P AUS EMODE I R TEST RETURN [ MENU ] : END 0:00:00:00 0 V I DEO ED I T ED I T SET CONTROL ADJ TEST RETURN " CUT- Digital program editing 11 7,8 V I DEO ED I T 0:00:00:00 ED I T SET CONTROL ADJ TEST " CUT- I N " " CUT-OUT " I R SETUP P AUS EMODE I R TEST RETURN [ MENU ] ..., video and audio signals are transmitted in digital format for about 10 seconds of lead before starting the recording. Set CONTROL to IR in the menu settings of your camcorder . •When you complete step 3, the image to allow about 50 seconds. •If you may not ...
...- I N " " CUT-OUT " I R SETUP P AUS EMODE I R TEST RETURN [ MENU ] : END 0:00:00:00 0 V I DEO ED I T ED I T SET CONTROL ADJ TEST RETURN " CUT- Digital program editing 11 7,8 V I DEO ED I T 0:00:00:00 ED I T SET CONTROL ADJ TEST " CUT- I N " " CUT-OUT " I R SETUP P AUS EMODE I R TEST RETURN [ MENU ] ..., video and audio signals are transmitted in digital format for about 10 seconds of lead before starting the recording. Set CONTROL to IR in the menu settings of your camcorder . •When you complete step 3, the image to allow about 50 seconds. •If you may not ...
Operating Instructions
Page 90
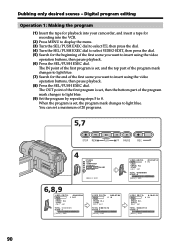
... bottom part of the program mark changes to light blue. (9) Set the program by repeating steps 5 to light blue. Digital program editing Operation 1: Making the program (1) Insert the tape for playback into your camcorder, and insert a tape for recording into the VCR. (2) Press MENU to display the menu. (3) Turn the SEL/PUSH...
... bottom part of the program mark changes to light blue. (9) Set the program by repeating steps 5 to light blue. Digital program editing Operation 1: Making the program (1) Insert the tape for playback into your camcorder, and insert a tape for recording into the VCR. (2) Press MENU to display the menu. (3) Turn the SEL/PUSH...

Operating Instructions
Page 91
... camera recorder, set program mark flashes. (2) Turn the SEL/PUSH EXEC dial to select EXECUTE, then press the dial. Operation 2: Performing Digital program editing (Dubbing a tape) Make sure that your camcorder and VCR stop automatically. 91 The program mark flashes. Editing Dubbing only desired scenes - This procedure is canceled. On a blank portion...
... camera recorder, set program mark flashes. (2) Turn the SEL/PUSH EXEC dial to select EXECUTE, then press the dial. Operation 2: Performing Digital program editing (Dubbing a tape) Make sure that your camcorder and VCR stop automatically. 91 The program mark flashes. Editing Dubbing only desired scenes - This procedure is canceled. On a blank portion...


