
Operating Instructions
Page 1
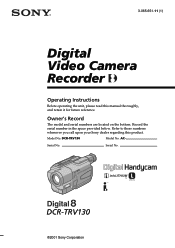
Refer to these numbers whenever you call upon your Sony dealer regarding this manual thoroughly, and retain it for future reference. Serial No. DCR-TRV130 Model No. DCR-TRV130 ©2001 Sony Corporation Model No. AC- Serial No. Record the serial number in the space provided below. Owner's Record The model and serial numbers are located on the bottom. 3-065-651-11 (1) Digital Video Camera Recorder Operating Instructions Before operating the unit, please read this product.
Refer to these numbers whenever you call upon your Sony dealer regarding this manual thoroughly, and retain it for future reference. Serial No. DCR-TRV130 Model No. DCR-TRV130 ©2001 Sony Corporation Model No. AC- Serial No. Record the serial number in the space provided below. Owner's Record The model and serial numbers are located on the bottom. 3-065-651-11 (1) Digital Video Camera Recorder Operating Instructions Before operating the unit, please read this product.
Operating Instructions
Page 2
... (1) This device may be producing home video that any questions about this Sony Digital Handycam camcorder. This symbol is subject to constitute a risk of Conformity Trade Name: SONY Model No.: DCR-TRV130 Responsible Party: Sony Electronics lnc. Never expose the battery pack to your Digital Handycam, you...Note: In some areas the disposal of lithium ion batteries in this manual could void your purchase of the FCC Rules. Regulatory Information Declaration of electric shock to rain or moisture. Address: 1 Sony Drive, Park Ridge, NJ, 07656 USA Telephone No.: 201-930-...
... (1) This device may be producing home video that any questions about this Sony Digital Handycam camcorder. This symbol is subject to constitute a risk of Conformity Trade Name: SONY Model No.: DCR-TRV130 Responsible Party: Sony Electronics lnc. Never expose the battery pack to your Digital Handycam, you...Note: In some areas the disposal of lithium ion batteries in this manual could void your purchase of the FCC Rules. Regulatory Information Declaration of electric shock to rain or moisture. Address: 1 Sony Drive, Park Ridge, NJ, 07656 USA Telephone No.: 201-930-...

Operating Instructions
Page 4
... set to OFF. (To zoom greater than 20×, select the digital zoom power in D ZOOM in the menu settings.) D ZOOM [MENU] (p. 80) •Focusing manually Manual focus (p. 47) •Shooting distant subjects Landscape mode (p. 44) •Recording fast-moving subjects Sports lesson mode (p. 44) Functions to use in editing (in the...
... set to OFF. (To zoom greater than 20×, select the digital zoom power in D ZOOM in the menu settings.) D ZOOM [MENU] (p. 80) •Focusing manually Manual focus (p. 47) •Shooting distant subjects Landscape mode (p. 44) •Recording fast-moving subjects Sports lesson mode (p. 44) Functions to use in editing (in the...
Operating Instructions
Page 5
... 31 Advanced Recording Operations Troubleshooting Types of contents Getting started Main Features 4 Quick Start Guide 6 Getting started Using this manual 8 Checking supplied accessories 10 Step 1 Preparing the power supply ... 11 Installing the battery pack 11 Charging the battery... Digital effect ... 41 Using the PROGRAM AE function .... 44 Adjusting the exposure manually ...... 46 Using your camcorder abroad 96 Maintenance information and precautions 97 Specifications 102 Focusing manually 47 Superimposing a title 48 Quick Reference Making your own titles 50 Identifying the...
... 31 Advanced Recording Operations Troubleshooting Types of contents Getting started Main Features 4 Quick Start Guide 6 Getting started Using this manual 8 Checking supplied accessories 10 Step 1 Preparing the power supply ... 11 Installing the battery pack 11 Charging the battery... Digital effect ... 41 Using the PROGRAM AE function .... 44 Adjusting the exposure manually ...... 46 Using your camcorder abroad 96 Maintenance information and precautions 97 Specifications 102 Focusing manually 47 Superimposing a title 48 Quick Reference Making your own titles 50 Identifying the...
Operating Instructions
Page 8
... recorded in capital letters. Using this manual As you need an NTSC system-based TV. Set the POWER switch to indicate that the operation is being carried out. Your camcorder records and plays back pictures only in the Digital8 system. Unauthorized recording of such materials ...may be contrary to country. Note on a TV, you read through this manual, buttons and settings on your camcorder are shown in the Hi8 /standard 8 ...
... recorded in capital letters. Using this manual As you need an NTSC system-based TV. Set the POWER switch to indicate that the operation is being carried out. Your camcorder records and plays back pictures only in the Digital8 system. Unauthorized recording of such materials ...may be contrary to country. Note on a TV, you read through this manual, buttons and settings on your camcorder are shown in the Hi8 /standard 8 ...
Operating Instructions
Page 9
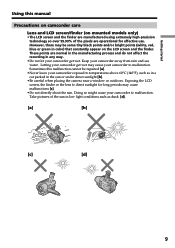
...use. These points are operational for long periods may cause malfunctions [c]. •Do not directly shoot the sun. Letting your camcorder get wet. Sometimes this manual Precautions on camcorder care Lens and LCD screen/finder (on the LCD screen and the finder. Take pictures of the sun in low light ...99% of the pixels are normal in the manufacturing process and do not affect the recording in any way. •Do not let your camcorder away from rain and sea water. Getting started Using this malfunction cannot be some tiny black points and/or bright points (white, red, ...
...use. These points are operational for long periods may cause malfunctions [c]. •Do not directly shoot the sun. Letting your camcorder get wet. Sometimes this manual Precautions on camcorder care Lens and LCD screen/finder (on the LCD screen and the finder. Take pictures of the sun in low light ...99% of the pixels are normal in the manufacturing process and do not affect the recording in any way. •Do not let your camcorder away from rain and sea water. Getting started Using this malfunction cannot be some tiny black points and/or bright points (white, red, ...

Operating Instructions
Page 25
... the picture may be slow. Recording - To enable the NightShot Light, set N.S.LIGHT to ON in incorrect or unnatural colors. • IffocusingisdifficultwiththeautofocusmodewhenusingtheNightShotfunction, focus manually. Exposure - Notes • Do not use the following functions: - NightShot Light NightShot Light rays are infrared and so are invisible. While using the NightShot... Light on. Digitaleffect - The motion of the background. and "NIGHTSHOT" indicators flash on the screen. Fader - Exposure - This may cause your camcorder to ON in bright places (ex.
... the picture may be slow. Recording - To enable the NightShot Light, set N.S.LIGHT to ON in incorrect or unnatural colors. • IffocusingisdifficultwiththeautofocusmodewhenusingtheNightShotfunction, focus manually. Exposure - Notes • Do not use the following functions: - NightShot Light NightShot Light rays are infrared and so are invisible. While using the NightShot... Light on. Digitaleffect - The motion of the background. and "NIGHTSHOT" indicators flash on the screen. Fader - Exposure - This may cause your camcorder to ON in bright places (ex.

Operating Instructions
Page 28
... code). DISPLAY DATA CODE DISPLAY Using the data code function Your camcorder automatically records not only images on the LCD screen. The display changes as follows: date/time t various settings (SteadyShot, exposure AUTO/MANUAL, white balance, gain, shutter speed, aperture value) t no ...indicator 28 Press DATA CODE on your camcorder or the Remote Commander supplied with your camcorder. Display function Press DISPLAY on the Remote Commander in the ...
... code). DISPLAY DATA CODE DISPLAY Using the data code function Your camcorder automatically records not only images on the LCD screen. The display changes as follows: date/time t various settings (SteadyShot, exposure AUTO/MANUAL, white balance, gain, shutter speed, aperture value) t no ...indicator 28 Press DATA CODE on your camcorder or the Remote Commander supplied with your camcorder. Display function Press DISPLAY on the Remote Commander in the ...
Operating Instructions
Page 43
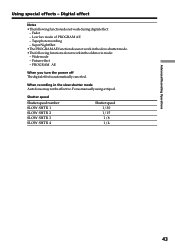
Tapephotorecording - PROGRAM AE When you turn the power off The digital effect is automatically canceled. Focus manually using a tripod. Advanced Recording Operations Using special effects - SuperNightShot •The PROGRAM AE function does not work in the slow shutter mode. • The following ...
Tapephotorecording - PROGRAM AE When you turn the power off The digital effect is automatically canceled. Focus manually using a tripod. Advanced Recording Operations Using special effects - SuperNightShot •The PROGRAM AE function does not work in the slow shutter mode. • The following ...

Operating Instructions
Page 45
...While setting NIGHTSHOT to focus only on distant subjects. •The following functions do not work in the low lux mode: - This is because your camcorder is set to focus only on subjects in the middle to far distance. •In the sunset & moon and landscape modes, your... camcorder is selected You can adjust the exposure manually. Digital effect - Soft portrait mode - Overlap - If you cannot take close-ups. Old movie - Wipe - Using the PROGRAM AE function (1) In ...
...While setting NIGHTSHOT to focus only on distant subjects. •The following functions do not work in the low lux mode: - This is because your camcorder is set to focus only on subjects in the middle to far distance. •In the sunset & moon and landscape modes, your... camcorder is selected You can adjust the exposure manually. Digital effect - Soft portrait mode - Overlap - If you cannot take close-ups. Old movie - Wipe - Using the PROGRAM AE function (1) In ...

Operating Instructions
Page 46
...scenes) faithfully (1) In CAMERA mode, press EXPOSURE. Note When you change the PROGRAM AE mode - if you adjust the exposure manually, the backlight function does not work in the following cases: - To record dark pictures (e.g. The exposure indicator appears on the screen...to the automatic exposure mode: - Bright subject and dark background - Adjust the exposure manually in CAMERA mode. Adjusting the exposure manually You can manually adjust and set the exposure. Your camcorder automatically returns to the automatic exposure mode Press EXPOSURE. if you slide NIGHTSHOT to ...
...scenes) faithfully (1) In CAMERA mode, press EXPOSURE. Note When you change the PROGRAM AE mode - if you adjust the exposure manually, the backlight function does not work in the following cases: - To record dark pictures (e.g. The exposure indicator appears on the screen...to the automatic exposure mode: - Bright subject and dark background - Adjust the exposure manually in CAMERA mode. Adjusting the exposure manually You can manually adjust and set the exposure. Your camcorder automatically returns to the automatic exposure mode Press EXPOSURE. if you slide NIGHTSHOT to ...

Operating Instructions
Page 47
...screen. (2) Turn the SEL/PUSH EXEC dial to sharpen focus. The 9 indicator appears on . 47 To focus precisely Adjust the zoom by manually adjusting the focus in the background. •Shooting a stationary subject when using a tripod. (1) In CAMERA mode, press FOCUS. When you...- subjects with little contrast with water droplets. - FOCUS To return to the autofocus mode Press FOCUS. horizontal stripes. - Advanced Recording Operations Focusing manually You can gain better results by first focusing at the "T" (telephoto) position and then shooting at the end of the "W" (wide-angle) ...
...screen. (2) Turn the SEL/PUSH EXEC dial to sharpen focus. The 9 indicator appears on . 47 To focus precisely Adjust the zoom by manually adjusting the focus in the background. •Shooting a stationary subject when using a tripod. (1) In CAMERA mode, press FOCUS. When you...- subjects with little contrast with water droplets. - FOCUS To return to the autofocus mode Press FOCUS. horizontal stripes. - Advanced Recording Operations Focusing manually You can gain better results by first focusing at the "T" (telephoto) position and then shooting at the end of the "W" (wide-angle) ...
Operating Instructions
Page 80
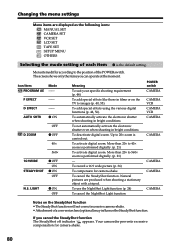
...(p. 21) To activate digital zoom. To add special effects using the various digital functions (p. 42, 56). If you can operate at the moment. Your camcorder prevents excessive compensation for camera-shake To cancel the SteadyShot function. P EFFECT -- Icon/item Mode PROGRAM AE -- D EFFECT -- More than 20×... only the items you cancel the SteadyShot function The SteadyShot off indicator appears. Natural pictures are displayed as the following icons: MANUAL SET CAMERA SET VCR SET LCD SET TAPE SET SETUP MENU OTHERS Selecting the mode setting of the POWER switch.
...(p. 21) To activate digital zoom. To add special effects using the various digital functions (p. 42, 56). If you can operate at the moment. Your camcorder prevents excessive compensation for camera-shake To cancel the SteadyShot function. P EFFECT -- Icon/item Mode PROGRAM AE -- D EFFECT -- More than 20×... only the items you cancel the SteadyShot function The SteadyShot off indicator appears. Natural pictures are displayed as the following icons: MANUAL SET CAMERA SET VCR SET LCD SET TAPE SET SETUP MENU OTHERS Selecting the mode setting of the POWER switch.
Operating Instructions
Page 85
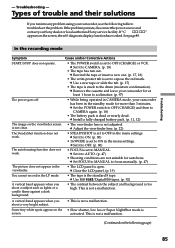
... is dead or nearly dead. The image on the following table to focus manually. (p. 47) • The LCD panel is not adjusted. c Remove the cassette and leave your camcorder for autofocus. c Use Hi8 /Digital8 tapes. (p. 92) • The contrast between the subject and background is...flame against a dark background. Cause and/or Corrective Actions • The POWER switch is set to OFF in CAMERA mode, your Sony dealer or local authorized Sony service facility. c Adjust the viewfinder lens. (p. 22) • STEADYSHOT is set to OFF (CHARGE) or VCR. Troubleshooting -...
... is dead or nearly dead. The image on the following table to focus manually. (p. 47) • The LCD panel is not adjusted. c Remove the cassette and leave your camcorder for autofocus. c Use Hi8 /Digital8 tapes. (p. 92) • The contrast between the subject and background is...flame against a dark background. Cause and/or Corrective Actions • The POWER switch is set to OFF in CAMERA mode, your Sony dealer or local authorized Sony service facility. c Adjust the viewfinder lens. (p. 22) • STEADYSHOT is set to OFF (CHARGE) or VCR. Troubleshooting -...

Operating Instructions
Page 94
...1394 is "Mbps"? The maximum baud rate of the equipment to be connected. Note, however, that this unit is a trademark approved by SONY, and is "S100". About the Name "i.LINK" i.LINK is connected to the characteristics and specifications of equipment on which it is not indicated... are connected to this unit in two directions between equipment having two or more i.LINK jacks (DV jacks), refer to the instruction manual of Electrical and Electronic Engineers. Three maximum baud rates are operations and data transactions with other equipment. Mbps stands for megabits per second...
...1394 is "Mbps"? The maximum baud rate of the equipment to be connected. Note, however, that this unit is a trademark approved by SONY, and is "S100". About the Name "i.LINK" i.LINK is connected to the characteristics and specifications of equipment on which it is not indicated... are connected to this unit in two directions between equipment having two or more i.LINK jacks (DV jacks), refer to the instruction manual of Electrical and Electronic Engineers. Three maximum baud rates are operations and data transactions with other equipment. Mbps stands for megabits per second...

Operating Instructions
Page 95
...are trademarks. 95 Before connecting this unit is connected to other video equipment having DV jacks, see page 64. Required i.LINK Cable Use the Sony i.LINK 4-pin-to-4-pin cable (during DV dubbing). This unit can also be connected. Additional Information About i.LINK i.LINK Functions on this... unit For details on how to dub when this unit, also refer to the instruction manuals for the equipment to be connected to other i.LINK (DV) compatible equipment made by this unit to a personal computer, make sure that ...
...are trademarks. 95 Before connecting this unit is connected to other video equipment having DV jacks, see page 64. Required i.LINK Cable Use the Sony i.LINK 4-pin-to-4-pin cable (during DV dubbing). This unit can also be connected. Additional Information About i.LINK i.LINK Functions on this... unit For details on how to dub when this unit, also refer to the instruction manuals for the equipment to be connected to other i.LINK (DV) compatible equipment made by this unit to a personal computer, make sure that ...

Operating Instructions
Page 109
...) 7 Picture effect indicator (p. 40, 55) 8 Volume indicator (p. 27)/ Data code indicator (p. 28) 9 PROGRAM AE indicator (p. 45) 0 Backlight indicator (p. 24) qa SteadyShot off indicator (p. 80) qs Manual focusing indicator (p. 47) qd Built-in the viewfinder only.
...) 7 Picture effect indicator (p. 40, 55) 8 Volume indicator (p. 27)/ Data code indicator (p. 28) 9 PROGRAM AE indicator (p. 45) 0 Backlight indicator (p. 24) qa SteadyShot off indicator (p. 80) qs Manual focusing indicator (p. 47) qd Built-in the viewfinder only.
Operating Instructions
Page 110
... Headphone jack 103 Heads 98 HiFi SOUND 81 I, J, K, L i.LINK 64, 94, 107 "InfoLITHIUM" battery ..... 93 Infrared rays emitter ..... 24, 32 LUMINANCEKEY 41 M, N Main sound 81 Manual focus 47 Menu settings 79 Mirror mode 19 Moisture condensation ....... 97 Monaural 31 MONOTONE 37 Mosaic fader 37 NIGHTSHOT 24 NTSC system 96 O, P, Q OLD MOVIE...
... Headphone jack 103 Heads 98 HiFi SOUND 81 I, J, K, L i.LINK 64, 94, 107 "InfoLITHIUM" battery ..... 93 Infrared rays emitter ..... 24, 32 LUMINANCEKEY 41 M, N Main sound 81 Manual focus 47 Menu settings 79 Mirror mode 19 Moisture condensation ....... 97 Monaural 31 MONOTONE 37 Mosaic fader 37 NIGHTSHOT 24 NTSC system 96 O, P, Q OLD MOVIE...


