

Operating Instructions
Page 3
... the equipment into an outlet on , the user is connected. - Consult the dealer or an experienced radio/TV technician for a Class B digital device, pursuant to Part 15 of the following measures: - However, there is no guarantee that to which the receiver is encouraged to try to correct the interference by turning...
... the equipment into an outlet on , the user is connected. - Consult the dealer or an experienced radio/TV technician for a Class B digital device, pursuant to Part 15 of the following measures: - However, there is no guarantee that to which the receiver is encouraged to try to correct the interference by turning...
Operating Instructions
Page 5
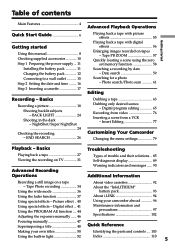
... a wall outlet 15 Step 2 Setting the date and time ........ 16 Step 3 Inserting a cassette 17 Recording - Insert Editing 77 Customizing Your Camcorder Changing the menu settings 79 Playback - Picture effect .. 40 Using special effects - Basics Recording a picture 18 Shooting backlit subjects - Date search ... and precautions 97 Specifications 102 Focusing manually 47 Superimposing a title 48 Quick Reference Making your own titles 50 Identifying the parts and controls .... 103 Using the built-in the dark - Tape Photo recording 34 Using the wide mode 36 About video...
... a wall outlet 15 Step 2 Setting the date and time ........ 16 Step 3 Inserting a cassette 17 Recording - Insert Editing 77 Customizing Your Camcorder Changing the menu settings 79 Playback - Picture effect .. 40 Using special effects - Basics Recording a picture 18 Shooting backlit subjects - Date search ... and precautions 97 Specifications 102 Focusing manually 47 Superimposing a title 48 Quick Reference Making your own titles 50 Identifying the parts and controls .... 103 Using the built-in the dark - Tape Photo recording 34 Using the wide mode 36 About video...
Operating Instructions
Page 12
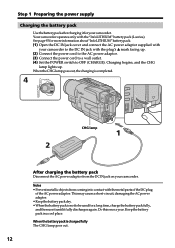
...parts of the DC plug of the AC power adaptor. Do this once a year. See page 93 for more information about "InfoLITHIUM" battery pack. (1) Open the DC IN jack cover and connect the AC power adaptor supplied with your camcorder...mark facing up . Notes • Prevent metallic objects from the DC IN jack on your camcorder. Keep the battery pack in a cool place. Charging begins, and the CHG lamp lights... Connect the power cord to a wall outlet. (4) Set the POWER switch to be used for your camcorder. This may cause a short-circuit, damaging the AC power adaptor. • Keep the battery pack...
...parts of the DC plug of the AC power adaptor. Do this once a year. See page 93 for more information about "InfoLITHIUM" battery pack. (1) Open the DC IN jack cover and connect the AC power adaptor supplied with your camcorder...mark facing up . Notes • Prevent metallic objects from the DC IN jack on your camcorder. Keep the battery pack in a cool place. Charging begins, and the CHG lamp lights... Connect the power cord to a wall outlet. (4) Set the POWER switch to be used for your camcorder. This may cause a short-circuit, damaging the AC power adaptor. • Keep the battery pack...

Operating Instructions
Page 17
...Inserting a cassette We recommend using Hi8 /Digital8 video cassettes. (1) Prepare the power supply (p. 11). (2) Open the lid of the cassette compartment other DCR-TRV130) •The cassette compartment may cause a malfunction. •Your camcorder records pictures in step 3. Doing so ...may not be sure to expose the red mark. 17 If you select the LP mode in the menu settings, 3/4 of indicated time on Hi8 /Digital8 tape. •If you press any part...
...Inserting a cassette We recommend using Hi8 /Digital8 video cassettes. (1) Prepare the power supply (p. 11). (2) Open the lid of the cassette compartment other DCR-TRV130) •The cassette compartment may cause a malfunction. •Your camcorder records pictures in step 3. Doing so ...may not be sure to expose the red mark. 17 If you select the LP mode in the menu settings, 3/4 of indicated time on Hi8 /Digital8 tape. •If you press any part...
Operating Instructions
Page 51
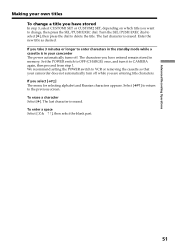
...new title as desired. To enter a space Select [ Z & ? ! ], then select the blank part. We recommend setting the POWER switch to VCR or removing the cassette so that your camcorder does not automatically turn it to enter characters in the standby mode while a cassette is erased. Turn the... to return To erase a character Select [C]. Select [ to the previous screen. ] to delete the title. The last character is in your camcorder The power automatically turns off while you are entering title characters. If you take 3 minutes or longer to CAMERA again, then proceed from step ...
...new title as desired. To enter a space Select [ Z & ? ! ], then select the blank part. We recommend setting the POWER switch to VCR or removing the cassette so that your camcorder does not automatically turn it to enter characters in the standby mode while a cassette is erased. Turn the... to return To erase a character Select [C]. Select [ to the previous screen. ] to delete the title. The last character is in your camcorder The power automatically turns off while you are entering title characters. If you take 3 minutes or longer to CAMERA again, then proceed from step ...
Operating Instructions
Page 73
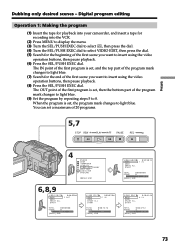
... by repeating steps 5 to insert using the video operation buttons, then pause playback. (8) Press the SEL/PUSH EXEC dial. You can set , then the bottom part of 20 programs. 5,7 STOP REW PLAY FF PAUSE REC 4 OTHERS BEEP COMMA ND E R D I SPLAY V I DEO ED I T READY ED I T SET I ND I CATOR RETURN [ MENU ]...beginning of the first scene you want to light blue. Digital program editing Operation 1: Making the program (1) Insert the tape for playback into your camcorder, and insert a tape for recording into the VCR. (2) Press MENU to display the menu. (3) Turn the SEL/PUSH EXEC dial to ...
... by repeating steps 5 to insert using the video operation buttons, then pause playback. (8) Press the SEL/PUSH EXEC dial. You can set , then the bottom part of 20 programs. 5,7 STOP REW PLAY FF PAUSE REC 4 OTHERS BEEP COMMA ND E R D I SPLAY V I DEO ED I T READY ED I T SET I ND I CATOR RETURN [ MENU ]...beginning of the first scene you want to light blue. Digital program editing Operation 1: Making the program (1) Insert the tape for playback into your camcorder, and insert a tape for recording into the VCR. (2) Press MENU to display the menu. (3) Turn the SEL/PUSH EXEC dial to ...
Operating Instructions
Page 102
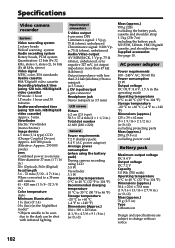
...(-4 °F to +140 °F) Dimensions (approx.) 125 × 39 × 62 mm (5 × 1 9/16 × 2 1/2 in.) (w/h/d) excluding projecting parts Mass (approx.) 280 g (9.8 oz) excluding power cord Battery pack Maximum output voltage DC 8.4 V Output voltage DC 7.2 V Capacity 5.0 Wh (700 mAh) Operating temperature 0 ...°C to +60 °C (-4 °F to change without notice. 102 Hi8/Digital8 video cassette) Approx. 5 min. Hi8/Digital8 cassette, and shoulder strap Supplied accessories See page 10. Hi8/Digital8 video cassette) SP mode: 1 hour LP mode: 1 hour and 30 minutes Fastforward/...
...(-4 °F to +140 °F) Dimensions (approx.) 125 × 39 × 62 mm (5 × 1 9/16 × 2 1/2 in.) (w/h/d) excluding projecting parts Mass (approx.) 280 g (9.8 oz) excluding power cord Battery pack Maximum output voltage DC 8.4 V Output voltage DC 7.2 V Capacity 5.0 Wh (700 mAh) Operating temperature 0 ...°C to +60 °C (-4 °F to change without notice. 102 Hi8/Digital8 video cassette) Approx. 5 min. Hi8/Digital8 cassette, and shoulder strap Supplied accessories See page 10. Hi8/Digital8 video cassette) SP mode: 1 hour LP mode: 1 hour and 30 minutes Fastforward/...
Operating Instructions
Page 103
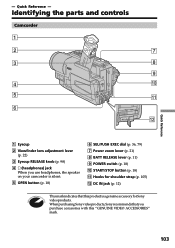
...parts and controls Camcorder 1 2 7 3 8 9 4 0 5 qa 6 qs 1 Eyecup 2 Viewfinder lens adjustment lever (p. 22) 3 Eyecup RELEASE knob (p. 98) 4 i (headphones) jack When you purchase accessories with this product is silent. 5 OPEN button (p. 18) 6 SEL/PUSH EXEC dial (p. 36, 79) 7 Power zoom lever (p. 21) 8 BATT RELEASE lever (p. 11) 9 POWER switch (p. 18) q; - When purchasing Sony... video products, Sony recommends that you use headphones, the speaker on your camcorder is a genuine accessory for shoulder strap (p. 105) qs...
...parts and controls Camcorder 1 2 7 3 8 9 4 0 5 qa 6 qs 1 Eyecup 2 Viewfinder lens adjustment lever (p. 22) 3 Eyecup RELEASE knob (p. 98) 4 i (headphones) jack When you purchase accessories with this product is silent. 5 OPEN button (p. 18) 6 SEL/PUSH EXEC dial (p. 36, 79) 7 Power zoom lever (p. 21) 8 BATT RELEASE lever (p. 11) 9 POWER switch (p. 18) q; - When purchasing Sony... video products, Sony recommends that you use headphones, the speaker on your camcorder is a genuine accessory for shoulder strap (p. 105) qs...
Operating Instructions
Page 104
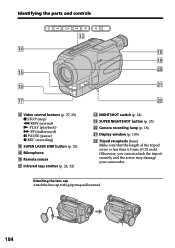
Otherwise, you cannot attach the tripod securely and the screw may damage your camcorder. Camera recording lamp (p. 18) wa Display window (p. 109) ws Tripod receptacle (base) Make sure that the length of the tripod screw is less than 6.5 mm (9/... NIGHTSHOT switch (p. 24) ql SUPER NIGHTSHOT button (p. 25) w; Attaching the lens cap Attach the lens cap to the grip strap as illustrated. 104 Identifying the parts and controls qd qf qk ql w;
Otherwise, you cannot attach the tripod securely and the screw may damage your camcorder. Camera recording lamp (p. 18) wa Display window (p. 109) ws Tripod receptacle (base) Make sure that the length of the tripod screw is less than 6.5 mm (9/... NIGHTSHOT switch (p. 24) ql SUPER NIGHTSHOT button (p. 25) w; Attaching the lens cap Attach the lens cap to the grip strap as illustrated. 104 Identifying the parts and controls qd qf qk ql w;

Operating Instructions
Page 105
Quick Reference 105 FOCUS button (p. 47) Attaching the shoulder strap Attach the shoulder strap supplied with your camcorder to the hooks for the shoulder strap. Identifying the parts and controls wd wf wg wh wd Speaker wf LCD screen (p. 19) wg MENU button (p. 36, 79) wh RESET button (p. 88) wj wk wl e; wj EXPOSURE button (p. 46) wk FADER button (p. 38) wl BACK LIGHT button (p. 24) e;
Quick Reference 105 FOCUS button (p. 47) Attaching the shoulder strap Attach the shoulder strap supplied with your camcorder to the hooks for the shoulder strap. Identifying the parts and controls wd wf wg wh wd Speaker wf LCD screen (p. 19) wg MENU button (p. 36, 79) wh RESET button (p. 88) wj wk wl e; wj EXPOSURE button (p. 46) wk FADER button (p. 38) wl BACK LIGHT button (p. 24) e;

Operating Instructions
Page 106
Identifying the parts and controls eg ea eh ej es ek ed el ef ea END SEARCH button (p. 26) es DISPLAY button (p. 28) ed PB ZOOM button (p. 57) ef VOLUME buttons (p. 27) eg LIGHT button (p. 52) eh PHOTO button (p. 34) ej Viewfinder (p. 22) ek CHG lamp (p. 12) el TITLE button (p. 48, 50) 106
Identifying the parts and controls eg ea eh ej es ek ed el ef ea END SEARCH button (p. 26) es DISPLAY button (p. 28) ed PB ZOOM button (p. 57) ef VOLUME buttons (p. 27) eg LIGHT button (p. 52) eh PHOTO button (p. 34) ej Viewfinder (p. 22) ek CHG lamp (p. 12) el TITLE button (p. 48, 50) 106
Operating Instructions
Page 107
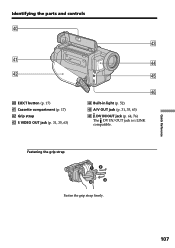
rd ra rf rs rg r; Identifying the parts and controls r; Fastening the grip strap Quick Reference Fasten the grip strap firmly. 107 EJECT button (p. 17) ra Cassette compartment (p. 17) rs Grip strap rd S VIDEO OUT jack (p. 31, 35, 63) rh rf Built-in light (p. 52) rg A/V OUT jack (p. 31, 35, 63) rh DV IN/OUT jack (p. 64, 76) The DV IN/OUT jack is i.LINK compatible.
rd ra rf rs rg r; Identifying the parts and controls r; Fastening the grip strap Quick Reference Fasten the grip strap firmly. 107 EJECT button (p. 17) ra Cassette compartment (p. 17) rs Grip strap rd S VIDEO OUT jack (p. 31, 35, 63) rh rf Built-in light (p. 52) rg A/V OUT jack (p. 31, 35, 63) rh DV IN/OUT jack (p. 64, 76) The DV IN/OUT jack is i.LINK compatible.

Operating Instructions
Page 108
...and - polarities on the Remote Commander •Point the remote sensor away from other Sony VCRs to avoid remote control misoperation. Otherwise, the Remote Commander may not function properly. •Your camcorder works in the Commander mode VTR 2, we recommend changing the Commander mode or covering the...sensor of the VCR with black paper. Identifying the parts and controls Remote Commander The buttons that have the same name on the Remote Commander as on your camcorder function identically to the buttons on your camcorder from strong light sources such as direct sunlight or overhead...
...and - polarities on the Remote Commander •Point the remote sensor away from other Sony VCRs to avoid remote control misoperation. Otherwise, the Remote Commander may not function properly. •Your camcorder works in the Commander mode VTR 2, we recommend changing the Commander mode or covering the...sensor of the VCR with black paper. Identifying the parts and controls Remote Commander The buttons that have the same name on the Remote Commander as on your camcorder function identically to the buttons on your camcorder from strong light sources such as direct sunlight or overhead...

Operating Instructions
Page 109
Identifying the parts and controls Operation indicators LCD screen and Viewfinder Display window 1 qf 2 3 qg wf 4 40min W T REC 0:00:00 qh 5 M . wf Tape counter indicator (p. 23)/Time code ...
Identifying the parts and controls Operation indicators LCD screen and Viewfinder Display window 1 qf 2 3 qg wf 4 40min W T REC 0:00:00 qh 5 M . wf Tape counter indicator (p. 23)/Time code ...


