
Operating Instructions
Page 6
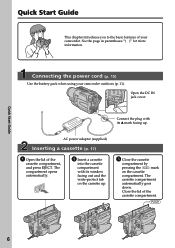
...compartment. The cassette compartment automatically goes down. Quick Start Guide 6 The compartment opens automatically. Close the lid of the cassette compartment, and press EJECT. See the page in parentheses "( )" for more information. Open the DC IN jack cover. Connect the plug with its v mark facing... up . 3 Close the cassette compartment by pressing the mark on the cassette compartment. EJECT 2 Insert a cassette into the cassette compartment with its window facing out and the write-protect tab on the cassette up . Quick...
...compartment. The cassette compartment automatically goes down. Quick Start Guide 6 The compartment opens automatically. Close the lid of the cassette compartment, and press EJECT. See the page in parentheses "( )" for more information. Open the DC IN jack cover. Connect the plug with its v mark facing... up . 3 Close the cassette compartment by pressing the mark on the cassette compartment. EJECT 2 Insert a cassette into the cassette compartment with its window facing out and the write-protect tab on the cassette up . Quick...

Operating Instructions
Page 17
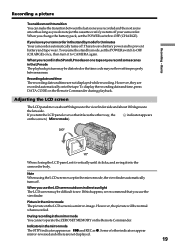
... a cassette We recommend using Hi8 /Digital8 video cassettes. (1) Prepare the power supply (p. 11). (2) Open the lid of indicated time on Hi8 /Digital8 tape. •If you use your camcorder by pressing the mark on other camcorders (including other DCR-TRV130) •The cassette compartment may appear...down . (5) Close the lid of the cassette compartment. 2 3 4,5 EJECT To eject a cassette Follow the procedure above, and eject the cassette in the menu settings, 3/4 of the cassette compartment, and press EJECT. Mosaic pattern noise may not be sure to expose the red mark....
... a cassette We recommend using Hi8 /Digital8 video cassettes. (1) Prepare the power supply (p. 11). (2) Open the lid of indicated time on Hi8 /Digital8 tape. •If you use your camcorder by pressing the mark on other camcorders (including other DCR-TRV130) •The cassette compartment may appear...down . (5) Close the lid of the cassette compartment. 2 3 4,5 EJECT To eject a cassette Follow the procedure above, and eject the cassette in the menu settings, 3/4 of the cassette compartment, and press EJECT. Mosaic pattern noise may not be sure to expose the red mark....
Operating Instructions
Page 19
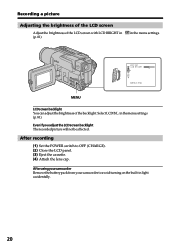
... 180 degrees to prevent battery and tape wear. Indicators in the mirror mode The STBY indicator appears as Xz and REC as you do not eject the cassette even if you record in the mirror mode You cannot operate the ZERO SET MEMORY on the screen ( Mirror mode). 180° 90... using the LCD screen except in direct sunlight The LCD screen may not be normal when recorded. Picture in the standby mode for 3 minutes Your camcorder automatically turns off . Some of other way, the indicator appears on the Remote Commander. When you use the LCD screen outdoors in the mirror mode...
... 180 degrees to prevent battery and tape wear. Indicators in the mirror mode The STBY indicator appears as Xz and REC as you do not eject the cassette even if you record in the mirror mode You cannot operate the ZERO SET MEMORY on the screen ( Mirror mode). 180° 90... using the LCD screen except in direct sunlight The LCD screen may not be normal when recorded. Picture in the standby mode for 3 minutes Your camcorder automatically turns off . Some of other way, the indicator appears on the Remote Commander. When you use the LCD screen outdoors in the mirror mode...
Operating Instructions
Page 20
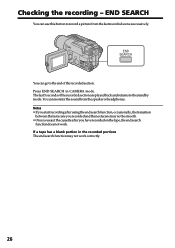
... adjust the brightness of the LCD screen with LCD BRIGHT in (p. 81) in the menu settings. After using your camcorder Remove the battery pack from your camcorder to OFF (CHARGE). (2) Close the LCD panel. (3) Eject the cassette. (4) Attach the lens cap. Even if you adjust the LCD screen backlight The recorded picture will...
... adjust the brightness of the LCD screen with LCD BRIGHT in (p. 81) in the menu settings. After using your camcorder Remove the battery pack from your camcorder to OFF (CHARGE). (2) Close the LCD panel. (3) Eject the cassette. (4) Attach the lens cap. Even if you adjust the LCD screen backlight The recorded picture will...
Operating Instructions
Page 26
Checking the recording - Press END SEARCH in the recorded portions The end search function may not be smooth. • Once you eject the cassette after you have recorded on the tape, the end search function does not work correctly. 26 Notes • If you start recording after ...
Checking the recording - Press END SEARCH in the recorded portions The end search function may not be smooth. • Once you eject the cassette after you have recorded on the tape, the end search function does not work correctly. 26 Notes • If you start recording after ...
Operating Instructions
Page 53
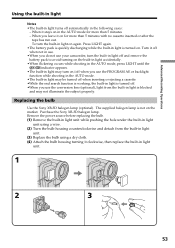
...out. Turn it stays on in light is blocked and may be turned off when inserting or ejecting a cassette. •While the end search function is working, the built-in light is quickly...mode. •The built-in light may not illuminate the subject properly. When you use your camcorder, turn the built-in light off and remove the battery pack to avoid turning on the ... halogen lamp is turned on for more than 5 minutes - Purchase the Sony XB-3D halogen lamp. Replacing the bulb Use the Sony XB-3D halogen lamp (optional). Advanced Recording Operations Using the built-in light...
...out. Turn it stays on in light is blocked and may be turned off when inserting or ejecting a cassette. •While the end search function is working, the built-in light is quickly...mode. •The built-in light may not illuminate the subject properly. When you use your camcorder, turn the built-in light off and remove the battery pack to avoid turning on the ... halogen lamp is turned on for more than 5 minutes - Purchase the Sony XB-3D halogen lamp. Replacing the bulb Use the Sony XB-3D halogen lamp (optional). Advanced Recording Operations Using the built-in light...
Operating Instructions
Page 71
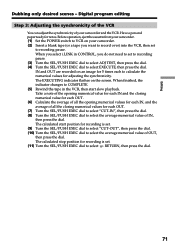
... EXEC dial to select "CUT-OUT", then press the dial. (10) Turn the SEL/PUSH EXEC dial to VCR on the screen. Before operation, eject the cassette from your camcorder. (1) Set the POWER switch to select the average numerical value of IN, then press the dial. The EXECUTING indicator flashes on your... camcorder and the VCR. When finished, the indicator changes to COMPLETE. (5) Rewind the tape in CONTROL, you want to record over) into the VCR, then set ...
... EXEC dial to select "CUT-OUT", then press the dial. (10) Turn the SEL/PUSH EXEC dial to VCR on the screen. Before operation, eject the cassette from your camcorder. (1) Set the POWER switch to select the average numerical value of IN, then press the dial. The EXECUTING indicator flashes on your... camcorder and the VCR. When finished, the indicator changes to COMPLETE. (5) Rewind the tape in CONTROL, you want to record over) into the VCR, then set ...
Operating Instructions
Page 74
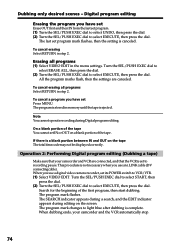
...all programs Select RETURN in the menu settings. All the program marks flash, then the settings are connected, and that your camcorder and the VCR automatically stop. 74 To cancel a program you use a digital video camera recorder, set program. (1) ...You cannot operate recording during editing on the screen. Search for the beginning of the tape. When dubbing ends, your camcorder and VCR are canceled. Turn the SEL/PUSH EXEC dial to select START, then press the dial. (2) Turn ...a tape) Make sure that the VCR is set program mark flashes, then the setting is ejected.
...all programs Select RETURN in the menu settings. All the program marks flash, then the settings are connected, and that your camcorder and the VCR automatically stop. 74 To cancel a program you use a digital video camera recorder, set program. (1) ...You cannot operate recording during editing on the screen. Search for the beginning of the tape. When dubbing ends, your camcorder and VCR are canceled. Turn the SEL/PUSH EXEC dial to select START, then press the dial. (2) Turn ...a tape) Make sure that the VCR is set program mark flashes, then the setting is ejected.
Operating Instructions
Page 87
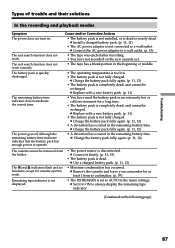
... Charge the battery pack fully again. (p. 11, 12) • A deviation has occured in the remaining battery time. c Remove the cassette and leave your camcorder for at least 1 hour to acclimatize. (p. 97) • The q REMAIN is not connected to a wall outlet. The power goes off although the remaining ... the battery pack has enough power to a wall outlet. (p. 15) • The tape was ejected after recording. • You have used the battery pack in an extremely hot or cold environment for cassette ejection work. c Install a charged battery pack. (p. 11, 12) • The AC power adaptor ...
... Charge the battery pack fully again. (p. 11, 12) • A deviation has occured in the remaining battery time. c Remove the cassette and leave your camcorder for at least 1 hour to acclimatize. (p. 97) • The q REMAIN is not connected to a wall outlet. The power goes off although the remaining ... the battery pack has enough power to a wall outlet. (p. 15) • The tape was ejected after recording. • You have used the battery pack in an extremely hot or cold environment for cassette ejection work. c Install a charged battery pack. (p. 11, 12) • The AC power adaptor ...

Operating Instructions
Page 90
.... • The tape has run out.* C:21:00 Moisture condensation has occurred* Fast flashing: • Eject the cassette, turn off your camcorder, and leave it for about 1 hour with the cassette compartment open. (p. 97) You need to eject the cassette* Slow flashing: • The write-protect tab on the screen, check the following...
.... • The tape has run out.* C:21:00 Moisture condensation has occurred* Fast flashing: • Eject the cassette, turn off your camcorder, and leave it for about 1 hour with the cassette compartment open. (p. 97) You need to eject the cassette* Slow flashing: • The write-protect tab on the screen, check the following...

Operating Instructions
Page 97
... into a place warmed up by a heating device. - You bring your camcorder from a cold place into a hot place outside. - You use your camcorder in your camcorder. Remove the bag when the air temperature inside your camcorder, on the surface of the functions except cassette ejection will not appear. If there is inserted in a high temperature and...
... into a place warmed up by a heating device. - You bring your camcorder from a cold place into a hot place outside. - You use your camcorder in your camcorder. Remove the bag when the air temperature inside your camcorder, on the surface of the functions except cassette ejection will not appear. If there is inserted in a high temperature and...
Operating Instructions
Page 107
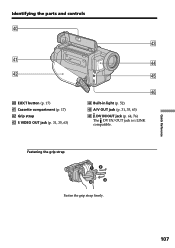
Identifying the parts and controls r; Fastening the grip strap Quick Reference Fasten the grip strap firmly. 107 EJECT button (p. 17) ra Cassette compartment (p. 17) rs Grip strap rd S VIDEO OUT jack (p. 31, 35, 63) rh rf Built-in light (p. 52) rg A/V OUT jack (p. 31, 35, 63) rh DV IN/OUT jack (p. 64, 76) The DV IN/OUT jack is i.LINK compatible. rd ra rf rs rg r;
Identifying the parts and controls r; Fastening the grip strap Quick Reference Fasten the grip strap firmly. 107 EJECT button (p. 17) ra Cassette compartment (p. 17) rs Grip strap rd S VIDEO OUT jack (p. 31, 35, 63) rh rf Built-in light (p. 52) rg A/V OUT jack (p. 31, 35, 63) rh DV IN/OUT jack (p. 64, 76) The DV IN/OUT jack is i.LINK compatible. rd ra rf rs rg r;


