Operating Guide
Page 7
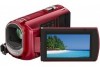
...No.: 858-942-2230 This device complies with Part 15 of Conformity Trade Name: SONY Model No.: DCR-SX40, DCR-SX41, DCR-SX60 Responsible Party:Sony Electronics Inc. Regulatory Information Declaration of the FCC Rules. This equipment generates, uses...58181; USB cable (1) Rechargeable battery pack NP-FH30 (1) CD-ROM "Handycam Application Software" (1) (p. 24) "PMB" (software) including "PMB Guide" "Handycam Handbook" (PDF) "Operating Guide" (This manual) (1) See page 38 for "Memory ...try to which can use with this camcorder.
...No.: 858-942-2230 This device complies with Part 15 of Conformity Trade Name: SONY Model No.: DCR-SX40, DCR-SX41, DCR-SX60 Responsible Party:Sony Electronics Inc. Regulatory Information Declaration of the FCC Rules. This equipment generates, uses...58181; USB cable (1) Rechargeable battery pack NP-FH30 (1) CD-ROM "Handycam Application Software" (1) (p. 24) "PMB" (software) including "PMB Guide" "Handycam Handbook" (PDF) "Operating Guide" (This manual) (1) See page 38 for "Memory ...try to which can use with this camcorder.
Operating Guide
Page 8
...) or the access lamp (p. 38) are lit or flashing. However, there may appear different from the actual images of the LCD screen. In this Operating Guide, the internal memory of the camcorder and "Memory Stick PRO Duo" media are called "recording...Handycam Handbook" (PDF) on the supplied CD-ROM (p. 44). The screenshots are from being lost or other materials may vary depending on -screen displays in each local language are used in a malfunction of the computer. Also, you repeat recording/deleting images for illustration purposes are captured using the camcorder...
...) or the access lamp (p. 38) are lit or flashing. However, there may appear different from the actual images of the LCD screen. In this Operating Guide, the internal memory of the camcorder and "Memory Stick PRO Duo" media are called "recording...Handycam Handbook" (PDF) on the supplied CD-ROM (p. 44). The screenshots are from being lost or other materials may vary depending on -screen displays in each local language are used in a malfunction of the computer. Also, you repeat recording/deleting images for illustration purposes are captured using the camcorder...
Operating Guide
Page 10
... setting the date and time 14 Changing the language setting 15 Recording Recording 16 Recording and playing movies and photos easily (Easy Handycam operation 19 Playback Playback on the camcorder 20 Playing images on a TV 23 Saving movies and photos with a computer Preparing a computer (Windows 24 When using a Macintosh 24 Creating a disc...
... setting the date and time 14 Changing the language setting 15 Recording Recording 16 Recording and playing movies and photos easily (Easy Handycam operation 19 Playback Playback on the camcorder 20 Playing images on a TV 23 Saving movies and photos with a computer Preparing a computer (Windows 24 When using a Macintosh 24 Creating a disc...
Operating Guide
Page 11
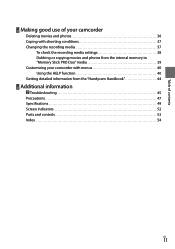
Table of contents Making good use of your camcorder Deleting movies and photos 36 Coping with shooting conditions 37 Changing the recording media 37 To check the recording media settings 38 Dubbing or copying movies and photos from the internal memory to "Memory Stick PRO Duo" media 39 Customizing your camcorder with menus 40 Using the HELP function 40 Getting detailed information from the "Handycam Handbook 44 Additional information Troubleshooting 45 Precautions 47 Specifications 49 Screen indicators 52 Parts and controls 53 Index 54 US 11
Table of contents Making good use of your camcorder Deleting movies and photos 36 Coping with shooting conditions 37 Changing the recording media 37 To check the recording media settings 38 Dubbing or copying movies and photos from the internal memory to "Memory Stick PRO Duo" media 39 Customizing your camcorder with menus 40 Using the HELP function 40 Getting detailed information from the "Handycam Handbook 44 Additional information Troubleshooting 45 Precautions 47 Specifications 49 Screen indicators 52 Parts and controls 53 Index 54 US 11
Operating Guide
Page 25
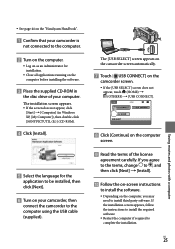
See page 44 on the "Handycam Handbook". Confirm that your camcorder is not connected to the computer. Turn on the computer. Log on as an Administrator for the application to be installed, then ...Install]. Follow the on-screen instructions to install the software. Depending on the computer screen. Read the terms of your camcorder, then connect the camcorder to the computer using the USB cable (supplied). If the installation screen appears, follow the instructions to install the required software. Restart the...
See page 44 on the "Handycam Handbook". Confirm that your camcorder is not connected to the computer. Turn on the computer. Log on as an Administrator for the application to be installed, then ...Install]. Follow the on-screen instructions to install the software. Depending on the computer screen. Read the terms of your camcorder, then connect the camcorder to the computer using the USB cable (supplied). If the installation screen appears, follow the instructions to install the required software. Restart the...
Operating Guide
Page 26
...Disc Burn can be saved on a disc automatically. Install "PMB" beforehand (p. 24), however, do not start "PMB." Connect your camcorder to the computer using the AC Adaptor supplied for the type of the computer [Safely remove USB Mass Storage Device]. Touch [END]... [YES] on the installation procedure. The "Handycam Handbook" is completed, following icons will appear. US 26 Remove the CD-ROM from your camcorder from the computer Click the icon at the bottom right of the desktop of discs you ...
...Disc Burn can be saved on a disc automatically. Install "PMB" beforehand (p. 24), however, do not start "PMB." Connect your camcorder to the computer using the AC Adaptor supplied for the type of the computer [Safely remove USB Mass Storage Device]. Touch [END]... [YES] on the installation procedure. The "Handycam Handbook" is completed, following icons will appear. US 26 Remove the CD-ROM from your camcorder from the computer Click the icon at the bottom right of the desktop of discs you ...
Operating Guide
Page 27
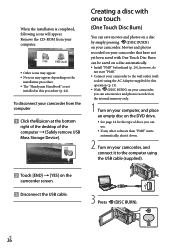
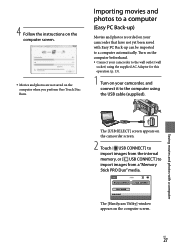
...been saved with a computer The [USB SELECT] screen appears on the computer beforehand. Connect your camcorder to import images from a "Memory Stick PRO Duo" media. The [Handycam Utility] window appears on the computer when you perform One Touch Disc Burn. 4 Follow the instructions on ...the computer screen. Movies and photos are not saved on the computer screen. Turn on the camcorder screen. 2 Touch [ USB CONNECT]...
...been saved with a computer The [USB SELECT] screen appears on the computer beforehand. Connect your camcorder to import images from a "Memory Stick PRO Duo" media. The [Handycam Utility] window appears on the computer when you perform One Touch Disc Burn. 4 Follow the instructions on ...the computer screen. Movies and photos are not saved on the computer screen. Turn on the camcorder screen. 2 Touch [ USB CONNECT]...

Operating Guide
Page 40
...desired tab the item to change in the "Handycam Handbook" (p. 44). Customizing your camcorder. (HOME) Touch the desired category the menu item to be no tab.) You cannot use the OPTION MENU during Easy Handycam operation. The menu items you can change the settings of ... Using the HELP function To see the descriptions on the HOME MENU, touch (HELP) on the HOME MENU screen. (The bottom of your camcorder with menus Menu items are described in more details with color photos in the context appear. (OPTION) Category Follow the ...
...desired tab the item to change in the "Handycam Handbook" (p. 44). Customizing your camcorder. (HOME) Touch the desired category the menu item to be no tab.) You cannot use the OPTION MENU during Easy Handycam operation. The menu items you can change the settings of ... Using the HELP function To see the descriptions on the HOME MENU, touch (HELP) on the HOME MENU screen. (The bottom of your camcorder with menus Menu items are described in more details with color photos in the context appear. (OPTION) Category Follow the ...
Operating Guide
Page 42
DIGITAL ZOOM p. 17 STEADYSHOT p. 17 AUTO SLW SHUTTR....... Adjusts the shutter speed automatically. CLOCK/...horizontal or vertical. REMAINING SET........ VIEW IMAGES SET DATA CODE Displays the detailed recording data during Easy Handycam operation. CALIBRATION Calibrates the touch panel. Sets how the remaining recording time of the LCD screen.... to be displayed. LCD BL LEVEL Adjusts the backlight of the LCD screen. Sets whether or not the camcorder is horizontal or vertical. GUIDEFRAME Displays the frame to [SOUND SETTINGS] during playback. AUTO SLW SHUTTR....... A....
DIGITAL ZOOM p. 17 STEADYSHOT p. 17 AUTO SLW SHUTTR....... Adjusts the shutter speed automatically. CLOCK/...horizontal or vertical. REMAINING SET........ VIEW IMAGES SET DATA CODE Displays the detailed recording data during Easy Handycam operation. CALIBRATION Calibrates the touch panel. Sets how the remaining recording time of the LCD screen.... to be displayed. LCD BL LEVEL Adjusts the backlight of the LCD screen. Sets whether or not the camcorder is horizontal or vertical. GUIDEFRAME Displays the frame to [SOUND SETTINGS] during playback. AUTO SLW SHUTTR....... A....

Operating Guide
Page 44
....com/ Refer to "PMB Guide" for details on the supplied software "PMB" (p. 28). 3 Select the desired language and the model name of your camcorder, then click [Handycam Handbook (PDF)]. The model name of your camcorder is printed on a Windows computer, place the supplied CD-ROM in the disc drive of your...
....com/ Refer to "PMB Guide" for details on the supplied software "PMB" (p. 28). 3 Select the desired language and the model name of your camcorder, then click [Handycam Handbook (PDF)]. The model name of your camcorder is printed on a Windows computer, place the supplied CD-ROM in the disc drive of your...
Operating Guide
Page 45
...installed. Check the computer environment or installation procedure required to install "PMB" (p. 24). If your camcorder still does not work correctly. Quit "PMB" and restart your Sony dealer. Pressing START/STOP or PHOTO does not record images. Press MODE to a computer. "PMB"... event of this, the data stored on the internal memory will neither copy nor retain your data. See the "Handycam Handbook" (p. 44) for any new recordings during operation. Additional information Troubleshooting If you press RESET, all settings, including the clock setting, ...
...installed. Check the computer environment or installation procedure required to install "PMB" (p. 24). If your camcorder still does not work correctly. Quit "PMB" and restart your Sony dealer. Pressing START/STOP or PHOTO does not record images. Press MODE to a computer. "PMB"... event of this, the data stored on the internal memory will neither copy nor retain your data. See the "Handycam Handbook" (p. 44) for any new recordings during operation. Additional information Troubleshooting If you press RESET, all settings, including the clock setting, ...
Operating Guide
Page 48
... recommended that you may not delete data from the "Handycam Handbook"" on a computer. Procedures Connect your camcorder to somebody, it is always charged while your camcorder after charging the pre-installed rechargeable battery. Note on your camcorder or a computer, you destroy the actual body of the camcorder. When you perform [ EMPTY] (See "Getting detailed information...
... recommended that you may not delete data from the "Handycam Handbook"" on a computer. Procedures Connect your camcorder to somebody, it is always charged while your camcorder after charging the pre-installed rechargeable battery. Note on your camcorder or a computer, you destroy the actual body of the camcorder. When you perform [ EMPTY] (See "Getting detailed information...

Handycam® Handbook
Page 2
... indicators that actually appear on how to the Operating Guide (a separate volume). About this Handycam Handbook The example images used in this manual. Design and specifications of your camcorder and "Memory Stick PRO Duo" media are called "recording media." "Memory ...Click here. You can search for tips on your camcorder. In this Handycam Handbook, the internal memory of your camcorder and accessories are subject to as "Memory Stick PRO Duo" media in this Handycam Handbook for illustration purposes are captured using Adobe Reader. Read the...
... indicators that actually appear on how to the Operating Guide (a separate volume). About this Handycam Handbook The example images used in this manual. Design and specifications of your camcorder and "Memory Stick PRO Duo" media are called "recording media." "Memory ...Click here. You can search for tips on your camcorder. In this Handycam Handbook, the internal memory of your camcorder and accessories are subject to as "Memory Stick PRO Duo" media in this Handycam Handbook for illustration purposes are captured using Adobe Reader. Read the...

Handycam® Handbook
Page 3
...photos 25 Recording 26 Recording movies 26 Shooting photos 28 Useful functions for recording movies and photos 30 Zooming 30 Adjusting the exposure for information quickly 2 Useful recording techniques 6 Parts and controls 7 Screen ...8 " HOME" and " OPTION" - Table of Contents Useful Recording Techniques Table of contents Using the Handycam Handbook 2 Searching for backlit subjects 30 Recording in mirror mode 31 Switching the screen display 31 Playback on... this before operating your camcorder 13 Getting started Step 1: Charging the battery pack 15 Step 2: Turning the power...
...photos 25 Recording 26 Recording movies 26 Shooting photos 28 Useful functions for recording movies and photos 30 Zooming 30 Adjusting the exposure for information quickly 2 Useful recording techniques 6 Parts and controls 7 Screen ...8 " HOME" and " OPTION" - Table of Contents Useful Recording Techniques Table of contents Using the Handycam Handbook 2 Searching for backlit subjects 30 Recording in mirror mode 31 Switching the screen display 31 Playback on... this before operating your camcorder 13 Getting started Step 1: Charging the battery pack 15 Step 2: Turning the power...

Handycam® Handbook
Page 10
Table of Contents Useful Recording Techniques Notes When the item you want is not on the screen, touch another tab. (There may be no tab.) You cannot use the OPTION MENU during Easy Handycam operation. The tabs and items that appear on the screen depend on the recording/playback status of your camcorder at the time. 10 Index
Table of Contents Useful Recording Techniques Notes When the item you want is not on the screen, touch another tab. (There may be no tab.) You cannot use the OPTION MENU during Easy Handycam operation. The tabs and items that appear on the screen depend on the recording/playback status of your camcorder at the time. 10 Index
Handycam® Handbook
Page 13
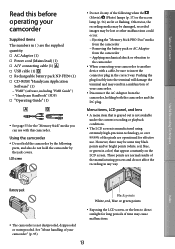
...in a malfunction of the following parts, and also do not hold the camcorder by the following when the (Movie)/ (Photo) lamps (p. 17) or the access lamp (p. 56) are lit or flashing. Pushing the plug forcibly into the terminal will damage the terminal and may ...FH30 (1) CD-ROM "Handycam Application Software" (1) "PMB" (software, including "PMB Guide" ) "Handycam Handbook" (PDF) "Operating Guide" (1) See page 55 for the "Memory Stick" media you can use . Using the camcorder Do not hold the camcorder by the jack covers. However,...
...in a malfunction of the following parts, and also do not hold the camcorder by the following when the (Movie)/ (Photo) lamps (p. 17) or the access lamp (p. 56) are lit or flashing. Pushing the plug forcibly into the terminal will damage the terminal and may ...FH30 (1) CD-ROM "Handycam Application Software" (1) "PMB" (software, including "PMB Guide" ) "Handycam Handbook" (PDF) "Operating Guide" (1) See page 55 for the "Memory Stick" media you can use . Using the camcorder Do not hold the camcorder by the jack covers. However,...

Handycam® Handbook
Page 20
... camcorder when the LCD screen is turned on. To turn on the internal memory (p. 55). Fasten the grip belt. Open the lens cover. Open the LCD screen of Contents Useful Recording Techniques Recording and playing movies and photos easily ( Easy Handycam ... changing the image size or deleting images, among the setting and adjustment items. Other items are set automatically. When Easy Handycam operation is started, nearly all menu settings are reset to the default settings automatically. (Some menu items retain the settings that were ...
... camcorder when the LCD screen is turned on. To turn on the internal memory (p. 55). Fasten the grip belt. Open the lens cover. Open the LCD screen of Contents Useful Recording Techniques Recording and playing movies and photos easily ( Easy Handycam ... changing the image size or deleting images, among the setting and adjustment items. Other items are set automatically. When Easy Handycam operation is started, nearly all menu settings are reset to the default settings automatically. (Some menu items retain the settings that were ...

Handycam® Handbook
Page 25
... show/pause Next Tips The setting of Contents Useful Recording Techniques Your camcorder starts playing the selected photo. disappears Menu settings during Easy Handycam operation since they are automatically set an invalid operation, [Invalid during Easy Handycam operation.] may appear. 25 Index from the LCD screen. If you set . Viewing photos...
... show/pause Next Tips The setting of Contents Useful Recording Techniques Your camcorder starts playing the selected photo. disappears Menu settings during Easy Handycam operation since they are automatically set an invalid operation, [Invalid during Easy Handycam operation.] may appear. 25 Index from the LCD screen. If you set . Viewing photos...
Handycam® Handbook
Page 81
...58317; [SPOT MTR/FCS] [SPOT METER] Index 81 If the functions still do not work, press RESET (p. 7) using your camcorder, use the following items return to the wall outlet (wall socket) (p. 15). In the event of this, the data stored on . Be...work. During Easy Handycam operation, the playback zoom (p. 37) function is not a malfunction. Disconnect the AC Adaptor from the wall outlet (wall socket). If the problem persists, disconnect the power source and contact your Sony dealer. Overall operations/Easy Handycam operation p. 81 Batteries...
...58317; [SPOT MTR/FCS] [SPOT METER] Index 81 If the functions still do not work, press RESET (p. 7) using your camcorder, use the following items return to the wall outlet (wall socket) (p. 15). In the event of this, the data stored on . Be...work. During Easy Handycam operation, the playback zoom (p. 37) function is not a malfunction. Disconnect the AC Adaptor from the wall outlet (wall socket). If the problem persists, disconnect the power source and contact your Sony dealer. Overall operations/Easy Handycam operation p. 81 Batteries...
Handycam® Handbook
Page 98
...and/ or other countries. Macintosh and Mac OS are registered trademarks of copyright. Table of Contents Useful Recording Techniques On trademarks "Handycam" and are registered trademarks of Sony Corporation. "Memory Stick," " ," "Memory Stick Duo," " ," "Memory Stick PRO Duo," " ," "Memory Stick PRO-HG Duo... the following . Source code is needed. Read "license2.pdf " in this software based on your camcorder. When downloading the source code, select DCR-SR87 as "LGPL") are not mentioned in each case in the "License" folder on the web....
...and/ or other countries. Macintosh and Mac OS are registered trademarks of copyright. Table of Contents Useful Recording Techniques On trademarks "Handycam" and are registered trademarks of Sony Corporation. "Memory Stick," " ," "Memory Stick Duo," " ," "Memory Stick PRO Duo," " ," "Memory Stick PRO-HG Duo... the following . Source code is needed. Read "license2.pdf " in this software based on your camcorder. When downloading the source code, select DCR-SR87 as "LGPL") are not mentioned in each case in the "License" folder on the web....


