Operating Guide
Page 7
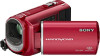
... Information Declaration of FCC Rules. CAUTION You are cautioned that may not cause harmful interference, and (2) this camcorder. The supplied interface cable must accept any interference received, including interference that any questions about this product, you...Handycam Handbook" (PDF) "Operating Guide" (This manual) (1) See page 38 for the FCC related matters only. The number below is no guarantee that to which the receiver is subject to Subpart B of Part 15 of Conformity Trade Name: SONY Model No.: DCR-SX40, DCR-SX41, DCR-SX60 Responsible Party:Sony...
... Information Declaration of FCC Rules. CAUTION You are cautioned that may not cause harmful interference, and (2) this camcorder. The supplied interface cable must accept any interference received, including interference that any questions about this product, you...Handycam Handbook" (PDF) "Operating Guide" (This manual) (1) See page 38 for the FCC related matters only. The number below is no guarantee that to which the receiver is subject to Subpart B of Part 15 of Conformity Trade Name: SONY Model No.: DCR-SX40, DCR-SX41, DCR-SX60 Responsible Party:Sony...
Operating Guide
Page 8
... and other malfunctions could occur. ejecting "Memory Stick PRO Duo" media removing the battery pack or AC Adaptor from the camcorder When connecting your computer. To view your recorded images on external media periodically. On recording Before starting to record, test ... Duo" media. You will damage the terminal and may be copyrighted. Pushing the plug forcibly into the terminal will find the "Handycam Handbook" (PDF) on the LCD screen. These points are from the actual images of the LCD screen. In this Operating Guide...
... and other malfunctions could occur. ejecting "Memory Stick PRO Duo" media removing the battery pack or AC Adaptor from the camcorder When connecting your computer. To view your recorded images on external media periodically. On recording Before starting to record, test ... Duo" media. You will damage the terminal and may be copyrighted. Pushing the plug forcibly into the terminal will find the "Handycam Handbook" (PDF) on the LCD screen. These points are from the actual images of the LCD screen. In this Operating Guide...
Operating Guide
Page 10
... setting the date and time 14 Changing the language setting 15 Recording Recording 16 Recording and playing movies and photos easily (Easy Handycam operation 19 Playback Playback on the camcorder 20 Playing images on a TV 23 Saving movies and photos with a computer Preparing a computer (Windows 24 When using a Macintosh 24 Creating a disc...
... setting the date and time 14 Changing the language setting 15 Recording Recording 16 Recording and playing movies and photos easily (Easy Handycam operation 19 Playback Playback on the camcorder 20 Playing images on a TV 23 Saving movies and photos with a computer Preparing a computer (Windows 24 When using a Macintosh 24 Creating a disc...
Operating Guide
Page 11
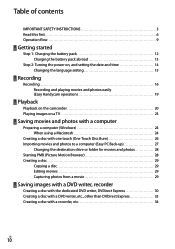
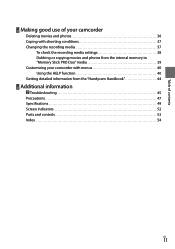
Table of contents Making good use of your camcorder Deleting movies and photos 36 Coping with shooting conditions 37 Changing the recording media 37 To check the recording media settings 38 Dubbing or copying movies and photos from the internal memory to "Memory Stick PRO Duo" media 39 Customizing your camcorder with menus 40 Using the HELP function 40 Getting detailed information from the "Handycam Handbook 44 Additional information Troubleshooting 45 Precautions 47 Specifications 49 Screen indicators 52 Parts and controls 53 Index 54 US 11
Table of contents Making good use of your camcorder Deleting movies and photos 36 Coping with shooting conditions 37 Changing the recording media 37 To check the recording media settings 38 Dubbing or copying movies and photos from the internal memory to "Memory Stick PRO Duo" media 39 Customizing your camcorder with menus 40 Using the HELP function 40 Getting detailed information from the "Handycam Handbook 44 Additional information Troubleshooting 45 Precautions 47 Specifications 49 Screen indicators 52 Parts and controls 53 Index 54 US 11
Operating Guide
Page 19
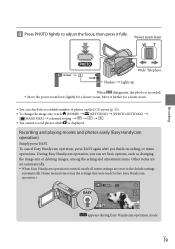
...are set basic options, such as changing the image size or deleting images, among the setting and adjustment items. Other items are reset to adjust the focus, then press it further for a slower zoom. Power zoom lever Wide Telephoto Flashes Lights up When disappears..., the photo is recorded. Move the power zoom lever slightly for a faster zoom. You can set automatically. When Easy Handycam operation is displayed. Move it fully.
...are set basic options, such as changing the image size or deleting images, among the setting and adjustment items. Other items are reset to adjust the focus, then press it further for a slower zoom. Power zoom lever Wide Telephoto Flashes Lights up When disappears..., the photo is recorded. Move the power zoom lever slightly for a faster zoom. You can set automatically. When Easy Handycam operation is displayed. Move it fully.
Operating Guide
Page 25
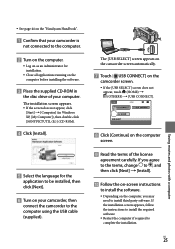
... third party software. US 25 Saving movies and photos with a computer See page 44 on the "Handycam Handbook". Confirm that your camcorder is not connected to the computer. Turn on the computer. Log on as an Administrator ...58373; Select the language for installation. Close all applications running on the computer screen. Read the terms of your camcorder, then connect the camcorder to the computer using the USB cable (supplied). The installation screen appears. If the screen does not appear, click [Start...
... third party software. US 25 Saving movies and photos with a computer See page 44 on the "Handycam Handbook". Confirm that your camcorder is not connected to the computer. Turn on the computer. Log on as an Administrator ...58373; Select the language for installation. Close all applications running on the computer screen. Read the terms of your camcorder, then connect the camcorder to the computer using the USB cable (supplied). The installation screen appears. If the screen does not appear, click [Start...
Operating Guide
Page 26
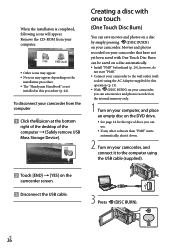
...] [YES] on a disc automatically. Install "PMB" beforehand (p. 24), however, do not start "PMB." Connect your camcorder to the computer using the AC Adaptor supplied for this procedure (p. 44). Remove the CD-ROM from the computer Click the icon at the...; With (DISC BURN) on your camcorder, you can save movies and photos on a disc by simply pressing (DISC BURN) on your computer. Other icons may appear. No icon may appear depending on the installation procedure. The "Handycam Handbook" is completed, following icons will...
...] [YES] on a disc automatically. Install "PMB" beforehand (p. 24), however, do not start "PMB." Connect your camcorder to the computer using the AC Adaptor supplied for this procedure (p. 44). Remove the CD-ROM from the computer Click the icon at the...; With (DISC BURN) on your camcorder, you can save movies and photos on a disc by simply pressing (DISC BURN) on your computer. Other icons may appear. No icon may appear depending on the installation procedure. The "Handycam Handbook" is completed, following icons will...
Operating Guide
Page 27
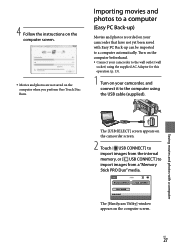
The [Handycam Utility] window appears on the computer when you perform One Touch Disc Burn. US 27 4 Follow the instructions on the computer screen. Movies and photos are not saved on the computer screen. Turn on the computer beforehand. Connect your camcorder to the wall outlet (...be imported to a computer automatically. Importing movies and photos to a computer (Easy PC Back-up) Movies and photos recorded on the camcorder screen. 2 Touch [ USB CONNECT] to import images from the internal memory, or [ USB CONNECT] to the computer using the USB cable (supplied...
The [Handycam Utility] window appears on the computer when you perform One Touch Disc Burn. US 27 4 Follow the instructions on the computer screen. Movies and photos are not saved on the computer screen. Turn on the computer beforehand. Connect your camcorder to the wall outlet (...be imported to a computer automatically. Importing movies and photos to a computer (Easy PC Back-up) Movies and photos recorded on the camcorder screen. 2 Touch [ USB CONNECT] to import images from the internal memory, or [ USB CONNECT] to the computer using the USB cable (supplied...

Operating Guide
Page 28
Reading "PMB Guide" For details on importing selected movies and photos (p. 28). Changing the destination drive or folder for movies and photos On the [Handycam Utility] screen in step 3 above, click [Easy PC Back-up ] [Import]. On the screen displayed, you can also open the "...displayed on the computer screen. Double-click the "PMB Guide" short-cut icon on the computer screen, click [Start] [All Programs] [Sony Picture Utility] [Help] [PMB Guide]. In the meantime, you can view, edit, or create discs of "PMB." 3 On the computer...
Reading "PMB Guide" For details on importing selected movies and photos (p. 28). Changing the destination drive or folder for movies and photos On the [Handycam Utility] screen in step 3 above, click [Easy PC Back-up ] [Import]. On the screen displayed, you can also open the "...displayed on the computer screen. Double-click the "PMB Guide" short-cut icon on the computer screen, click [Start] [All Programs] [Sony Picture Utility] [Help] [PMB Guide]. In the meantime, you can view, edit, or create discs of "PMB." 3 On the computer...

Operating Guide
Page 40
... Using the HELP function To see the descriptions on the HOME MENU, touch (HELP) on the HOME MENU screen. (The bottom of your camcorder with menus Menu items are described in more details with color photos in the context appear. (OPTION) Category Follow the ...40 Touch the desired tab the item to be no tab.) You cannot use the OPTION MENU during Easy Handycam operation. Customizing your camcorder. (HOME) Touch the desired category the menu item to change the settings of turns orange.) Then, touch the menu ...
... Using the HELP function To see the descriptions on the HOME MENU, touch (HELP) on the HOME MENU screen. (The bottom of your camcorder with menus Menu items are described in more details with color photos in the context appear. (OPTION) Category Follow the ...40 Touch the desired tab the item to be no tab.) You cannot use the OPTION MENU during Easy Handycam operation. Customizing your camcorder. (HOME) Touch the desired category the menu item to change the settings of turns orange.) Then, touch the menu ...
Operating Guide
Page 42
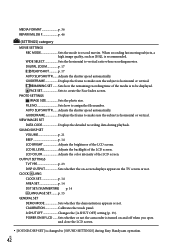
...SET] is turned on the TV screen or not. Sets whether or not the camcorder is changed to be displayed. MEDIA FORMAT p. 36 REPAIR IMG.DB F p. ... category MOVIE SETTINGS REC MODE Sets the mode to assign the file number. DIGITAL ZOOM p. 17 STEADYSHOT p. 17 AUTO SLW SHUTTR....... FILE NO Sets how to record ...movies. VIEW IMAGES SET DATA CODE Displays the detailed recording data during Easy Handycam operation. CLOCK/ LANG CLOCK SET p. 14 AREA SET p. 14 DST SET//...IMAGE SIZE Sets the photo size. p. 15 GENERAL SET DEMO MODE Sets whether the demonstration appears or ...
...SET] is turned on the TV screen or not. Sets whether or not the camcorder is changed to be displayed. MEDIA FORMAT p. 36 REPAIR IMG.DB F p. ... category MOVIE SETTINGS REC MODE Sets the mode to assign the file number. DIGITAL ZOOM p. 17 STEADYSHOT p. 17 AUTO SLW SHUTTR....... FILE NO Sets how to record ...movies. VIEW IMAGES SET DATA CODE Displays the detailed recording data during Easy Handycam operation. CLOCK/ LANG CLOCK SET p. 14 AREA SET p. 14 DST SET//...IMAGE SIZE Sets the photo size. p. 15 GENERAL SET DEMO MODE Sets whether the demonstration appears or ...

Operating Guide
Page 44
.../ Refer to "PMB Guide" for details on the supplied software "PMB" (p. 28). 3 Select the desired language and the model name of your camcorder, then click [Handycam Handbook (PDF)]. The model name of your camcorder is printed on its bottom surface. 4 Click [Exit] [Exit], then remove the CD-ROM from your...
.../ Refer to "PMB Guide" for details on the supplied software "PMB" (p. 28). 3 Select the desired language and the model name of your camcorder, then click [Handycam Handbook (PDF)]. The model name of your camcorder is printed on its bottom surface. 4 Click [Exit] [Exit], then remove the CD-ROM from your...
Operating Guide
Page 45
... recordings during operation. "PMB" does not work correctly. Quit "PMB" and restart your camcorder still does not work, press RESET (p. 53) using your camcorder. However, your Sony dealer will neither copy nor retain your data. See the "Handycam Handbook" (p. 44) for any loss of internal memory data. During repair, we may...
... recordings during operation. "PMB" does not work correctly. Quit "PMB" and restart your camcorder still does not work, press RESET (p. 53) using your camcorder. However, your Sony dealer will neither copy nor retain your data. See the "Handycam Handbook" (p. 44) for any loss of internal memory data. During repair, we may...
Operating Guide
Page 48
... the seaside Store in a well-ventilated location subject to prevent the recovery of the camcorder Even if you perform [ EMPTY] (See "Getting detailed information from the "Handycam Handbook"" on disposal/transfer of your data. Note on page 44.) to little dirt or dust. To ...prevent mold, periodically clean the lens as you are fingerprints on your camcorder or a computer, you destroy the actual body of...
... the seaside Store in a well-ventilated location subject to prevent the recovery of the camcorder Even if you perform [ EMPTY] (See "Getting detailed information from the "Handycam Handbook"" on disposal/transfer of your data. Note on page 44.) to little dirt or dust. To ...prevent mold, periodically clean the lens as you are fingerprints on your camcorder or a computer, you destroy the actual body of...
Operating Guide
Page 51
... trademarks or registered trademarks of Adobe Systems Incorporated in the United States and/or other countries. On trademarks "Handycam" and are registered trademarks of Sony Corporation. "Memory Stick," " ," "Memory Stick Duo," " ," "Memory Stick PRO Duo," " ,"...Memory Stick" and "MagicGate Memory Stick Duo" are trademarks or registered trademarks of Sony Corporation. "InfoLITHIUM" is a trademark of Sony Corporation. "DVDirect" is a trademark of Sony Corporation. Dolby and the double-D symbol are trademarks of Dolby Laboratories...
... trademarks or registered trademarks of Adobe Systems Incorporated in the United States and/or other countries. On trademarks "Handycam" and are registered trademarks of Sony Corporation. "Memory Stick," " ," "Memory Stick Duo," " ," "Memory Stick PRO Duo," " ,"...Memory Stick" and "MagicGate Memory Stick Duo" are trademarks or registered trademarks of Sony Corporation. "InfoLITHIUM" is a trademark of Sony Corporation. "DVDirect" is a trademark of Sony Corporation. Dolby and the double-D symbol are trademarks of Dolby Laboratories...

Operating Guide
Page 54
... drive or folder........28 Disc recorder 34 DST SET 14 Dubbing 39 DVDirect Express 30 DVD writer 30 E Easy Handycam operation.........19 Easy PC Back-up 27 Editing movies 29 F Format 36 H Handycam Handbook 44 HELP function 40 HOME MENU 40, 41 I Install 24 L Language 15 US 54 M Macintosh 24 Maintenance 47... TV Type 23 U USB 24, 30 Using a wall outlet (wall socket) as a power source 13 V VISUAL INDEX 20 Volume 21 W Warning indicators 46 Windows 24 Z Zoom 17, 19, 22 You will find the menu lists on pages 41 to 43.
... drive or folder........28 Disc recorder 34 DST SET 14 Dubbing 39 DVDirect Express 30 DVD writer 30 E Easy Handycam operation.........19 Easy PC Back-up 27 Editing movies 29 F Format 36 H Handycam Handbook 44 HELP function 40 HOME MENU 40, 41 I Install 24 L Language 15 US 54 M Macintosh 24 Maintenance 47... TV Type 23 U USB 24, 30 Using a wall outlet (wall socket) as a power source 13 V VISUAL INDEX 20 Volume 21 W Warning indicators 46 Windows 24 Z Zoom 17, 19, 22 You will find the menu lists on pages 41 to 43.
Handycam® Handbook
Page 1
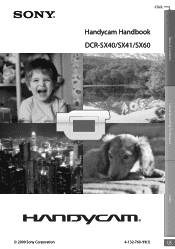
Click Handycam Handbook DCR-SX40/SX41/SX60 Table of Contents Useful Recording Techniques Index 2009 Sony Corporation 4-132-760-11(1) US
Click Handycam Handbook DCR-SX40/SX41/SX60 Table of Contents Useful Recording Techniques Index 2009 Sony Corporation 4-132-760-11(1) US

Handycam® Handbook
Page 2
... the Help of the supplied "PMB (Picture Motion Browser)" software. Table of Contents Useful Recording Techniques Using the Handycam Handbook You will find information on using your camcorder connected to a computer will jump to the page for that item. Click here. You...an item by keyword using Adobe Reader. About this Handycam Handbook The example images used in this Handycam Handbook for information quickly Click an item on your camcorder. In this manual. Design and specifications of your camcorder and "Memory Stick PRO Duo" media are called...
... the Help of the supplied "PMB (Picture Motion Browser)" software. Table of Contents Useful Recording Techniques Using the Handycam Handbook You will find information on using your camcorder connected to a computer will jump to the page for that item. Click here. You...an item by keyword using Adobe Reader. About this Handycam Handbook The example images used in this Handycam Handbook for information quickly Click an item on your camcorder. In this manual. Design and specifications of your camcorder and "Memory Stick PRO Duo" media are called...

Handycam® Handbook
Page 3
...for successful recording 19 Recording and playing movies and photos easily ( Easy Handycam Operation) ...20 Recording movies 20 Shooting photos 22 Playing movies 23 ...photos 25 Recording 26 Recording movies 26 Shooting photos 28 Useful functions for recording movies and photos 30 Zooming 30 Adjusting the exposure for information quickly 2 Useful recording techniques 6 Parts and controls 7 Screen indicators...of the HOME MENU 11 List of the OPTION MENU 12 Read this before operating your camcorder 13 Getting started Step 1: Charging the battery pack 15 Step 2: Turning the power on,...
...for successful recording 19 Recording and playing movies and photos easily ( Easy Handycam Operation) ...20 Recording movies 20 Shooting photos 22 Playing movies 23 ...photos 25 Recording 26 Recording movies 26 Shooting photos 28 Useful functions for recording movies and photos 30 Zooming 30 Adjusting the exposure for information quickly 2 Useful recording techniques 6 Parts and controls 7 Screen indicators...of the HOME MENU 11 List of the OPTION MENU 12 Read this before operating your camcorder 13 Getting started Step 1: Charging the battery pack 15 Step 2: Turning the power on,...

Handycam® Handbook
Page 10
Table of Contents Useful Recording Techniques Notes When the item you want is not on the screen, touch another tab. (There may be no tab.) You cannot use the OPTION MENU during Easy Handycam operation. The tabs and items that appear on the screen depend on the recording/playback status of your camcorder at the time. 10 Index
Table of Contents Useful Recording Techniques Notes When the item you want is not on the screen, touch another tab. (There may be no tab.) You cannot use the OPTION MENU during Easy Handycam operation. The tabs and items that appear on the screen depend on the recording/playback status of your camcorder at the time. 10 Index


