Operating Guide
Page 8
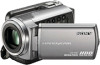
... (1) Rechargeable battery pack Only for DCR-SR47/SR48/SR67: NP-FH30 (1) Only for DCR-SR87: NP-FH50 (1) CD-ROM "Handycam Application Software" (1) (p. 25) "PMB" (software) including "PMB Guide" "Handycam Handbook" (PDF) "Operating Guide" (This manual) (1) See page 39 for help. The camcorder may not be able to record or...
... (1) Rechargeable battery pack Only for DCR-SR47/SR48/SR67: NP-FH30 (1) Only for DCR-SR87: NP-FH50 (1) CD-ROM "Handycam Application Software" (1) (p. 25) "PMB" (software) including "PMB Guide" "Handycam Handbook" (PDF) "Operating Guide" (This manual) (1) See page 39 for help. The camcorder may not be able to record or...
Operating Guide
Page 9
...image data on a disc such as "Memory Stick PRO Duo" media. You will find the "Handycam Handbook" (PDF) on the supplied CD-ROM (p. 45). The screenshots are captured using a digital ... the LCD screen. Change the screen language before using a DVD writer, VCR, or DVD/HDD recorder. Images cannot be copyrighted. On recording Before starting to record, test the ...may appear different from Windows Vista. The scenes may vary depending on the operating system of the camcorder and "Memory Stick PRO Duo" media are called "recording media." In this Operating...
...image data on a disc such as "Memory Stick PRO Duo" media. You will find the "Handycam Handbook" (PDF) on the supplied CD-ROM (p. 45). The screenshots are captured using a digital ... the LCD screen. Change the screen language before using a DVD writer, VCR, or DVD/HDD recorder. Images cannot be copyrighted. On recording Before starting to record, test the ...may appear different from Windows Vista. The scenes may vary depending on the operating system of the camcorder and "Memory Stick PRO Duo" media are called "recording media." In this Operating...
Operating Guide
Page 11
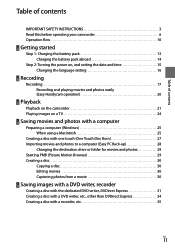
Table of contents Table of contents IMPORTANT SAFETY INSTRUCTIONS 3 Read this before operating your camcorder 6 Operation flow 10 Getting started Step 1: Charging the battery pack 13 Charging the battery pack abroad 14 Step 2: Turning the power on, and ...setting the date and time 15 Changing the language setting 16 Recording Recording 17 Recording and playing movies and photos easily (Easy Handycam operation 20 Playback Playback on the camcorder 21 Playing images on a TV 24 Saving movies and photos with a computer Preparing a computer (Windows 25 When using a Macintosh 25 Creating...
Table of contents Table of contents IMPORTANT SAFETY INSTRUCTIONS 3 Read this before operating your camcorder 6 Operation flow 10 Getting started Step 1: Charging the battery pack 13 Charging the battery pack abroad 14 Step 2: Turning the power on, and ...setting the date and time 15 Changing the language setting 16 Recording Recording 17 Recording and playing movies and photos easily (Easy Handycam operation 20 Playback Playback on the camcorder 21 Playing images on a TV 24 Saving movies and photos with a computer Preparing a computer (Windows 25 When using a Macintosh 25 Creating...
Operating Guide
Page 12
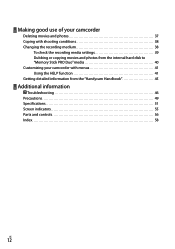
Making good use of your camcorder Deleting movies and photos 37 Coping with shooting conditions 38 Changing the recording medium 38 To check the recording media settings 39 Dubbing or copying movies and photos from the internal hard disk to "Memory Stick PRO Duo" media 40 Customizing your camcorder with menus 41 Using the HELP function 41 Getting detailed information from the "Handycam Handbook 45 Additional information Troubleshooting 46 Precautions 49 Specifications 51 Screen indicators 55 Parts and controls 56 Index 58 US 12
Making good use of your camcorder Deleting movies and photos 37 Coping with shooting conditions 38 Changing the recording medium 38 To check the recording media settings 39 Dubbing or copying movies and photos from the internal hard disk to "Memory Stick PRO Duo" media 40 Customizing your camcorder with menus 41 Using the HELP function 41 Getting detailed information from the "Handycam Handbook 45 Additional information Troubleshooting 46 Precautions 49 Specifications 51 Screen indicators 55 Parts and controls 56 Index 58 US 12
Operating Guide
Page 20
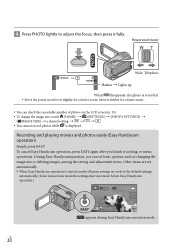
...changing the image size or deleting images, among the setting and adjustment items. Other items are set automatically. When Easy Handycam operation is recorded. Move the power zoom lever slightly for a faster zoom. You can check the recordable ...settings automatically. (Some menu items retain the settings that were made before Easy Handycam operation.) appears during Easy Handycam operation mode. Move it fully. Recording and playing movies and photos easily (Easy Handycam operation) Simply press EASY. During Easy Handycamoperation, you finish recording, or menu...
...changing the image size or deleting images, among the setting and adjustment items. Other items are set automatically. When Easy Handycam operation is recorded. Move the power zoom lever slightly for a faster zoom. You can check the recordable ...settings automatically. (Some menu items retain the settings that were made before Easy Handycam operation.) appears during Easy Handycam operation mode. Move it fully. Recording and playing movies and photos easily (Easy Handycam operation) Simply press EASY. During Easy Handycamoperation, you finish recording, or menu...

Operating Guide
Page 26
...screen appears. If the screen does not appear, click [Start] [Computer] (in the disc drive of your camcorder, then connect the camcorder to the computer using the supplied USB cable. higher version of "PMB" first, some functions may need to install third party software. ...to install the software. Depending on the computer, you may not work correctly. See page 45 on the "Handycam Handbook". Confirm that your camcorder is not connected to the computer. Turn on the computer. Log on as an Administrator for installation. ...
...screen appears. If the screen does not appear, click [Start] [Computer] (in the disc drive of your camcorder, then connect the camcorder to the computer using the supplied USB cable. higher version of "PMB" first, some functions may need to install third party software. ...to install the software. Depending on the computer, you may not work correctly. See page 45 on the "Handycam Handbook". Confirm that your camcorder is not connected to the computer. Turn on the computer. Log on as an Administrator for installation. ...

Operating Guide
Page 27
... beforehand (p. 25), however, do not start "PMB." Connect your camcorder to the wall outlet (wall socket) using the USB cable. Creating a disc...on a disc by simply pressing (DISC BURN) on your camcorder. Saving movies and photos with one touch (One Touch Disc... If any software starts automatically, shut it down. 2 Turn on your camcorder, and connect it to the computer using the AC Adaptor supplied for the...Touch [END] [YES] on the camcorder screen. Disconnect the USB cable. To disconnect your camcorder from your computer. Other icons may appear...
... beforehand (p. 25), however, do not start "PMB." Connect your camcorder to the wall outlet (wall socket) using the USB cable. Creating a disc...on a disc by simply pressing (DISC BURN) on your camcorder. Saving movies and photos with one touch (One Touch Disc... If any software starts automatically, shut it down. 2 Turn on your camcorder, and connect it to the computer using the AC Adaptor supplied for the...Touch [END] [YES] on the camcorder screen. Disconnect the USB cable. To disconnect your camcorder from your computer. Other icons may appear...
Operating Guide
Page 28
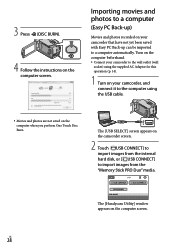
... a computer (Easy PC Back-up) Movies and photos recorded on the computer screen. US 28 The [Handycam Utility] window appears on your camcorder, and connect it to a computer automatically. Turn on the computer beforehand. Connect your camcorder to the wall outlet (wall socket) using the supplied AC Adaptor for this operation (p. 14...). 1 Turn on your camcorder that have not yet been saved with Easy PC Back-up can be imported to the computer using the USB cable. Movies and photos ...
... a computer (Easy PC Back-up) Movies and photos recorded on the computer screen. US 28 The [Handycam Utility] window appears on your camcorder, and connect it to a computer automatically. Turn on the computer beforehand. Connect your camcorder to the wall outlet (wall socket) using the supplied AC Adaptor for this operation (p. 14...). 1 Turn on your camcorder that have not yet been saved with Easy PC Back-up can be imported to the computer using the USB cable. Movies and photos ...
Operating Guide
Page 29
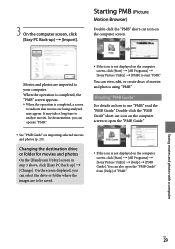
...photos with a computer US 29 Double-click the "PMB Guide" short-cut icon on the computer screen, click [Start] [All Programs] [Sony Picture Utility] [Help] [PMB Guide]. 3 On the computer screen, click [Easy PC Back-up ] [Change]. On the ... appears. When the operation is not displayed on the computer screen. Changing the destination drive or folder for movies and photos On the [Handycam Utility] screen in step 3 above, click [Easy PC Back-up ] [Import]. Starting PMB (Picture Motion Browser) Double-click the ...
...photos with a computer US 29 Double-click the "PMB Guide" short-cut icon on the computer screen, click [Start] [All Programs] [Sony Picture Utility] [Help] [PMB Guide]. 3 On the computer screen, click [Easy PC Back-up ] [Change]. On the ... appears. When the operation is not displayed on the computer screen. Changing the destination drive or folder for movies and photos On the [Handycam Utility] screen in step 3 above, click [Easy PC Back-up ] [Import]. Starting PMB (Picture Motion Browser) Double-click the ...
Operating Guide
Page 41
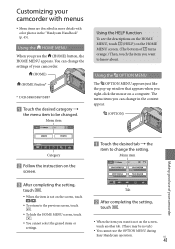
...When the item is not on the screen, touch another tab. (There may be no tab.) You cannot use of your camcorder. (HOME) (HOME) button* * DCR-SR48/SR67/SR87 Touch the desired category the menu item to be changed. Using the OPTION MENU The OPTION MENU appears just like the... on a computer. US 41 The menu items you can change the settings of turns orange.) Then, touch the item you want to change in the "Handycam Handbook" (p. 45). Using the HOME MENU When you right-click the mouse on the screen, touch /. To return to the previous screen, touch ....
...When the item is not on the screen, touch another tab. (There may be no tab.) You cannot use of your camcorder. (HOME) (HOME) button* * DCR-SR48/SR67/SR87 Touch the desired category the menu item to be changed. Using the OPTION MENU The OPTION MENU appears just like the... on a computer. US 41 The menu items you can change the settings of turns orange.) Then, touch the item you want to change in the "Handycam Handbook" (p. 45). Using the HOME MENU When you right-click the mouse on the screen, touch /. To return to the previous screen, touch ....
Operating Guide
Page 44
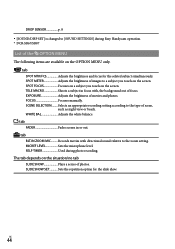
... situation/no tab SLIDE SHOW Plays a series of movies and photos. Records movies with , the background out of focus. SELF-TIMER Used during Easy Handycam operation. * DCR-SR67/SR87 List of scene, such as night view or beach. EXPOSURE Adjusts the brightness of photos. tab FADER Fades scenes in focus with directional sound...
... situation/no tab SLIDE SHOW Plays a series of movies and photos. Records movies with , the background out of focus. SELF-TIMER Used during Easy Handycam operation. * DCR-SR67/SR87 List of scene, such as night view or beach. EXPOSURE Adjusts the brightness of photos. tab FADER Fades scenes in focus with directional sound...
Operating Guide
Page 45
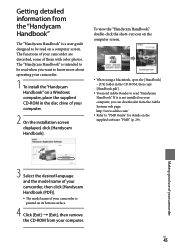
..." on a Windows computer, place the supplied CD-ROM in the disc drive of your camcorder is a user guide designed to be read "Handycam Handbook." If it from the "Handycam Handbook" The "Handycam Handbook" is printed on its bottom surface. 4 Click [Exit] [Exit], then remove ...the CD-ROM from your computer. Making good use of your camcorder 3 Select the desired language and the model name of your camcorder, then click [Handycam Handbook (PDF)]. The model name of your camcorder are described, some of them with color photos. The functions of your computer...
..." on a Windows computer, place the supplied CD-ROM in the disc drive of your camcorder is a user guide designed to be read "Handycam Handbook." If it from the "Handycam Handbook" The "Handycam Handbook" is printed on its bottom surface. 4 Click [Exit] [Exit], then remove ...the CD-ROM from your computer. Making good use of your camcorder 3 Select the desired language and the model name of your camcorder, then click [Handycam Handbook (PDF)]. The model name of your camcorder are described, some of them with color photos. The functions of your computer...
Operating Guide
Page 46
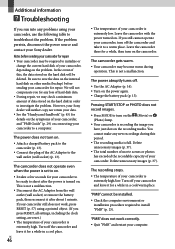
...on connecting your data. See the "Handycam Handbook" (p. 45) for repair. "PMB" cannot be deleted. Be sure to save the data on the internal hard disk on the hard disk will neither copy nor retain your camcorder to troubleshoot the problem. You cannot make any ...is not a malfunction. In the event of your Sony dealer. Turn off the camcorder and take it for a while in a cool/warm place. Leave the camcorder with the power turned on the camcorder. Leave the camcorder there for a while, then turn off the camcorder and leave it after the power is not a...
...on connecting your data. See the "Handycam Handbook" (p. 45) for repair. "PMB" cannot be deleted. Be sure to save the data on the internal hard disk on the hard disk will neither copy nor retain your camcorder to troubleshoot the problem. You cannot make any ...is not a malfunction. In the event of your Sony dealer. Turn off the camcorder and take it for a while in a cool/warm place. Leave the camcorder with the power turned on the camcorder. Leave the camcorder there for a while, then turn off the camcorder and leave it after the power is not a...
Operating Guide
Page 50
...rechargeable battery to the wall outlet (wall socket) via the AC Adaptor or while the battery pack is not charged, the camcorder operation will be entirely deleted from the "Handycam Handbook" " on a computer. Also, when you dispose of the "Memory Stick PRO Duo" media, it is recommended that... you perform [MEDIA FORMAT] or formatting, some data might not be fully discharged in about 3 months if you do not use your camcorder at the seaside...
...rechargeable battery to the wall outlet (wall socket) via the AC Adaptor or while the battery pack is not charged, the camcorder operation will be entirely deleted from the "Handycam Handbook" " on a computer. Also, when you dispose of the "Memory Stick PRO Duo" media, it is recommended that... you perform [MEDIA FORMAT] or formatting, some data might not be fully discharged in about 3 months if you do not use your camcorder at the seaside...

Operating Guide
Page 54
...Inc. Furthermore, and are not mentioned in each case in the U.S. US 54 On trademarks "Handycam" and are registered trademarks of Sony Corporation. "Memory Stick," " ," "Memory Stick Duo," " ," "Memory Stick PRO Duo," " ," "Memory Stick... Memory Stick" and "MagicGate Memory Stick Duo" are trademarks or registered trademarks of Sony Corporation. "InfoLITHIUM" is a trademark of Sony Corporation. "DVDirect" is a trademark of Sony Corporation. Dolby and the double-D symbol are trademarks of Dolby Laboratories. ...
...Inc. Furthermore, and are not mentioned in each case in the U.S. US 54 On trademarks "Handycam" and are registered trademarks of Sony Corporation. "Memory Stick," " ," "Memory Stick Duo," " ," "Memory Stick PRO Duo," " ," "Memory Stick... Memory Stick" and "MagicGate Memory Stick Duo" are trademarks or registered trademarks of Sony Corporation. "InfoLITHIUM" is a trademark of Sony Corporation. "DVDirect" is a trademark of Sony Corporation. Dolby and the double-D symbol are trademarks of Dolby Laboratories. ...
Operating Guide
Page 58
... drive or folder........29 Disc recorder 35 DST SET 15 Dubbing 40 DVDirect Express 31 DVD writer 31 E Easy Handycam operation.........20 Easy PC Back-up 28 Editing movies 30 F Format 37 H Handycam Handbook 45 HELP function 41 HOME MENU 41, 42 I Install 25 L Language 16 US 58 M Macintosh 25 Maintenance 49...
... drive or folder........29 Disc recorder 35 DST SET 15 Dubbing 40 DVDirect Express 31 DVD writer 31 E Easy Handycam operation.........20 Easy PC Back-up 28 Editing movies 30 F Format 37 H Handycam Handbook 45 HELP function 41 HOME MENU 41, 42 I Install 25 L Language 16 US 58 M Macintosh 25 Maintenance 49...
Marketing Specifications
Page 1
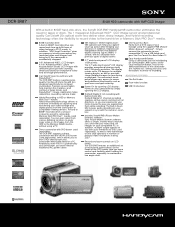
...USB 2.0 interface: Dolby® Digital 5.1ch recording with 1MP CCD imager With a built-in 80GB1 hard disk drive, the Sony® DCR-SR87 Handycam® camcorder eliminates the need an additional AC power cable. 25X Optical / 2000X Digital Zoom: 25X optical zoom help maintain the sharpness ...designed specifically for a PC. With a press of the Easy Handycam Button, most of the advanced features of the camcorder are "locked out," letting you burn your memories to 2000X) is powered by camera shake. DCR-SR87 80GB HDD camcorder with Built-in Zoom Mic: Dolby® Digital 5.1 channel ...
...USB 2.0 interface: Dolby® Digital 5.1ch recording with 1MP CCD imager With a built-in 80GB1 hard disk drive, the Sony® DCR-SR87 Handycam® camcorder eliminates the need an additional AC power cable. 25X Optical / 2000X Digital Zoom: 25X optical zoom help maintain the sharpness ...designed specifically for a PC. With a press of the Easy Handycam Button, most of the advanced features of the camcorder are "locked out," letting you burn your memories to 2000X) is powered by camera shake. DCR-SR87 80GB HDD camcorder with Built-in Zoom Mic: Dolby® Digital 5.1 channel ...
Marketing Specifications
Page 2
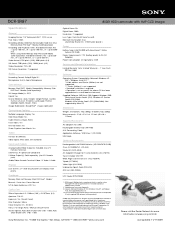
... = up to be included if logo shown or listed in a multi-boot environment. Available capacity is approximately 79.3GB. 3. Sony, Handycam, Advanced HAD, Memory Stick, Memory Stick Duo, Memory Stick PRO Duo, DVDirect and SteadyShot are trademarks of Microsoft Corporation. Not ... Built-in part without written permission is prohibited. Not supported by Mac OS. 12. Windows, and Windows Vista are registered trademarks of Sony. DCR-SR87 80GB HDD camcorder with AccuPower™ Meter System (NP-FH50) Power Requirements: 7.2V (battery pack); 8.4V (AC Adaptor) Power Consumption (in Operation...
... = up to be included if logo shown or listed in a multi-boot environment. Available capacity is approximately 79.3GB. 3. Sony, Handycam, Advanced HAD, Memory Stick, Memory Stick Duo, Memory Stick PRO Duo, DVDirect and SteadyShot are trademarks of Microsoft Corporation. Not ... Built-in part without written permission is prohibited. Not supported by Mac OS. 12. Windows, and Windows Vista are registered trademarks of Sony. DCR-SR87 80GB HDD camcorder with AccuPower™ Meter System (NP-FH50) Power Requirements: 7.2V (battery pack); 8.4V (AC Adaptor) Power Consumption (in Operation...

Handycam® Handbook
Page 1
Click Handycam Handbook DCR-SR47/SR48/SR67/SR87 Table of Contents Useful Recording Techniques Index 2009 Sony Corporation 4-124-310-12(1) US
Click Handycam Handbook DCR-SR47/SR48/SR67/SR87 Table of Contents Useful Recording Techniques Index 2009 Sony Corporation 4-124-310-12(1) US
Handycam® Handbook
Page 2
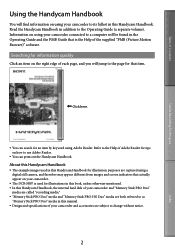
... the Operating Guide and the PMB Guide that is used in this Handycam Handbook for illustration purposes are captured using your camcorder connected to the page for information quickly Click an item on your camcorder. The DCR-SR87 is the Help of each page, and you will jump to a... computer will be found in this manual. Design and specifications of your camcorder and "Memory Stick PRO Duo" media are called "recording media...
... the Operating Guide and the PMB Guide that is used in this Handycam Handbook for illustration purposes are captured using your camcorder connected to the page for information quickly Click an item on your camcorder. The DCR-SR87 is the Help of each page, and you will jump to a... computer will be found in this manual. Design and specifications of your camcorder and "Memory Stick PRO Duo" media are called "recording media...


