Handycam® Handbook
Page 2
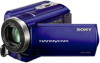
...(1) A/V connecting cable (1) USB cable (1) Rechargeable battery pack NP-FV30 (1) CD-ROM "Handycam" Application Software (1) "PMB" (software, including "PMB Help") "Handycam" Handbook (PDF) "Operating Guide" (1) under the current recording or playback conditions. ... Exposing the LCD screen or the lens to malfunction. Save important data to your camcorder for long periods of your camcorder to direct sunlight for the first time, formatting the memory card with this first Supplied items...
...(1) A/V connecting cable (1) USB cable (1) Rechargeable battery pack NP-FV30 (1) CD-ROM "Handycam" Application Software (1) "PMB" (software, including "PMB Help") "Handycam" Handbook (PDF) "Operating Guide" (1) under the current recording or playback conditions. ... Exposing the LCD screen or the lens to malfunction. Save important data to your camcorder for long periods of your camcorder to direct sunlight for the first time, formatting the memory card with this first Supplied items...
Handycam® Handbook
Page 3
...SR68/SR88/SX44/SX63) [YES] [YES] . Also, you repeat recording/deleting images for a long time, fragmentation of data occurs on some type of external media first, and then perform [MEDIA FORMAT] by Carl Zeiss, in Germany, and Sony Corporation, and produces superior images. Note on the camcorder/battery... on battery pack/AC Adaptor Be sure to another device with a Carl Zeiss lens, which was developed jointly by touching (MENU) [Show others] [MEDIA FORMAT] (under [MANAGE MEDIA] category) the desired medium (DCR- It...
...SR68/SR88/SX44/SX63) [YES] [YES] . Also, you repeat recording/deleting images for a long time, fragmentation of data occurs on some type of external media first, and then perform [MEDIA FORMAT] by Carl Zeiss, in Germany, and Sony Corporation, and produces superior images. Note on the camcorder/battery... on battery pack/AC Adaptor Be sure to another device with a Carl Zeiss lens, which was developed jointly by touching (MENU) [Show others] [MEDIA FORMAT] (under [MANAGE MEDIA] category) the desired medium (DCR- It...

Handycam® Handbook
Page 4
On the drop sensor (DCR-SR68/SR88) To protect the internal hard disk from the camcorder, or subject the camcorder to change without notice. Note on using a digital still camera, and therefore may appear different from images and screen indicators that actually appear on your camcorder The model name is shown in this manual when...stopped. Confirm the model name of this series are as follows. If the drop sensor catches a drop repeatedly, recording/ playback may damage the internal hard disk drive of your camcorder in very loud areas. Doing so may be recorded.
On the drop sensor (DCR-SR68/SR88) To protect the internal hard disk from the camcorder, or subject the camcorder to change without notice. Note on using a digital still camera, and therefore may appear different from images and screen indicators that actually appear on your camcorder The model name is shown in this manual when...stopped. Confirm the model name of this series are as follows. If the drop sensor catches a drop repeatedly, recording/ playback may damage the internal hard disk drive of your camcorder in very loud areas. Doing so may be recorded.

Handycam® Handbook
Page 6
..., since the recording person is essential that you not move your camcorder horizontally as you can continue recording without worrying about battery power shortages. By always carrying spare batteries, you hold the camcorder, keep your upper body upright, and hold your arms close to... the microphone than the recorded person. Evoking a feeling of camcorder accessories. And, use of spaciousness ...
..., since the recording person is essential that you not move your camcorder horizontally as you can continue recording without worrying about battery power shortages. By always carrying spare batteries, you hold the camcorder, keep your upper body upright, and hold your arms close to... the microphone than the recorded person. Evoking a feeling of camcorder accessories. And, use of spaciousness ...
Handycam® Handbook
Page 8
... for successful recording 6 Getting started Step 1: Charging the battery pack 11 Step 2: Turning the power on, and setting the date and time 15 Changing the language setting 16 Step 3: Preparing the recording media 17 Selecting the recording media for movies (DCR-SR68/SR88/SX44/SX63).. . . . . 17 Selecting the...recording mode 25 Using the VIDEO LIGHT 26 Adjusting the exposure for backlit subjects 26 Recording in mirror mode 26 Playback on the camcorder 27 Useful functions for playing movies and photos 30 Searching for desired images by date (Date Index 30 Searching for desired scene...
... for successful recording 6 Getting started Step 1: Charging the battery pack 11 Step 2: Turning the power on, and setting the date and time 15 Changing the language setting 16 Step 3: Preparing the recording media 17 Selecting the recording media for movies (DCR-SR68/SR88/SX44/SX63).. . . . . 17 Selecting the...recording mode 25 Using the VIDEO LIGHT 26 Adjusting the exposure for backlit subjects 26 Recording in mirror mode 26 Playback on the camcorder 27 Useful functions for playing movies and photos 30 Searching for desired images by date (Date Index 30 Searching for desired scene...
Handycam® Handbook
Page 10
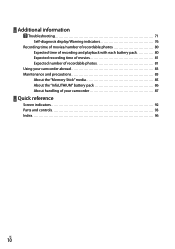
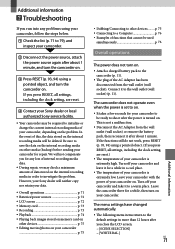
Additional information Troubleshooting 71 Self-diagnosis display/Warning indicators 76 Recording time of movies/number of recordable photos 80 Expected time of recording and playback with each battery pack 80 Expected recording time of movies 81 Expected number of recordable photos 81 Using your camcorder abroad 83 Maintenance and precautions 85 About the "Memory Stick" media 85 About the "InfoLITHIUM" battery pack 86 About handling of your camcorder 87 Quick reference Screen indicators 92 Parts and controls 93 Index 96 US 10
Additional information Troubleshooting 71 Self-diagnosis display/Warning indicators 76 Recording time of movies/number of recordable photos 80 Expected time of recording and playback with each battery pack 80 Expected recording time of movies 81 Expected number of recordable photos 81 Using your camcorder abroad 83 Maintenance and precautions 85 About the "Memory Stick" media 85 About the "InfoLITHIUM" battery pack 86 About handling of your camcorder 87 Quick reference Screen indicators 92 Parts and controls 93 Index 96 US 10

Handycam® Handbook
Page 11
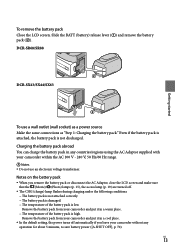
Getting started Step 1: Charging the battery pack DCR-SR68/SR88 Battery pack CHG (charge) lamp DCR-SX43/SX44/SX63 DC IN jack DC plug AC Adaptor Power cord (Mains lead) To the wall outlet (wall socket) CHG (charge) lamp Getting started Battery pack DC IN jack DC plug AC Adaptor Power cord (Mains lead) To the wall outlet (wall socket) US 11
Getting started Step 1: Charging the battery pack DCR-SR68/SR88 Battery pack CHG (charge) lamp DCR-SX43/SX44/SX63 DC IN jack DC plug AC Adaptor Power cord (Mains lead) To the wall outlet (wall socket) CHG (charge) lamp Getting started Battery pack DC IN jack DC plug AC Adaptor Power cord (Mains lead) To the wall outlet (wall socket) US 11

Handycam® Handbook
Page 12
...°F to 86 °F) is on, you fully charge a fully discharged battery pack. You can check the approximate amount of your camcorder. Tips See page 80 on recording and playing time. When your camcorder and the wall outlet (wall socket). Align the mark ...Adaptor and the power cord (mains lead) to your camcorder. 1 Turn off when the battery pack is fully charged. 4 When the battery is charged, disconnect the AC Adaptor from the DC IN jack of remaining battery power with the remaining battery indicator at the upper left on the DC IN jack....
...°F to 86 °F) is on, you fully charge a fully discharged battery pack. You can check the approximate amount of your camcorder. Tips See page 80 on recording and playing time. When your camcorder and the wall outlet (wall socket). Align the mark ...Adaptor and the power cord (mains lead) to your camcorder. 1 Turn off when the battery pack is fully charged. 4 When the battery is charged, disconnect the AC Adaptor from the DC IN jack of remaining battery power with the remaining battery indicator at the upper left on the DC IN jack....
Handycam® Handbook
Page 13
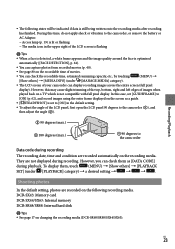
...the battery pack." Remove the battery pack from your camcorder and put it in any operation for about 5 minutes, to save battery power ([A.SHUT OFF], p. 70). Slide the BATT (battery) release lever () and remove the battery pack (). Charging the battery pack abroad You can charge the battery pack...: The battery pack is not attached correctly. The battery pack is damaged. The temperature of the battery pack is not discharged. US 13 Getting started To remove the battery pack Close the LCD screen. DCR-SR68/SR88 DCR-SX43/SX44/SX63 To...
...the battery pack." Remove the battery pack from your camcorder and put it in any operation for about 5 minutes, to save battery power ([A.SHUT OFF], p. 70). Slide the BATT (battery) release lever () and remove the battery pack (). Charging the battery pack abroad You can charge the battery pack...: The battery pack is not attached correctly. The battery pack is damaged. The temperature of the battery pack is not discharged. US 13 Getting started To remove the battery pack Close the LCD screen. DCR-SR68/SR88 DCR-SX43/SX44/SX63 To...

Handycam® Handbook
Page 14
Notes on the AC Adaptor Use the nearby wall outlet (wall socket) when using your camcorder. Do not use the AC Adaptor placed in a narrow space, such as between a wall and furniture. Do not short-circuit the DC plug of the AC Adaptor or battery terminal with any metallic objects. US 14 This may cause a malfunction. Disconnect the AC Adaptor from the wall outlet (wall socket) immediately if any malfunction occurs while using the AC Adaptor.
Notes on the AC Adaptor Use the nearby wall outlet (wall socket) when using your camcorder. Do not use the AC Adaptor placed in a narrow space, such as between a wall and furniture. Do not short-circuit the DC plug of the AC Adaptor or battery terminal with any metallic objects. US 14 This may cause a malfunction. Disconnect the AC Adaptor from the wall outlet (wall socket) immediately if any malfunction occurs while using the AC Adaptor.
Handycam® Handbook
Page 23
... not displayed during recording The recording date, time and condition are recorded on changing the recording media (DCR-SR68/SR88/SX44/SX63). DCR-SX43: Memory card DCR-SX44/SX63: Internal memory DCR-SR68/SR88: Internal hard disk Tips See page 17 on the following states will be indicated if data is ...and then adjust the angle (). 90 degrees (max.) 180 degrees (max.) 90 degrees to the camcorder, or remove the battery or AC Adaptor. Access lamp (p. 19) is lit or flashing The media icon in the upper right of images...
... not displayed during recording The recording date, time and condition are recorded on changing the recording media (DCR-SR68/SR88/SX44/SX63). DCR-SX43: Memory card DCR-SX44/SX63: Internal memory DCR-SR68/SR88: Internal hard disk Tips See page 17 on the following states will be indicated if data is ...and then adjust the angle (). 90 degrees (max.) 180 degrees (max.) 90 degrees to the camcorder, or remove the battery or AC Adaptor. Access lamp (p. 19) is lit or flashing The media icon in the upper right of images...
Handycam® Handbook
Page 26
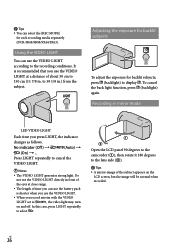
... adjust the exposure for each recording media separately (DCR-SR68/SR88/SX44/SX63). Open the LCD panel 90 degrees to the camcorder (), then rotate it 180 degrees to the lens side (). Tips A mirror-image of time you can use the battery pack is recommended that you use the VIDEO LIGHT...
... adjust the exposure for each recording media separately (DCR-SR68/SR88/SX44/SX63). Open the LCD panel 90 degrees to the camcorder (), then rotate it 180 degrees to the lens side (). Tips A mirror-image of time you can use the battery pack is recommended that you use the VIDEO LIGHT...
Handycam® Handbook
Page 36
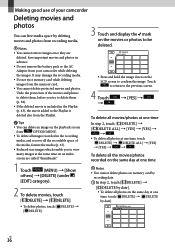
... delete them, before you try to delete them (p. 38). If the deleted movie is included in advance. Do not remove the battery pack or the AC Adaptor from the memory card. You cannot delete protected movies and photos. To delete all the movies/photos recorded on...DELETE] [ DELETE by date]. To delete all photos on the LCD screen to confirm the image. US 36 Making good use of your camcorder while deleting the images. Save important movies and photos in the Playlist (p. 43), the movie added to the Playlist is deleted also from the Playlist...
... delete them, before you try to delete them (p. 38). If the deleted movie is included in advance. Do not remove the battery pack or the AC Adaptor from the memory card. You cannot delete protected movies and photos. To delete all the movies/photos recorded on...DELETE] [ DELETE by date]. To delete all photos on the LCD screen to confirm the image. US 36 Making good use of your camcorder while deleting the images. Save important movies and photos in the Playlist (p. 43), the movie added to the Playlist is deleted also from the Playlist...
Handycam® Handbook
Page 39
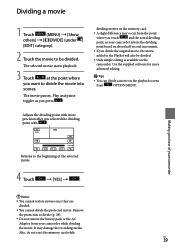
... divide the protected movie. Remove the protection to divide (p. 38). Do not remove the battery pack or the AC Adaptor from OPTION MENU. Making good use of your camcorder Returns to divide the movie into scenes. The selected movie starts playback. 3 Touch at the point where... Adjusts the dividing point with more advanced editing. Tips You can divide a movie on the playback screen from your camcorder selects the dividing point based on about half-second increments. If you press . It may occur from the point where you touch...
... divide the protected movie. Remove the protection to divide (p. 38). Do not remove the battery pack or the AC Adaptor from OPTION MENU. Making good use of your camcorder Returns to divide the movie into scenes. The selected movie starts playback. 3 Touch at the point where... Adjusts the dividing point with more advanced editing. Tips You can divide a movie on the playback screen from your camcorder selects the dividing point based on about half-second increments. If you press . It may occur from the point where you touch...

Handycam® Handbook
Page 43
...to return to the previous screen. Touch [YES] . Notes Do not remove the battery pack or the AC Adaptor from your camcorder US 43 Also, do not eject the memory card while editing movies on the Playlist by date]. Touch to return to the previous screen.... good use of the movies that you edit or erase the movies added to the Playlist. The selected movie is a list showing thumbnails of your camcorder while adding movies to the Playlist. You can add a movie on the memory card. You cannot add photos to the Playlist....
...to return to the previous screen. Touch [YES] . Notes Do not remove the battery pack or the AC Adaptor from your camcorder US 43 Also, do not eject the memory card while editing movies on the Playlist by date]. Touch to return to the previous screen.... good use of the movies that you edit or erase the movies added to the Playlist. The selected movie is a list showing thumbnails of your camcorder while adding movies to the Playlist. You can add a movie on the memory card. You cannot add photos to the Playlist....
Handycam® Handbook
Page 56
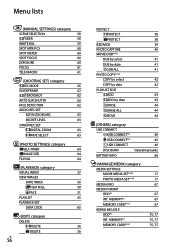
... ADD 43 ADD by date 43 ERASE 44 ERASE ALL 44 MOVE 44 (OTHERS) category USB CONNECT USB CONNECT*1 USB CONNECT*2 USB CONNECT DISC BURN BATTERY INFO 49 49 49 Operating Guide 66 (MANAGE MEDIA) category MEDIA SETTINGS MOVIE MEDIA SET*1*2 PHOTO MEDIA SET*1*2 MEDIA INFO MEDIA FORMAT HDD*1 INT.
... ADD 43 ADD by date 43 ERASE 44 ERASE ALL 44 MOVE 44 (OTHERS) category USB CONNECT USB CONNECT*1 USB CONNECT*2 USB CONNECT DISC BURN BATTERY INFO 49 49 49 Operating Guide 66 (MANAGE MEDIA) category MEDIA SETTINGS MOVIE MEDIA SET*1*2 PHOTO MEDIA SET*1*2 MEDIA INFO MEDIA FORMAT HDD*1 INT.

Handycam® Handbook
Page 59
Out In To cancel the fader before starting the operation, touch [OFF]. Tips When you have changed the battery pack while [AUTO] was selected, or taken your camcorder outdoors after touching , set [WHITE BAL.] to [AUTO]. If you set [WHITE BAL.], [SCENE SELECTION] is set to [...The white balance will be set. When [ONE PUSH] was selected, if keeps flashing after inside use (or vice versa), aim your camcorder Out In BLACK FADER Fades in [ONE PUSH] under white or cool white fluorescent lamps. When you select [ONE PUSH], keep framing ...
Out In To cancel the fader before starting the operation, touch [OFF]. Tips When you have changed the battery pack while [AUTO] was selected, or taken your camcorder outdoors after touching , set [WHITE BAL.] to [AUTO]. If you set [WHITE BAL.], [SCENE SELECTION] is set to [...The white balance will be set. When [ONE PUSH] was selected, if keeps flashing after inside use (or vice versa), aim your camcorder Out In BLACK FADER Fades in [ONE PUSH] under white or cool white fluorescent lamps. When you select [ONE PUSH], keep framing ...
Handycam® Handbook
Page 66
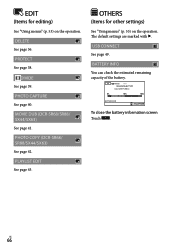
DIVIDE See page 39. USB CONNECT See page 49. To close the battery information screen Touch . EDIT (Items for other settings) See "Using menus" (p. 53) on the operation. PHOTO COPY (DCR-SR68/ SR88/SX44/SX63) See page 42. PLAYLIST EDIT See page 43. MOVIE DUB (DCR-SR68/SR88/ SX44/SX63) See page 41. BATTERY INFO You can check the estimated remaining capacity of the battery. PHOTO CAPTURE See page 40. OTHERS (Items for editing) See "Using menus" (p. 53) on the operation. US 66 DELETE See page 36. PROTECT See page 38. The default settings are marked with .
DIVIDE See page 39. USB CONNECT See page 49. To close the battery information screen Touch . EDIT (Items for other settings) See "Using menus" (p. 53) on the operation. PHOTO COPY (DCR-SR68/ SR88/SX44/SX63) See page 42. PLAYLIST EDIT See page 43. MOVIE DUB (DCR-SR68/SR88/ SX44/SX63) See page 41. BATTERY INFO You can check the estimated remaining capacity of the battery. PHOTO CAPTURE See page 40. OTHERS (Items for editing) See "Using menus" (p. 53) on the operation. US 66 DELETE See page 36. PROTECT See page 38. The default settings are marked with .
Handycam® Handbook
Page 68
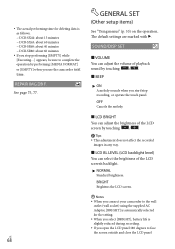
... [MEDIA FORMAT] or [EMPTY] when you use the camcorder next time. The actual performing time for the setting. When you select [BRIGHT], battery life is as follows; DCR-SX44: about 13 minutes DCR-SX63: about 60 minutes DCR-SR68: about 40 minutes DCR-SR88: about 60 minutes If you stop...
... [MEDIA FORMAT] or [EMPTY] when you use the camcorder next time. The actual performing time for the setting. When you select [BRIGHT], battery life is as follows; DCR-SX44: about 13 minutes DCR-SX63: about 60 minutes DCR-SR68: about 40 minutes DCR-SR88: about 60 minutes If you stop...
Handycam® Handbook
Page 71
...turn on the problem. If you press RESET, all settings, including the clock setting, are reset. Contact your Sony dealer or local authorized Sony service facility. Your camcorder may check a minimum amount of data stored on . p. 75 Connecting to a Computer p. 76 ... During repair, we may be required to initialize or change the current internal recording media of your camcorder, depending on . Attach a charged battery pack to the camcorder (p. 11). The plug of the AC Adaptor has been disconnected from the wall outlet (wall ...
...turn on the problem. If you press RESET, all settings, including the clock setting, are reset. Contact your Sony dealer or local authorized Sony service facility. Your camcorder may check a minimum amount of data stored on . p. 75 Connecting to a Computer p. 76 ... During repair, we may be required to initialize or change the current internal recording media of your camcorder, depending on . Attach a charged battery pack to the camcorder (p. 11). The plug of the AC Adaptor has been disconnected from the wall outlet (wall ...


