Handycam® Handbook
Page 2
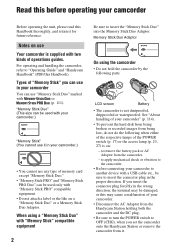
... the following when either of the respective lamps of your camcorder.) "Memory Stick" (You cannot use in your camcorder You can be used with your camcorder" (p. 114). • To prevent the hard disk from being broken or recorded images from being lost, do not do the following parts. ... On using a "Memory Stick Duo" with "Memory Stick" compatible equipment 2 Be sure to "Operating Guide" and "Handycam Handbook" (PDF/this Handbook). Read this before operating your camcorder to another device with a USB cable etc., be sure to remove the battery pack or AC Adaptor from the...
... the following when either of the respective lamps of your camcorder.) "Memory Stick" (You cannot use in your camcorder You can be used with your camcorder" (p. 114). • To prevent the hard disk from being broken or recorded images from being lost, do not do the following parts. ... On using a "Memory Stick Duo" with "Memory Stick" compatible equipment 2 Be sure to "Operating Guide" and "Handycam Handbook" (PDF/this Handbook). Read this before operating your camcorder to another device with a USB cable etc., be sure to remove the battery pack or AC Adaptor from the...

Handycam® Handbook
Page 12
.... Rechargeable battery pack NP-FH40 (1) (p. 13, 112) (DCR-SR32E/ SR33E/SR42E/SR52E/SR62E/SR72E/ SR82E) NP-FH60 (1) (p. 13, 112) (DCR-SR190E/ SR200E/SR290E/SR300E) Handycam Station (1) (p. 13) A/V connecting cable (1) (p. 35, 45) USB cable (1) (p. 46, 78, 81) 21-pin adaptor (p. 36) For the model with your camcorder. Picture Motion Browser (Software) - Handycam Handbook (This Handbook) Operating Guide (1) 12 mark...
.... Rechargeable battery pack NP-FH40 (1) (p. 13, 112) (DCR-SR32E/ SR33E/SR42E/SR52E/SR62E/SR72E/ SR82E) NP-FH60 (1) (p. 13, 112) (DCR-SR190E/ SR200E/SR290E/SR300E) Handycam Station (1) (p. 13) A/V connecting cable (1) (p. 35, 45) USB cable (1) (p. 46, 78, 81) 21-pin adaptor (p. 36) For the model with your camcorder. Picture Motion Browser (Software) - Handycam Handbook (This Handbook) Operating Guide (1) 12 mark...

Handycam® Handbook
Page 35
... (Red) VIDEO (White) AUDIO (Red) (Yellow) VCRs or TVs 1 A/V connecting cable (supplied) The Handycam Station and your camcorder are both your camcorder and the Handycam Station at the same time. Connect the A/V connecting cable either to the Handycam Station or to your camcorder, according to your setup. 2 A/V connecting cable with S VIDEO (optional) When connecting to another device via the...
... (Red) VIDEO (White) AUDIO (Red) (Yellow) VCRs or TVs 1 A/V connecting cable (supplied) The Handycam Station and your camcorder are both your camcorder and the Handycam Station at the same time. Connect the A/V connecting cable either to the Handycam Station or to your camcorder, according to your setup. 2 A/V connecting cable with S VIDEO (optional) When connecting to another device via the...

Handycam® Handbook
Page 36
... be displayed full screen. This is designed for that purpose. This adaptor is not a malfunction. TV/VCR • When you will view images on the camcorder. 2 Touch (HOME) t (SETTINGS) t [OUTPUT SETTINGS] t [TV TYPE] t [16:9] or [4:3] t . If your TV/VCR has a 21-pin adaptor (EUROCONNECTOR) Use the 21-pin ...adaptor supplied with your TV has only one audio input jack) Connect the yellow plug of the A/V connecting cable to the video input jack and connect the white (left channel) or red (right channel) plug to the audio input jack of the TV...
... be displayed full screen. This is designed for that purpose. This adaptor is not a malfunction. TV/VCR • When you will view images on the camcorder. 2 Touch (HOME) t (SETTINGS) t [OUTPUT SETTINGS] t [TV TYPE] t [16:9] or [4:3] t . If your TV/VCR has a 21-pin adaptor (EUROCONNECTOR) Use the 21-pin ...adaptor supplied with your TV has only one audio input jack) Connect the yellow plug of the A/V connecting cable to the video input jack and connect the white (left channel) or red (right channel) plug to the audio input jack of the TV...
Handycam® Handbook
Page 45
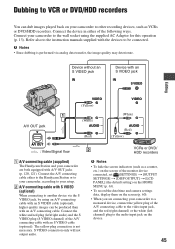
...Red) (White) AUDIO (Red) (Yellow) VCRs or DVD/ HDD recorders A A/V connecting cable (supplied) The Handycam Station and your camcorder are connecting your camcorder to a monaural device, connect the yellow plug of the A/V connecting cable to the video input jack, and the red (right channel) or the white (left /right...supplied with an A/V connecting cable. Connect the white and red plug (left channel) plug to another device via analog data transfer, the image quality may deteriorate. Connect the device in either to the Handycam Station or to your camcorder, according to be produced than...
...Red) (White) AUDIO (Red) (Yellow) VCRs or DVD/ HDD recorders A A/V connecting cable (supplied) The Handycam Station and your camcorder are connecting your camcorder to a monaural device, connect the yellow plug of the A/V connecting cable to the video input jack, and the red (right channel) or the white (left /right...supplied with an A/V connecting cable. Connect the white and red plug (left channel) plug to another device via analog data transfer, the image quality may deteriorate. Connect the device in either to the Handycam Station or to your camcorder, according to be produced than...

Handycam® Handbook
Page 46
... power from the wall socket (p. 13). Turn on the printer. Connect your camcorder to the AC Adaptor to the input jacks of the Handycam Station to the recording device (VCR or DVD/ HDD recorder) with the A/V connecting cable (supplied) 1 or an A/V connecting cable with your recording device for details. 5 When dubbing is finished, stop...
... power from the wall socket (p. 13). Turn on the printer. Connect your camcorder to the AC Adaptor to the input jacks of the Handycam Station to the recording device (VCR or DVD/ HDD recorder) with the A/V connecting cable (supplied) 1 or an A/V connecting cable with your recording device for details. 5 When dubbing is finished, stop...
Handycam® Handbook
Page 47
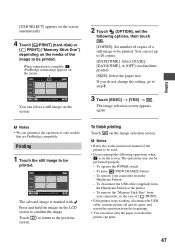
...- Touch to return to step 3. 3 Touch [EXEC] t [YES] t . To disconnect the USB cable (supplied) from the Handycam Station - To remove your camcorder, in the case of a still image to be used. • Do not attempt the following options, then...cable, turn the printer off and on the screen. The image selection screen appears again. b Notes • We can set the following operations when is on again, and restart the operation from your camcorder from the Handycam Station or the printer - Editing [USB SELECT] appears on the screen automatically. 4 Touch [ PRINT] (hard disk...
...- Touch to return to step 3. 3 Touch [EXEC] t [YES] t . To disconnect the USB cable (supplied) from the Handycam Station - To remove your camcorder, in the case of a still image to be used. • Do not attempt the following options, then...cable, turn the printer off and on the screen. The image selection screen appears again. b Notes • We can set the following operations when is on again, and restart the operation from your camcorder from the Handycam Station or the printer - Editing [USB SELECT] appears on the screen automatically. 4 Touch [ PRINT] (hard disk...

Handycam® Handbook
Page 51
... [Completed.] appears, touch . DCR-SR33E/SR190E/SR200E/SR290E/ SR300E: approx. 40 minutes • If you stop performing [ EMPTY] between step 4 and 5, be saved (p. 37) before performing [ EMPTY]. • You cannot perform [ EMPTY] unless you perform [ EMPTY], all cables except the AC Adaptor. Do ... are deleted. DCR-SR32E/SR42E/SR52E/SR62E: approx. 30 minutes - The [ FORMAT] screen appears. 3 Press and hold BACK LIGHT button for this operation, whichever position of the (Movie) lamp/ (Still) lamp is connected, then turn on the hard disk of the camcorder. DCR-SR72E/SR82E: ...
... [Completed.] appears, touch . DCR-SR33E/SR190E/SR200E/SR290E/ SR300E: approx. 40 minutes • If you stop performing [ EMPTY] between step 4 and 5, be saved (p. 37) before performing [ EMPTY]. • You cannot perform [ EMPTY] unless you perform [ EMPTY], all cables except the AC Adaptor. Do ... are deleted. DCR-SR32E/SR42E/SR52E/SR62E: approx. 30 minutes - The [ FORMAT] screen appears. 3 Press and hold BACK LIGHT button for this operation, whichever position of the (Movie) lamp/ (Still) lamp is connected, then turn on the hard disk of the camcorder. DCR-SR72E/SR82E: ...

Handycam® Handbook
Page 74
... other cable, make sure you use the supplied software when operating images recorded on the camcorder through a computer. It is necessary to have DirectX installed.) Sound system: Direct Sound compatible sound card Memory: 256 MB or more Hard disk: Available free hard disk space ...camcorder with a computer OS: Microsoft Windows 2000 Professional, Windows XP Home Edition, Windows XP Professional or Windows XP Media Center Edition Standard installation is not assured if the above OS has been upgraded. Otherwise, the software will not be provided as standard), DVD burner (CD-ROM drive...
... other cable, make sure you use the supplied software when operating images recorded on the camcorder through a computer. It is necessary to have DirectX installed.) Sound system: Direct Sound compatible sound card Memory: 256 MB or more Hard disk: Available free hard disk space ...camcorder with a computer OS: Microsoft Windows 2000 Professional, Windows XP Home Edition, Windows XP Professional or Windows XP Media Center Edition Standard installation is not assured if the above OS has been upgraded. Otherwise, the software will not be provided as standard), DVD burner (CD-ROM drive...
Handycam® Handbook
Page 75
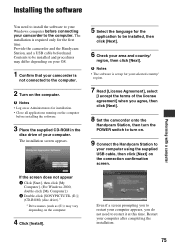
... switch to turn on. 9 Connect the Handycam Station to the computer. The installation is set up for installation. • Close all applications running on the computer before connecting your camcorder to your computer using the supplied USB cable, then click [Next] on the connection ... [Start], then click [My Computer]. (For Windows 2000, double-click [My Computer].) 2 Double-click [SONYPICTUTIL (E:)] (CD-ROM) (disc drive).* * Drive names (such as Administrators for your selected country/ region. 7 Read [License Agreement], select [I accept the terms of the license agreement] when you...
... switch to turn on. 9 Connect the Handycam Station to the computer. The installation is set up for installation. • Close all applications running on the computer before connecting your camcorder to your computer using the supplied USB cable, then click [Next] on the connection ... [Start], then click [My Computer]. (For Windows 2000, double-click [My Computer].) 2 Double-click [SONYPICTUTIL (E:)] (CD-ROM) (disc drive).* * Drive names (such as Administrators for your selected country/ region. 7 Read [License Agreement], select [I accept the terms of the license agreement] when you...

Handycam® Handbook
Page 76
.../registration/di/ • For the information about Picture Motion Browser, visit the following URL: http://www.sony.net/support-disoft/ 11Remove the CD-ROM from the disc drive of your computer. z Tips • For disconnecting the USB cable, see page 79. 76 The short-cut icons, such as [ ] (Picture Motion Browser), appear on...
.../registration/di/ • For the information about Picture Motion Browser, visit the following URL: http://www.sony.net/support-disoft/ 11Remove the CD-ROM from the disc drive of your computer. z Tips • For disconnecting the USB cable, see page 79. 76 The short-cut icons, such as [ ] (Picture Motion Browser), appear on...

Handycam® Handbook
Page 78
... transfer data at a faster rate using the supplied USB cable. Do not insert the connector forcibly as it . 4 Connect the Handycam Station to the wall socket using the supplied AC Adaptor. 5 Set the camcorder onto the Handycam Station, then turn on the Handycam Station. 7 Connect the (USB) jack of the (...interface not compatible with Hi-Speed USB (USB 2.0). You can perform this operation, whichever position of the Handycam Station to a computer, make sure you insert the connector in the DVD drive of USB 1.1 (USB Full-Speed). 78 When the DVD type is compatible with Hi-Speed USB (USB...
... transfer data at a faster rate using the supplied USB cable. Do not insert the connector forcibly as it . 4 Connect the Handycam Station to the wall socket using the supplied AC Adaptor. 5 Set the camcorder onto the Handycam Station, then turn on the Handycam Station. 7 Connect the (USB) jack of the (...interface not compatible with Hi-Speed USB (USB 2.0). You can perform this operation, whichever position of the Handycam Station to a computer, make sure you insert the connector in the DVD drive of USB 1.1 (USB Full-Speed). 78 When the DVD type is compatible with Hi-Speed USB (USB...

Handycam® Handbook
Page 79
... DVD creation is lit. • Before turning off your computer. The DVD creation may cause a malfunction of the hard disk of your camcorder. 5 Disconnect the USB cable from the Handycam Station and the computer. To create another DVD, click [Copy]. b Notes • Do not disconnect the USB..., then insert a new DVD onto the DVD drive. 8 Once the completion dialog for DVD creation appears, click [Close] on the computer screen. b Notes • During DVD creation, do not apply vibration to your camcorder, disconnect the USB cable following the proper procedures described above. • ...
... DVD creation is lit. • Before turning off your computer. The DVD creation may cause a malfunction of the hard disk of your camcorder. 5 Disconnect the USB cable from the Handycam Station and the computer. To create another DVD, click [Copy]. b Notes • Do not disconnect the USB..., then insert a new DVD onto the DVD drive. 8 Once the completion dialog for DVD creation appears, click [Close] on the computer screen. b Notes • During DVD creation, do not apply vibration to your camcorder, disconnect the USB cable following the proper procedures described above. • ...
Handycam® Handbook
Page 80
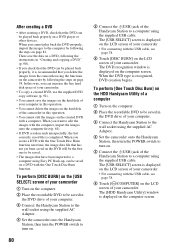
...SELECT] screen of your camcorder 1 Turn on the computer. 2 Place the recordable DVD to be saved in this operation. • You cannot delete the images on the hard disk of the camcorder in the DVD drive of your computer. 3 Connect the Handycam Station to the wall ...socket using the supplied AC Adaptor. 4 Set the camcorder onto the Handycam Station, then turn the POWER switch to turn on. 80 5 Connect the (USB) jack of the Handycam Station to a computer using the supplied USB cable...
...SELECT] screen of your camcorder 1 Turn on the computer. 2 Place the recordable DVD to be saved in this operation. • You cannot delete the images on the hard disk of the camcorder in the DVD drive of your computer. 3 Connect the Handycam Station to the wall ...socket using the supplied AC Adaptor. 4 Set the camcorder onto the Handycam Station, then turn the POWER switch to turn on. 80 5 Connect the (USB) jack of the Handycam Station to a computer using the supplied USB cable...

Handycam® Handbook
Page 81
...PC Back-up function of the HDD Handycam Utility. C Writing speed Select [Optimum Speed] for temporary files Specify a folder to be imported to your camcorder to a computer using the supplied USB cable. The images recorded on the hard disk of your camcorder. • For connecting with a simple... yet been imported to the computer. To import images from the camcorder to a computer can import images recorded on the computer screen. A Drive settings Select the drive you can view and edit images imported from the camcorder, use to a computer You can create a DVD with a...
...PC Back-up function of the HDD Handycam Utility. C Writing speed Select [Optimum Speed] for temporary files Specify a folder to be imported to your camcorder to a computer using the supplied USB cable. The images recorded on the hard disk of your camcorder. • For connecting with a simple... yet been imported to the computer. To import images from the camcorder to a computer can import images recorded on the computer screen. A Drive settings Select the drive you can view and edit images imported from the camcorder, use to a computer You can create a DVD with a...
Handycam® Handbook
Page 83
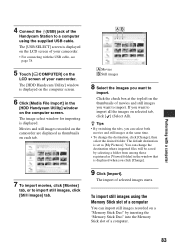
... Import] in the window that is displayed when you click [Change]. 9 Click [Import]. To import still images using the supplied USB cable. The [HDD Handycam Utility] window is displayed. Click the check box at the same time. • To change the destination where imported files will be ...click [ ] (Select All). Performing with a computer 4 Connect the (USB) jack of your camcorder. • For connecting with the USB cable, see page 78. 5 Touch [ COMPUTER] on the LCD screen of the Handycam Station to a computer using the Memory Stick slot of a computer You can select both movies and...
... Import] in the window that is displayed when you click [Change]. 9 Click [Import]. To import still images using the supplied USB cable. The [HDD Handycam Utility] window is displayed. Click the check box at the same time. • To change the destination where imported files will be ...click [ ] (Select All). Performing with a computer 4 Connect the (USB) jack of your camcorder. • For connecting with the USB cable, see page 78. 5 Touch [ COMPUTER] on the LCD screen of the Handycam Station to a computer using the Memory Stick slot of a computer You can select both movies and...
Handycam® Handbook
Page 84
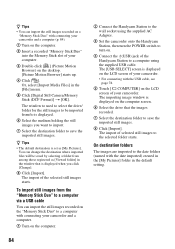
... is displayed on . 4 Connect the (USB) jack of the Handycam Station to a computer using the supplied AC Adaptor. 3 Set the camcorder onto the Handycam Station, then turn the POWER switch to turn on the computer screen. 6 Select the drive that is displayed. 6 Select the medium holding the still images you...still images recorded on the "Memory Stick Duo" to the wall socket using the supplied USB cable. To import still images from the "Memory Stick Duo" to a computer via a USB cable You can change the destination where imported files will be imported from among those registered as [My...
... is displayed on . 4 Connect the (USB) jack of the Handycam Station to a computer using the supplied AC Adaptor. 3 Set the camcorder onto the Handycam Station, then turn the POWER switch to turn on the computer screen. 6 Select the drive that is displayed. 6 Select the medium holding the still images you...still images recorded on the "Memory Stick Duo" to the wall socket using the supplied USB cable. To import still images from the "Memory Stick Duo" to a computer via a USB cable You can change the destination where imported files will be imported from among those registered as [My...

Handycam® Handbook
Page 85
Deleting images recorded on the camcorder through the computer (DCR-SR42E/SR62E/ SR82E/SR200E/SR300E) You can delete images recorded on the computer screen. The image select window is not available for DCR-SR32E/ SR33E/SR52E/SR72E/SR190E/SR290E. • You cannot restore images once they are ...displayed as thumbnails on each tab. 1 Turn on the LCD screen of your camcorder. • For connecting with a computer 2 Connect the Handycam Station to delete. Performing with the USB cable, ...
Deleting images recorded on the camcorder through the computer (DCR-SR42E/SR62E/ SR82E/SR200E/SR300E) You can delete images recorded on the computer screen. The image select window is not available for DCR-SR32E/ SR33E/SR52E/SR72E/SR190E/SR290E. • You cannot restore images once they are ...displayed as thumbnails on each tab. 1 Turn on the LCD screen of your camcorder. • For connecting with a computer 2 Connect the Handycam Station to delete. Performing with the USB cable, ...
Handycam® Handbook
Page 91
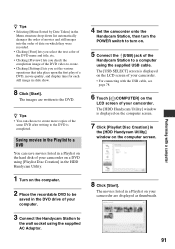
... computer using [Playlist Disc Creation] in the HDD Handycam Utility. 1 Turn on the computer. 2 Place the recordable DVD to be saved in slide show. 8 Click [Start]. z Tips • You can save movies listed in a Playlist on the hard disk of your camcorder. • For connecting with a computer The [USB... for each still image in the DVD drive of your computer. 3 Connect the Handycam Station to the wall socket using the supplied AC Adaptor. 4 Set the camcorder onto the Handycam Station, then turn the POWER switch to the DVD. The [HDD Handycam Utility] window is displayed on the LCD...
... computer using [Playlist Disc Creation] in the HDD Handycam Utility. 1 Turn on the computer. 2 Place the recordable DVD to be saved in slide show. 8 Click [Start]. z Tips • You can save movies listed in a Playlist on the hard disk of your camcorder. • For connecting with a computer The [USB... for each still image in the DVD drive of your computer. 3 Connect the Handycam Station to the wall socket using the supplied AC Adaptor. 4 Set the camcorder onto the Handycam Station, then turn the POWER switch to the DVD. The [HDD Handycam Utility] window is displayed on the LCD...

Handycam® Handbook
Page 100
...cable, too (p. 35). to a "Memory Stick Duo" as a still image during playback on your TV (p. 62). Editing images on your camcorder (p. 45). Erase unnecessary movies (p. 43). • You cannot add still images in the Playlist. • The hard disk is closed. Unable to copy the images from the hard disk...Disconnect the cable from your camcorder Unable to edit. • There are no images recorded. • Unable to edit because of the condition of the playback is not correct when connecting your camcorder to the Help for dubbing a image from the computer and the Handycam Station, ...
...cable, too (p. 35). to a "Memory Stick Duo" as a still image during playback on your TV (p. 62). Editing images on your camcorder (p. 45). Erase unnecessary movies (p. 43). • You cannot add still images in the Playlist. • The hard disk is closed. Unable to copy the images from the hard disk...Disconnect the cable from your camcorder Unable to edit. • There are no images recorded. • Unable to edit because of the condition of the playback is not correct when connecting your camcorder to the Help for dubbing a image from the computer and the Handycam Station, ...


