Operating Guide
Page 3
... an adult, and serious damage to the plugs, receptacles, and the point where the cord exits from the wall outlet and disconnect the antenna or cable system. Use a cloth lightly dampened with a cloth or other materials. - Never place the set in a confined space, such as specified by placing the set on...
... an adult, and serious damage to the plugs, receptacles, and the point where the cord exits from the wall outlet and disconnect the antenna or cable system. Use a cloth lightly dampened with a cloth or other materials. - Never place the set in a confined space, such as specified by placing the set on...
Operating Guide
Page 5
Connect the equipment into an outlet on , the user is encouraged to try to Subpart B of Part 15 of FCC Rules. The supplied interface cable must be determined by turning the equipment off and on a circuit different from that interference will not occur in a particular installation. This equipment generates, uses, ...
Connect the equipment into an outlet on , the user is encouraged to try to Subpart B of Part 15 of FCC Rules. The supplied interface cable must be determined by turning the equipment off and on a circuit different from that interference will not occur in a particular installation. This equipment generates, uses, ...
Operating Guide
Page 8
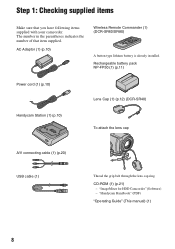
... that you have following items supplied with your camcorder. Rechargeable battery pack NP-FP50 (1) (p.11) Power cord (1) (p.10) Handycam Station (1) (p.10) Lens Cap (1) (p.12) (DCR-SR40) To attach the lens cap A/V connecting cable (1) (p.20) USB cable (1) Thread the grip belt through the lens cap ring. Step 1: Checking supplied items Make sure that item supplied. AC...
... that you have following items supplied with your camcorder. Rechargeable battery pack NP-FP50 (1) (p.11) Power cord (1) (p.10) Handycam Station (1) (p.10) Lens Cap (1) (p.12) (DCR-SR40) To attach the lens cap A/V connecting cable (1) (p.20) USB cable (1) Thread the grip belt through the lens cap ring. Step 1: Checking supplied items Make sure that item supplied. AC...

Operating Guide
Page 17
... DVD BURN button Create a DVD by connecting the camcorder to display .. ws (USB) jack Connect with the camcorder and the Handycam Station. During Easy Handycam operation, you can change the settings for date and time. Connecting to the shoulder belt hook. The accessory can magnify images from ...the speaker while playing back. wa Interface connector Connect with the USB cable. 17 Recording/Playback qh EASY button By pressing the EASY button, most of the AC Adaptor. Open the jack cover. 3 Shoe cover (DCR-SR60/SR80) Open when using Active Interface Shoe. 4 Active Interface Shoe...
... DVD BURN button Create a DVD by connecting the camcorder to display .. ws (USB) jack Connect with the camcorder and the Handycam Station. During Easy Handycam operation, you can change the settings for date and time. Connecting to the shoulder belt hook. The accessory can magnify images from ...the speaker while playing back. wa Interface connector Connect with the USB cable. 17 Recording/Playback qh EASY button By pressing the EASY button, most of the AC Adaptor. Open the jack cover. 3 Shoe cover (DCR-SR60/SR80) Open when using Active Interface Shoe. 4 Active Interface Shoe...
Operating Guide
Page 20
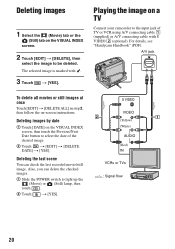
.... 1 Slide the POWER switch to select the date of TV or VCR using A/V connecting cable 1 (supplied) or A/V connecting cable with . 3 Touch t [YES]. S VIDEO VIDEO (Yellow) (White) AUDIO (Red) IN VCRs or TVs : Signal flow 20 For details, see "Handycam Handbook" (PDF). Also, you can check the last recorded movie/still image. Deleting images...
.... 1 Slide the POWER switch to select the date of TV or VCR using A/V connecting cable 1 (supplied) or A/V connecting cable with . 3 Touch t [YES]. S VIDEO VIDEO (Yellow) (White) AUDIO (Red) IN VCRs or TVs : Signal flow 20 For details, see "Handycam Handbook" (PDF). Also, you can check the last recorded movie/still image. Deleting images...
Operating Guide
Page 26
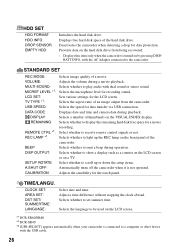
... display. Selects the language to a computer or other device with the USB cable. 26 MULTI-SOUND: Selects whether to play audio with the AC Adaptor connected to show a display such as a counter on the LCD screen or on the hard disk drive from the camcorder. USB SPEED: Selects the speed for recording sound. DISP... LCD screen. LCD SET: TV TYPE *1: Sets various settings for data protection. Displays this item only when the camcorder is turned on the LCD screen. *1 DCR-SR60/SR80 *2 DCR-SR40 *3 [USB SELECT] appears automatically when your camcorder is not operated.
... display. Selects the language to a computer or other device with the USB cable. 26 MULTI-SOUND: Selects whether to play audio with the AC Adaptor connected to show a display such as a counter on the LCD screen or on the hard disk drive from the camcorder. USB SPEED: Selects the speed for recording sound. DISP... LCD screen. LCD SET: TV TYPE *1: Sets various settings for data protection. Displays this item only when the camcorder is turned on the LCD screen. *1 DCR-SR60/SR80 *2 DCR-SR40 *3 [USB SELECT] appears automatically when your camcorder is not operated.


