
Operating Guide
Page 9
Rechargeable battery pack NP-FH40 (1) (p.11) (DCR-SR42/SR62/ SR82) NP-FH60 (1) (p.11) (DCR-SR200/SR300) Handycam Station (1) (p.11) A/V connecting cable (1) (p.25) USB cable (1) (p.27) CD-ROM "Handycam Application Software" (1) (p.26) - Handycam Handbook (PDF) "Operating Guide" (This manual) (1) 9 Picture Motion Browser (Software) ... (p.11) Power cord (1) (p.11) Wireless Remote Commander (1) (except for DCR-SR42) A button-type lithium battery is already installed. The number in the parentheses indicates the number of that you have the following items supplied with your camcorder.
Rechargeable battery pack NP-FH40 (1) (p.11) (DCR-SR42/SR62/ SR82) NP-FH60 (1) (p.11) (DCR-SR200/SR300) Handycam Station (1) (p.11) A/V connecting cable (1) (p.25) USB cable (1) (p.27) CD-ROM "Handycam Application Software" (1) (p.26) - Handycam Handbook (PDF) "Operating Guide" (This manual) (1) 9 Picture Motion Browser (Software) ... (p.11) Power cord (1) (p.11) Wireless Remote Commander (1) (except for DCR-SR42) A button-type lithium battery is already installed. The number in the parentheses indicates the number of that you have the following items supplied with your camcorder.
Operating Guide
Page 21
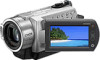
wd (USB) jack Connect with the USB cable. *1 DCR-SR42/SR62/SR82 *2 DCR-SR200/SR300 *3 Except for DCR-SR42 *4 For DCR-SR42, the position of the buttons differ from the illustration. 21 For details, see "Handycam Handbook" (PDF). Recording/Playback ws DISC BURN button Create a DVD by connecting the camcorder to a computer.
wd (USB) jack Connect with the USB cable. *1 DCR-SR42/SR62/SR82 *2 DCR-SR200/SR300 *3 Except for DCR-SR42 *4 For DCR-SR42, the position of the buttons differ from the illustration. 21 For details, see "Handycam Handbook" (PDF). Recording/Playback ws DISC BURN button Create a DVD by connecting the camcorder to a computer.

Operating Guide
Page 27
...Hard disk: Available free hard disk space for installation required: Approximately 600 MB (for creating a DVD, 5 GB or more may be required) Display: DirectX 7 or later-compatible video card, Minimum 1024 × 768 dots, High Color (16 bit color) Others: USB port (this time. Provide the camcorder and the Handycam Station, and a USB...Otherwise, the software will not be affected. • Operations are guaranteed, frames may be provided as standard), Disc drive that your camcorder is reproduced in 2ch sound. • If you do not need to install the software to restart your computer ...
...Hard disk: Available free hard disk space for installation required: Approximately 600 MB (for creating a DVD, 5 GB or more may be required) Display: DirectX 7 or later-compatible video card, Minimum 1024 × 768 dots, High Color (16 bit color) Others: USB port (this time. Provide the camcorder and the Handycam Station, and a USB...Otherwise, the software will not be affected. • Operations are guaranteed, frames may be provided as standard), Disc drive that your camcorder is reproduced in 2ch sound. • If you do not need to install the software to restart your computer ...

Operating Guide
Page 28
...To see the explanation of the function of your computer. • For disconnecting the USB cable, see "Handycam Handbook" (PDF). 1 Turn on the website, you may need to change the ... on the computer, you can change the recording functions and the operating settings for your camcorder, then press (HOME) A (or B). 2 Touch the desired setup item. 3 ...sony.net/support-disoft/ Performing various functions - For details, see "Handycam Handbook" (PDF). Follow the on the screen, touch v/V to install third party software (shown below). qa Remove the CD-ROM from the disc drive...
...To see the explanation of the function of your computer. • For disconnecting the USB cable, see "Handycam Handbook" (PDF). 1 Turn on the website, you may need to change the ... on the computer, you can change the recording functions and the operating settings for your camcorder, then press (HOME) A (or B). 2 Touch the desired setup item. 3 ...sony.net/support-disoft/ Performing various functions - For details, see "Handycam Handbook" (PDF). Follow the on the screen, touch v/V to install third party software (shown below). qa Remove the CD-ROM from the disc drive...
Operating Guide
Page 37
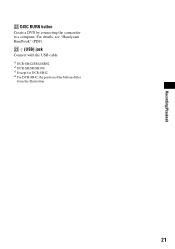
...SR300 76 × 78 × 128 mm (3 × 3 1/8 × 5 1/8 in.) (w×h×d) including the projecting parts 76 × 78 × 149 mm (3 × 3 1/8 × 5 7/8 in this format can have additional information such as your camcorder's setting information at load impedance 47 kΩ (kilohms)), Output impedance less than 2.2 kΩ (kilohms) USB..." is a file format for DCR-SR42) Stereo mini-minijack (Ø 2.5 mm) LCD screen Picture DCR-SR42 6.2 cm (2.5 type) DCR-SR62/SR82/SR200/SR300 6.9 cm (2.7 type, aspect ratio 16:9) Total number of Sony's ClearVid CMOS Sensor and image ...
...SR300 76 × 78 × 128 mm (3 × 3 1/8 × 5 1/8 in.) (w×h×d) including the projecting parts 76 × 78 × 149 mm (3 × 3 1/8 × 5 7/8 in this format can have additional information such as your camcorder's setting information at load impedance 47 kΩ (kilohms)), Output impedance less than 2.2 kΩ (kilohms) USB..." is a file format for DCR-SR42) Stereo mini-minijack (Ø 2.5 mm) LCD screen Picture DCR-SR42 6.2 cm (2.5 type) DCR-SR62/SR82/SR200/SR300 6.9 cm (2.7 type, aspect ratio 16:9) Total number of Sony's ClearVid CMOS Sensor and image ...

Operating Guide
Page 38
... Operating temperature 0°C to + 40°C (32°F to 104°F) 38 Type Li-ion NP-FH60 (DCR-SR200/SR300) Maximum output voltage DC 8.4 V Output voltage DC 7.2 V Capacity 7.2 wh (1 000 mAh) Dimensions (Approx.) 31... oz) excluding the power cord * See at the label of AC Adaptor for other specifications. Handycam Station DCRA-C171 Input/Output connectors Audio/Video output 10 pin connector Video signal: 1 Vp-p, ...mV (at load impedance 47 kΩ (kilohms)), Output impedance less than 2.2 kΩ (kilohms) USB jack mini-B AC Adaptor AC-L200/L200B Power requirements AC 100 - 240 V, 50/60 Hz ...
... Operating temperature 0°C to + 40°C (32°F to 104°F) 38 Type Li-ion NP-FH60 (DCR-SR200/SR300) Maximum output voltage DC 8.4 V Output voltage DC 7.2 V Capacity 7.2 wh (1 000 mAh) Dimensions (Approx.) 31... oz) excluding the power cord * See at the label of AC Adaptor for other specifications. Handycam Station DCRA-C171 Input/Output connectors Audio/Video output 10 pin connector Video signal: 1 Vp-p, ...mV (at load impedance 47 kΩ (kilohms)), Output impedance less than 2.2 kΩ (kilohms) USB jack mini-B AC Adaptor AC-L200/L200B Power requirements AC 100 - 240 V, 50/60 Hz ...
Handycam® Handbook
Page 2
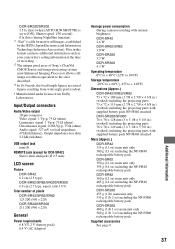
... Stick Duo Adaptor. to "Operating Guide" and "Handycam Handbook" (PDF/this Handbook thoroughly, and retain it for future reference. Memory Stick Duo Adaptor On using a "Memory Stick Duo" with a USB cable etc., be sure to the camcorder. • Before connecting your camcorder" (p. 114). • To prevent the hard disk from being broken or recorded images from...
... Stick Duo Adaptor. to "Operating Guide" and "Handycam Handbook" (PDF/this Handbook thoroughly, and retain it for future reference. Memory Stick Duo Adaptor On using a "Memory Stick Duo" with a USB cable etc., be sure to the camcorder. • Before connecting your camcorder" (p. 114). • To prevent the hard disk from being broken or recorded images from...
Handycam® Handbook
Page 12
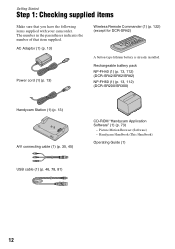
.../SR82) NP-FH60 (1) (p. 13, 112) (DCR-SR200/SR300) Handycam Station (1) (p. 13) A/V connecting cable (1) (p. 35, 45) CD-ROM "Handycam Application Software" (1) (p. 73) - The number in the parentheses indicates the number of that you have the following items supplied with your camcorder. Picture Motion Browser (Software) - Handycam Handbook (This Handbook) Operating Guide (1) USB cable (1) (p. 46, 78, 81) 12 Getting...
.../SR82) NP-FH60 (1) (p. 13, 112) (DCR-SR200/SR300) Handycam Station (1) (p. 13) A/V connecting cable (1) (p. 35, 45) CD-ROM "Handycam Application Software" (1) (p. 73) - The number in the parentheses indicates the number of that you have the following items supplied with your camcorder. Picture Motion Browser (Software) - Handycam Handbook (This Handbook) Operating Guide (1) USB cable (1) (p. 46, 78, 81) 12 Getting...

Handycam® Handbook
Page 46
... supplied AC Adaptor. 2 Set the camcorder onto the Handycam Station securely, then turn the POWER switch to turn on. 3 Connect the (USB) jack of the recording device. 4 Start the playback on your camcorder to obtain power from the wall outlet (p. 13). 1 Turn on your camcorder. Connecting your camcorder. Connect your camcorder to the AC Adaptor to the...
... supplied AC Adaptor. 2 Set the camcorder onto the Handycam Station securely, then turn the POWER switch to turn on. 3 Connect the (USB) jack of the recording device. 4 Start the playback on your camcorder to obtain power from the wall outlet (p. 13). 1 Turn on your camcorder. Connecting your camcorder. Connect your camcorder to the AC Adaptor to the...

Handycam® Handbook
Page 47
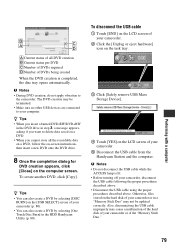
...printer off and on again, and restart the operation from the beginning. • You can print. 47 To disconnect the USB cable (supplied) from the Handycam Station - You can select a still image on the screen. 2 Touch (OPTION), set up to confirm the image....camcorder from the Handycam Station or the printer - If you do not change the setting, go to be performed properly. - When connection is marked with . The selected image is complete, (PictBridge connecting) appears on the screen. Editing [USB SELECT] appears on the screen automatically. 4 Touch [ PRINT] (hard disk...
...printer off and on again, and restart the operation from the beginning. • You can print. 47 To disconnect the USB cable (supplied) from the Handycam Station - You can select a still image on the screen. 2 Touch (OPTION), set up to confirm the image....camcorder from the Handycam Station or the printer - If you do not change the setting, go to be performed properly. - When connection is marked with . The selected image is complete, (PictBridge connecting) appears on the screen. Editing [USB SELECT] appears on the screen automatically. 4 Touch [ PRINT] (hard disk...

Handycam® Handbook
Page 74
...or in uneven playback. It is necessary to have DirectX installed.) Sound system: Direct Sound compatible sound card Memory: 256 MB or more Hard disk: Available free hard disk space for installation required: Approximately 600 MB (for creating a DVD, 5 GB or more may be affected. • Operations are ... use a Notebook computer, connect it , connect your camcorder with the USB cable or other language (p. 75). CPU: MMX Pentium 200 MHz or faster Others: USB port (this must be provided as standard), DVD burner (CD-ROM drive is necessary for installation) When playing still images recorded...
...or in uneven playback. It is necessary to have DirectX installed.) Sound system: Direct Sound compatible sound card Memory: 256 MB or more Hard disk: Available free hard disk space for installation required: Approximately 600 MB (for creating a DVD, 5 GB or more may be affected. • Operations are ... use a Notebook computer, connect it , connect your camcorder with the USB cable or other language (p. 75). CPU: MMX Pentium 200 MHz or faster Others: USB port (this must be provided as standard), DVD burner (CD-ROM drive is necessary for installation) When playing still images recorded...

Handycam® Handbook
Page 75
... language for your selected country/ region. 7 Read [License Agreement], select [I accept the terms of your computer after completing the installation. Provide the camcorder and the Handycam Station, and a USB cable beforehand. Contents to be installed, then click [Next]. 6 Check your computer appears, you do not need to install the software to your...If the screen does not appear 1 Click [Start], then click [My Computer]. (For Windows 2000, double-click [My Computer].) 2 Double-click [SONYPICTUTIL (E:)] (CD-ROM) (disc drive).* * Drive names (such as Administrators for the first time.
... language for your selected country/ region. 7 Read [License Agreement], select [I accept the terms of your computer after completing the installation. Provide the camcorder and the Handycam Station, and a USB cable beforehand. Contents to be installed, then click [Next]. 6 Check your computer appears, you do not need to install the software to your...If the screen does not appear 1 Click [Start], then click [My Computer]. (For Windows 2000, double-click [My Computer].) 2 Double-click [SONYPICTUTIL (E:)] (CD-ROM) (disc drive).* * Drive names (such as Administrators for the first time.

Handycam® Handbook
Page 76
.../registration/di/ • For the information about Picture Motion Browser, visit the following URL: http://www.sony.net/support-disoft/ 11Remove the CD-ROM from the disc drive of your computer. z Tips • For disconnecting the USB cable, see page 79. 76 x Windows Media Format 9 Series Runtime (Windows 2000 only) Software required to...
.../registration/di/ • For the information about Picture Motion Browser, visit the following URL: http://www.sony.net/support-disoft/ 11Remove the CD-ROM from the disc drive of your computer. z Tips • For disconnecting the USB cable, see page 79. 76 x Windows Media Format 9 Series Runtime (Windows 2000 only) Software required to...

Handycam® Handbook
Page 78
... not compatible with Hi-Speed USB (USB 2.0). When the DVD type is displayed on the Handycam Station. 7 Connect the (USB) jack of USB 1.1 (USB Full-Speed). 78 The DVD recognition window is recognized, DVD creation begins. b Notes • When connecting your camcorder to a computer, make sure you insert the connector in the DVD drive of the (Movie)/ (Still...
... not compatible with Hi-Speed USB (USB 2.0). When the DVD type is displayed on the Handycam Station. 7 Connect the (USB) jack of USB 1.1 (USB Full-Speed). 78 The DVD recognition window is recognized, DVD creation begins. b Notes • When connecting your camcorder to a computer, make sure you insert the connector in the DVD drive of the (Movie)/ (Still...
Handycam® Handbook
Page 79
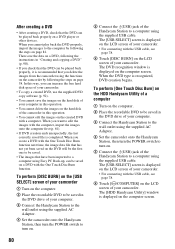
... terminated. • Make sure no other USB devices are connected to the camcorder. The DVD creation may cause a malfunction of the hard disk of your camcorder, disconnect the USB cable following the proper procedures described above. • Disconnect the USB cable using the proper procedures described above....the DVD drive. 8 Once the completion dialog for DVD creation appears, click [Close] on the computer screen. b Notes • During DVD creation, do not apply vibration to your camcorder or in the HDD Handycam Utility (p. 80). Otherwise, files stored on the hard disk of your ...
... terminated. • Make sure no other USB devices are connected to the camcorder. The DVD creation may cause a malfunction of the hard disk of your camcorder, disconnect the USB cable following the proper procedures described above. • Disconnect the USB cable using the proper procedures described above....the DVD drive. 8 Once the completion dialog for DVD creation appears, click [Close] on the computer screen. b Notes • During DVD creation, do not apply vibration to your camcorder or in the HDD Handycam Utility (p. 80). Otherwise, files stored on the hard disk of your ...
Handycam® Handbook
Page 80
.... When you can be saved in the DVD drive of the camcorder in this operation. • You cannot delete the images on the hard disk of your camcorder. In this operation. • You cannot edit the images on . 80 5 Connect the (USB) jack of your computer. 3 Connect the Handycam Station to the wall outlet using the supplied...
.... When you can be saved in the DVD drive of the camcorder in this operation. • You cannot delete the images on the hard disk of your camcorder. In this operation. • You cannot edit the images on . 80 5 Connect the (USB) jack of your computer. 3 Connect the Handycam Station to the wall outlet using the supplied...
Handycam® Handbook
Page 81
... computer with the imported materials. When the DVD type is completed. 3 Set the camcorder onto the Handycam Station, then turn on. 4 Connect the (USB) jack of the HDD Handycam Utility. To import images from the camcorder to a computer using the supplied AC Adaptor. B Location for temporary files Specify a.... Also, you want to save temporary files in the [HDD Handycam Utility] window on the hard disk of the DVD drive used to use [Easy PC Back-up ) You can view and edit images imported from the camcorder, use to a computer You can import images recorded on the ...
... computer with the imported materials. When the DVD type is completed. 3 Set the camcorder onto the Handycam Station, then turn on. 4 Connect the (USB) jack of the HDD Handycam Utility. To import images from the camcorder to a computer using the supplied AC Adaptor. B Location for temporary files Specify a.... Also, you want to save temporary files in the [HDD Handycam Utility] window on the hard disk of the DVD drive used to use [Easy PC Back-up ) You can view and edit images imported from the camcorder, use to a computer You can import images recorded on the ...

Handycam® Handbook
Page 83
...you click [Change]. 9 Click [Import]. To import still images using the supplied USB cable. Performing with the USB cable, see page 78. 5 Touch [ COMPUTER] on the LCD screen of your camcorder. The [HDD Handycam Utility] window is displayed when you can import still images recorded on a "Memory... registered as thumbnails on the thumbnails of selected images starts. The [USB SELECT] screen is displayed on the LCD screen of your camcorder. • For connecting with a computer 4 Connect the (USB) jack of the Handycam Station to a computer using the Memory Stick slot of a computer ...
...you click [Change]. 9 Click [Import]. To import still images using the supplied USB cable. Performing with the USB cable, see page 78. 5 Touch [ COMPUTER] on the LCD screen of your camcorder. The [HDD Handycam Utility] window is displayed when you can import still images recorded on a "Memory... registered as thumbnails on the thumbnails of selected images starts. The [USB SELECT] screen is displayed on the LCD screen of your camcorder. • For connecting with a computer 4 Connect the (USB) jack of the Handycam Station to a computer using the Memory Stick slot of a computer ...
Handycam® Handbook
Page 84
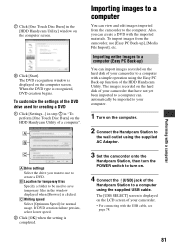
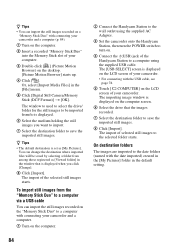
...is displayed on the LCD screen of your camcorder. • For connecting with the USB cable, see page 78. 5 Touch [ COMPUTER] on . 4 Connect the (USB) jack of the Handycam Station to a computer using the supplied AC Adaptor. 3 Set the camcorder onto the Handycam Station, then turn the POWER switch to turn...on the "Memory Stick Duo" to a computer with connecting your camcorder and a computer. 1 Turn on the computer. 2 Connect the Handycam Station to the wall outlet using the supplied USB cable. The window to used to select the drive/ folder for the still images to be saved by selecting a ...
...is displayed on the LCD screen of your camcorder. • For connecting with the USB cable, see page 78. 5 Touch [ COMPUTER] on . 4 Connect the (USB) jack of the Handycam Station to a computer using the supplied AC Adaptor. 3 Set the camcorder onto the Handycam Station, then turn the POWER switch to turn...on the "Memory Stick Duo" to a computer with connecting your camcorder and a computer. 1 Turn on the computer. 2 Connect the Handycam Station to the wall outlet using the supplied USB cable. The window to used to select the drive/ folder for the still images to be saved by selecting a ...

Handycam® Handbook
Page 85
...on the computer screen. 6 Click [Delete Media Files from Handycam] in the [HDD Handycam Utility] window on . 4 Connect the (USB) jack of the Handycam Station to delete. 9 Click [Delete]. Movies and still images recorded on the camcorder are deleted. • You cannot delete images recorded on... the LCD screen of your camcorder. The deleting confirmation screen appears. 10Click [Yes]. The [USB SELECT] screen is displayed on the "Memory Stick Duo" using the supplied AC Adaptor. 3 Set the camcorder onto the Handycam Station, then turn the POWER switch to turn...
...on the computer screen. 6 Click [Delete Media Files from Handycam] in the [HDD Handycam Utility] window on . 4 Connect the (USB) jack of the Handycam Station to delete. 9 Click [Delete]. Movies and still images recorded on the camcorder are deleted. • You cannot delete images recorded on... the LCD screen of your camcorder. The deleting confirmation screen appears. 10Click [Yes]. The [USB SELECT] screen is displayed on the "Memory Stick Duo" using the supplied AC Adaptor. 3 Set the camcorder onto the Handycam Station, then turn the POWER switch to turn...


