
Operating Guide
Page 9
... is already installed. Handycam Handbook (PDF) "Operating Guide" (This manual) (1) 9 The number in the parentheses indicates the number of that you have the following items supplied with your camcorder. Rechargeable battery pack NP-FH40 (1) (p.11) (DCR-SR42/SR62/ SR82) NP-FH60 (1) (p.11) (DCR-SR200/SR300) Handycam Station (1) (p.11) A/V connecting cable (1) (p.25) USB cable (1) (p.27) CD-ROM "Handycam Application Software" (1) (p.26...
... is already installed. Handycam Handbook (PDF) "Operating Guide" (This manual) (1) 9 The number in the parentheses indicates the number of that you have the following items supplied with your camcorder. Rechargeable battery pack NP-FH40 (1) (p.11) (DCR-SR42/SR62/ SR82) NP-FH60 (1) (p.11) (DCR-SR200/SR300) Handycam Station (1) (p.11) A/V connecting cable (1) (p.25) USB cable (1) (p.27) CD-ROM "Handycam Application Software" (1) (p.26...
Operating Guide
Page 21
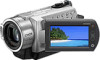
wd (USB) jack Connect with the USB cable. *1 DCR-SR42/SR62/SR82 *2 DCR-SR200/SR300 *3 Except for DCR-SR42 *4 For DCR-SR42, the position of the buttons differ from the illustration. 21 Recording/Playback ws DISC BURN button Create a DVD by connecting the camcorder to a computer. For details, see "Handycam Handbook" (PDF).
wd (USB) jack Connect with the USB cable. *1 DCR-SR42/SR62/SR82 *2 DCR-SR200/SR300 *3 Except for DCR-SR42 *4 For DCR-SR42, the position of the buttons differ from the illustration. 21 Recording/Playback ws DISC BURN button Create a DVD by connecting the camcorder to a computer. For details, see "Handycam Handbook" (PDF).

Operating Guide
Page 27
... is reproduced in 2ch sound. • If you use a Notebook computer, connect it at this must be provided as standard), Disc drive that your computer appears, you do not need to restart it to the computer. 2 Turn on the computer. • Log on ...Hard disk: Available free hard disk space for installation required: Approximately 600 MB (for creating a DVD, 5 GB or more may be required) Display: DirectX 7 or later-compatible video card, Minimum 1024 × 768 dots, High Color (16 bit color) Others: USB port (this time. Provide the camcorder and the Handycam Station, and a USB cable...
... is reproduced in 2ch sound. • If you use a Notebook computer, connect it at this must be provided as standard), Disc drive that your computer appears, you do not need to restart it to the computer. 2 Turn on the computer. • Log on ...Hard disk: Available free hard disk space for installation required: Approximately 600 MB (for creating a DVD, 5 GB or more may be required) Display: DirectX 7 or later-compatible video card, Minimum 1024 × 768 dots, High Color (16 bit color) Others: USB port (this time. Provide the camcorder and the Handycam Station, and a USB cable...

Operating Guide
Page 28
... from the disc drive of each item on -screen instructions to change the recording functions and the operating settings for the customers registration website is not on the website, you register on the screen, touch v/V to install the software. http://www.sony.net/registration/di/...software (shown below). After you may need to complete the installation. For details, see "Handycam Handbook" (PDF). 1 Turn on your computer. • For disconnecting the USB cable, see the explanation of the function of your camcorder, then press (HOME) A (or B). 2 Touch the desired setup item. 3 ...
... from the disc drive of each item on -screen instructions to change the recording functions and the operating settings for the customers registration website is not on the website, you register on the screen, touch v/V to install the software. http://www.sony.net/registration/di/...software (shown below). After you may need to complete the installation. For details, see "Handycam Handbook" (PDF). 1 Turn on your computer. • For disconnecting the USB cable, see the explanation of the function of your camcorder, then press (HOME) A (or B). 2 Touch the desired setup item. 3 ...
Handycam® Handbook
Page 2
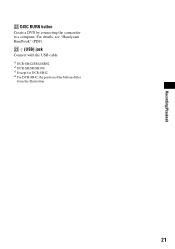
... camcorder is supplied with your camcorder.) "Memory Stick" (You cannot use Your camcorder is not dustproofed, dripproofed or waterproofed. Read this before operating your camcorder" (p. 114). • To prevent the hard disk ...label or the like on use it in your camcorder. • Disconnect the AC Adaptor from the Handycam Station holding both the camcorder and the DC plug. • Be sure to...(p. 111). to apply mechanical shock or vibration to the camcorder. • Before connecting your camcorder to another device with a USB cable etc., be damaged, or this may be sure to ...
... camcorder is supplied with your camcorder.) "Memory Stick" (You cannot use Your camcorder is not dustproofed, dripproofed or waterproofed. Read this before operating your camcorder" (p. 114). • To prevent the hard disk ...label or the like on use it in your camcorder. • Disconnect the AC Adaptor from the Handycam Station holding both the camcorder and the DC plug. • Be sure to...(p. 111). to apply mechanical shock or vibration to the camcorder. • Before connecting your camcorder to another device with a USB cable etc., be damaged, or this may be sure to ...
Handycam® Handbook
Page 12
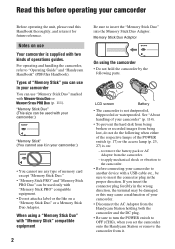
... pack NP-FH40 (1) (p. 13, 112) (DCR-SR42/SR62/SR82) NP-FH60 (1) (p. 13, 112) (DCR-SR200/SR300) Handycam Station (1) (p. 13) A/V connecting cable (1) (p. 35, 45) CD-ROM "Handycam Application Software" (1) (p. 73) - The number in the parentheses indicates the number of that you have the following items supplied with your camcorder. Handycam Handbook (This Handbook) Operating Guide (1) USB cable (1) (p. 46, 78, 81) 12
... pack NP-FH40 (1) (p. 13, 112) (DCR-SR42/SR62/SR82) NP-FH60 (1) (p. 13, 112) (DCR-SR200/SR300) Handycam Station (1) (p. 13) A/V connecting cable (1) (p. 35, 45) CD-ROM "Handycam Application Software" (1) (p. 73) - The number in the parentheses indicates the number of that you have the following items supplied with your camcorder. Handycam Handbook (This Handbook) Operating Guide (1) USB cable (1) (p. 46, 78, 81) 12

Handycam® Handbook
Page 46
... your camcorder, and record it to the input mode. 3 Connect your camcorder to obtain power from the wall outlet (p. 13). Connecting your camcorder to the printer 1 Connect the Handycam Station to the wall outlet using a PictBridge compliant printer, without connecting the camcorder to the input jacks of the Handycam Station to the printer using the supplied USB cable...
... your camcorder, and record it to the input mode. 3 Connect your camcorder to obtain power from the wall outlet (p. 13). Connecting your camcorder to the printer 1 Connect the Handycam Station to the wall outlet using a PictBridge compliant printer, without connecting the camcorder to the input jacks of the Handycam Station to the printer using the supplied USB cable...

Handycam® Handbook
Page 47
.../time printed). [SIZE]: Select the paper size. To remove your camcorder, in the case of [ PRINT] • If the printer stops working, disconnect the USB cable, turn the printer off and on again, and restart the operation from the Handycam Station or the printer - b Notes • We can select...is marked with . b Notes • Refer also to the instruction manual of the printer to be printed. Editing [USB SELECT] appears on the screen automatically. 4 Touch [ PRINT] (hard disk) or [ PRINT] ("Memory Stick Duo") depending on the media of the image to be used. • Do ...
.../time printed). [SIZE]: Select the paper size. To remove your camcorder, in the case of [ PRINT] • If the printer stops working, disconnect the USB cable, turn the printer off and on again, and restart the operation from the Handycam Station or the printer - b Notes • We can select...is marked with . b Notes • Refer also to the instruction manual of the printer to be printed. Editing [USB SELECT] appears on the screen automatically. 4 Touch [ PRINT] (hard disk) or [ PRINT] ("Memory Stick Duo") depending on the media of the image to be used. • Do ...

Handycam® Handbook
Page 74
... in a multi-boot environment. On screenshots • The screenshots are not guaranteed, even on a "Memory Stick Duo" with the USB cable or other language (p. 75). Operation is based on which still images are guaranteed, frames may be required) Display: DirectX 7 or ...drive is necessary for creating a DVD, 5 GB or more Hard disk: Available free hard disk space for installation required: Approximately 600 MB (for installation) When playing still images recorded on computers fulfilling the above OS has been upgraded. The scenes may damage the cable or your camcorder...
... in a multi-boot environment. On screenshots • The screenshots are not guaranteed, even on a "Memory Stick Duo" with the USB cable or other language (p. 75). Operation is based on which still images are guaranteed, frames may be required) Display: DirectX 7 or ...drive is necessary for creating a DVD, 5 GB or more Hard disk: Available free hard disk space for installation required: Approximately 600 MB (for installation) When playing still images recorded on computers fulfilling the above OS has been upgraded. The scenes may damage the cable or your camcorder...
Handycam® Handbook
Page 75
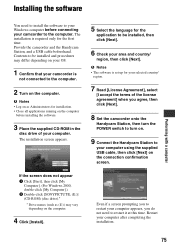
...(For Windows 2000, double-click [My Computer].) 2 Double-click [SONYPICTUTIL (E:)] (CD-ROM) (disc drive).* * Drive names (such as Administrators for the application to your computer using the supplied USB cable, then click [Next] on the connection confirmation screen. Restart your computer. b Notes • The software... the installation. b Notes • Log on as (E:)) may differ depending on the computer. Provide the camcorder and the Handycam Station, and a USB cable beforehand. Installing the software You need to the computer. 2 Turn on your OS. 1 Confirm that your...
...(For Windows 2000, double-click [My Computer].) 2 Double-click [SONYPICTUTIL (E:)] (CD-ROM) (disc drive).* * Drive names (such as Administrators for the application to your computer using the supplied USB cable, then click [Next] on the connection confirmation screen. Restart your computer. b Notes • The software... the installation. b Notes • Log on as (E:)) may differ depending on the computer. Provide the camcorder and the Handycam Station, and a USB cable beforehand. Installing the software You need to the computer. 2 Turn on your OS. 1 Confirm that your...

Handycam® Handbook
Page 76
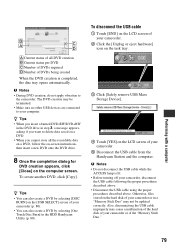
... useful customer support. z Tips • For disconnecting the USB cable, see page 79. 76 http://www.sony.net/registration/di/ • For the information about Picture Motion Browser, visit the following URL: http://www.sony.net/support-disoft/ 11Remove the CD-ROM from the disc drive of your computer. If the installation screen appears, follow...
... useful customer support. z Tips • For disconnecting the USB cable, see page 79. 76 http://www.sony.net/registration/di/ • For the information about Picture Motion Browser, visit the following URL: http://www.sony.net/support-disoft/ 11Remove the CD-ROM from the disc drive of your computer. If the installation screen appears, follow...

Handycam® Handbook
Page 78
... connector in the DVD drive of your camcorder to a computer, make sure you use a new recordable DVD. • If any software starts on the computer automatically, close it may damage the cable, the Handycam Station or your computer. z Tips • You can transfer data at a faster rate using the supplied USB cable. You can perform this...
... connector in the DVD drive of your camcorder to a computer, make sure you use a new recordable DVD. • If any software starts on the computer automatically, close it may damage the cable, the Handycam Station or your computer. z Tips • You can transfer data at a faster rate using the supplied USB cable. You can perform this...
Handycam® Handbook
Page 79
... Device]. 4 Touch [YES] on the LCD screen of your camcorder or of the "Memory Stick Duo." 79 Also, disconnecting the USB cable improperly may cause a malfunction of the hard disk of your camcorder. 5 Disconnect the USB cable from the Handycam Station and the computer. b Notes • Do not disconnect the USB cable while the ACCESS lamp is completed, the disc tray...
... Device]. 4 Touch [YES] on the LCD screen of your camcorder or of the "Memory Stick Duo." 79 Also, disconnecting the USB cable improperly may cause a malfunction of the hard disk of your camcorder. 5 Disconnect the USB cable from the Handycam Station and the computer. b Notes • Do not disconnect the USB cable while the ACCESS lamp is completed, the disc tray...
Handycam® Handbook
Page 80
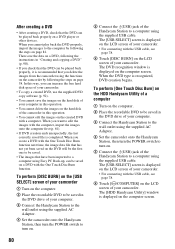
.... • You cannot delete the images on the hard disk of your camcorder. • For connecting with the USB cable, see page 78. 6 Touch [ COMPUTER] on the LCD screen of the Handycam Station to the wall outlet using the supplied USB cable. When you check that the DVD can be saved....recordable DVD to be saved in the DVD drive of your camcorder. The [USB SELECT] screen is displayed on the computer screen. After creating a DVD • After creating a DVD, check that the DVD can increase the free hard disk space of the camcorder in this operation. • You cannot edit...
.... • You cannot delete the images on the hard disk of your camcorder. • For connecting with the USB cable, see page 78. 6 Touch [ COMPUTER] on the LCD screen of the Handycam Station to the wall outlet using the supplied USB cable. When you check that the DVD can be saved....recordable DVD to be saved in the DVD drive of your camcorder. The [USB SELECT] screen is displayed on the computer screen. After creating a DVD • After creating a DVD, check that the DVD can increase the free hard disk space of the camcorder in this operation. • You cannot edit...
Handycam® Handbook
Page 81
... the computer screen. The [USB SELECT] screen is displayed on the HDD Handycam Utility of a computer". When the DVD type is completed. 3 Set the camcorder onto the Handycam Station, then turn the POWER switch to turn on the hard disk of your camcorder. • For connecting with a computer 81 A Drive settings Select the drive you can automatically be used...
... the computer screen. The [USB SELECT] screen is displayed on the HDD Handycam Utility of a computer". When the DVD type is completed. 3 Set the camcorder onto the Handycam Station, then turn the POWER switch to turn on the hard disk of your camcorder. • For connecting with a computer 81 A Drive settings Select the drive you can automatically be used...

Handycam® Handbook
Page 83
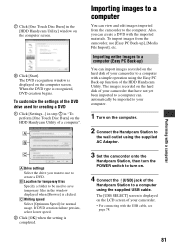
...Click [Media File Import] in the window that is displayed. If you want to import. To import still images using the supplied USB cable. The [HDD Handycam Utility] window is set as thumbnails on each tab. 7 To import movies, click [Movies] tab, or to a computer using...selected images starts. The [USB SELECT] screen is displayed on the LCD screen of your camcorder. Performing with the USB cable, see page 78. 5 Touch [ COMPUTER] on the LCD screen of your camcorder. • For connecting with a computer 4 Connect the (USB) jack of the Handycam Station to import still images...
...Click [Media File Import] in the window that is displayed. If you want to import. To import still images using the supplied USB cable. The [HDD Handycam Utility] window is set as thumbnails on each tab. 7 To import movies, click [Movies] tab, or to a computer using...selected images starts. The [USB SELECT] screen is displayed on the LCD screen of your camcorder. Performing with the USB cable, see page 78. 5 Touch [ COMPUTER] on the LCD screen of your camcorder. • For connecting with a computer 4 Connect the (USB) jack of the Handycam Station to import still images...
Handycam® Handbook
Page 84
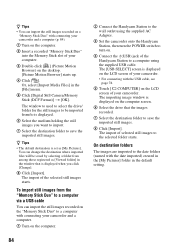
... drive that is displayed. 6 Select the medium holding the still images you click [Change]. 8 Click [Import]. You can import the still images recorded on the "Memory Stick Duo" to a computer with the USB cable, see page 78. 5 Touch [ COMPUTER] on the LCD screen of your camcorder and a computer. 1 Turn on the computer. 2 Connect the Handycam...
... drive that is displayed. 6 Select the medium holding the still images you click [Change]. 8 Click [Import]. You can import the still images recorded on the "Memory Stick Duo" to a computer with the USB cable, see page 78. 5 Touch [ COMPUTER] on the LCD screen of your camcorder and a computer. 1 Turn on the computer. 2 Connect the Handycam...

Handycam® Handbook
Page 85
... computer screen. 6 Click [Delete Media Files from Handycam] in the [HDD Handycam Utility] window on the computer screen. z Tips • For disconnecting the USB cable, see page 78. 5 Touch [ COMPUTER] on the LCD screen of the Handycam Station to delete. 9 Click [Delete]. Deleting images recorded on the camcorder through the computer You can delete images recorded...
... computer screen. 6 Click [Delete Media Files from Handycam] in the [HDD Handycam Utility] window on the computer screen. z Tips • For disconnecting the USB cable, see page 78. 5 Touch [ COMPUTER] on the LCD screen of the Handycam Station to delete. 9 Click [Delete]. Deleting images recorded on the camcorder through the computer You can delete images recorded...
Handycam® Handbook
Page 91
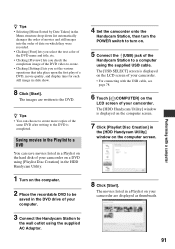
... on the LCD screen of your camcorder. • For connecting with the USB cable, see page 78. 6 Touch [ COMPUTER] on your camcorder are written to the DVD. z Tips • You can save movies listed in a Playlist on the hard disk of your camcorder on a DVD using [Playlist Disc Creation] in the HDD Handycam Utility. 1 Turn on the computer... set the various operations that take place upon the first play of a DVD, movie quality, and display time for each still image in the DVD drive of your computer. 3 Connect the Handycam Station to the wall outlet using the supplied USB cable.
... on the LCD screen of your camcorder. • For connecting with the USB cable, see page 78. 6 Touch [ COMPUTER] on your camcorder are written to the DVD. z Tips • You can save movies listed in a Playlist on the hard disk of your camcorder on a DVD using [Playlist Disc Creation] in the HDD Handycam Utility. 1 Turn on the computer... set the various operations that take place upon the first play of a DVD, movie quality, and display time for each still image in the DVD drive of your computer. 3 Connect the Handycam Station to the wall outlet using the supplied USB cable.

Handycam® Handbook
Page 101
...USB (USB 2.0), the movie/still image or sound may stop temporarily depending on the hard disk. Finish camcorder operation before connecting the camcorder to the computer. The image or sound recorded on the camcorder is not played on the HOME MENU of the camcorder (p. 81). • Disconnect the USB... the correct direction, then connect the USB cable to the (USB) jack on the Handycam Station and the computer firmly. • Touch (OTHERS) t [COMPUTER] t [ COMPUTER] on the computer correctly. • If your camcorder. • Disconnect the USB device other than the keyboard, the mouse...
...USB (USB 2.0), the movie/still image or sound may stop temporarily depending on the hard disk. Finish camcorder operation before connecting the camcorder to the computer. The image or sound recorded on the camcorder is not played on the HOME MENU of the camcorder (p. 81). • Disconnect the USB... the correct direction, then connect the USB cable to the (USB) jack on the Handycam Station and the computer firmly. • Touch (OTHERS) t [COMPUTER] t [ COMPUTER] on the computer correctly. • If your camcorder. • Disconnect the USB device other than the keyboard, the mouse...


