
Operating Instructions
Page 2
...can enjoy for the FCC related matters only. Never expose the battery pack to your Digital Handycam, you can capture life's precious moments with advanced features, but at the same... such as in a car parked in household or business trash may be producing home video that may cause undesired operation. For the Customers in the U.S.A. If you have any... handle damaged or leaking lithium ion battery. "Memory Stick" This device complies with Part 15 of Conformity Trade Name: SONY Model No.: DCR-PC9 Responsible Party:Sony Electronics Inc. Operation is intended to alert the...
...can enjoy for the FCC related matters only. Never expose the battery pack to your Digital Handycam, you can capture life's precious moments with advanced features, but at the same... such as in a car parked in household or business trash may be producing home video that may cause undesired operation. For the Customers in the U.S.A. If you have any... handle damaged or leaking lithium ion battery. "Memory Stick" This device complies with Part 15 of Conformity Trade Name: SONY Model No.: DCR-PC9 Responsible Party:Sony Electronics Inc. Operation is intended to alert the...
Operating Instructions
Page 3
... to radio or television reception, which the receiver is connected. - "Memory Stick" This Class B digital apparatus complies with the limits for help. Increase the separation between the equipment and receiver. - Consult the dealer or an experienced radio/ TV technician for a Class B digital device, pursuant to Part 15 of the following measures: - This equipment...
... to radio or television reception, which the receiver is connected. - "Memory Stick" This Class B digital apparatus complies with the limits for help. Increase the separation between the equipment and receiver. - Consult the dealer or an experienced radio/ TV technician for a Class B digital device, pursuant to Part 15 of the following measures: - This equipment...
Operating Instructions
Page 4
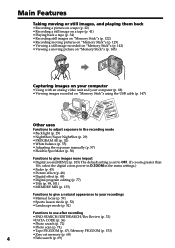
... Recording still images on "Memory Stick"s (p. 122) • Recording moving pictures on "Memory Stick"s (p. 129) • Viewing a still image recorded on "Memory Stick"s (p. 142) • Viewing a moving picture on "Memory Stick"s (p. 145) Capturing images on your computer • Using with an analog video unit... (p. 45) • Picture effect (p. 48) • Digital effect (p. 49) • Digital program editing (p. 77) • Title (p. 98, 101) • MEMORY MIX (p. 135) Functions to give a natural appearance to your recordings • Manual focus (p. 59) • Sports lesson mode...
... Recording still images on "Memory Stick"s (p. 122) • Recording moving pictures on "Memory Stick"s (p. 129) • Viewing a still image recorded on "Memory Stick"s (p. 142) • Viewing a moving picture on "Memory Stick"s (p. 145) Capturing images on your computer • Using with an analog video unit... (p. 45) • Picture effect (p. 48) • Digital effect (p. 49) • Digital program editing (p. 77) • Title (p. 98, 101) • MEMORY MIX (p. 135) Functions to give a natural appearance to your recordings • Manual focus (p. 59) • Sports lesson mode...
Operating Instructions
Page 5
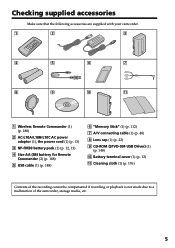
...cord (1) (p. 13) 3 NP-FM30 battery pack (1) (p. 12, 13) 4 Size AA (R6) battery for Remote Commander (2) (p. 188) 5 USB cable (1) (p. 148) 6 "Memory Stick" (1) (p. 112) 7 A/V connecting cable (1) (p. 40) 8 Lens cap (1) (p. 22) 9 CD-ROM (SPVD-004 USB Driver) (1) (p. 148) q; Battery terminal cover... (1) (p. 12) qa Cleaning cloth (1) (p. 176) Contents of the recording cannot be compensated if recording or playback is not made due to a malfunction of the camcorder, storage media, etc. 5 Getting started Checking supplied accessories Make...
...cord (1) (p. 13) 3 NP-FM30 battery pack (1) (p. 12, 13) 4 Size AA (R6) battery for Remote Commander (2) (p. 188) 5 USB cable (1) (p. 148) 6 "Memory Stick" (1) (p. 112) 7 A/V connecting cable (1) (p. 40) 8 Lens cap (1) (p. 22) 9 CD-ROM (SPVD-004 USB Driver) (1) (p. 148) q; Battery terminal cover... (1) (p. 12) qa Cleaning cloth (1) (p. 176) Contents of the recording cannot be compensated if recording or playback is not made due to a malfunction of the camcorder, storage media, etc. 5 Getting started Checking supplied accessories Make...
Operating Instructions
Page 6
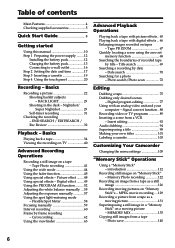
... with digital effects ... 66 Enlarging images recorded on tapes - Cut recording 62 Using the viewfinder 63 Advanced Playback Operations Playing back a tape with picture effects .. 65 Playing back a tape with an analog video unit and your own titles 101 Labeling a cassette 103 Customizing Your Camcorder Changing the menu settings 105 "Memory Stick" Operations Using a "Memory Stick...
... with digital effects ... 66 Enlarging images recorded on tapes - Cut recording 62 Using the viewfinder 63 Advanced Playback Operations Playing back a tape with picture effects .. 65 Playing back a tape with an analog video unit and your own titles 101 Labeling a cassette 103 Customizing Your Camcorder Changing the menu settings 105 "Memory Stick" Operations Using a "Memory Stick...

Operating Instructions
Page 7
...back images in a continuous loop - Image protection 155 Deleting images 156 Writing a print mark - PRINT MARK .. 159 Troubleshooting Types of contents Viewing a still image - Memory photo playback 142 Viewing a moving picture - MPEG movie playback 145 Viewing images using your camcorder abroad 174 Maintenance information and precautions 175 Specifications 181 Quick... and messages ......... 167 Additional Information Usable cassettes 169 About the "InfoLITHIUM" battery pack 171 About i.LINK 172 Using your computer .. 147 Enlarging still images recorded on "Memory Stick"s -
...back images in a continuous loop - Image protection 155 Deleting images 156 Writing a print mark - PRINT MARK .. 159 Troubleshooting Types of contents Viewing a still image - Memory photo playback 142 Viewing a moving picture - MPEG movie playback 145 Viewing images using your camcorder abroad 174 Maintenance information and precautions 175 Specifications 181 Quick... and messages ......... 167 Additional Information Usable cassettes 169 About the "InfoLITHIUM" battery pack 171 About i.LINK 172 Using your computer .. 147 Enlarging still images recorded on "Memory Stick"s -

Operating Instructions
Page 9
... click to off. Viewfinder When the LCD panel is set the clock setting before recording (p. 17). MEMORY OFF CAMERA (CHARGE) VCR 3 Set the POWER switch to open the LCD panel. POWER LOCK VCR MEMORY OFF CAMERA (CHARGE) 4 Press START/STOP. To stop recording, press START/STOP again. Recording a picture (p. 22) 1 Remove the lens cap. 2 Press OPEN to...
... click to off. Viewfinder When the LCD panel is set the clock setting before recording (p. 17). MEMORY OFF CAMERA (CHARGE) VCR 3 Set the POWER switch to open the LCD panel. POWER LOCK VCR MEMORY OFF CAMERA (CHARGE) 4 Press START/STOP. To stop recording, press START/STOP again. Recording a picture (p. 22) 1 Remove the lens cap. 2 Press OPEN to...
Operating Instructions
Page 10
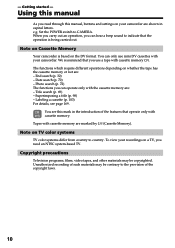
...details, see this manual As you use mini DV cassettes with cassette memory . Tapes with cassette memory. Copyright precautions Television programs, films, video tapes, and other materials may be copyrighted. Note on Cassette Memory Your camcorder is being carried out. Date search (p. 70) - Photo...country to CAMERA. We recommend that the operation is based on whether the tape has the cassette memory or not are marked by (Cassette Memory). Title search (p. 69) - You see page 169. Unauthorized recording of the features that operate only with cassette memory are : ...
...details, see this manual As you use mini DV cassettes with cassette memory . Tapes with cassette memory. Copyright precautions Television programs, films, video tapes, and other materials may be copyrighted. Note on Cassette Memory Your camcorder is being carried out. Date search (p. 70) - Photo...country to CAMERA. We recommend that the operation is based on whether the tape has the cassette memory or not are marked by (Cassette Memory). Title search (p. 69) - You see page 169. Unauthorized recording of the features that operate only with cassette memory are : ...

Operating Instructions
Page 13
... the charge is wrong with the battery pack. Something is completed, the CHARGE lamp goes out. (full charge) 2 CHARGE lamp 14 POWER LOCK VCR MEMORY OFF CAMERA (CHARGE) After charging the battery pack Disconnect the AC power adaptor from a wall outlet as soon as possible to cut off the power. 13 If...
... the charge is wrong with the battery pack. Something is completed, the CHARGE lamp goes out. (full charge) 2 CHARGE lamp 14 POWER LOCK VCR MEMORY OFF CAMERA (CHARGE) After charging the battery pack Disconnect the AC power adaptor from a wall outlet as soon as possible to cut off the power. 13 If...

Operating Instructions
Page 17
... 6. (8) Set the minute with r/R, and press EXEC by the time signal. "CLOCK SET" will have been discharged (p. 177). First, set the POWER switch to CAMERA or MEMORY unless you use your camcorder will be released (bars may be displayed each time that you set the year, then the month, the day, the... hour and then the minute. (1) Set the POWER switch to CAMERA or MEMORY. (2) Press FN to display PAGE1 (p. 20). (3) Press MENU to move. 2 FN 4R r SETUP MENU CLOCK SET DEMO MODE EXEC EXIT SETUP MENU EXIT CLOCK...
... 6. (8) Set the minute with r/R, and press EXEC by the time signal. "CLOCK SET" will have been discharged (p. 177). First, set the POWER switch to CAMERA or MEMORY unless you use your camcorder will be released (bars may be displayed each time that you set the year, then the month, the day, the... hour and then the minute. (1) Set the POWER switch to CAMERA or MEMORY. (2) Press FN to display PAGE1 (p. 20). (3) Press MENU to move. 2 FN 4R r SETUP MENU CLOCK SET DEMO MODE EXEC EXIT SETUP MENU EXIT CLOCK...

Operating Instructions
Page 18
If you do not set the date and time and are recorded on a 12-hour cycle. - 12:00 AM stands for midnight. - 12:00 PM stands for noon. 18 Note on the time indicator The internal clock of your camcorder operates on the data code of the tape and the "Memory Stick". Step 2 Setting the date and time The year changes as follows: 1995 y 2001 T t 2079 To return to FN Press EXIT.
If you do not set the date and time and are recorded on a 12-hour cycle. - 12:00 AM stands for midnight. - 12:00 PM stands for noon. 18 Note on the time indicator The internal clock of your camcorder operates on the data code of the tape and the "Memory Stick". Step 2 Setting the date and time The year changes as follows: 1995 y 2001 T t 2079 To return to FN Press EXIT.

Operating Instructions
Page 19
... of the back of the lid other than the mark. Insert the cassette in a straight line deeply into the cassette compartment with cassette memory Read the instruction about cassette memory to use mini DV cassette with the window facing out. (4) Close the cassette compartment by pressing the mark on the cassette to...
... of the back of the lid other than the mark. Insert the cassette in a straight line deeply into the cassette compartment with cassette memory Read the instruction about cassette memory to use mini DV cassette with the window facing out. (4) Close the cassette compartment by pressing the mark on the cassette to...

Operating Instructions
Page 20
...power supply (p. 12, 16). (2) Press OPEN to open the LCD panel. (3) Set the POWER switch to PAGE1/PAGE2/PAGE3. 20 SCH SURE 4 FN MEMORY OFF CAMERA (CHARGE) VCR 3 POWER LOCK PAGE1 PAGE2 PAGE3 EXIT TITLE LCD VOL MEM BRT MIX PAGE1 PAGE2 PAGE3 EXIT SELF TIMER 2 1 To return to PAGE1/... VCR mode (1) Install the battery pack, or connect the AC power adaptor for each function. To cancel settings Press OFF to return to CAMERA (in the standby/recording mode) or VCR (in the playback mode) while pressing the small green button. (4) Press FN. Touch the LCD panel directly to PAGE3. ...
...power supply (p. 12, 16). (2) Press OPEN to open the LCD panel. (3) Set the POWER switch to PAGE1/PAGE2/PAGE3. 20 SCH SURE 4 FN MEMORY OFF CAMERA (CHARGE) VCR 3 POWER LOCK PAGE1 PAGE2 PAGE3 EXIT TITLE LCD VOL MEM BRT MIX PAGE1 PAGE2 PAGE3 EXIT SELF TIMER 2 1 To return to PAGE1/... VCR mode (1) Install the battery pack, or connect the AC power adaptor for each function. To cancel settings Press OFF to return to CAMERA (in the standby/recording mode) or VCR (in the playback mode) while pressing the small green button. (4) Press FN. Touch the LCD panel directly to PAGE3. ...

Operating Instructions
Page 21
... work even if you press them, an adjustment is not on the LCD screen, touch the LCD screen lightly to display the following buttons: In CAMERA mode PAGE1 PAGE2 PAGE3 MENU, SPOT METER, FADER, DIG EFFT, END SCH, EXPOSURE TITLE, LCD BRT, VOL, MEM MIX SELFTIMER In VCR mode PAGE1 PAGE2... PAGE3 MENU, LCD BRT, VOL, END SCH TITLE, DIG EFFT, PB ZOOM DATA CODE, V SPD PLAY, A DUB CTRL, REC CTRL See p. 115 for MEMORY mode. 21 You can operate with your index finger.
... work even if you press them, an adjustment is not on the LCD screen, touch the LCD screen lightly to display the following buttons: In CAMERA mode PAGE1 PAGE2 PAGE3 MENU, SPOT METER, FADER, DIG EFFT, END SCH, EXPOSURE TITLE, LCD BRT, VOL, MEM MIX SELFTIMER In VCR mode PAGE1 PAGE2... PAGE3 MENU, LCD BRT, VOL, END SCH TITLE, DIG EFFT, PB ZOOM DATA CODE, V SPD PLAY, A DUB CTRL, REC CTRL See p. 115 for MEMORY mode. 21 You can operate with your index finger.

Operating Instructions
Page 22
... the previous position. (3) Eject the cassette. (4) Remove the battery pack. 22 Your camcorder starts recording. To stop recording, press START/STOP again. 5 LOCK 1 LOCK VCR Microphone MEMORY OFF CAMERA (CHARGE) 4 2 Camera recording lamp 6 3 LOCK 40min REC 0:00:01 VCR MEMORY OFF CAMERA (CHARGE) After recording (1) Set the POWER switch to OFF (CHARGE). (2) Close the LCD panel and set to...
... the previous position. (3) Eject the cassette. (4) Remove the battery pack. 22 Your camcorder starts recording. To stop recording, press START/STOP again. 5 LOCK 1 LOCK VCR Microphone MEMORY OFF CAMERA (CHARGE) 4 2 Camera recording lamp 6 3 LOCK 40min REC 0:00:01 VCR MEMORY OFF CAMERA (CHARGE) After recording (1) Set the POWER switch to OFF (CHARGE). (2) Close the LCD panel and set to...
Operating Instructions
Page 23
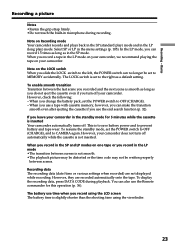
...The transition between scenes is not smooth. •The playback picture may be distorted or the time code may not be set to MEMORY accidentally. If you can also use the Remote commander for 5 minutes while the cassette is inserted Your camcorder automatically turns off automatically ...your camcorder. When you change the battery pack, set the POWER switch to OFF (CHARGE), and to CAMERA again. To resume the standby mode, set the POWER switch to prevent battery and tape wear. However, they are not displayed while recording. To display the recording data, press DATA CODE during...
...The transition between scenes is not smooth. •The playback picture may be distorted or the time code may not be set to MEMORY accidentally. If you can also use the Remote commander for 5 minutes while the cassette is inserted Your camcorder automatically turns off automatically ...your camcorder. When you change the battery pack, set the POWER switch to OFF (CHARGE), and to CAMERA again. To resume the standby mode, set the POWER switch to prevent battery and tape wear. However, they are not displayed while recording. To display the recording data, press DATA CODE during...

Operating Instructions
Page 24
... The LCD panel moves about 90 degrees to the viewfinder side and about 180 degrees to CAMERA, Xz appears in the standby mode, and z appears in the recording mode. If this feature to see. In CAMERA or MEMORY mode. The indicator appears in the mirror mode, the viewfinder automatically turns off. The subject uses...
... The LCD panel moves about 90 degrees to the viewfinder side and about 180 degrees to CAMERA, Xz appears in the standby mode, and z appears in the recording mode. If this feature to see. In CAMERA or MEMORY mode. The indicator appears in the mirror mode, the viewfinder automatically turns off. The subject uses...

Operating Instructions
Page 25
...brightness of the LCD screen appears. (3) Adjust the brightness of the LCD screen The recorded picture will be affected. 25 LCD screen backlight You can change the brightness of the LCD screen (1) In CAMERA or MEMORY mode, press FN and select PAGE2. in the viewfinder. The screen to PAGE1/PAGE2.... LCD BRT + the bar indicator To return to display PAGE1 (p. 20). (2) Press LCD BRT. Recording - When you adjust the LCD screen backlight or ...
...brightness of the LCD screen appears. (3) Adjust the brightness of the LCD screen The recorded picture will be affected. 25 LCD screen backlight You can change the brightness of the LCD screen (1) In CAMERA or MEMORY mode, press FN and select PAGE2. in the viewfinder. The screen to PAGE1/PAGE2.... LCD BRT + the bar indicator To return to display PAGE1 (p. 20). (2) Press LCD BRT. Recording - When you adjust the LCD screen backlight or ...

Operating Instructions
Page 26
You can change the brightness of the backlight. Even if you record pictures with the LCD panel closed, check the picture with the LCD screen facing out. You turn the LCD panel over and move the viewfinder ... backlight You can operate with the touch panel using the battery pack (p. 105). Adjust the viewfinder lens to your eyesight so that the indicators in CAMERA or MEMORY mode (p. 63). Recording a picture Adjusting the viewfinder If you adjust the viewfinder backlight The...
You can change the brightness of the backlight. Even if you record pictures with the LCD panel closed, check the picture with the LCD screen facing out. You turn the LCD panel over and move the viewfinder ... backlight You can operate with the touch panel using the battery pack (p. 105). Adjust the viewfinder lens to your eyesight so that the indicators in CAMERA or MEMORY mode (p. 63). Recording a picture Adjusting the viewfinder If you adjust the viewfinder backlight The...

Operating Instructions
Page 27
... function is sharp. The digital zooming zone appears when you move the power zoom lever to the "W" side until the focus is set to MEMORY You cannot use zoom greater than 10× Zoom greater than 10× is at least about 80 cm (about 2 feet 5/8 inch) ... set to function when zoom exceeds 10×. •The picture quality deteriorates as a default setting (p. 105). To activate digital zoom, select the digital zoom power in D ZOOM in better-looking recordings. Using the zoom function sparingly results in the menu settings. Move it further for a slower zoom. Notes on...
... function is sharp. The digital zooming zone appears when you move the power zoom lever to the "W" side until the focus is set to MEMORY You cannot use zoom greater than 10× Zoom greater than 10× is at least about 80 cm (about 2 feet 5/8 inch) ... set to function when zoom exceeds 10×. •The picture quality deteriorates as a default setting (p. 105). To activate digital zoom, select the digital zoom power in D ZOOM in better-looking recordings. Using the zoom function sparingly results in the menu settings. Move it further for a slower zoom. Notes on...


