
Operating Guide
Page 4
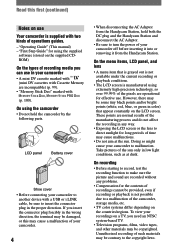
..."Memory Stick Duo" marked with , (p. 100). Unauthorized recording of such materials may be copyrighted. On using the camcorder • Do not hold both the DC plug and the Handycam Station and disconnect the AC Adaptor. • Be sure to malfunction. However, there may be some tiny black points... • A menu item that appear constantly on the LCD screen. Read this may cause a malfunction of your camcorder. 4 • When disconnecting the AC Adaptor from the Handycam Station. "First Step Guide" for using extremely high-precision technology, so over 99.99% of the pixels are ...
..."Memory Stick Duo" marked with , (p. 100). Unauthorized recording of such materials may be copyrighted. On using the camcorder • Do not hold both the DC plug and the Handycam Station and disconnect the AC Adaptor. • Be sure to malfunction. However, there may be some tiny black points... • A menu item that appear constantly on the LCD screen. Read this may cause a malfunction of your camcorder. 4 • When disconnecting the AC Adaptor from the Handycam Station. "First Step Guide" for using extremely high-precision technology, so over 99.99% of the pixels are ...
Operating Guide
Page 5
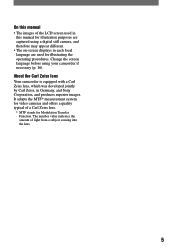
Change the screen language before using a digital still camera, and therefore may appear different. • The on-screen displays in Germany, and Sony Corporation, and produces superior images. It adopts the MTF* measurement system for video cameras and offers a quality typical of light from a subject ...lens. 5 The number value indicates the amount of a Carl Zeiss lens. * MTF stands for Modulation Transfer Function. About the Carl Zeiss lens Your camcorder is equipped with a Carl Zeiss lens, which was developed jointly by Carl Zeiss, in each local language are captured using your...
Change the screen language before using a digital still camera, and therefore may appear different. • The on-screen displays in Germany, and Sony Corporation, and produces superior images. It adopts the MTF* measurement system for video cameras and offers a quality typical of light from a subject ...lens. 5 The number value indicates the amount of a Carl Zeiss lens. * MTF stands for Modulation Transfer Function. About the Carl Zeiss lens Your camcorder is equipped with a Carl Zeiss lens, which was developed jointly by Carl Zeiss, in each local language are captured using your...
Operating Guide
Page 6
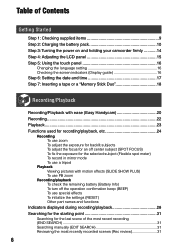
... Contents Getting Started Step 1: Checking supplied items 9 Step 2: Charging the battery pack 10 Step 3: Turning the power on and holding your camcorder firmly ...........14 Step 4: Adjusting the LCD panel 15 Step 5: Using the touch panel 16 Changing the language setting 16 Checking the ...6: Setting the date and time 17 Step 7: Inserting a tape or a "Memory Stick Duo 18 Recording/Playback Recording/Playback with ease (Easy Handycam 20 Recording 22 Playback 23 Functions used for recording/playback, etc 24 Recording To use zoom To adjust the exposure for backlit subjects To adjust...
... Contents Getting Started Step 1: Checking supplied items 9 Step 2: Charging the battery pack 10 Step 3: Turning the power on and holding your camcorder firmly ...........14 Step 4: Adjusting the LCD panel 15 Step 5: Using the touch panel 16 Changing the language setting 16 Checking the ...6: Setting the date and time 17 Step 7: Inserting a tape or a "Memory Stick Duo 18 Recording/Playback Recording/Playback with ease (Easy Handycam 20 Recording 22 Playback 23 Functions used for recording/playback, etc 24 Recording To use zoom To adjust the exposure for backlit subjects To adjust...
Operating Guide
Page 7
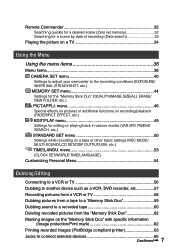
... Playing the picture on a TV 34 Using the Menu Using the menu items 36 Menu items 38 CAMERA SET menu 40 Settings to adjust your camcorder to connect external devices 65 Continued 7 menu 46 Special effects on pictures or additional functions on a tape or other basic settings (REC MODE/ MULTI...
... Playing the picture on a TV 34 Using the Menu Using the menu items 36 Menu items 38 CAMERA SET menu 40 Settings to adjust your camcorder to connect external devices 65 Continued 7 menu 46 Special effects on pictures or additional functions on a tape or other basic settings (REC MODE/ MULTI...
Operating Guide
Page 8
... a DVD (Direct Access to "Click to DVD 73 Connecting an analog VCR to the computer via your camcorder (Signal convert function 76 Troubleshooting Troubleshooting 78 Warning indicators and messages 94 Additional Information Using your camcorder abroad 98 Usable cassette tapes 99 About the "Memory Stick 100 About the "InfoLITHIUM" battery pack 102...
... a DVD (Direct Access to "Click to DVD 73 Connecting an analog VCR to the computer via your camcorder (Signal convert function 76 Troubleshooting Troubleshooting 78 Warning indicators and messages 94 Additional Information Using your camcorder abroad 98 Usable cassette tapes 99 About the "Memory Stick 100 About the "InfoLITHIUM" battery pack 102...
Operating Guide
Page 9
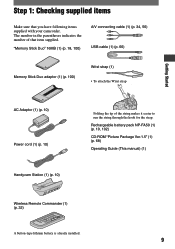
... adaptor (1) (p. 100) Wrist strap (1) • To attach the Wrist strap Getting Started AC Adaptor (1) (p. 10) Power cord (1) (p. 10) Handycam Station (1) (p. 10) Folding the tip of that you have following items supplied with your camcorder. The number in the parentheses indicates the number of the string makes it easier to run the string...
... adaptor (1) (p. 100) Wrist strap (1) • To attach the Wrist strap Getting Started AC Adaptor (1) (p. 10) Power cord (1) (p. 10) Handycam Station (1) (p. 10) Folding the tip of that you have following items supplied with your camcorder. The number in the parentheses indicates the number of the string makes it easier to run the string...
Operating Guide
Page 10
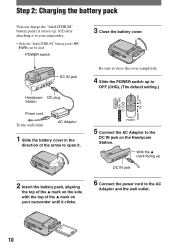
...With the mark facing up to OFF (CHG). (The default setting.) 5 Connect the AC Adaptor to the DC IN jack on your camcorder until it to your camcorder. • Only the "InfoLITHIUM" battery pack (NPFA50) can charge the "InfoLITHIUM" battery pack (A series) (p. 102) after attaching it clicks.... 6 Connect the power cord to open it. DC IN jack Handycam DC plug Station Power cord To the wall outlet AC Adaptor 1 Slide...
...With the mark facing up to OFF (CHG). (The default setting.) 5 Connect the AC Adaptor to the DC IN jack on your camcorder until it to your camcorder. • Only the "InfoLITHIUM" battery pack (NPFA50) can charge the "InfoLITHIUM" battery pack (A series) (p. 102) after attaching it clicks.... 6 Connect the power cord to open it. DC IN jack Handycam DC plug Station Power cord To the wall outlet AC Adaptor 1 Slide...
Operating Guide
Page 11
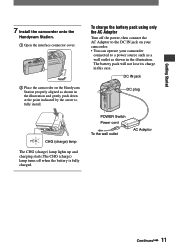
... Power cord To the wall outlet AC Adaptor Continued 11 Getting Started 7 Install the camcorder onto the Handycam Station. Open the interface connector cover. Place the camcorder on your camcorder. • You can operate your camcorder connected to fully install. The battery pack will not lose its charge in the illustration. CHG...
... Power cord To the wall outlet AC Adaptor Continued 11 Getting Started 7 Install the camcorder onto the Handycam Station. Open the interface connector cover. Place the camcorder on your camcorder. • You can operate your camcorder connected to fully install. The battery pack will not lose its charge in the illustration. CHG...
Operating Guide
Page 12
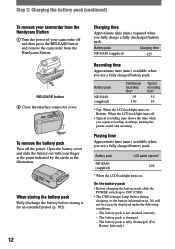
...recording time* 55 65 * Top: When the LCD backlight turns on /off and then press the RELEASE button and remove the camcorder from the Handycam Station Turn the power of your finger at the point indicated by the circle in the illustration. Playing time ...Charging time Approximate time (min.) required when you use a fully charged battery pack. Step 2: Charging the battery pack (continued) To remove your camcorder from the Handycam Station. On the battery pack • Before changing the battery pack, slide the POWER switch up to OFF (CHG). • The CHG ...
...recording time* 55 65 * Top: When the LCD backlight turns on /off and then press the RELEASE button and remove the camcorder from the Handycam Station Turn the power of your finger at the point indicated by the circle in the illustration. Playing time ...Charging time Approximate time (min.) required when you use a fully charged battery pack. Step 2: Charging the battery pack (continued) To remove your camcorder from the Handycam Station. On the battery pack • Before changing the battery pack, slide the POWER switch up to OFF (CHG). • The CHG ...
Operating Guide
Page 13
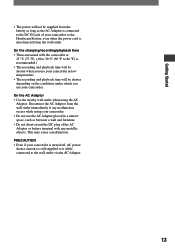
...8226; Times measured with any malfunction occurs while using the AC Adaptor. This may cause a malfunction. PRECAUTION • Even if your camcorder or the Handycam Station, even when the power cord is still supplied to it while connected to the wall outlet via the AC Adaptor. 13 Getting Started... • The power will be shorter depending on the conditions under which you use your camcorder in low temperatures. • The recording...
...8226; Times measured with any malfunction occurs while using the AC Adaptor. This may cause a malfunction. PRECAUTION • Even if your camcorder or the Handycam Station, even when the power cord is still supplied to it while connected to the wall outlet via the AC Adaptor. 13 Getting Started... • The power will be shorter depending on the conditions under which you use your camcorder in low temperatures. • The recording...
Operating Guide
Page 14
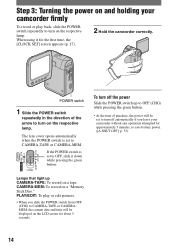
.... POWER switch 1 Slide the POWER switch repeatedly in the direction of purchase, the power will be set to turn off automatically if you leave your camcorder firmly To record or play or edit pictures. • When you slide the POWER switch from OFF (CHG) to CAMERA-TAPE or CAMERAMEM,... the current date and time will be displayed on the LCD screen for the first time, the [CLOCK SET] screen appears (p. 17). 2 Hold the camcorder correctly. PLAY/EDIT: To play back, slide the POWER switch repeatedly to turn on the respective lamp. Step 3: Turning the power on and holding your...
.... POWER switch 1 Slide the POWER switch repeatedly in the direction of purchase, the power will be set to turn off automatically if you leave your camcorder firmly To record or play or edit pictures. • When you slide the POWER switch from OFF (CHG) to CAMERA-TAPE or CAMERAMEM,... the current date and time will be displayed on the LCD screen for the first time, the [CLOCK SET] screen appears (p. 17). 2 Hold the camcorder correctly. PLAY/EDIT: To play back, slide the POWER switch repeatedly to turn on the respective lamp. Step 3: Turning the power on and holding your...

Operating Guide
Page 15
... recorded picture will not be affected by the setting. Step 4: Adjusting the LCD panel The LCD panel Open the LCD panel 90 degrees to the camcorder (), then rotate it to the best angle to record or play (). 180 degrees (max.) 90 degrees (max.) 2 Getting Started 1 DISP/BATT ...INFO 90 Degrees to the camcorder • Do not press the buttons on the LCD backlight, press and hold DISP/BATT INFO for a few seconds until disappears. • See [LCD BRIGHT...
... recorded picture will not be affected by the setting. Step 4: Adjusting the LCD panel The LCD panel Open the LCD panel 90 degrees to the camcorder (), then rotate it to the best angle to record or play (). 180 degrees (max.) 90 degrees (max.) 2 Getting Started 1 DISP/BATT ...INFO 90 Degrees to the camcorder • Do not press the buttons on the LCD backlight, press and hold DISP/BATT INFO for a few seconds until disappears. • See [LCD BRIGHT...
Operating Guide
Page 17
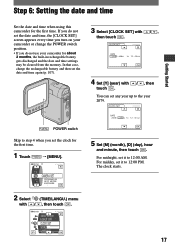
... for the first time. 1 Touch [MENU]. 60min -:--:-- If you do not use your camcorder for the first time. CLOCK SET -:--:-- Step 6: Setting the date and time Getting Started Set the date and ...time when using this camcorder for about 2 months, the built-in rechargeable battery gets discharged and the date and time ... set the date and time, the [CLOCK SET] screen appears every time you turn on your camcorder or change the POWER switch position. • If you set any year up to 12:00 PM...
... for the first time. 1 Touch [MENU]. 60min -:--:-- If you do not use your camcorder for the first time. CLOCK SET -:--:-- Step 6: Setting the date and time Getting Started Set the date and ...time when using this camcorder for about 2 months, the built-in rechargeable battery gets discharged and the date and time ... set the date and time, the [CLOCK SET] screen appears every time you turn on your camcorder or change the POWER switch position. • If you set any year up to 12:00 PM...

Operating Guide
Page 19
Otherwise, image data may be damaged. 19 Getting Started To eject a "Memory Stick Duo" Lightly push the "Memory Stick Duo" in once. • When the access lamp is reading/writing data. Do not shake or knock your camcorder is lit or flashing, your camcorder, turn the power off, eject the "Memory Stick Duo," or remove the battery pack.
Otherwise, image data may be damaged. 19 Getting Started To eject a "Memory Stick Duo" Lightly push the "Memory Stick Duo" in once. • When the access lamp is reading/writing data. Do not shake or knock your camcorder is lit or flashing, your camcorder, turn the power off, eject the "Memory Stick Duo," or remove the battery pack.
Operating Guide
Page 24
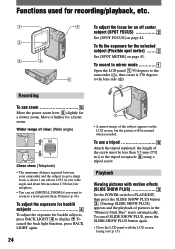
... pictures with the LCD screen facing out (p. 15). Wider range of pictures in mirror mode Open the LCD panel 90 degrees to the camcorder (), then rotate it further for telephoto. • You can set [DIGITAL ZOOM] if you want to zoom to the lens side (... . [Starting SLIDE SHOW PLUS] appears and the playback of view: (Wide angle) Close view: (Telephoto) • The minimum distance required between your camcorder and the subject to get a sharp focus is about 1 cm (about 13/32 in .)) to display . Recording To use a tripod Attach the tripod...
... pictures with the LCD screen facing out (p. 15). Wider range of pictures in mirror mode Open the LCD panel 90 degrees to the camcorder (), then rotate it further for telephoto. • You can set [DIGITAL ZOOM] if you want to zoom to the lens side (... . [Starting SLIDE SHOW PLUS] appears and the playback of view: (Wide angle) Close view: (Telephoto) • The minimum distance required between your camcorder and the subject to get a sharp focus is about 1 cm (about 13/32 in .)) to display . Recording To use a tripod Attach the tripod...
Operating Guide
Page 25
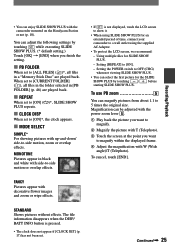
.... PB FOLDER When set to [ALL FILES] ( )*, all files in the folder selected in black and white with the camcorder mounted on the Handycam Station or not (p. 10). The file information disappears when the DISP/ BATT INFO button is not displayed, touch the LCD screen to ...show it. • When using SLIDE SHOW PLUS for an extended period of time, connect your camcorder to a wall outlet using the supplied AC ...
.... PB FOLDER When set to [ALL FILES] ( )*, all files in the folder selected in black and white with the camcorder mounted on the Handycam Station or not (p. 10). The file information disappears when the DISP/ BATT INFO button is not displayed, touch the LCD screen to ...show it. • When using SLIDE SHOW PLUS for an extended period of time, connect your camcorder to a wall outlet using the supplied AC ...

Operating Guide
Page 26
... Set the POWER switch up in red during recording (p. 52). Remote sensor Point the Remote Commander (p. 32) towards the remote sensor to operate your camcorder. Internal stereo microphone When an external microphone is connected, the audio input from the speaker. • For how to adjust the volume, see page...
... Set the POWER switch up in red during recording (p. 52). Remote sensor Point the Remote Commander (p. 32) towards the remote sensor to operate your camcorder. Internal stereo microphone When an external microphone is connected, the audio input from the speaker. • For how to adjust the volume, see page...
Operating Guide
Page 29
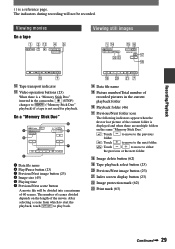
... folders on the same "Memory Stick Duo." : Touch folder. wa 7 Data file name Picture number/Total number of recorded pictures in the camcorder, (STOP) changes to ("Memory Stick Duo" playback) if a tape is a reference page. to move to the previous : Touch to move to the next folder. : Touch...
... folders on the same "Memory Stick Duo." : Touch folder. wa 7 Data file name Picture number/Total number of recorded pictures in the camcorder, (STOP) changes to ("Memory Stick Duo" playback) if a tape is a reference page. to move to the previous : Touch to move to the next folder. : Touch...
Operating Guide
Page 31
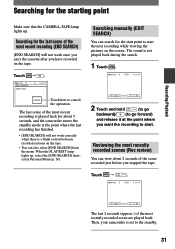
Then, your camcorder is not played back during the search. 1 Touch . 60min STBY 0:00:00 EDIT 2 Touch and hold (to go backward)/ (to go forward) and release it ... are played back. When the PLAY/EDIT lamp lights up . Reviewing the most recently recorded scenes (Rec review) You can view about 5 seconds, and the camcorder enters the standby mode at the point where you want the recording to start the next recording while viewing the pictures on the screen. The...
Then, your camcorder is not played back during the search. 1 Touch . 60min STBY 0:00:00 EDIT 2 Touch and hold (to go backward)/ (to go forward) and release it ... are played back. When the PLAY/EDIT lamp lights up . Reviewing the most recently recorded scenes (Rec review) You can view about 5 seconds, and the camcorder enters the standby mode at the point where you want the recording to start the next recording while viewing the pictures on the screen. The...
Operating Guide
Page 32
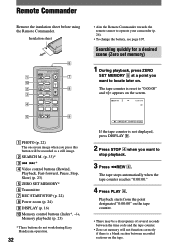
...) DISPLAY (p. 16) Memory control buttons (Index*, -/+, Memory playback) (p. 23) * These buttons do not work during Easy Handycam operation. 32 • Aim the Remote Commander towards the remote sensor to operate your camcorder (p. 26). • To change the battery, see page 107. Searching quickly for a desired scene (Zero set memory will...
...) DISPLAY (p. 16) Memory control buttons (Index*, -/+, Memory playback) (p. 23) * These buttons do not work during Easy Handycam operation. 32 • Aim the Remote Commander towards the remote sensor to operate your camcorder (p. 26). • To change the battery, see page 107. Searching quickly for a desired scene (Zero set memory will...


