Operating Instructions
Page 4
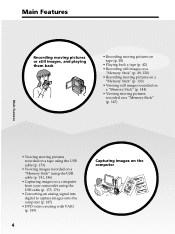
... using the USB cable (p. 173) • Viewing images recorded on a "Memory Stick" using the USB cable (p. 181, 186) • Capturing images on a computer from your camcorder using the USB cable (p. 175, 176) • Converting an analog signal into digital to capture images onto the computer (p. 187) • DVD video creating with...
... using the USB cable (p. 173) • Viewing images recorded on a "Memory Stick" using the USB cable (p. 181, 186) • Capturing images on a computer from your camcorder using the USB cable (p. 175, 176) • Converting an analog signal into digital to capture images onto the computer (p. 187) • DVD video creating with...
Operating Instructions
Page 6
Recording on a cassette with Cassette Memory 106 Making your camcorder on tape 87 Recording video or TV programs 97 Inserting a scene from a VCR - Picture effect ....... 60 Using special effects - Insert editing 100 Audio dubbing 102 ...
Recording on a cassette with Cassette Memory 106 Making your camcorder on tape 87 Recording video or TV programs 97 Inserting a scene from a VCR - Picture effect ....... 60 Using special effects - Insert editing 100 Audio dubbing 102 ...
Operating Instructions
Page 7
... Stick" - Digital program editing (on a computer - Signal convert function 187 Copying images to DVD with VAIO .... 189 Customizing your Camcorder Changing the menu settings 191 Troubleshooting Types of Contents "Memory Stick" Operations Using a "Memory Stick" - Memory PB ZOOM 151 Playing ...Usable cassettes 213 About the "InfoLITHIUM" battery pack 216 About i.LINK 218 Using your Computer Viewing images with your camcorder abroad 220 Maintenance information and precautions 221 Specifications 227 Quick Reference Identifying parts and controls 229 Index 237 7 Memory...
... Stick" - Digital program editing (on a computer - Signal convert function 187 Copying images to DVD with VAIO .... 189 Customizing your Camcorder Changing the menu settings 191 Troubleshooting Types of Contents "Memory Stick" Operations Using a "Memory Stick" - Memory PB ZOOM 151 Playing ...Usable cassettes 213 About the "InfoLITHIUM" battery pack 216 About i.LINK 218 Using your Computer Viewing images with your camcorder abroad 220 Maintenance information and precautions 221 Specifications 227 Quick Reference Identifying parts and controls 229 Index 237 7 Memory...
Operating Instructions
Page 8
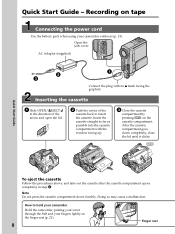
... opens completely in the direction of the arrow and open the lid. 2 Push the center of the cassette back to hold your camcorder Hold the camcorder, putting your wrist through the belt and your fingers lightly on tape Connecting the power cord Use the battery pack when using your... camcorder outdoors (p. 15). Quick Start Guide - AC Adaptor (supplied) 2 3 1 Connect the plug with the window facing up. 3 Close the cassette compartment by pressing ...
... opens completely in the direction of the arrow and open the lid. 2 Push the center of the cassette back to hold your camcorder Hold the camcorder, putting your wrist through the belt and your fingers lightly on tape Connecting the power cord Use the battery pack when using your... camcorder outdoors (p. 15). Quick Start Guide - AC Adaptor (supplied) 2 3 1 Connect the plug with the window facing up. 3 Close the cassette compartment by pressing ...
Operating Instructions
Page 9
...Viewfinder LCD panel Battery pack Flash 9 Viewfinder When the LCD panel is not set the clock before recording (p. 23). Adjust the viewfinder lens to your camcorder, the clock is closed, pull out the viewfinder placing your finger supporting the LCD panel from the back side of the touch panel to record... the date and time for a picture, set up your camcorder by the parts illustrated. Monitoring the playback picture on the LCD screen (p. 42) 1 Set the POWER switch to open the LCD panel. MEMORY ...
...Viewfinder LCD panel Battery pack Flash 9 Viewfinder When the LCD panel is not set the clock before recording (p. 23). Adjust the viewfinder lens to your camcorder, the clock is closed, pull out the viewfinder placing your finger supporting the LCD panel from the back side of the touch panel to record... the date and time for a picture, set up your camcorder by the parts illustrated. Monitoring the playback picture on the LCD screen (p. 42) 1 Set the POWER switch to open the LCD panel. MEMORY ...
Operating Instructions
Page 10
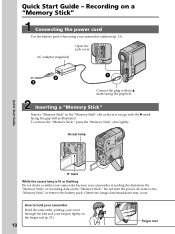
... far as illustrated. Access lamp Quick Start Guide B mark While the access lamp is lit or flashing Do not shake or strike your camcorder because your camcorder is reading the data from the "Memory Stick" or recording data on a "Memory Stick" Connecting the power cord Use the battery pack...v mark facing the grip belt. To remove the "Memory Stick," press the "Memory Stick" once lightly. How to hold your camcorder Hold the camcorder, putting your wrist through the belt and your camcorder outdoors (p. 15). Do not turn the power off, remove the "Memory Stick" or remove the battery pack.
... far as illustrated. Access lamp Quick Start Guide B mark While the access lamp is lit or flashing Do not shake or strike your camcorder because your camcorder is reading the data from the "Memory Stick" or recording data on a "Memory Stick" Connecting the power cord Use the battery pack...v mark facing the grip belt. To remove the "Memory Stick," press the "Memory Stick" once lightly. How to hold your camcorder Hold the camcorder, putting your wrist through the belt and your camcorder outdoors (p. 15). Do not turn the power off, remove the "Memory Stick" or remove the battery pack.
Operating Instructions
Page 11
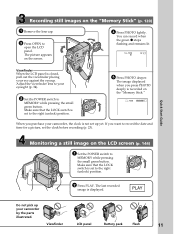
Recording still images on the "Memory Stick." 640 FINE MEMORY CAMERA When you purchase your camcorder, the clock is not set up your camcorder by the parts illustrated. You can record when the green z stops flashing and remains lit. 640 FINE 12 Viewfinder When the LCD panel is set ...
Recording still images on the "Memory Stick." 640 FINE MEMORY CAMERA When you purchase your camcorder, the clock is not set up your camcorder by the parts illustrated. You can record when the green z stops flashing and remains lit. 640 FINE 12 Viewfinder When the LCD panel is set ...
Operating Instructions
Page 12
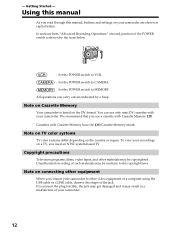
...on a TV, you read through this manual, buttons and settings on your camcorder to other video equipment or a computer using the USB cable or i.LINK cable, observe the shape of your camcorder. To view your recordings on connecting other materials may be copyrighted. Copyright precautions... are shown in a malfunction of the jack. - You can use a cassette with Cassette Memory . Cassettes with your camcorder. 12 All operations you connect your camcorder are indicated by the icons below. POWER LOCK VCR (CHG)OFF MEMORY CAMERA : Set the POWER switch to VCR. ...
...on a TV, you read through this manual, buttons and settings on your camcorder to other video equipment or a computer using the USB cable or i.LINK cable, observe the shape of your camcorder. To view your recordings on connecting other materials may be copyrighted. Copyright precautions... are shown in a malfunction of the jack. - You can use a cassette with Cassette Memory . Cassettes with your camcorder. 12 All operations you connect your camcorder are indicated by the icons below. POWER LOCK VCR (CHG)OFF MEMORY CAMERA : Set the POWER switch to VCR. ...
Operating Instructions
Page 13
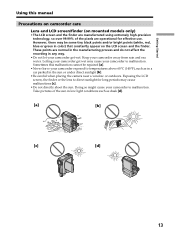
...of the pixels are normal in the manufacturing process and do not affect the recording in any way. •Do not let your camcorder to direct sunlight for effective use. Exposing the LCD screen, the finder or the lens to malfunction. However, there may be ...repaired [a]. •Never leave your camcorder exposed to malfunction. These points are operational for long periods may cause your camcorder away from rain and sea water. Keep your camcorder to temperatures above 60°C (140°F), such as dusk [d]. [a] [b] ...
...of the pixels are normal in the manufacturing process and do not affect the recording in any way. •Do not let your camcorder to direct sunlight for effective use. Exposing the LCD screen, the finder or the lens to malfunction. However, there may be ...repaired [a]. •Never leave your camcorder exposed to malfunction. These points are operational for long periods may cause your camcorder away from rain and sea water. Keep your camcorder to temperatures above 60°C (140°F), such as dusk [d]. [a] [b] ...
Operating Instructions
Page 14
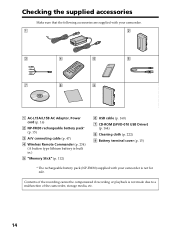
... cannot be compensated if recording or playback is not for sale. Checking the supplied accessories Make sure that the following accessories are supplied with your camcorder. 1 2 3 4 5 6 7 8 9 1 AC-L15A/L15B AC Adaptor, Power cord (p. 16) 2 NP-FM30 rechargeable battery pack* (p. 15) 3 A/V connecting cable (p. 47) 4 Wireless Remote Commander (p. 234) (A button type ...(p. 160) 7 CD-ROM (SPVD-010 USB Driver) (p. 164) 8 Cleaning cloth (p. 222) 9 Battery terminal cover (p. 15) * The rechargeable battery pack (NP-FM30) supplied with your camcorder is not made due to a malfunction of the...
... cannot be compensated if recording or playback is not for sale. Checking the supplied accessories Make sure that the following accessories are supplied with your camcorder. 1 2 3 4 5 6 7 8 9 1 AC-L15A/L15B AC Adaptor, Power cord (p. 16) 2 NP-FM30 rechargeable battery pack* (p. 15) 3 A/V connecting cable (p. 47) 4 Wireless Remote Commander (p. 234) (A button type ...(p. 160) 7 CD-ROM (SPVD-010 USB Driver) (p. 164) 8 Cleaning cloth (p. 222) 9 Battery terminal cover (p. 15) * The rechargeable battery pack (NP-FM30) supplied with your camcorder is not made due to a malfunction of the...
Operating Instructions
Page 16
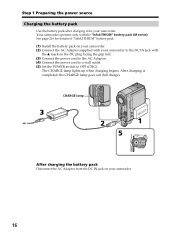
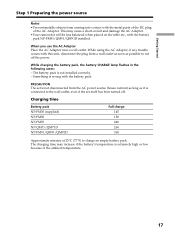
...the power cord to a wall outlet. (5) Set the POWER switch to OFF (CHG). The CHARGE lamp lights up when charging begins. Your camcorder operates only with the "InfoLITHIUM" battery pack (M series). Step 1 Preparing the power source Charging the battery pack Use the battery pack after charging... it for details of "InfoLITHIUM" battery pack. (1) Install the battery pack on your camcorder. (2) Connect the AC Adaptor supplied with your camcorder. CHARGE lamp 3 2 1 5 POWER LOCK VCR (CHG)OFF MEMORY CAMERA After charging the battery pack Disconnect the AC...
...the power cord to a wall outlet. (5) Set the POWER switch to OFF (CHG). The CHARGE lamp lights up when charging begins. Your camcorder operates only with the "InfoLITHIUM" battery pack (M series). Step 1 Preparing the power source Charging the battery pack Use the battery pack after charging... it for details of "InfoLITHIUM" battery pack. (1) Install the battery pack on your camcorder. (2) Connect the AC Adaptor supplied with your camcorder. CHARGE lamp 3 2 1 5 POWER LOCK VCR (CHG)OFF MEMORY CAMERA After charging the battery pack Disconnect the AC...
Operating Instructions
Page 17
... pack is extremely high or low because of the AC Adaptor. The charging time may cause a short-circuit and damage the AC Adaptor. •Your camcorder will be less balanced when placed on the table etc., with the battery pack. PRECAUTION The set itself has been turned off the power. This...
... pack is extremely high or low because of the AC Adaptor. The charging time may cause a short-circuit and damage the AC Adaptor. •Your camcorder will be less balanced when placed on the table etc., with the battery pack. PRECAUTION The set itself has been turned off the power. This...
Operating Instructions
Page 18
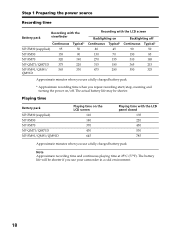
... 50 150 85 310 185 365 215 550 325 Approximate minutes when you use a fully charged battery pack * Approximate recording time when you use your camcorder in a cold environment. 18 The actual battery life may be shorter if you use a fully charged battery pack Note Approximate recording time and continuous playing...
... 50 150 85 310 185 365 215 550 325 Approximate minutes when you use a fully charged battery pack * Approximate recording time when you use your camcorder in a cold environment. 18 The actual battery life may be shorter if you use a fully charged battery pack Note Approximate recording time and continuous playing...
Operating Instructions
Page 20
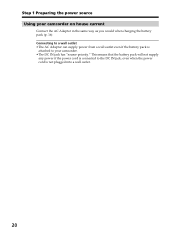
Step 1 Preparing the power source Using your camcorder. •The DC IN jack has "source priority." This means that the battery pack will not supply any power if the power cord is connected to the DC IN jack, even when the power cord is attached to a wall outlet •The AC Adaptor can supply power from a wall outlet even if the battery pack is not plugged into a wall outlet. 20 Connecting to your camcorder on house current Connect the AC Adaptor in the same way as you would when charging the battery pack (p. 16).
Step 1 Preparing the power source Using your camcorder. •The DC IN jack has "source priority." This means that the battery pack will not supply any power if the power cord is connected to the DC IN jack, even when the power cord is attached to a wall outlet •The AC Adaptor can supply power from a wall outlet even if the battery pack is not plugged into a wall outlet. 20 Connecting to your camcorder on house current Connect the AC Adaptor in the same way as you would when charging the battery pack (p. 16).
Operating Instructions
Page 21
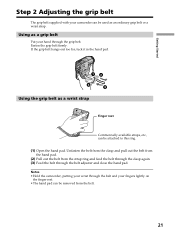
... too far, tuck it in the hand pad. 12 4 3 Using the grip belt as an ordinary grip belt or a wrist strap. Notes •Hold the camcorder, putting your wrist through the belt and your fingers lightly on the finger rest. •The hand pad can be removed from the strap ring... clasp again. (3) Feed the belt through the belt adjuster and close the hand pad. Fasten the grip belt firmly. Using as a grip belt Put your camcorder can be used as a wrist strap Finger rest Commercially available straps, etc., can be attached to this ring. (1) Open the hand pad. Getting Started Step...
... too far, tuck it in the hand pad. 12 4 3 Using the grip belt as an ordinary grip belt or a wrist strap. Notes •Hold the camcorder, putting your wrist through the belt and your fingers lightly on the finger rest. •The hand pad can be removed from the strap ring... clasp again. (3) Feed the belt through the belt adjuster and close the hand pad. Fasten the grip belt firmly. Using as a grip belt Put your camcorder can be used as a wrist strap Finger rest Commercially available straps, etc., can be attached to this ring. (1) Open the hand pad. Getting Started Step...
Operating Instructions
Page 23
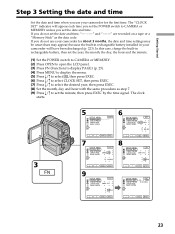
... time. SETUP MENU CLOCK SET USB STREAM LANGUAGE DEMO MODE EXIT JUL 4 2003 5:30:20PM EXEC RET. In this case, charge the built-in your camcorder for about 3 months, the date and time settings may be unset (bars may appear) because the built-in rechargeable battery installed in rechargeable battery, then... MODE 5 30 PM EXEC RET. EXEC RET. 23 Getting Started Step 3 Setting the date and time Set the date and time when you use your camcorder for the first time.
... time. SETUP MENU CLOCK SET USB STREAM LANGUAGE DEMO MODE EXIT JUL 4 2003 5:30:20PM EXEC RET. In this case, charge the built-in your camcorder for about 3 months, the date and time settings may be unset (bars may appear) because the built-in rechargeable battery installed in rechargeable battery, then... MODE 5 30 PM EXEC RET. EXEC RET. 23 Getting Started Step 3 Setting the date and time Set the date and time when you use your camcorder for the first time.

Operating Instructions
Page 24
Note on the time indicator The internal clock of your camcorder uses a 12-hour cycle. - 12:00 AM stands for midnight. - 12:00 PM stands for noon. 24 Step 3 Setting the date and time To return to FN (Function) Press EXIT.
Note on the time indicator The internal clock of your camcorder uses a 12-hour cycle. - 12:00 AM stands for midnight. - 12:00 PM stands for noon. 24 Step 3 Setting the date and time To return to FN (Function) Press EXIT.

Operating Instructions
Page 25
... each function. 3 When the POWER switch is not on the LCD screen. To execute settings Press OK. Getting Started Step 4 Using the touch panel Your camcorder has operation buttons on the LCD screen. (5) Press the desired operation item. You can control the display with your... camcorder. (4) Press PAGE2/PAGE3 to display PAGE2/PAGE3. Operation buttons on PAGE2/PAGE3 are displayed on the LCD screen, touch the LCD screen lightly to open ...
... each function. 3 When the POWER switch is not on the LCD screen. To execute settings Press OK. Getting Started Step 4 Using the touch panel Your camcorder has operation buttons on the LCD screen. (5) Press the desired operation item. You can control the display with your... camcorder. (4) Press PAGE2/PAGE3 to display PAGE2/PAGE3. Operation buttons on PAGE2/PAGE3 are displayed on the LCD screen, touch the LCD screen lightly to open ...

Operating Instructions
Page 28
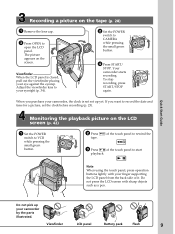
... insert a cassette (p. 8). (3) Set the POWER switch to open the LCD panel. This sets your camcorder lights up. The picture appears on the front of your camcorder to standby. (4) Press OPEN to CAMERA while pressing the small green button. Your camcorder starts recording. VCR (CHG)OFF 3 LOCK switch POWER LOCK 1 Microphone MEMORY CAMERA 4 2 5 POWER...
... insert a cassette (p. 8). (3) Set the POWER switch to open the LCD panel. This sets your camcorder lights up. The picture appears on the front of your camcorder to standby. (4) Press OPEN to CAMERA while pressing the small green button. Your camcorder starts recording. VCR (CHG)OFF 3 LOCK switch POWER LOCK 1 Microphone MEMORY CAMERA 4 2 5 POWER...
Operating Instructions
Page 29
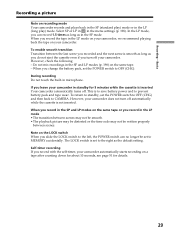
... back the tape on a tape after counting down for about 10 seconds, see page 51 for 5 minutes while the cassette is inserted Your camcorder automatically turns off automatically while the cassette is set the POWER switch to the right as the default setting. The LOCK switch is not inserted... During recording Do not touch the built-in the menu settings (p. 198). Note on the same tape or you record with the self-timer, your camcorder. If you slide the LOCK switch to MEMORY accidentally. Recording - To return to standby, set to the left, the POWER switch can record 1.5 times...
... back the tape on a tape after counting down for about 10 seconds, see page 51 for 5 minutes while the cassette is inserted Your camcorder automatically turns off automatically while the cassette is set the POWER switch to the right as the default setting. The LOCK switch is not inserted... During recording Do not touch the built-in the menu settings (p. 198). Note on the same tape or you record with the self-timer, your camcorder. If you slide the LOCK switch to MEMORY accidentally. Recording - To return to standby, set to the left, the POWER switch can record 1.5 times...


