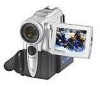
Operating Instructions
Page 6
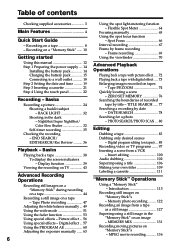
... function 39 Superimposing a title 106 Viewing the recording on TV 43 Making your own titles 109 Advanced Recording Operations Labeling a cassette 111 "Memory Stick" Operations Recording still images on a "Memory Stick" during recording on a tape 44 Recording a still image on a tape 8 - Recording on an image - NightShot/Super NightShot/ - Basics Recording video or TV programs ....... 97 Inserting a scene from a tape...
... function 39 Superimposing a title 106 Viewing the recording on TV 43 Making your own titles 109 Advanced Recording Operations Labeling a cassette 111 "Memory Stick" Operations Recording still images on a "Memory Stick" during recording on a tape 44 Recording a still image on a tape 8 - Recording on an image - NightShot/Super NightShot/ - Basics Recording video or TV programs ....... 97 Inserting a scene from a tape...
Operating Instructions
Page 12
.... Superimposing a title (p. 106) - Note on your recordings on a TV, you read through this manual, buttons and settings on TV color systems TV color systems differ from country to CAMERA. Unauthorized recording of the copyright laws. 12 e.g. To view your camcorder are : - Using this mark in capital letters. END...cassette memory. Labeling a cassette (p. 111) For details, see this manual As you need a NTSC system-based TV. - Getting started - The functions which require different operations depending on Cassette Memory Your camcorder is being carried out.
.... Superimposing a title (p. 106) - Note on your recordings on a TV, you read through this manual, buttons and settings on TV color systems TV color systems differ from country to CAMERA. Unauthorized recording of the copyright laws. 12 e.g. To view your camcorder are : - Using this mark in capital letters. END...cassette memory. Labeling a cassette (p. 111) For details, see this manual As you need a NTSC system-based TV. - Getting started - The functions which require different operations depending on Cassette Memory Your camcorder is being carried out.
Operating Instructions
Page 40
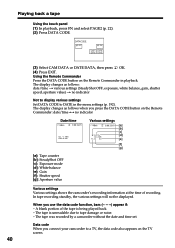
... OFF [c]: Exposure mode [d]: White balance [e]: Gain [f]: Shutter speed [g]: Aperture value Various settings Various settings shows the camcorder's recording information at the time of the tape is unreadable due to a TV, the data code also appears on the TV screen. 40 Playing back a tape Using the touch panel (1) In playback, press FN and select PAGE2...
... OFF [c]: Exposure mode [d]: White balance [e]: Gain [f]: Shutter speed [g]: Aperture value Various settings Various settings shows the camcorder's recording information at the time of the tape is unreadable due to a TV, the data code also appears on the TV screen. 40 Playing back a tape Using the touch panel (1) In playback, press FN and select PAGE2...
Operating Instructions
Page 43
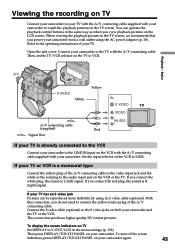
... can be reproduced more faithfully by using the AC power adaptor (p. 18). Viewing the recording on TV Connect your camcorder to your TV with the A/V connecting cable supplied with your camcorder to connect the yellow (video) plug of the A/V connecting cable. If you connect the red plug, the sound is a monaural type Connect the yellow...
... can be reproduced more faithfully by using the AC power adaptor (p. 18). Viewing the recording on TV Connect your camcorder to your TV with the A/V connecting cable supplied with your camcorder to connect the yellow (video) plug of the A/V connecting cable. If you connect the red plug, the sound is a monaural type Connect the yellow...
Operating Instructions
Page 50
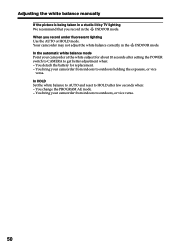
When you record in the n INDOOR mode. You bring your camcorder from indoors to outdoors holding the exposure, or vice versa. In the automatic white balance mode Point your camcorder at the white subject for replacement. - You bring your camcorder from indoors to outdoors, or vice versa. ...- Adjusting the white balance manually If the picture is being taken in a studio lit by TV lighting We recommend that you record under fluorescent lighting Use the AUTO or HOLD mode. Your camcorder may not adjust the white balance correctly in the n INDOOR mode. You change the PROGRAM AE...
When you record in the n INDOOR mode. You bring your camcorder from indoors to outdoors holding the exposure, or vice versa. In the automatic white balance mode Point your camcorder at the white subject for replacement. - You bring your camcorder from indoors to outdoors, or vice versa. ...- Adjusting the white balance manually If the picture is being taken in a studio lit by TV lighting We recommend that you record under fluorescent lighting Use the AUTO or HOLD mode. Your camcorder may not adjust the white balance correctly in the n INDOOR mode. You change the PROGRAM AE...

Operating Instructions
Page 51
... [d]. [a] [b] 16:9WIDE [c] [d] (1) In standby, press FN to display PAGE1. (2) Press MENU, then set 16:9WIDE to watch pictures of the wide-screen TV to the full mode, you can record a 16:9 wide picture to OFF in the menu settings. 51 To cancel the wide mode Set 16:9WIDE to FN Press EXIT.... In the wide mode, you cancel the wide mode, set your camcorder to tape recording standby and then set 16:9WIDE to ON in (p. 186). 1 FN To return to OFF in the menu settings. OLD MOVIE - Advanced...
... [d]. [a] [b] 16:9WIDE [c] [d] (1) In standby, press FN to display PAGE1. (2) Press MENU, then set 16:9WIDE to watch pictures of the wide-screen TV to the full mode, you can record a 16:9 wide picture to OFF in the menu settings. 51 To cancel the wide mode Set 16:9WIDE to FN Press EXIT.... In the wide mode, you cancel the wide mode, set your camcorder to tape recording standby and then set 16:9WIDE to ON in (p. 186). 1 FN To return to OFF in the menu settings. OLD MOVIE - Advanced...

Operating Instructions
Page 52
... other equipment using the A/V connecting cable. 52 Using the wide mode Connection for a TV Pictures recorded in the 16:9WIDE mode automatically appear on the TV. You connect your camcorder to a TV that is compatible with the ID-1 system, the screen size is automatically selected. ID-1 system The ID-1 system sends aspect ratio information (16...
... other equipment using the A/V connecting cable. 52 Using the wide mode Connection for a TV Pictures recorded in the 16:9WIDE mode automatically appear on the TV. You connect your camcorder to a TV that is compatible with the ID-1 system, the screen size is automatically selected. ID-1 system The ID-1 system sends aspect ratio information (16...

Operating Instructions
Page 56
.... B&W : The picture is clearer, and the picture looks like those in movies or on a "Memory Stick" in tape recording or tape recording standby When you cannot use following functions: - BOUNCE - NEG. Recording on the TV. LIGHT AUTO SHTR EXIT OFF NEG. To return to obtain special effects like an illustration. While using the picture...
.... B&W : The picture is clearer, and the picture looks like those in movies or on a "Memory Stick" in tape recording or tape recording standby When you cannot use following functions: - BOUNCE - NEG. Recording on the TV. LIGHT AUTO SHTR EXIT OFF NEG. To return to obtain special effects like an illustration. While using the picture...

Operating Instructions
Page 83
... systems 8 mm , Hi8 , Digital8 , VHS , S-VHS , VHSC , S-VHSC , Betamax , ED Betamax , mini DV , DV or MICRO MV If your camcorder. (5) Start recording on the VCR. Yellow A/V White Editing S VIDEO IN S VIDEO VIDEO AUDIO VCR Red A/V connecting cable (supplied) : Signal flow When you want to VCR on your...output. 83 You can dub or edit on the VCR or the TV. Refer to the operating instructions of the VCR. (3) Set the POWER switch to record over) into the VCR, and insert the recorded tape into your camcorder as a player. Refer to the operating instructions of the A/V ...
... systems 8 mm , Hi8 , Digital8 , VHS , S-VHS , VHSC , S-VHSC , Betamax , ED Betamax , mini DV , DV or MICRO MV If your camcorder. (5) Start recording on the VCR. Yellow A/V White Editing S VIDEO IN S VIDEO VIDEO AUDIO VCR Red A/V connecting cable (supplied) : Signal flow When you want to VCR on your...output. 83 You can dub or edit on the VCR or the TV. Refer to the operating instructions of the VCR. (3) Set the POWER switch to record over) into the VCR, and insert the recorded tape into your camcorder as a player. Refer to the operating instructions of the A/V ...
Operating Instructions
Page 97
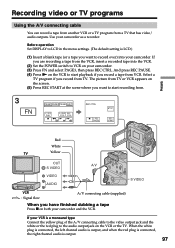
... FN and select PAGE3, then press REC CTRL. And press REC PAUSE. (4) Press N on the VCR to start recording from TV or VCR appears on your camcorder. When the white plug is connected, the left channel audio is output, and when the red plug is connected, the right channel audio is LCD.) (1) ...
... FN and select PAGE3, then press REC CTRL. And press REC PAUSE. (4) Press N on the VCR to start recording from TV or VCR appears on your camcorder. When the white plug is connected, the left channel audio is output, and when the red plug is connected, the right channel audio is LCD.) (1) ...
Operating Instructions
Page 98
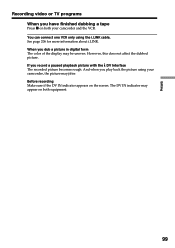
...DV format pictures. The picture from the DV products appears on the screen of both your camcorder. (3) Press FN and select PAGE3, then press REC CTRL. Recording video or TV programs If your camcorder. (5) Press REC START at the scene where you do not need to start playback. ...With this connection, you want to record over) into your camcorder, and insert the recorded tape into VCR. (2) Set the POWER...
...DV format pictures. The picture from the DV products appears on the screen of both your camcorder. (3) Press FN and select PAGE3, then press REC CTRL. Recording video or TV programs If your camcorder. (5) Press REC START at the scene where you do not need to start playback. ...With this connection, you want to record over) into your camcorder, and insert the recorded tape into VCR. (2) Set the POWER...
Operating Instructions
Page 99
... playback picture with the DV Interface The recorded picture becomes rough. Before recording Make sure if the DV IN indicator appears on both your camcorder, the picture may jitter. You can connect one VCR only using your camcorder and the VCR. If you dub a picture in digital form The color of ...the display may appear on the screen. See page 206 for more information about i.LINK. However, this does not affect the dubbed picture. Editing Recording video or TV programs When you have ...
... playback picture with the DV Interface The recorded picture becomes rough. Before recording Make sure if the DV IN indicator appears on both your camcorder, the picture may jitter. You can connect one VCR only using your camcorder and the VCR. If you dub a picture in digital form The color of ...the display may appear on the screen. See page 206 for more information about i.LINK. However, this does not affect the dubbed picture. Editing Recording video or TV programs When you have ...

Operating Instructions
Page 102
... dubbing You can record additional audio to a TV. The original sound will not be erased. The recorded sound is not output from a speaker. Connecting the microphone with the MIC jack MIC (PLUG IN POWER) Microphone (optional) : Signal flow You can add sound to your tape already recorded in the 12-...bit mode by using the headphones or TV. Check the sound by specifying starting and ending points. Select one of the following connections to the intelligent accessory...
... dubbing You can record additional audio to a TV. The original sound will not be erased. The recorded sound is not output from a speaker. Connecting the microphone with the MIC jack MIC (PLUG IN POWER) Microphone (optional) : Signal flow You can add sound to your tape already recorded in the 12-...bit mode by using the headphones or TV. Check the sound by specifying starting and ending points. Select one of the following connections to the intelligent accessory...

Operating Instructions
Page 125
... capacity on the LCD screen. When shooting with the self-timer or the Remote Commander Your camcorder automatically records up to recognize the effect. Memory photo recording (1) Set the POWER switch to stop recording. 125 Make sure that the LOCK switch is set to the right (unlock) position. (2)... Press FN to display PAGE1. (3) Press MENU, then select STILL SET in continuous shooting The number of still images you can shoot continuously varies depending on TV or the...
... capacity on the LCD screen. When shooting with the self-timer or the Remote Commander Your camcorder automatically records up to recognize the effect. Memory photo recording (1) Set the POWER switch to stop recording. 125 Make sure that the LOCK switch is set to the right (unlock) position. (2)... Press FN to display PAGE1. (3) Press MENU, then select STILL SET in continuous shooting The number of still images you can shoot continuously varies depending on TV or the...

Operating Instructions
Page 129
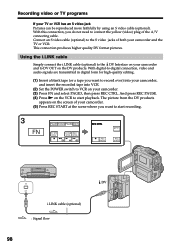
...not need to connect the yellow (video) plug of the A/V connecting cable to the video jack on the VCR or the TV. With this connection, you want to record, follow the steps 3 and 4 on page 127. This connection produces higher quality DV format pictures. 129 Using the A/V ... S VIDEO A/V connecting cable (supplied) Connect the yellow plug of the A/V connecting cable. If your camcorder and the TV or VCR. "Memory Stick" Operations Recording an image from a tape as a still image Recording a still image from other equipment is displayed on the LCD screen or in the menu settings. (The...
...not need to connect the yellow (video) plug of the A/V connecting cable to the video jack on the VCR or the TV. With this connection, you want to record, follow the steps 3 and 4 on page 127. This connection produces higher quality DV format pictures. 129 Using the A/V ... S VIDEO A/V connecting cable (supplied) Connect the yellow plug of the A/V connecting cable. If your camcorder and the TV or VCR. "Memory Stick" Operations Recording an image from a tape as a still image Recording a still image from other equipment is displayed on the LCD screen or in the menu settings. (The...

Operating Instructions
Page 130
When recording from a tape in poor condition, for example, a tape worn out from a TV tuner, radio set, etc. 130 When attempting to input images distorted by radio wave interference, emanating from repeated dubbing. - Recording an image from a tape as a still image Using the i.LINK cable DV DV OUT DV : Signal flow i.LINK cable (optional) Note In the following instances " REC ERROR" appears and recording cannot be carried out. Record distortion-free images: -
When recording from a tape in poor condition, for example, a tape worn out from a TV tuner, radio set, etc. 130 When attempting to input images distorted by radio wave interference, emanating from repeated dubbing. - Recording an image from a tape as a still image Using the i.LINK cable DV DV OUT DV : Signal flow i.LINK cable (optional) Note In the following instances " REC ERROR" appears and recording cannot be carried out. Record distortion-free images: -

Operating Instructions
Page 141
With this connection, you want to start recording. If your camcorder and the TV or VCR. 141 When the white plug is connected, the left channel audio is output, and when the red plug is connected, the right channel ... to connect the yellow (video) plug of the A/V connecting cable. "Memory Stick" Operations Recording a picture from a tape as a moving picture Recording a moving picture from other equipment is LCD.) (1) Set the POWER switch to VCR. (2) Play back the recorded tape, or turn the TV on to see the desired program. The image of both your...
With this connection, you want to start recording. If your camcorder and the TV or VCR. 141 When the white plug is connected, the left channel audio is output, and when the red plug is connected, the right channel ... to connect the yellow (video) plug of the A/V connecting cable. "Memory Stick" Operations Recording a picture from a tape as a moving picture Recording a moving picture from other equipment is LCD.) (1) Set the POWER switch to VCR. (2) Play back the recorded tape, or turn the TV on to see the desired program. The image of both your...

Operating Instructions
Page 142
When recording from a tape in poor condition, for example, a tape worn out from a TV tuner, radio set, etc. - When the input signal is canceled: - When attempting to input images distorted by radio wave interference, emanating from repeated dubbing. - Recording a picture from a tape as a moving picture Using the i.LINK cable DV DV OUT DV i.LINK cable (optional) : Signal flow Note In the following instances " REC ERROR" appears and recording is cut off. 142
When recording from a tape in poor condition, for example, a tape worn out from a TV tuner, radio set, etc. - When the input signal is canceled: - When attempting to input images distorted by radio wave interference, emanating from repeated dubbing. - Recording a picture from a tape as a moving picture Using the i.LINK cable DV DV OUT DV i.LINK cable (optional) : Signal flow Note In the following instances " REC ERROR" appears and recording is cut off. 142

Operating Instructions
Page 148
.... The image data is set to play back images but cannot record them on the "Memory Stick." •The file name flashes on your camcorder before operation, or noise (howling) may be output from the TV speakers. To play back recorded images on a "Memory Stick" by selecting the index screen. ...the LOCK switch is as good as ever. •Turn the audio volume of recording on a TV screen •Connect your camcorder to see the next image 2 PLAY 148 To stop memory photo playback Press CAM. The last recorded image is displayed. (3) Press -/+ on the LCD screen if the file is ...
.... The image data is set to play back images but cannot record them on the "Memory Stick." •The file name flashes on your camcorder before operation, or noise (howling) may be output from the TV speakers. To play back recorded images on a "Memory Stick" by selecting the index screen. ...the LOCK switch is as good as ever. •Turn the audio volume of recording on a TV screen •Connect your camcorder to see the next image 2 PLAY 148 To stop memory photo playback Press CAM. The last recorded image is displayed. (3) Press -/+ on the LCD screen if the file is ...

Operating Instructions
Page 151
... (3) Press -/+ to select the desired moving picture - The last recorded image is set to the right (unlock) position. (2) Press PLAY. To play back images with your camcorder before operation. •Turn the audio volume of recording on a "Memory Stick" at a time by selecting the index ... from the TV speakers. When playing back image data shot with -/+ on a TV screen •Connect your computer. - Moving picture You can also play back moving pictures also with other equipment. You can select moving pictures recorded on your camcorder to play back recorded images on ...
... (3) Press -/+ to select the desired moving picture - The last recorded image is set to the right (unlock) position. (2) Press PLAY. To play back images with your camcorder before operation. •Turn the audio volume of recording on a "Memory Stick" at a time by selecting the index ... from the TV speakers. When playing back image data shot with -/+ on a TV screen •Connect your computer. - Moving picture You can also play back moving pictures also with other equipment. You can select moving pictures recorded on your camcorder to play back recorded images on ...


