
Operating Instructions
Page 2
... and found to comply with the limits for years to Part 15 of this Sony Digital Handycam camcorder. If this device must accept any changes or modifications not expressly approved in household or business trash may be producing home video that may cause undesired operation. Welcome! These limits are cautioned that any interference received... rain or moisture. Connect the equipment into an outlet on a circuit different from that may be determined by one or more of Conformity Trade Name: SONY Model No.: DCR-PC100 Responsible Party:Sony Electronics Inc.
... and found to comply with the limits for years to Part 15 of this Sony Digital Handycam camcorder. If this device must accept any changes or modifications not expressly approved in household or business trash may be producing home video that may cause undesired operation. Welcome! These limits are cautioned that any interference received... rain or moisture. Connect the equipment into an outlet on a circuit different from that may be determined by one or more of Conformity Trade Name: SONY Model No.: DCR-PC100 Responsible Party:Sony Electronics Inc.

Operating Instructions
Page 4
... titles 72 Labeling a cassette 74 Customizing Your Camcorder Changing the menu settings 76 Resetting the date and time 83 "Memory Stick" Operations Using a "Memory Stick" - Digital effect ... 39 Using the PROGRAM AE function .... 42 Adjusting the exposure manually ...... 44 Focusing manually 45 Advanced Playback Operations Recording video or TV programs ....... 58 Inserting a scene from...
... titles 72 Labeling a cassette 74 Customizing Your Camcorder Changing the menu settings 76 Resetting the date and time 83 "Memory Stick" Operations Using a "Memory Stick" - Digital effect ... 39 Using the PROGRAM AE function .... 42 Adjusting the exposure manually ...... 44 Focusing manually 45 Advanced Playback Operations Recording video or TV programs ....... 58 Inserting a scene from...

Operating Instructions
Page 5
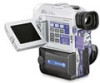
Getting started Checking supplied accessories Make sure that the following accessories are supplied with your camcorder. 1 2 3 4 5 6 7 8 9 0 qa 1 Wireless Remote Commander (1) (p. 136) 2 AC-L10A/L10B/L10C AC power adaptor (1), Power cord (1) (p. 11) 3 NP-FM50 battery pack (1) (p. 10, 11) 4 Size AA (R6) battery ...
Getting started Checking supplied accessories Make sure that the following accessories are supplied with your camcorder. 1 2 3 4 5 6 7 8 9 0 qa 1 Wireless Remote Commander (1) (p. 136) 2 AC-L10A/L10B/L10C AC power adaptor (1), Power cord (1) (p. 11) 3 NP-FM50 battery pack (1) (p. 10, 11) 4 Size AA (R6) battery ...

Operating Instructions
Page 6
... cassette to insert. See the page in the direction of the arrow and open the lid. 2 Push the middle portion of the back of your camcorder outdoors (p. 10). Connecting the power cord (p. 13) Use the battery pack when using your...
... cassette to insert. See the page in the direction of the arrow and open the lid. 2 Push the middle portion of the back of your camcorder outdoors (p. 10). Connecting the power cord (p. 13) Use the battery pack when using your...
Operating Instructions
Page 7
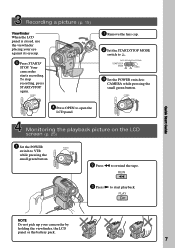
... pressing the small green button. MEMORY OFF CAMERA MEMORY OFF CAMERA Monitoring the playback picture on the LCD screen (p. 25) 1 Set the POWER POWER switch to rewind the tape. Quick Start Guide Recording a picture (p. 15) Viewfinder When the LCD panel is closed, use the viewfinder placing your camcorder by holding the viewfinder, the LCD...
... pressing the small green button. MEMORY OFF CAMERA MEMORY OFF CAMERA Monitoring the playback picture on the LCD screen (p. 25) 1 Set the POWER POWER switch to rewind the tape. Quick Start Guide Recording a picture (p. 15) Viewfinder When the LCD panel is closed, use the viewfinder placing your camcorder by holding the viewfinder, the LCD...
Operating Instructions
Page 8
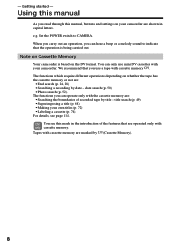
...Your camcorder is being carried out. You can only use a tape with cassette memory are shown in the introduction of recorded ... are: •End search (p. 24, 28) •Searching a recording by title - The functions you read through this manual, buttons and settings... the boundaries of the features that the operation is based on your camcorder are marked by (Cassette Memory). 8 We recommend that you can ... title search (p. 49) • Superimposing a title (p. 68) • Making your camcorder. You see page 114. When you carry out an operation, you use mini DV cassettes...
...Your camcorder is being carried out. You can only use a tape with cassette memory are shown in the introduction of recorded ... are: •End search (p. 24, 28) •Searching a recording by title - The functions you read through this manual, buttons and settings... the boundaries of the features that the operation is based on your camcorder are marked by (Cassette Memory). 8 We recommend that you can ... title search (p. 49) • Superimposing a title (p. 68) • Making your camcorder. You see page 114. When you carry out an operation, you use mini DV cassettes...

Operating Instructions
Page 9
...% or more. •Do not let your camcorder to the provision of such materials may cause your camcorder get wet may be copyrighted. Copyright precautions Television programs, films, video tapes, and other materials may be damaged [c]. [a] [b] [c] Contents of the recording cannot be repaired [a]. •Never leave your camcorder exposed to temperatures above 140°F (60...
...% or more. •Do not let your camcorder to the provision of such materials may cause your camcorder get wet may be copyrighted. Copyright precautions Television programs, films, video tapes, and other materials may be damaged [c]. [a] [b] [c] Contents of the recording cannot be repaired [a]. •Never leave your camcorder exposed to temperatures above 140°F (60...

Operating Instructions
Page 10
...terminal cover To protect the battery terminals, install the battery terminal cover after the battery pack is removed in the viewfinder roughly indicates the recording time. Step 1 Preparing the power supply Installing the battery pack Install the battery pack to be correct, depending on the conditions in ... you close the LCD panel and open it again, it takes about one minute for the correct remaining battery time in minutes to use your camcorder outdoors. (1) While sliding BATT RELEASE in the direction of the arrow 1, slide the battery terminal cover in the direction of the arrow 2. ...
...terminal cover To protect the battery terminals, install the battery terminal cover after the battery pack is removed in the viewfinder roughly indicates the recording time. Step 1 Preparing the power supply Installing the battery pack Install the battery pack to be correct, depending on the conditions in ... you close the LCD panel and open it again, it takes about one minute for the correct remaining battery time in minutes to use your camcorder outdoors. (1) While sliding BATT RELEASE in the direction of the arrow 1, slide the battery terminal cover in the direction of the arrow 2. ...

Operating Instructions
Page 11
... only with the "InfoLITHIUM" battery pack (M series). (1) Open the DC IN jack cover and connect the AC power adaptor supplied with your camcorder. Charging begins. When the CHARGE lamp goes out, normal charge is completed. This may cause a short-circuit, damaging the AC power adaptor. ...the battery pack Use the battery pack after charging it for approximately one hour after the CHARGE lamp goes out. 1 4 POWER LOCK VTR MEMORY OFF CAMERA 2 CHARGE lamp Note Prevent metallic objects from coming into contact with the plug's v mark facing up . For full charge, which allows you to...
... only with the "InfoLITHIUM" battery pack (M series). (1) Open the DC IN jack cover and connect the AC power adaptor supplied with your camcorder. Charging begins. When the CHARGE lamp goes out, normal charge is completed. This may cause a short-circuit, damaging the AC power adaptor. ...the battery pack Use the battery pack after charging it for approximately one hour after the CHARGE lamp goes out. 1 4 POWER LOCK VTR MEMORY OFF CAMERA 2 CHARGE lamp Note Prevent metallic objects from coming into contact with the plug's v mark facing up . For full charge, which allows you to...

Operating Instructions
Page 12
... data with compatible electronic equipment about its battery consumption. Sony recommends that you use the "InfoLITHIUM" battery pack with electronic equipment having the mark. 12 The battery life will be shorter if you use your camcorder. The "InfoLITHIUM" is "InfoLITHIUM?" The battery life will...shorter. After charging the battery pack Disconnect the AC power adaptor from the DC IN jack on your camcorder in a cold environment. ** Approximate minutes when recording while you repeat recording start/stop, zooming and turning the power on LCD screen 130 (115) 270 (245) 410 (370...
... data with compatible electronic equipment about its battery consumption. Sony recommends that you use the "InfoLITHIUM" battery pack with electronic equipment having the mark. 12 The battery life will be shorter if you use your camcorder. The "InfoLITHIUM" is "InfoLITHIUM?" The battery life will...shorter. After charging the battery pack Disconnect the AC power adaptor from the DC IN jack on your camcorder in a cold environment. ** Approximate minutes when recording while you repeat recording start/stop, zooming and turning the power on LCD screen 130 (115) 270 (245) 410 (370...
Operating Instructions
Page 13
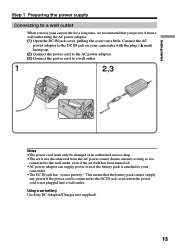
Connect the AC power adaptor to the DC IN jack on your camcorder with the plug's v mark facing up. (2) Connect the power cord to the AC power adaptor. (3) Connect the power cord to a wall outlet. 1 2,3 Notes •The ... the DC IN jack cover, pulling the cover out a little. Using a car battery Use Sony DC Adaptor/Charger (not supplied). 13 Getting started Step 1 Preparing the power supply Connecting to a wall outlet When you use your camcorder for a long time, we recommend that the battery pack cannot supply any power if the...
Connect the AC power adaptor to the DC IN jack on your camcorder with the plug's v mark facing up. (2) Connect the power cord to the AC power adaptor. (3) Connect the power cord to a wall outlet. 1 2,3 Notes •The ... the DC IN jack cover, pulling the cover out a little. Using a car battery Use Sony DC Adaptor/Charger (not supplied). 13 Getting started Step 1 Preparing the power supply Connecting to a wall outlet When you use your camcorder for a long time, we recommend that the battery pack cannot supply any power if the...

Operating Instructions
Page 15
... the POWER switch to fix it. (2) Install the power source and insert a cassette. Basics - The camera recording lamp located on Recording mode Your camcorder records and plays back in the SP (standard play) mode and in microphone during recording. Recording - Your camcorder is set to the standby mode. (4) Press OPEN to open the LCD panel. (5) Press START/STOP...
... the POWER switch to fix it. (2) Install the power source and insert a cassette. Basics - The camera recording lamp located on Recording mode Your camcorder records and plays back in the SP (standard play) mode and in microphone during recording. Recording - Your camcorder is set to the standby mode. (4) Press OPEN to open the LCD panel. (5) Press START/STOP...

Operating Instructions
Page 16
... rotates about 90 degrees to the viewfinder side and about 180 degrees to prevent battery and tape wear. The LOCK switch is not inserted, your camcorder does not turn the LCD panel over so that it faces the other way, the indicator appears on one tape. Note When using the LCD... turn off . If you use a tape with cassette memory, however, you can no longer be set to CAMERA again. To resume the standby mode, set the POWER switch to OFF, and to MEMORY accidentally. Recording a picture Note on the LOCK switch When you change the battery pack, set the POWER switch to...
... rotates about 90 degrees to the viewfinder side and about 180 degrees to prevent battery and tape wear. The LOCK switch is not inserted, your camcorder does not turn the LCD panel over so that it faces the other way, the indicator appears on one tape. Note When using the LCD... turn off . If you use a tape with cassette memory, however, you can no longer be set to CAMERA again. To resume the standby mode, set the POWER switch to OFF, and to MEMORY accidentally. Recording a picture Note on the LOCK switch When you change the battery pack, set the POWER switch to...

Operating Instructions
Page 20
... appears when using a tape with cassette memory. Indicators displayed in the recording mode The indicators are not recorded on the power and wait for about five seconds from the moment you press START/STOP, your camcorder records for a while. To extend the recording time, press START/STOP again before all the dots disappear. ANTI GROUND...
... appears when using a tape with cassette memory. Indicators displayed in the recording mode The indicators are not recorded on the power and wait for about five seconds from the moment you press START/STOP, your camcorder records for a while. To extend the recording time, press START/STOP again before all the dots disappear. ANTI GROUND...

Operating Instructions
Page 22
... memory mode, slide NIGHTSHOT to shoot a subject in a dark place. To enable NightShot Light, set to ON in normal recording, the picture may be clearer with the NightShot Light. While your camcorder to malfunction. •When you shoot with the NightShot Light on. Notes •Do not use this function. the outdoors...
... memory mode, slide NIGHTSHOT to shoot a subject in a dark place. To enable NightShot Light, set to ON in normal recording, the picture may be clearer with the NightShot Light. While your camcorder to malfunction. •When you shoot with the NightShot Light on. Notes •Do not use this function. the outdoors...

Operating Instructions
Page 24
... blank portion at the beginning or between the recorded portions, the end search function may not work once you eject the cassette after you eject the cassette. END SEARCH You can monitor the sound from the LCD or viewfinder screen while your camcorder is in step 2 (p. 32). If you ...use a tape without cassette memory, the end search function does not work correctly (p. 114). 24 Recording a picture To stop searching Press END SEARCH again. End search function When...
... blank portion at the beginning or between the recorded portions, the end search function may not work once you eject the cassette after you eject the cassette. END SEARCH You can monitor the sound from the LCD or viewfinder screen while your camcorder is in step 2 (p. 32). If you ...use a tape without cassette memory, the end search function does not work correctly (p. 114). 24 Recording a picture To stop searching Press END SEARCH again. End search function When...

Operating Instructions
Page 25
... - The video control buttons light up. (4) Press m to rewind the tape. (5) Press N to VTR while pressing the small green button. VTR 3 POWER LOCK MEMORY OFF CAMERA 2 1 To stop playback Press x. 4 REW 5 PLAY 25 You can control playback using the Remote Commander supplied with your camcorder. (1) Install the power source and insert the recorded tape...
... - The video control buttons light up. (4) Press m to rewind the tape. (5) Press N to VTR while pressing the small green button. VTR 3 POWER LOCK MEMORY OFF CAMERA 2 1 To stop playback Press x. 4 REW 5 PLAY 25 You can control playback using the Remote Commander supplied with your camcorder. (1) Install the power source and insert the recorded tape...

Operating Instructions
Page 26
... back a tape When monitoring on the Remote Commander supplied with the LCD screen facing out. When you leave the power on for a long time Your camcorder gets warm. The indicators disappear from the LCD screen. To control the display of the screen indicators Press DISPLAY on your... camcorder or on the LCD screen You can turn the LCD panel over and move it back to the camcorder body with your camcorder. This is set vertically. If you open/close the LCD panel Make sure that...
... back a tape When monitoring on the Remote Commander supplied with the LCD screen facing out. When you leave the power on for a long time Your camcorder gets warm. The indicators disappear from the LCD screen. To control the display of the screen indicators Press DISPLAY on your... camcorder or on the LCD screen You can turn the LCD panel over and move it back to the camcorder body with your camcorder. This is set vertically. If you open/close the LCD panel Make sure that...

Operating Instructions
Page 27
...Recording data Recording data is automatically recorded on the tape but also the recording data (date/time or various settings when recorded) (Data code). Playback - Basics Playing back a tape Using the data code function Your camcorder automatically records not only images on the tape. In the recording mode, the recording... data will not be displayed. Data code When you have recorded. You can only operate with the Remote Commander. ...
...Recording data Recording data is automatically recorded on the tape but also the recording data (date/time or various settings when recorded) (Data code). Playback - Basics Playing back a tape Using the data code function Your camcorder automatically records not only images on the tape. In the recording mode, the recording... data will not be displayed. Data code When you have recorded. You can only operate with the Remote Commander. ...

Operating Instructions
Page 28
... plays back and stops. To search the last scene recorded (END SEARCH) Press END SEARCH in the reverse direction, press , then press y on the Remote Commander during playback. Playing back a tape Various playback modes To operate video control buttons, set the POWER switch to reverse the ...with cassette memory, the end search function works even once you have recorded on the Remote Commander. When you use a tape without cassette memory, the end search function does not work for five minutes Your camcorder automatically enters the stop mode. In the various playback modes Sound is...
... plays back and stops. To search the last scene recorded (END SEARCH) Press END SEARCH in the reverse direction, press , then press y on the Remote Commander during playback. Playing back a tape Various playback modes To operate video control buttons, set the POWER switch to reverse the ...with cassette memory, the end search function works even once you have recorded on the Remote Commander. When you use a tape without cassette memory, the end search function does not work for five minutes Your camcorder automatically enters the stop mode. In the various playback modes Sound is...


