
Operating Instructions
Page 4
... recording by title - Basics Playing back a tape 25 Viewing the recording on TV 29 Advanced Recording Operations Recording a still image on "Memory Stick"s - Digital effect ... 39 Using the PROGRAM AE function .... 42 Adjusting the exposure manually ...... 44 Focusing manually 45 Advanced Playback Operations Recording video... Preparing the power supply ... 10 Installing the battery pack 10 Charging the battery pack 11 Connecting to mini DV tapes 106 Playing back images continuously - Image protection 109 Deleting images 110 Writing a print mark - Basics Recording a picture 15...
... recording by title - Basics Playing back a tape 25 Viewing the recording on TV 29 Advanced Recording Operations Recording a still image on "Memory Stick"s - Digital effect ... 39 Using the PROGRAM AE function .... 42 Adjusting the exposure manually ...... 44 Focusing manually 45 Advanced Playback Operations Recording video... Preparing the power supply ... 10 Installing the battery pack 10 Charging the battery pack 11 Connecting to mini DV tapes 106 Playing back images continuously - Image protection 109 Deleting images 110 Writing a print mark - Basics Recording a picture 15...

Operating Instructions
Page 5
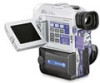
... Checking supplied accessories Make sure that the following accessories are supplied with your camcorder. 1 2 3 4 5 6 7 8 9 0 qa 1 Wireless Remote Commander (1) (p. 136) 2 AC-L10A/L10B/L10C AC power adaptor (1), Power cord (1) (p. 11) 3 NP-FM50 battery pack (1) (p. 10, 11) 4 Size AA (R6) battery for Remote Commander (2) (p. 137) 5 Serial port adaptor for Memory Stick (1), PC serial cable...
... Checking supplied accessories Make sure that the following accessories are supplied with your camcorder. 1 2 3 4 5 6 7 8 9 0 qa 1 Wireless Remote Commander (1) (p. 136) 2 AC-L10A/L10B/L10C AC power adaptor (1), Power cord (1) (p. 11) 3 NP-FM50 battery pack (1) (p. 10, 11) 4 Size AA (R6) battery for Remote Commander (2) (p. 137) 5 Serial port adaptor for Memory Stick (1), PC serial cable...

Operating Instructions
Page 6
... arrow and open the lid. 2 Push the middle portion of the back of your camcorder outdoors (p. 10). Open the DC IN jack cover. Connecting the power cord (p. 13) Use the battery pack when using your camcorder. Insert the cassette in parentheses "( )" for more information. AC... power adaptor (supplied) Connect the plug with the window facing out. 3 Close the cassette compartment by pressing the mark on the cassette compartment. 4 After the cassette ...
... arrow and open the lid. 2 Push the middle portion of the back of your camcorder outdoors (p. 10). Open the DC IN jack cover. Connecting the power cord (p. 13) Use the battery pack when using your camcorder. Insert the cassette in parentheses "( )" for more information. AC... power adaptor (supplied) Connect the plug with the window facing out. 3 Close the cassette compartment by pressing the mark on the cassette compartment. 4 After the cassette ...
Operating Instructions
Page 7
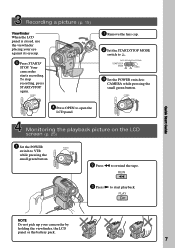
... VTR 4 Press OPEN to rewind the tape. REW 3 Press N to CAMERA while pressing the small green button. ANTI GROUND SHOOTING START/STOP MODE 5SEC 3 Set the POWER switch to start playback. Quick Start Guide Recording a picture (p. 15) Viewfinder When the LCD panel is closed, use the viewfinder placing your camcorder by holding the...
... VTR 4 Press OPEN to rewind the tape. REW 3 Press N to CAMERA while pressing the small green button. ANTI GROUND SHOOTING START/STOP MODE 5SEC 3 Set the POWER switch to start playback. Quick Start Guide Recording a picture (p. 15) Viewfinder When the LCD panel is closed, use the viewfinder placing your camcorder by holding the...
Operating Instructions
Page 8
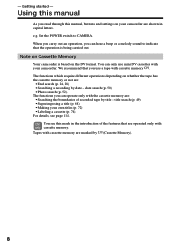
Set the POWER switch to indicate that the operation is based on your camcorder are marked by (Cassette ...on the DV format. We recommend that are operated only with the cassette memory are : •End search (p. 24, 28) •Searching a recording by title - Tapes with your own titles (p. 72) • Labeling a cassette (p. 74). - Getting started - e.g. Using this manual As you... • Superimposing a title (p. 68) • Making your camcorder. You can hear a beep or a melody sound to CAMERA. You see page 114. date search (p. 50) •Photo search (p. 52).
Set the POWER switch to indicate that the operation is based on your camcorder are marked by (Cassette ...on the DV format. We recommend that are operated only with the cassette memory are : •End search (p. 24, 28) •Searching a recording by title - Tapes with your own titles (p. 72) • Labeling a cassette (p. 74). - Getting started - e.g. Using this manual As you... • Superimposing a title (p. 68) • Making your camcorder. You can hear a beep or a melody sound to CAMERA. You see page 114. date search (p. 50) •Photo search (p. 52).

Operating Instructions
Page 10
... cover To protect the battery terminals, install the battery terminal cover after the battery pack is removed in the viewfinder roughly indicates the recording time. Step 1 Preparing the power supply Installing the battery pack Install the battery pack to be correct, depending on the conditions in minutes to use your camcorder outdoors.... When you close the LCD panel and open it again, it takes about one minute for the correct remaining battery time in which you are recording. The indicator may not be displayed.
... cover To protect the battery terminals, install the battery terminal cover after the battery pack is removed in the viewfinder roughly indicates the recording time. Step 1 Preparing the power supply Installing the battery pack Install the battery pack to be correct, depending on the conditions in minutes to use your camcorder outdoors.... When you close the LCD panel and open it again, it takes about one minute for the correct remaining battery time in which you are recording. The indicator may not be displayed.

Operating Instructions
Page 11
... When the CHARGE lamp goes out, normal charge is completed. Getting started Step 1 Preparing the power supply Charging the battery pack Use the battery pack after the CHARGE lamp goes out. 1 4 POWER LOCK VTR MEMORY OFF CAMERA 2 CHARGE lamp Note Prevent metallic objects from coming into contact with your camcorder. Charging begins. Your...
... When the CHARGE lamp goes out, normal charge is completed. Getting started Step 1 Preparing the power supply Charging the battery pack Use the battery pack after the CHARGE lamp goes out. 1 4 POWER LOCK VTR MEMORY OFF CAMERA 2 CHARGE lamp Note Prevent metallic objects from coming into contact with your camcorder. Charging begins. Your...

Operating Instructions
Page 12
...Approximate minutes when you use your camcorder. Sony recommends that you use a fully charged battery Numbers in parentheses "( )" indicate the time using a normally charged battery. * Approximate continuous recording time at 77°F (25°C). Step 1 Preparing the power supply Charging time Battery pack NP-FM50 .... After charging the battery pack Disconnect the AC power adaptor from the DC IN jack on your camcorder in a cold environment. ** Approximate minutes when recording while you repeat recording start/stop, zooming and turning the power on LCD screen 130 (115) 270 (245)...
...Approximate minutes when you use your camcorder. Sony recommends that you use a fully charged battery Numbers in parentheses "( )" indicate the time using a normally charged battery. * Approximate continuous recording time at 77°F (25°C). Step 1 Preparing the power supply Charging time Battery pack NP-FM50 .... After charging the battery pack Disconnect the AC power adaptor from the DC IN jack on your camcorder in a cold environment. ** Approximate minutes when recording while you repeat recording start/stop, zooming and turning the power on LCD screen 130 (115) 270 (245)...
Operating Instructions
Page 13
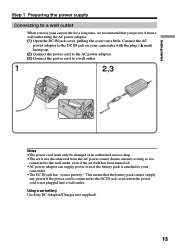
... •The set itself has been turned off. •AC power adaptor can supply power even if the battery pack is not plugged into a wall outlet. Using a car battery Use Sony DC Adaptor/Charger (not supplied). 13 Connect the AC power adaptor to the DC IN jack on your camcorder with the plug...'s v mark facing up. (2) Connect the power cord to the AC power adaptor. (3) Connect the power cord to the wall outlet, even if the ...
... •The set itself has been turned off. •AC power adaptor can supply power even if the battery pack is not plugged into a wall outlet. Using a car battery Use Sony DC Adaptor/Charger (not supplied). 13 Connect the AC power adaptor to the DC IN jack on your camcorder with the plug...'s v mark facing up. (2) Connect the power cord to the AC power adaptor. (3) Connect the power cord to the wall outlet, even if the ...

Operating Instructions
Page 14
... the write-protect tab on the cassette compartment. When you press any part of the lid other than the mark. Step 2 Inserting a cassette (1) Install the power source. (2) Slide OPEN/ZEJECT in the direction of the cassette to insert. The cassette compartment automatically lifts up and opens. (3) Push the middle portion of...
... the write-protect tab on the cassette compartment. When you press any part of the lid other than the mark. Step 2 Inserting a cassette (1) Install the power source. (2) Slide OPEN/ZEJECT in the direction of the cassette to insert. The cassette compartment automatically lifts up and opens. (3) Push the middle portion of...

Operating Instructions
Page 15
... we recommend playing the tape on your camcorder lights up. Basics - Your camcorder starts recording. Basics VTR MEMORY OFF CAMERA MEMORY OFF CAMERA VTR 4 2 5 POWER LOCK 40min REC 0:00:01 Camera recording lamp Note Fasten the grip strap firmly. Your camcorder is set to the standby mode... OPEN to fix it. (2) Install the power source and insert a cassette. - Select SP or LP in microphone during recording. Recording - Do not touch the built-in the menu settings. The camera recording lamp located on Recording mode Your camcorder records and plays back in the SP (standard ...
... we recommend playing the tape on your camcorder lights up. Basics - Your camcorder starts recording. Basics VTR MEMORY OFF CAMERA MEMORY OFF CAMERA VTR 4 2 5 POWER LOCK 40min REC 0:00:01 Camera recording lamp Note Fasten the grip strap firmly. Your camcorder is set to the standby mode... OPEN to fix it. (2) Install the power source and insert a cassette. - Select SP or LP in microphone during recording. Recording - Do not touch the built-in the menu settings. The camera recording lamp located on Recording mode Your camcorder records and plays back in the SP (standard ...

Operating Instructions
Page 16
... to the right as you do not eject the cassette even if you change the battery pack, set the POWER switch to OFF, and to OFF. • Do not mix recordings in the SP mode and ones in the LP mode on the LCD screen and in the mirror mode, the viewfinder... it clicks, and swing it into the camcorder body. To enable smooth transition Transition between the last scene you recorded and the next scene is inserted Your camcorder automatically turns off . To resume the standby mode, set the POWER switch to CAMERA again. However, check the following: • When you turn off . 16
... to the right as you do not eject the cassette even if you change the battery pack, set the POWER switch to OFF, and to OFF. • Do not mix recordings in the SP mode and ones in the LP mode on the LCD screen and in the mirror mode, the viewfinder... it clicks, and swing it into the camcorder body. To enable smooth transition Transition between the last scene you recorded and the next scene is inserted Your camcorder automatically turns off . To resume the standby mode, set the POWER switch to CAMERA again. However, check the following: • When you turn off . 16

Operating Instructions
Page 17
... When you adjust the LCD screen backlight or brightness of the LCD screen The recorded picture will be normal when recorded. If this happens, we recommend that you adjust angles of the backlight. Select LCD B.L. After recording (1) Set the POWER switch to adjust the brightness of the LCD screen, then press the dial. 1 LCD...
... When you adjust the LCD screen backlight or brightness of the LCD screen The recorded picture will be normal when recorded. If this happens, we recommend that you adjust angles of the backlight. Select LCD B.L. After recording (1) Set the POWER switch to adjust the brightness of the LCD screen, then press the dial. 1 LCD...

Operating Instructions
Page 19
Recording - When you shoot close to a subject If you cannot get a sharp focus, move the power zoom lever to OFF as you move the power zoom lever toward the "T" side. •You cannot use the digital zoom when the POWER switch is sharp. Using the zoom function sparingly... (about 1 cm) away in better-looking recordings. Basics Recording a picture Using the zoom feature Move the power zoom lever a little for a faster zoom. W T The right-ended portion of the bar shows the digital zooming zone. Notes on digital zoom •Digital zoom starts to function when zoom exceeds 10×...
Recording - When you shoot close to a subject If you cannot get a sharp focus, move the power zoom lever to OFF as you move the power zoom lever toward the "T" side. •You cannot use the digital zoom when the POWER switch is sharp. Using the zoom function sparingly... (about 1 cm) away in better-looking recordings. Basics Recording a picture Using the zoom feature Move the power zoom lever a little for a faster zoom. W T The right-ended portion of the bar shows the digital zooming zone. Notes on digital zoom •Digital zoom starts to function when zoom exceeds 10×...

Operating Instructions
Page 20
...extend the recording time in the recording mode The indicators are not recorded on the power and wait for a while. Use this mode to avoid recording unnecessary scenes. 5SEC: When you press START/STOP, your camcorder records for about five seconds from the moment you press START/STOP. Recording continues for.... Indicators displayed in the 5SEC mode Five dots (zzzzz) appear, and then disappear at a rate of one per second. Recording mode indicator STBY/REC indicator 40min REC 0:00:01 Time code/Tape counter 45min Remaining tape indicator This appears after you insert a ...
...extend the recording time in the recording mode The indicators are not recorded on the power and wait for a while. Use this mode to avoid recording unnecessary scenes. 5SEC: When you press START/STOP, your camcorder records for about five seconds from the moment you press START/STOP. Recording continues for.... Indicators displayed in the 5SEC mode Five dots (zzzzz) appear, and then disappear at a rate of one per second. Recording mode indicator STBY/REC indicator 40min REC 0:00:01 Time code/Tape counter 45min Remaining tape indicator This appears after you insert a ...

Operating Instructions
Page 23
...speed in the NightShot +Slow shutter mode. When the POWER switch is set to MEMORY. In the last two seconds of the countdown, the beep sound gets faster, then recording starts automatically. (self-timer) START/STOP 23 Exposure - Digital effect* * You cannot use . - When NIGHTSHOT...the fader function is useful when you cannot use . - White balance - Fader* - While the digital effect function is about 10 feet (3 m). Self-timer recording You can make a recording with a beep sound. NightShot Light NightShot Light rays are infrared and so are invisible. The maximum ...
...speed in the NightShot +Slow shutter mode. When the POWER switch is set to MEMORY. In the last two seconds of the countdown, the beep sound gets faster, then recording starts automatically. (self-timer) START/STOP 23 Exposure - Digital effect* * You cannot use . - When NIGHTSHOT...the fader function is useful when you cannot use . - White balance - Fader* - While the digital effect function is about 10 feet (3 m). Self-timer recording You can make a recording with a beep sound. NightShot Light NightShot Light rays are infrared and so are invisible. The maximum ...

Operating Instructions
Page 24
...self-timer), then press PHOTO in step 2 (p. 32). Note The self-timer recording mode is finished. - You can go to OFF or VTR. The POWER switch is a blank portion at the beginning or between the recorded portions, the end search function may not work once you eject the cassette after you... record. To record still pictures on tapes using the self-timer Press PHOTO in ...
...self-timer), then press PHOTO in step 2 (p. 32). Note The self-timer recording mode is finished. - You can go to OFF or VTR. The POWER switch is a blank portion at the beginning or between the recorded portions, the end search function may not work once you eject the cassette after you... record. To record still pictures on tapes using the self-timer Press PHOTO in ...

Operating Instructions
Page 25
... You can control playback using the Remote Commander supplied with your camcorder. (1) Install the power source and insert the recorded tape. (2) Press OPEN to open the LCD panel. (3) Set the POWER switch to start playback. (6) To adjust the volume, press either of the two buttons...close the LCD panel, you can monitor the playback picture in the viewfinder. The video control buttons light up. (4) Press m to rewind the tape. (5) Press N to VTR while pressing the small green button. VTR 3 POWER LOCK MEMORY OFF CAMERA 2 1 To stop playback Press x. 4 REW 5 PLAY 25 Playback - ...
... You can control playback using the Remote Commander supplied with your camcorder. (1) Install the power source and insert the recorded tape. (2) Press OPEN to open the LCD panel. (3) Set the POWER switch to start playback. (6) To adjust the volume, press either of the two buttons...close the LCD panel, you can monitor the playback picture in the viewfinder. The video control buttons light up. (4) Press m to rewind the tape. (5) Press N to VTR while pressing the small green button. VTR 3 POWER LOCK MEMORY OFF CAMERA 2 1 To stop playback Press x. 4 REW 5 PLAY 25 Playback - ...

Operating Instructions
Page 26
... open/close the LCD panel Make sure that the LCD panel is not a malfunction. The indicators disappear from the LCD screen. When you leave the power on for a long time Your camcorder gets warm. This is set vertically.
... open/close the LCD panel Make sure that the LCD panel is not a malfunction. The indicators disappear from the LCD screen. When you leave the power on for a long time Your camcorder gets warm. This is set vertically.

Operating Instructions
Page 28
...normal playback, press N. For double speed playback in reverse Horizontal noise may appear at the center, or the top and bottom of the recorded portion plays back and stops. To resume playback, press N. To view the picture at slow speed (slow playback) Press y on the ...the reverse direction, press , then press y on the Remote Commander during playback. Playing back a tape Various playback modes To operate video control buttons, set the POWER switch to reverse the playback direction. To monitor the high-speed picture while advancing or rewinding the tape (skip scan) Keep pressing...
...normal playback, press N. For double speed playback in reverse Horizontal noise may appear at the center, or the top and bottom of the recorded portion plays back and stops. To resume playback, press N. To view the picture at slow speed (slow playback) Press y on the ...the reverse direction, press , then press y on the Remote Commander during playback. Playing back a tape Various playback modes To operate video control buttons, set the POWER switch to reverse the playback direction. To monitor the high-speed picture while advancing or rewinding the tape (skip scan) Keep pressing...

